We frequently connect the cell phone to the PC with the USB cable to transfer files or photos. Generally Android is already prepared to “hook” on the computer and allow us this task. However, on some devices you may find that it is not detected by the PC or you can only transfer photos.
This may be because the mobile is set to an inappropriate USB connection mode (there are several modes).
For example, some computers come preconfigured to charge only, or in the best case, exclusively transfer photos when connected to the PC. In this case you will have problems to transfer other types of files.
Change USB connection mode
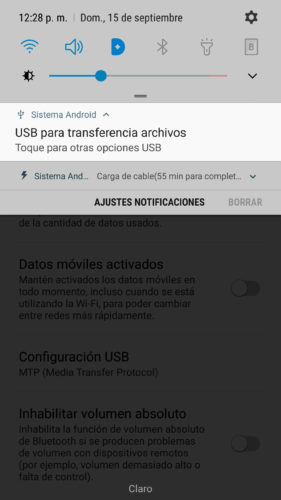
Fortunately, switching between the two USB connection modes is simple. Once you connect the phone to the PC, slide the notification bar and tap on the “USB Connection” notification.
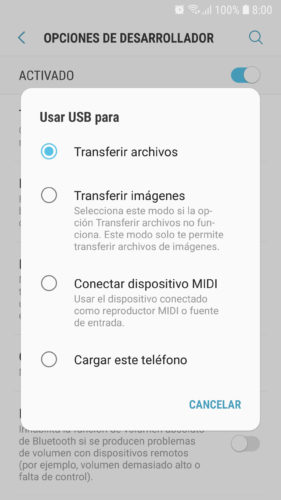
This will allow you to quickly switch between common connection modes such as “Transfer files”, “Transfer images”, “Connect MIDI device” or “Charge the phone”.
Default USB configuration
What has been said only changes the USB connection for that moment. If you disconnect the phone and reconnect it will return to the default or default connection mode.
Yes, in some mobiles it is possible to modify this default configuration (only some accept the change). This way, even if you make connection changes from the notification bar, it will return to that default value.
For example, if you usually transfer files between cell phones and computers, you will want to establish the MTP connection by default.
Additionally you can find other USB connection modes that are not available from the shortcut in the status bar. For example, the connection «RNDIS» or «Audio source».
Change default USB mode
- Open the Android system settings.
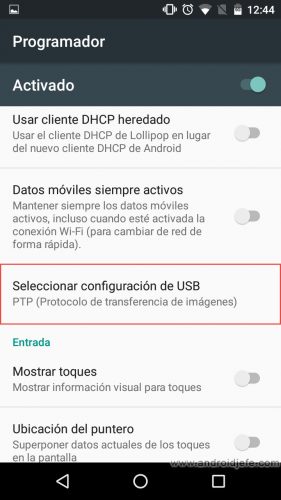
- Tap on the “Developer Options” (or developer) menu. If you can’t find it, below I’ll show you how to unhide it.
- Click on «Select USB configuration».
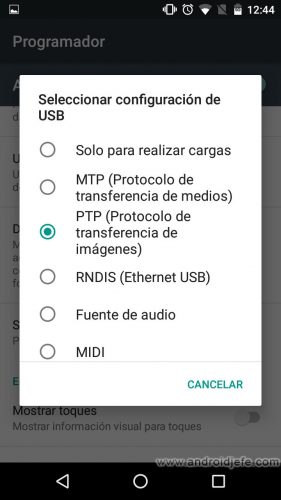
- Choose the USB configuration you want to use when the cell phone connects to the PC:
Charge only : Obviously, it only serves to charge the device battery.
PTP : Only to transfer photos and videos from the cell phone to the PC and vice versa.
MTP : To transfer files of all kinds from the cell phone to the PC and vice versa. It could be considered the successor of « Mass storage » in old cell phones.
RNDIS : Allows to “emulate” an Ethernet connection between the PC and the cell phone. It is commonly used for development purposes.
MIDI : It could be used to connect a MIDI device to the cell phone (a MIDI keyboard, perhaps). This would create music with both teams. More information here.
Audio source : As the name suggests, it is used to transfer the audio from the cell phone to the equipment connected to the other side of the USB cable.
The “Developer Options” menu mentioned is usually hidden from the factory. To make it visible go to System Settings, tap on “About phone”> “Software Info” and press seven times on “Build number”.
Keep in mind that these connection modes only start when the cell phone connects to the PC. No matter which one is enabled, it will not affect charging via wall charger or AC. If you use the “Charge Only” USB mode, your cell phone will not be detected as another device on the computer. It will only be charged.
After choosing the USB mode and connecting the cell phone to the PC for the first time, Windows should automatically install the respective driver or drivers (if not, you will have to install them). Wait for the installation to complete to see your phone as a new device on the PC.
In the case of RNDIS, the drivers may not be installed. If so, go to Windows Device Manager and force a manual installation by choosing one of the Windows drivers: “Network adapters”> “Microsoft Corporation”> “RNDIS”.
Receive updates: SUBSCRIBE by email and join 10,000+ readers. Follow this blog on Facebook and Twitter.