Microsoft developers, drawing conclusions from the errors of the latest 8 version of the operating system, released a new Windows 10, in which the interface was significantly redesigned. The developers took into account the wishes of those who wanted a more stylish and modern design, and those who liked the convenience and simplicity of the XP interface. In addition, many other useful features were added, which led to the fact that Windows 10 was received warmer than its predecessor. This article will take a closer look at how to customize the start menu in Windows 10. Let’s figure it out. Go!
Contents
Remove unwanted items from the Start Menu Application List
Opening the Start menu in front of you, you will see a bisected area with a list box on one side and a set of tiles on the other. At the bottom are the familiar shutdown, explorer, and All Apps buttons (in earlier versions, All Programs).
By clicking on the user at the top of the window, you will open a small menu through which you can access your account settings.
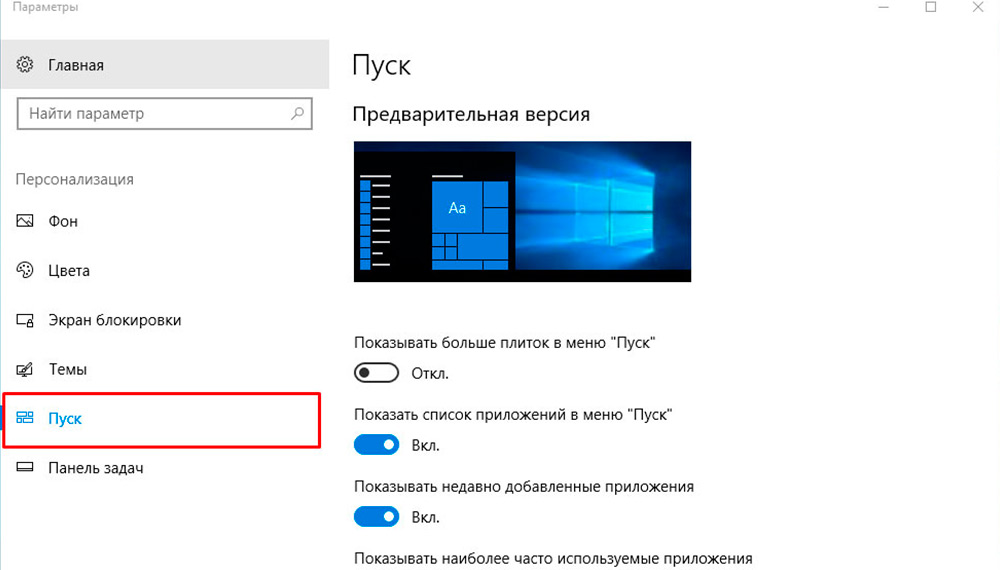
You can customize the Start menu in the Personalization window. To get there, use the “Options” button or click on the icon with windows (“Start”) and select the required item in the list that opens.

In the personalization window, you can enable or disable certain menu items by toggling sliders, including:
- Show the most used applications.
- Show recently added apps.
- “Open the start screen in full screen mode” (by enabling this item you will get an interface similar to Windows 8.1, which can be useful if you have a tablet or laptop equipped with a touch screen).
- Show Recently Opened Items in Start Menu Jump Lists and Taskbar.
By clicking on the item at the bottom of the window, you can configure which folders to show and which not:
- “Conductor”.
- “Options”.
- “The documents”.
- Downloads.
- “Music”.
- “Images”.
- “Videos”.
- “Home group”.
- “Network”.
- “Personal folder”.
In the future, the user, at his discretion, can delete any of the specified elements manually (by opening the context menu with the right mouse button on the selected folder in the “Start”) or add their own (from the context menu select “Pin to the initial screen”).

The only item that cannot be removed is the User folder on the left side of the Start window itself. A link to the home directory of the current user is displayed there (regardless of whether he is logged in as an administrator or a guest). This can only be done through third-party programs that completely replace the “Start” menu with their own, but in order to install them, you will have to make some changes to the registry.
To change the color of the menu, you will need:
- open “Options”, go to “Personalization” and open the “Colors” tab
- in the “Windows Colors” section, select the appropriate one;

- just below, check the item “In the” Start “menu, on the taskbar and in the notification center” (otherwise the specified color will be applied only to the “Explorer” windows).
You can also make the menu semi-transparent (only in the latest editions of Windows 10, starting with version 19H1) by checking the corresponding item. You can also make an automatic color selection in the “Start” menu on the desktop image (adaptive setting). This option is only available in Windows 10 19H2 and later operating system editions. It should be noted that some of these settings become inactive if the user has previously enabled the “Light theme” (or it was enabled automatically on a schedule). Fine tuning is available only when using the standard “Dark theme”.
The items on the right side of the Start menu are called tiles. The user can completely customize their location, size, list at his discretion. Moreover, now even separate folders can be formed from the “tiles” – this will help to group frequently used applications into their own categories.
So, to add a new tile to the specified list, you will need:
- right-click on any program in the menu;
- select “Pin to home screen”;
- to remove a tile, you also need to right-click on it and select Unpin from Start (or Remove if the user wants to completely uninstall a program installed from the Microsoft Store).

To change the size of any of the tiles, you also need to call its context menu, open the “Size” tab and select the required option (there are 4 sizes in total).
If the user wants to create a folder of several “tiles”, then it is enough to drag them to the same place in the “Start”. By clicking on the double line near the folder, it will be possible to give it an arbitrary name.
Also, the user may notice that the labels of some “tiles” will regularly change their image. These are so-called “dynamic shortcuts” that bring basic information out of the application. To disable this feature, just right-click on the tile and select “Disable Live Tiles” in the “Advanced” tab.
If you right-click on the “Start” icon itself, a context menu appears with a list of most service applications for servicing Windows (for example, “Task Manager”, command line “PowerShell” and so on). And the user can also edit this list at his discretion! True, this cannot be done using regular means. The easiest way is to use the free Win + X Menu Editor utility.

The program takes up literally 1.5 megabytes and does not require installation. But it’s better to run it with administrator rights. Its only drawback is that it is not Russified. But even without translation, it won’t be difficult to deal with it – the interface is intuitive.
So, after launching the utility, the user will see a list of applications added to the context menu. There he can:
- change the order of each of the items;
- remove or add any application;
- enable “hidden” service applications (for example, “Command line CMD”).
After making new settings, you must click “Restart Explorer” to restart “Explorer” (the desktop interface will disappear for 3 – 5 seconds). If the context menu items remain the same after that, you will additionally need to restart the computer.
You can change the context menu list without third-party applications. But for this you have to manually make all the edits to the “Registry”. In fact, Win + X Menu Editor performs the same actions, but through a user-friendly graphical interface. And therefore, even if you delete it, the new context menu settings will not become standard.
Additional customization options
The size of the menu itself is adjusted with the mouse in the same way as the size of a regular window. This way, you can get rid of the tiles (by simply “shrinking” the menu window). Of the additional settings, you can also mention (they are all located in the “Parameters”, in the “Personalization” tab):
- disable side dropdown column on mouseover;
- enable or disable the “Tablet” mode (it can also be launched from the “Action Center”);

- Turn off promotional offers in Start (in the Tiles section only if you are using dynamic shortcuts).
On some laptops, by default, when you log in, the same “Tablet” mode is turned on. As a rule, this is done on devices equipped with a touch screen. You can also disable this in the “Parameters”, in the “System” tab. In the “Tablet Mode” section, just set the “Prompt” or “Do not switch” value. The next time you turn on the device, the desktop will be standard, that is, adapted for working with a mouse.
One of the key changes in Windows 10 is the completely redesigned Start menu, which not all users enjoy. But using standard tools to make it the same as in Windows 7, Vista, XP will not work. This can be done through third-party utilities. Most users recommend the following for use:
- OpenShell. One of the first programs that allowed in Windows 10 to make the Start menu the same as in Windows For it, there are also a lot of third-party themes, flexible customization. The application is completely free, but many users may find it too complicated.

- Classic Shell. Also free, its functionality is very similar to OpenShell. But at the same time, there is a completely Russified version.

- StartIsBack ++. The most convenient and easy-to-use program with a small list of pre-installed themes. The disadvantage is that the utility is paid. The demo version works for 30 days, the cost of the license is just over 120 rubles.

- Start10. The optimal choice for those users who are not satisfied with the menu either in the “Ten” or in the “Seven”. The developer offers his own variation, referred to as “Modern Style”. Its main difference is that you can set a texture for the menu, and not a monotonous color scheme. There is even an option to use a gradient. The application is paid, the license will cost $ 5. The demo version has significantly limited functionality.

After installing any of these programs, it must be added to startup. This can be done through the “Task Manager”:
- open the “Startup” tab;

- right-click on the program that was installed to change the menu view;
- select “Enable”.
Further, it is also recommended to restart the computer.
Now you can customize Start in Windows 10 for yourself, making it as convenient as possible and meeting your requirements. Microsoft developers made the right decision, having implemented such ample opportunities for personalization in Windows 10. Write in the comments if this article was useful for you and ask any questions of interest on the topic discussed.