Nowadays, bootable media with useful software are no longer the privilege of only system administrators. Flash drives or disks with operating systems, as well as other must-have software are very helpful in case of sudden problems with system performance. A modern user always has removable bootable media in his arsenal in order to use the necessary tool if necessary (for example, for the purpose of disinfecting or installing an OS). So, with the help of a bootable flash drive, you can perform various operations, including even before starting the operating system. The scope of application of the media recorded in this mode is quite wide. Among the main features are the installation of an operating system, diagnostic work without starting the OS, the use of special software (for structuring hard disk partitions, backups and other actions).

Regardless of the purpose of use, you can create a bootable environment (on a USB drive or in an ISO image) in various ways and means, for this you do not need to be an advanced user, but it is enough to have basic computer and software skills. One of the best options among the tools that allow you to burn a drive in this format is Paragon Hard Disk Manager. This is a whole complex of utilities for performing work with a hard disk of a different nature. With Paragon Hard Disk Manager, you will have access to the functions of partitioning and optimizing HDD, backup, recovery, movement, data wiping, virtualization and other features. Among the many tools in the package is the new Rescue Disk Builder 3.0, with which you can create a WinPE / Linux / DOS-based bootable media.This will allow you to maintain and restore the device when the main OS cannot boot due to damage or its launch is impossible for other reasons. There are many advantages of using the Paragon Hard Disk Manager product, among the main advantages is the convenience of working with the tools, which is realized thanks to a simple and intuitive interface, so that mastering the program will not be difficult even for a user without skills.
Contents
Create a bootable USB flash drive
Let’s take a look at how to use the bootable media creation tool. First you need to complete the preparatory work. All that in our case is required for the bootable USB flash drive to be created is Paragon Hard Disk Manager 15 (or another version) and the drive itself of the required size, from which we will make the bootable one. The volume of the flash drive must accommodate the recorded data, so you need to take care in advance that it is enough for your purposes. For example, if we are talking about recording a Windows 8 or 10 distribution kit, then a 4 GB flash drive is not enough, you will need a device with at least 8 GB. In addition, the process of creating a bootable media assumes that it will be formatted, as a result of which the files from the USB device will be lost, so the existing information should be copied in advance. When everything is readyLet’s start the process of creating a bootable USB-drive using the Paragon Hard Disk Manager software. The procedure may differ depending on the presence of WAIK / ADK tools in the system (Microsoft tools for deploying Windows, creating images). Their use is preferable when creating a bootable USB flash drive.

RMB 3.0 launch
The procedure is slightly different with Recovery Media Builder 3.0. The Rescue Disk Creation Wizard (RMB 3.0) must be launched from the Paragon Hard Disk Manager menu, after which it is supposed to select the type of bootable media, for this we do the following:
- We connect the USB drive, which we will make bootable.
- Launch Paragon Hard Disk Manager and go to the “Home” tab, where we select “Rescue Disk Creation Wizard”.

- The start page of the tool assumes a choice of mode (for advanced users or using ADK / WAIK). In the first case, it is possible to change the settings of the network, network folders and drivers, in the second – in the process of creating an environment based on Windows PE, the Wizard will use the WIM image of the current OS. If you are not an advanced user, it is recommended to check the box opposite the second option “Use ADK / WAIK” (while the first item for experienced users should not be checked), then click the “Next” button.

Selecting the platform and format of the drive
- The next step is to select the media platform (Windows PE or Linux), and if Linux is selected, the EFI or BIOS internal software interface. In the first case, by choosing WinPE, we will get almost the full functionality and interface of the Windows OS, in the second – the Linux / DOS environment to use it as a system for booting the device into Linux / PTS-DOS (for maintenance and recovery purposes). You can resort to PTS-DOS safe mode if there are some difficulties (for example, a conflict in hardware settings or more significant hardware problems), then only the main files and device drivers will be loaded. Having decided on the choice, click “Next”.

- The next window assumes the choice of the format of the rescue media (ISO image – you must specify its location, or an external USB device – indicate the connected one or select from the list, if there are several of them), mark the desired option and click “Next”.

- After the above actions, a window will appear with a warning about formatting the USB device with the destruction of data on it. We confirm the intention by clicking the appropriate button.

Installing ADK / WAIK
- On the next page, you need to specify the path to install ADK / WAIK. The address must be written on the line, provided that a licensed Windows OS is used. Typically, the item is located in the Windows Kits folder of the Program Files directory. If so, then click the “Next” button, which will lead to the final stage of the procedure (in this case, we will skip the next two points of the instructions).

- When the component is not present in the system, you will need to download it. To do this, click “Download WAIK / ADK”, after which the default browser will be launched, the download page of the package of the official Microsoft resource will open. Here, in the list of software, we are looking for a component suitable for the operating system, download and save it on the hard disk in ISO format.

- After downloading the ISO file, launch it using the utility available on the device for working with virtual disks, perform the necessary installation steps, following the prompts of the Installation Wizard.

The final stage of creating a bootable USB drive
So, if there is ADK / WAIK in the system, and the location address is already registered, then we simply continue the procedure by clicking the “Next” button, after which the process of creating a bootable USB drive will begin. If the component was not there, and you downloaded it from the Microsoft website and installed it, then we return to the Rescue Media Creation Wizard page and perform the following actions:
- We indicate the location of the object by clicking the “Browse” button. It is supposed to open the explorer and select the desired folder where ADK / WAIK was installed. Usually located at C: Program Files Windows Kits. Select the component location directory and click “OK”. Now the address field on the ADK / WAIK location page will be filled in, after which you can click the “Next” button.


- If during the operation there were no problems, at the end of the procedure the Wizard will notify you of the successful creation of the bootable media, after which we close the program by clicking the “Finish” button. The USB stick is ready to use.
Boot from USB stick
Now all that remains is to test your work by booting from the created rescue media in the WinPE / Linux environment. First, it is necessary to set the startup from a removable drive in the system boot parameters. We carry out the following actions:
- We connect the bootable USB flash drive to the computer and reboot the device.
- Without waiting for the OS to load, press the F8 key (or another one corresponding to the launch of the Boot Menu).
- In the Boot Menu, select the + Removable Devices item to boot from a USB flash drive.
These actions are not always enough and you may need to refer to the BIOS / uEFI settings to boot from a connected media:
- We reboot the device and, before starting the system, press the key necessary to enter the BIOS (As a rule, this is F12 or Del, but it may be different, in any case this information can be seen on the screen).
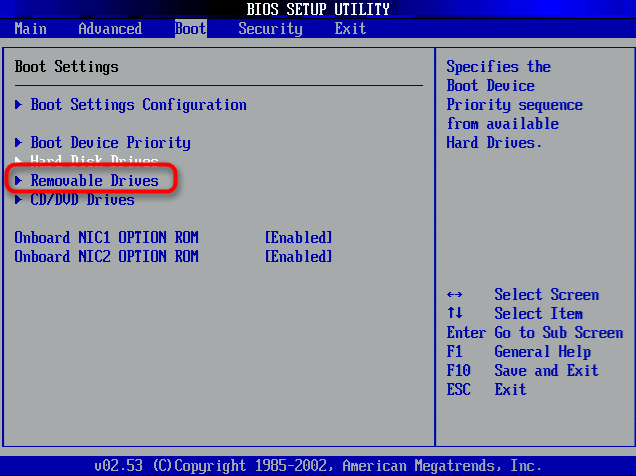
- Go to BIOS Setup and find the section responsible for the boot priority. The location of the option depends on the version of the utility and can be located in Boot, Boot Options, etc., sometimes you can get to these settings through the main menu Advanced Options, Advanced BIOS Features, etc.
- Change the boot order of devices (install the flash drive as 1st Drive, save the settings and exit the utility interface.

- Now, having rebooted, we start from the USB device in the environment we created.
The process of creating a bootable drive in Paragon Hard Disk Manager 15 is not difficult. The software interface is convenient and intuitive, so even an inexperienced user can cope with the task.