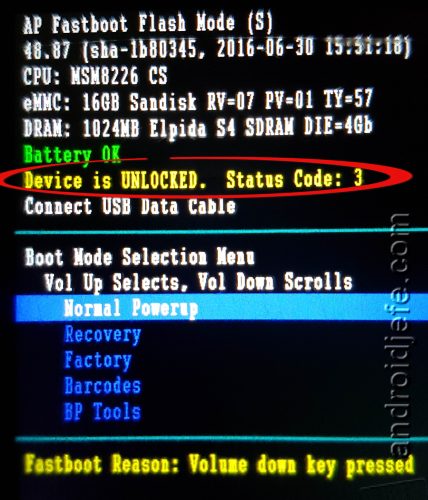
When you turn on your device in Bootloader or Download mode with the Power + Volume Down (+ Start buttons, if available), you will see a line that says something like device is locked (or unlocked ) and also status code 0 (or status code 3 ). This refers to the state of the device bootloader.
The bootloader is a small «little program» that verifies the state of the software, manages the ignition of the cell phone and runs before the Android system (that’s why you see that welcome screen with the brand’s logo).
Bootloader locked vs. unlocked
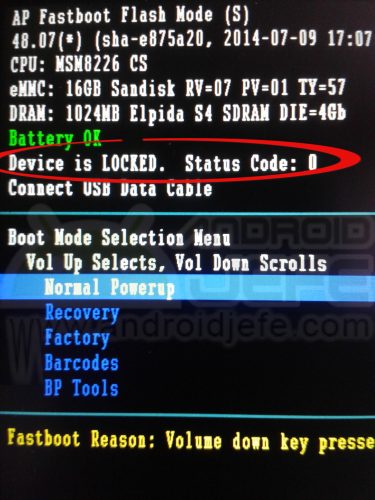
By default the bootloader is locked, something the manufacturer does to prevent you from modifying or replacing the Android software, protecting the partitions of the internal storage. When you see “device is locked”, “status code 0”, it means just that: that the bootloader is locked .
When you unlock the bootloader you will see something like device is unlocked , status code 3 . On Samsung phones you can also see FRP Lock : OFF (FRP = Factory Reset Protection).
You will and will need to unlock the bootloader of an Android device when you want to alter the software. For example, to obtain root permissions or replace the original recovery with a custom one. If you don’t unlock it, you can end up with your phone “brickened”. The disadvantage is that this procedure erases all the data in the internal memory, in addition to invalidating the guarantee of the equipment.
How to unlock the bootloader
Unlocking the bootloader varies from one computer to another. On Samsung devices it is as simple as activating the ” OEM Unlock ” option in the device settings (Developer Options). On other computers you must do so by sending a command from the PC using the ADB / FastBoot software. For example, on Pixel devices the command ” fastboot flashing unlock ” is used. In Xiaomi and Motorola equipment, the same procedure is followed, but additionally, the manufacturer must request the unlock code.
Please note that to use ADB / Fastboot software you must enable USB debugging and, in the case of Windows, also install the USB drivers.
EX: Motorola
For example, to unlock the bootloader of a Motorola, the procedure is as follows:
Step 1 . Start the device in bootloader mode. To do this, with the phone turned off, press and hold the Power and Volume Down button at the same time, until you see the bootloader screen.
Step 2 . Assuming that you already activated USB debugging correctly And on your Windows PC you already installed the USB drivers, connect the cell phone to the PC with the USB cable.
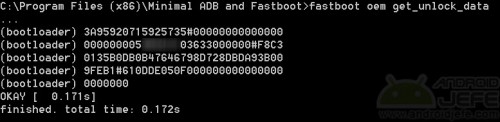
Step 3 . Open the ADB / Fastboot command line and enter the command “fastboot oem get_unlock_data” (without quotes). You will get five lines of characters. Right-click and click “Dial”. Select the characters and press “Enter” to copy them. You will have to join all the lines in a single string (eliminating the words “bootloader” and blanks), which you will have to paste in step five.
![]()
Step 4 . Go to this Motorola page to unlock the bootloader, click on the “Continue” button (at the bottom) and log in (if you don’t have an account, create one).
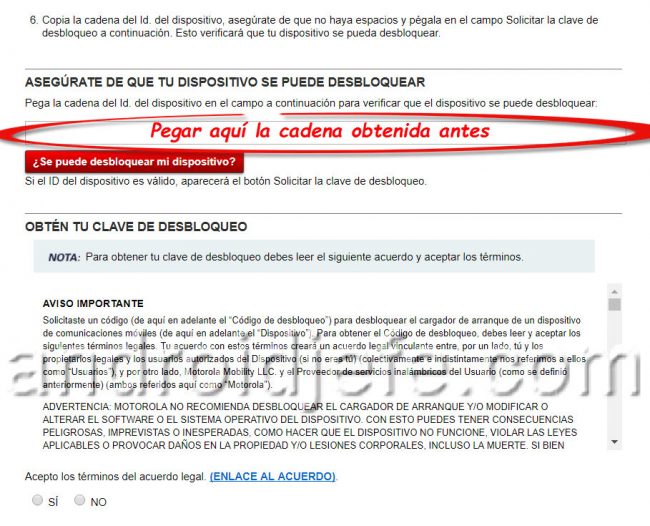
Step 5 . Paste the character string from step three into the text box illustrated in the image:
Step 6 . Accept the terms and conditions and press the red button to get your unlock code. Motorola will send it to your account email.
Step 7 . Open FastBoot again and enter the command “fastboot oem unlock UNLOCK_DE_LOCK” (without quotes), replacing CODE_DE_UNLOCK with the one the company sent you by email.
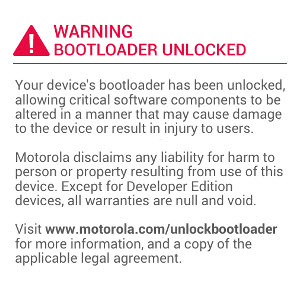
If you have done everything correctly, you will see an image similar to the one above when you turn on the device. Another way to know if the bootloader is already unlocked is to enter this mode, as indicated at the beginning.
References : Motorola
Receive updates: SUBSCRIBE by email and join 10,000+ readers. Follow this blog on Facebook and Twitter.