Almost every laptop today has a built-in camera. The product greatly simplifies life: you no longer need to connect any additional wires, an Internet connection is enough and you can already see your own face on the screen. However, the camera sometimes stops working properly. What to do in such a situation?
Contents
Causes
There can be many factors due to which a webcam remains invisible to a laptop. The problem can be related to both hardware and software issues. First of all, experts recommend checking the version with a software shell, because you can set up the work with utilities and drivers on your own, which cannot be said about the physical repair of equipment.
Device not included
Users often start to panic ahead of time, forgetting that the camera can simply be turned off.
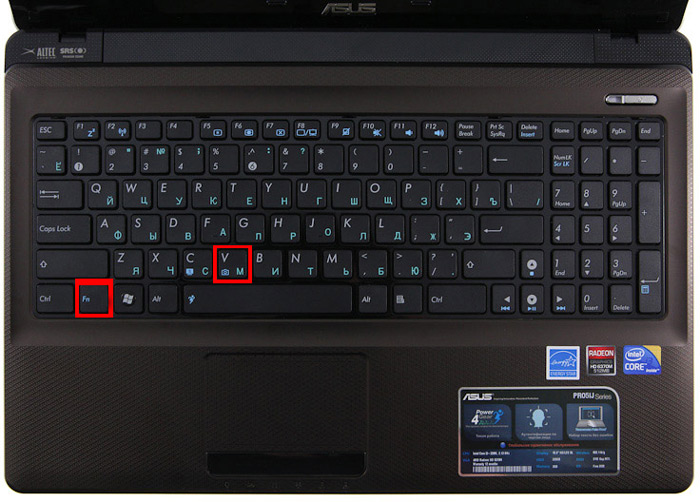
To solve the problem, press the Fn button together with one of the functional ones (most often these are F6, F10, but in your case there may be another option from the F1 – F12 list). The correct key will be prompted by the icon with the camera.
Drivers
An old build or lack of drivers affects the performance of the camera on a laptop. Sometimes the OS “forgets” about the presence of a camera on your device, and does not “pull up” the drivers for it, you have to do it manually. In addition, due to various system failures, the driver may simply be damaged. So, to update or change the driver for the camera, you should follow these steps:
- find the device you are interested in in the device manager;
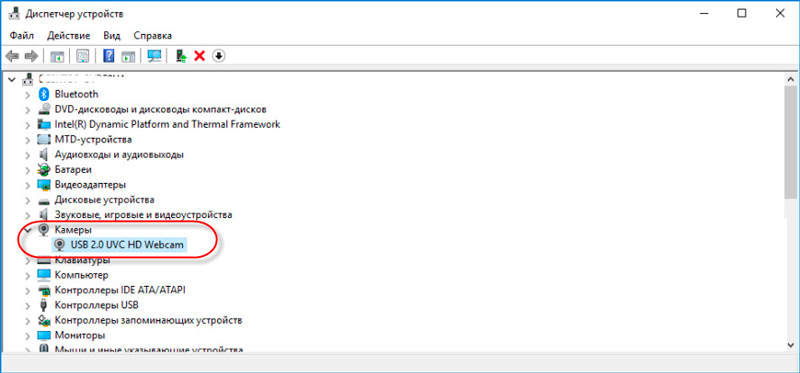
- if there is no camera in the list, it means that the OS does not see it. If a yellow question mark is lit in front of the equipment name, we recommend removing the component;
- to delete, right-click on the line with the camera and find the delete key in the properties;
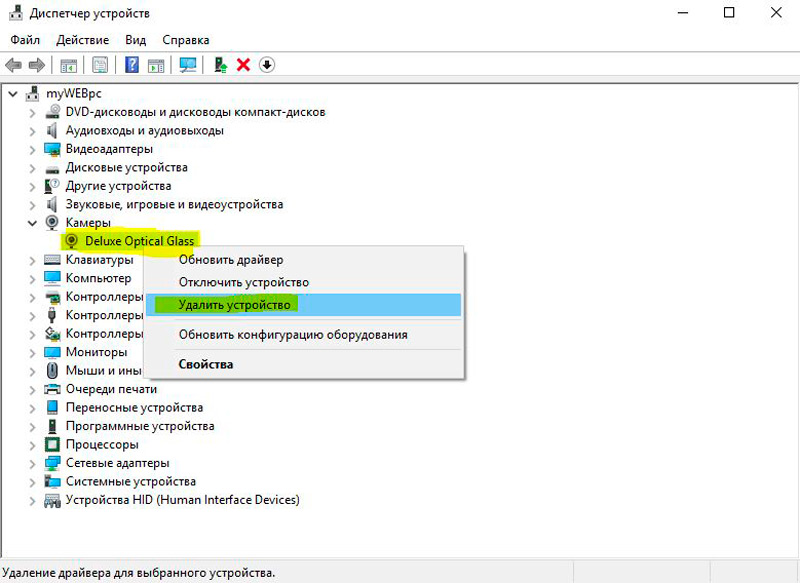
- after removing the driver, perform the same manipulations to eliminate the camera itself;
- it is advisable to install a new component after restarting the computer;
- if you have an installation disk, it is better to get the installation files from it. An alternative option is to download information from the developer’s website, having previously figured out the name of the laptop model and the type of OS.
Perform the installation, reboot and check if the camera starts working. There are models for which, during the driver installation, the configuration tool is also “pulled up”. If you have such a utility, launch it and start working!
For Windows XP users, the following method is suitable: go to “My Computer”, view the list of shortcuts. After the names of the sections, information about the webcam should appear.
Can’t find your device? Then install a camera tool, or use Skype. The operability of the camera via Skype is checked in a matter of seconds; for this, an assistant has been introduced into the program.
Hardware defects
If the device is turned on, all the components are installed, but it is not possible to work with the device, the hardware elements may not work. Most often, the breakdown of the cable that connects the motherboard to the product is considered. Another option is the failure of the device. One way or another, if the laptop works without a camera or it does not turn on, it will have to be carried to diagnostics.
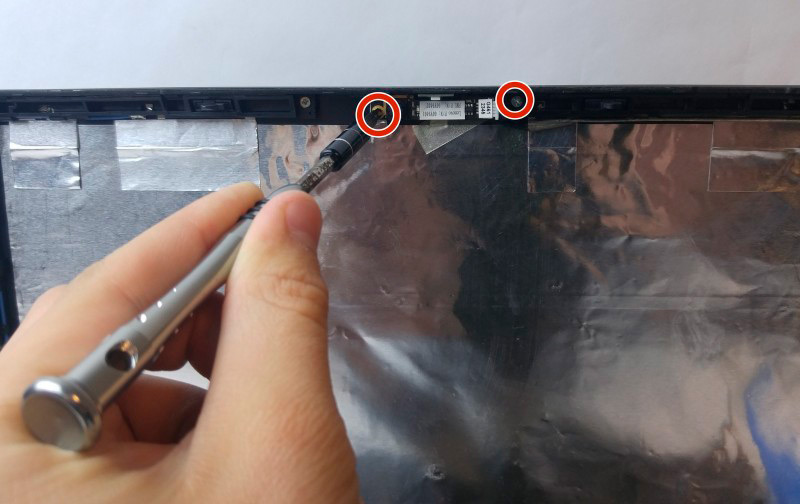
The experts from the service center will help identify the real cause and indicate the cost of the repair. Interestingly, it is sometimes more profitable to buy an external webcam than to disassemble the entire laptop. Especially if you use the device often, and any downtime can affect your financial well-being.
Privacy preferences
In Windows 10, the developers from Microsoft paid increased attention to privacy settings. Therefore, by default, all programs are denied access to the webcam. When trying to get an image from it, the system issues a corresponding request. If the user is logged into the system with the “Guest” profile (that is, with limited rights), then none of the applications will be able to access the webcam until the corresponding setting is manually disabled. This requires:
- open “Options”, go to the “Privacy” section, then – “Camera”;
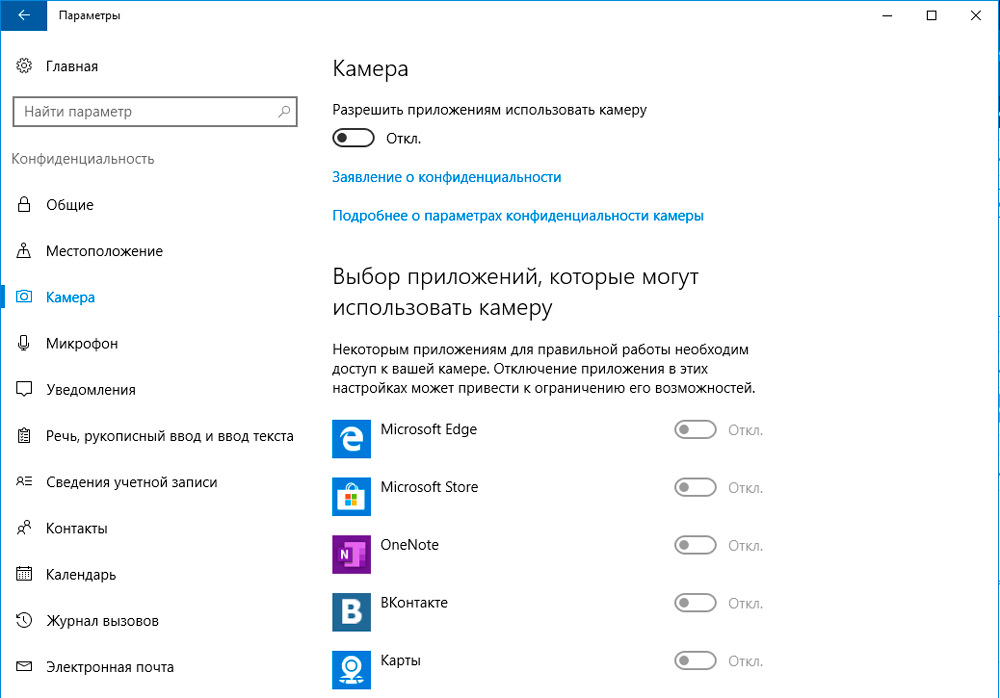
- in the “Allow access” section, turn the switch to the “On” position;
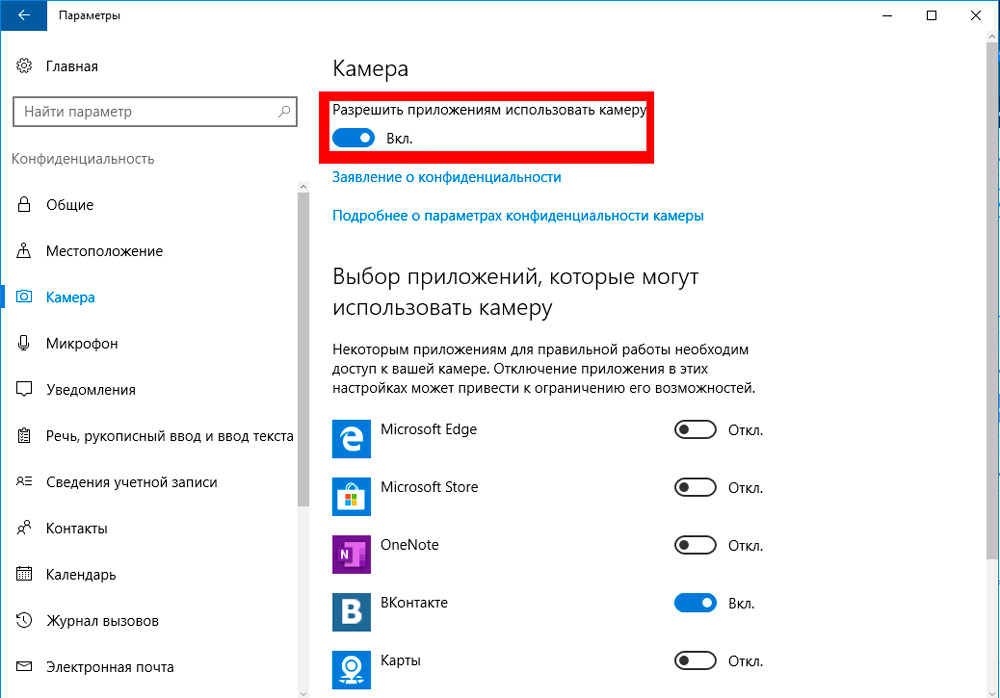
- at the bottom of the window, also switch the toggle to On in the Allow desktop apps to access the camera section.
There is also a list of all applications installed on the system that at least once requested access to the camera. If necessary, the user can manually enable the ban for each of them. As a rule, by default, access is allowed only to programs from Microsoft, as well as to those that were installed from the official application store (Microsoft Store).
By the way, if the user is connected to the local network and the server version of Windows is installed on the server, then the privacy settings are changed only through the administrator (if the user is logged in as a “Guest”).
Prohibition by antivirus
Almost all third-party antiviruses also have a function to deny access to the camera for third-party applications. Therefore, if changing the privacy settings did not solve the problem, then you should also check the settings of the installed antivirus software (unless it is Windows Defender). You can also temporarily disable it – this will allow you to accurately determine if the antivirus is the reason for which the webcam does not work.
Application from the manufacturer
For the convenience of the user, some laptop manufacturers pre-install special programs for quick basic configuration of the device’s hardware. This is true, for example, for Lenovo laptops – the Lenovo Vantage application is installed in them. And it is quite possible that the ban on the use of the camera is just established in it. For example, in this utility it is turned on like this:
- open the main interface of Lenovo Vantage, go to the “My device settings” tab;
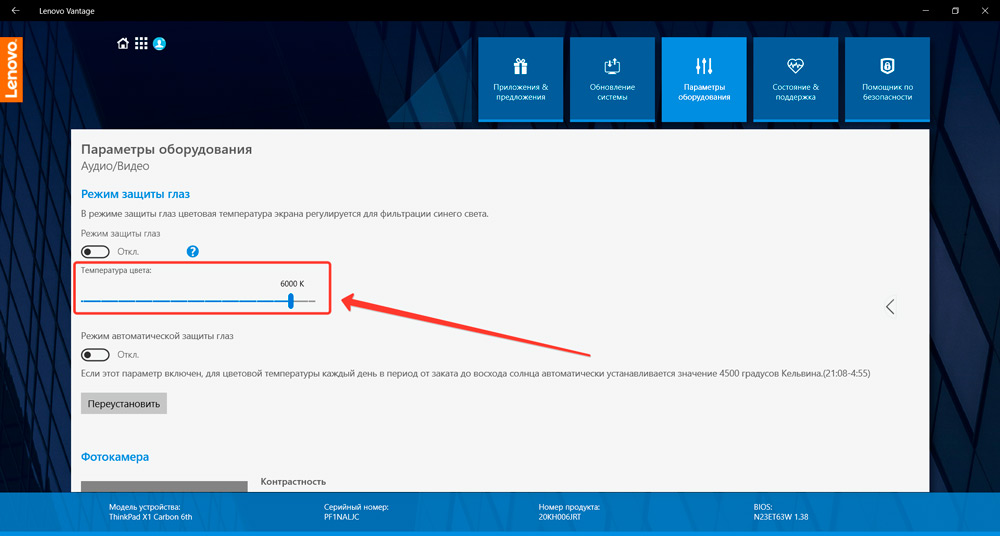
- open the “Display and camera” section;
- uncheck the box in the “Privacy Mode” section;
- click “Save”.
Similar utilities are also installed in Asus notebooks (ROG line), Acer (Predator line). But if necessary, you can disable them (or remove them from Windows startup).
Camera stopped working after Windows 10 update
In Windows 10, the developers have redesigned the algorithm for installing drivers. The innovation affects OS revision 1703 and newer. Now, if the driver does not have a digital signature from Microsoft, then it will not be possible to install it using standard tools. And for the same reason, drivers from Windows 8, 7, Vista in Windows 10 cannot be installed even when using the compatibility mode (although they may even be compatible programmatically).
In such cases, Microsoft developers recommend only installing OS updates, since all the latest drivers for the existing hardware are installed along with this. If this does not help, then it is recommended to disable digital signature verification specifically for media equipment (to which the camera belongs). This is done as follows:
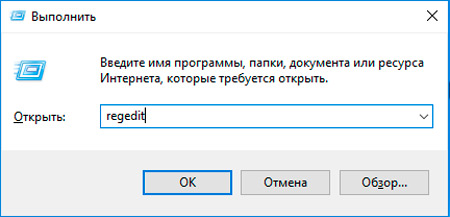
- open the registry (press Win + R and enter the command “regedit”);
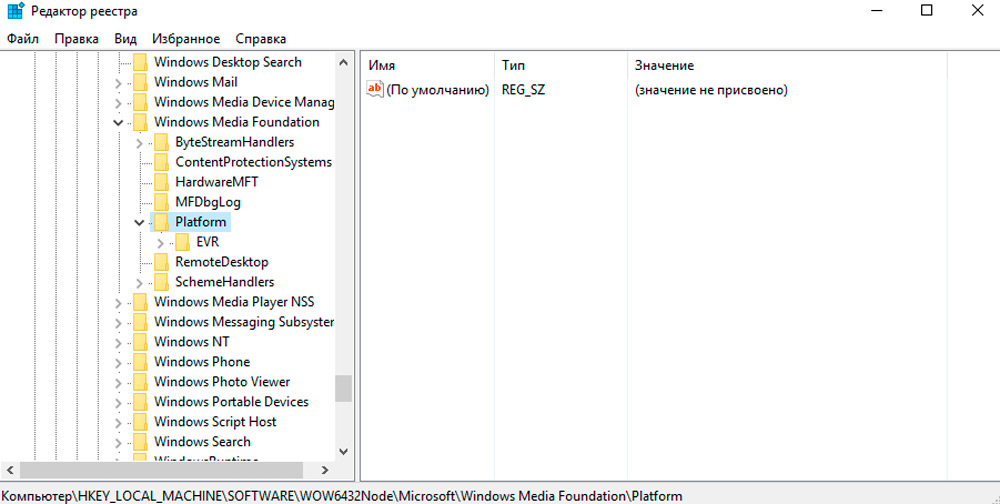
- go to the HKEY_LOCAL_MACHINE section, open the SOFTWARE tab from the list, then – WOW6432Node, then go to Microsoft, after – Windows Media Foundation, from the entire list click on the line “Platform”;
- in the right part of the window, right-click (in the free area), select “New”, then – “Parameter Dword 32 bits”;
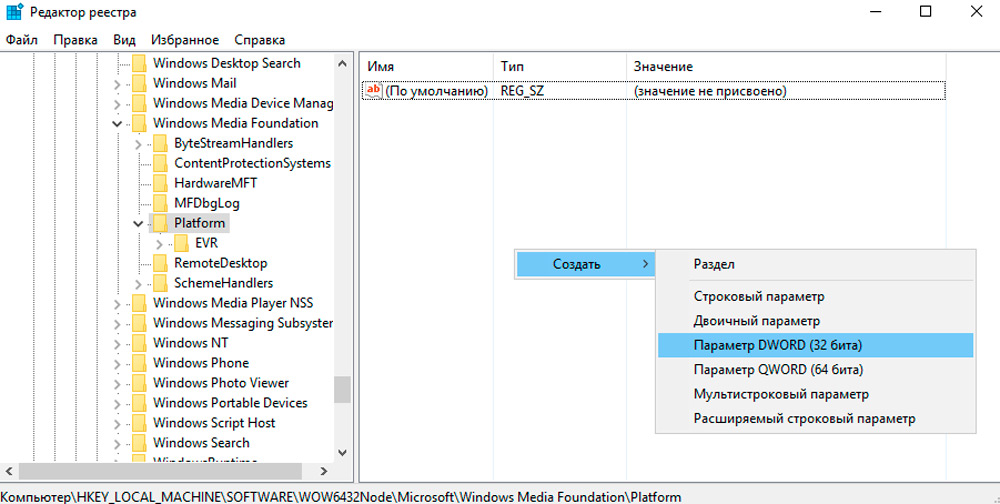
- for the created row, set the name EnableFrameServerMode (right-click and select “Change”);
- double-click the left mouse button on the created line and enter the value “0” (zero);
- click “Save”.
After that, you must definitely restart your computer. If after that the webcam does not work, then it is recommended to install a driver compatible with Windows 8 or 7. It is not necessary to use the “Compatibility Mode”. During the installation process, the system will warn you several times that the driver does not have a digital signature and that this can make the computer vulnerable. In this situation, these notifications can be ignored.
User profile issues
Quite rare, but still a common reason: the camera does not work with only one user profile. If you create a new one, even with the same parameters and rights, then it can function normally in it. This solution should be tried as a last resort. And this “bug” was fixed in Windows 10 edition 20H2 and newer. At least this was reported by developers from Microsoft.
Outcomes
Your laptop can’t see the camera? There are several options for solving the problem. Most often, users forget to turn on the device. Updating the drivers on your computer also helps. If the correct software setup did not solve the problem, take the equipment to the service center, where experienced staff will quickly put the product on its feet!