Recently, users are often faced with the “Bad Module Info” error (in most cases when launching modern games such as PUBG and CS: GO), especially after Windows Update 1709 for Developers. Since then, players playing PUBG, CS Go, and Fortnite have reported this error from time to time. The main reason is the mechanisms and modules involved in running the game on your computer running Windows itself. The complete error message is: “The bad_module_info program is not working.”

Contents
Cause of bad module info error on Windows
You might think that since PUBG and other games have their own launcher, it has nothing to do with the various Windows libraries and modules. But that’s not how it works; Each game uses a predefined mechanism implemented in Windows, and as the main structure, they perform their operations during the game launch. Among the main reasons for the error:
- Full screen optimization enabled.
- Incorrect virtual memory value settings.
- Incompatibility between applications and your version of Windows.
- Outdated drivers for video cards or other hardware.
- Incorrectly installed OS updates (or lack thereof).
- Other resource-intensive applications / games running in the background.
- Game bar built into Windows
- Outdated BIOS version.
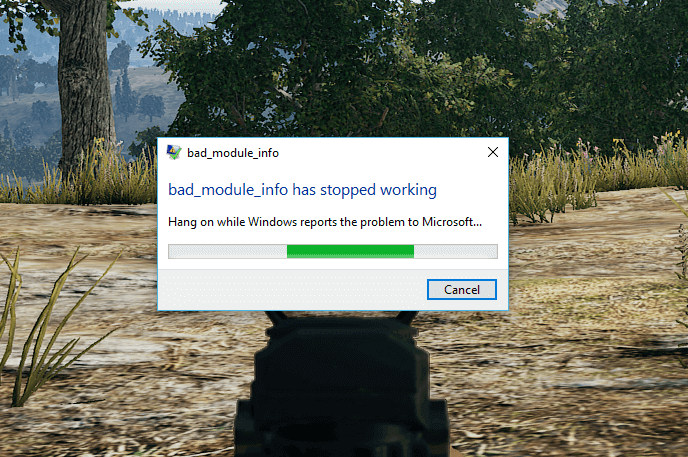
Let’s consider the possible methods for solving the problem in more detail.
Error elimination methods
When you see the bad_module_info error, the first thing you should try is putting your game in the background.
Disable fullscreen optimization
Windows has a “Full Screen Optimization” feature that allows the operating system to improve game quality and performance when the program is running in full screen mode. Since modern games are mostly set to full screen, this mechanism turns on and tries to optimize it. Instead of Windows Update 1709, there are many messages that this is causing the error message. To fix bad module info on Windows 10, you can turn off full screen optimization and see if that solves the problem. Remember, disabling this option will decrease your FPS, but you should at least be able to play.
- Right-click on the game / program shortcut or launcher and select Properties.
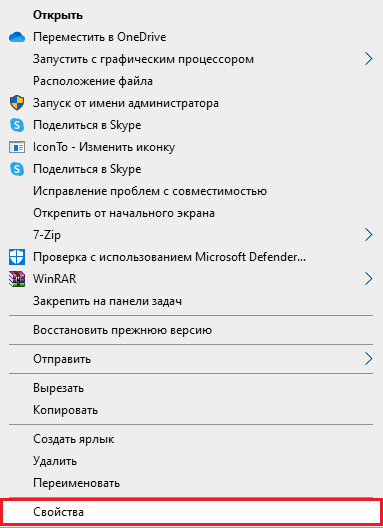
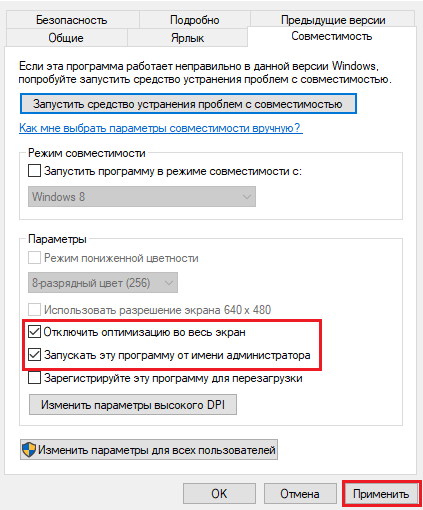
- After that select the Compatibility tab and check the “Disable full screen optimization” option. Also check the “Run this program as administrator” checkbox.
- Click “Apply” to save changes and exit.
Changing the virtual memory value
Virtual memory is an extension of physical memory. If you installed Windows 10 (1709) on an SSD, you can change the virtual memory to prevent the bad_module_info error message from appearing:
- Use the Win + PauseBreak keyboard shortcuts to launch the System Properties window.
- On the left side, click on Advanced System Settings.
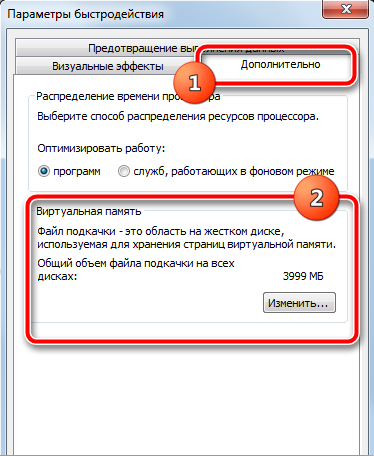
- Click on the “Advanced” tab. Under Performance, click Settings to open performance options.
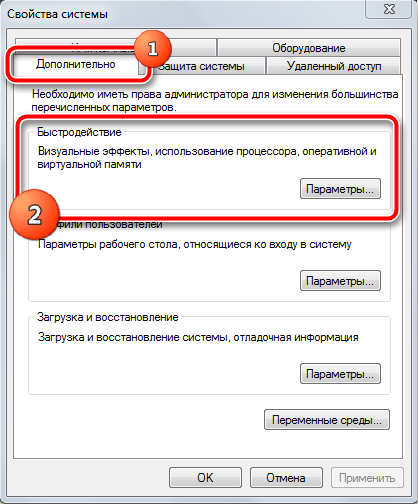
- Select the “Advanced” tab and click the “Change” button.
- Clear the Automatically manage paging file size for all drives check box.
- Select Custom Size to set the correct paging file size for each disk.
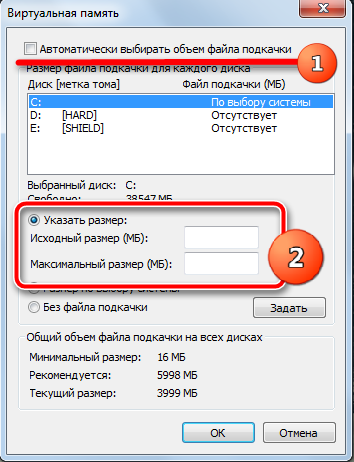
Check to see if you managed to fix the bad module info error.
Run programs in Windows 7 or 8 compatibility mode
Demanding games and programs may not be compatible with the latest version of Windows 10 Fall Creator Update (1709), and to fix the bad_module_info crash, you can enable the compatibility mode of the program file with the .exe extension:
- Find the .exe file of your failing application and right-click it. select “Properties”.
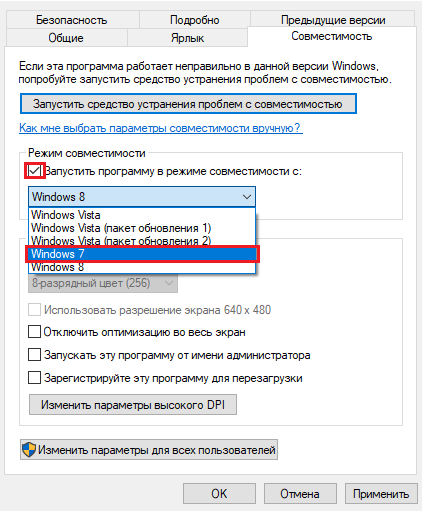
- Click on the Compatibility tab. Here, check the “Run this program in compatibility mode” box. Then select Windows 7 from the dropdown menu.
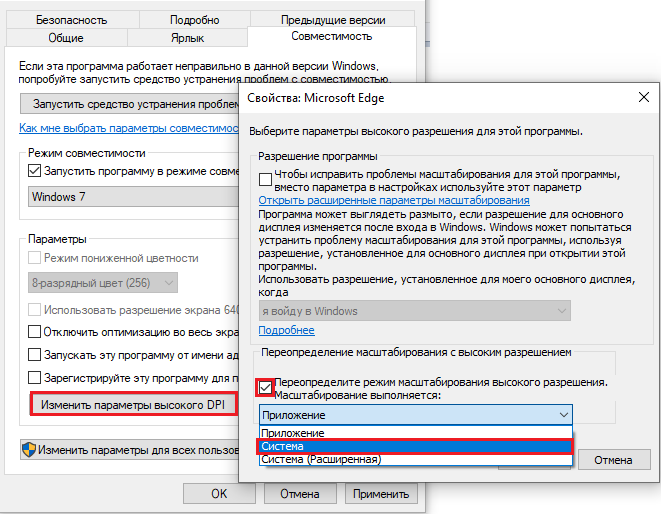
- Click the Change High DPI Settings button, select the Override Zoom Mode checkbox and select System (Advanced) from the drop-down list. click OK.
- Check “Run this program as administrator”.
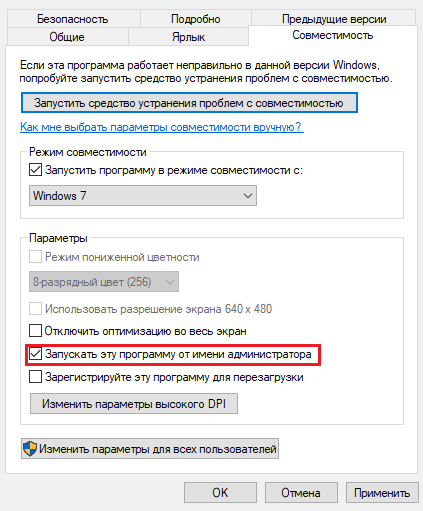
- Click “Apply” and the OK button.
Updating video card drivers
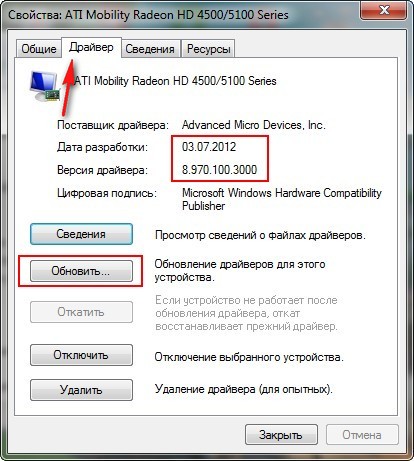
The module may stop working because you are using the wrong device drivers or they are out of date. In case this is the source of the error, you should update all drivers and see if that solves the problem. You can do it manually. Press Win + X and select Device Manager. In the window that opens, expand the Video adapters branch, find and double-click your video card. In the window, select the Driver tab and click the Update Driver button. Next, you will be prompted to select automatic or manual installation (select automatic), wait until the scan and installation is complete, then restart your PC.
Windows Update
Among other companies, the PUBG developers have officially acknowledged the bug report and also reported that this is not the only game affected by Windows Update 1709. According to PUBG:
At the time of posting, there were no possible workarounds for the situation. This bug was quickly noticed by Microsoft engineers who later released several software updates to fix the error message. In the wake of Microsoft, PUBG has also updated the game to fix the issue and make sure it doesn’t happen in the future.
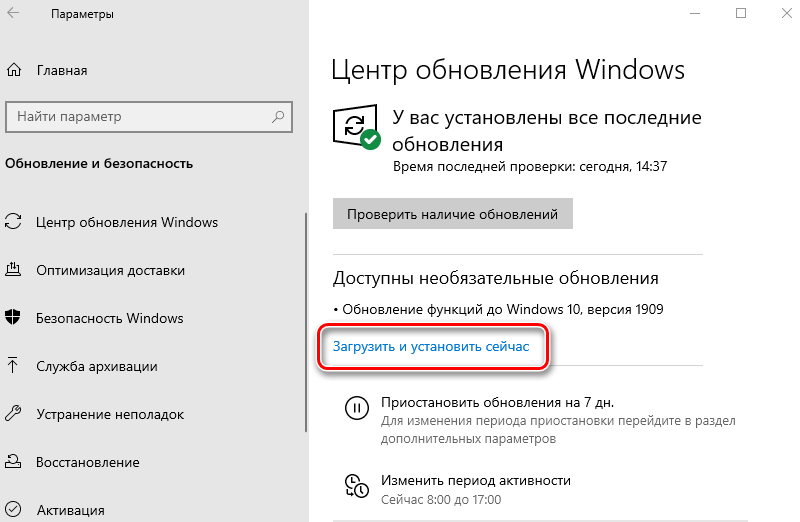
So if you encounter this error, it probably means that you do not have the latest version of Windows installed. In this case, we recommend that you update Windows as soon as possible using the steps below:
- Press Windows + S, type in the Update dialog box and open the Settings app.
- Select the “Check for Updates and Allow Windows Updates” option. Make sure you have an active internet connection before proceeding.
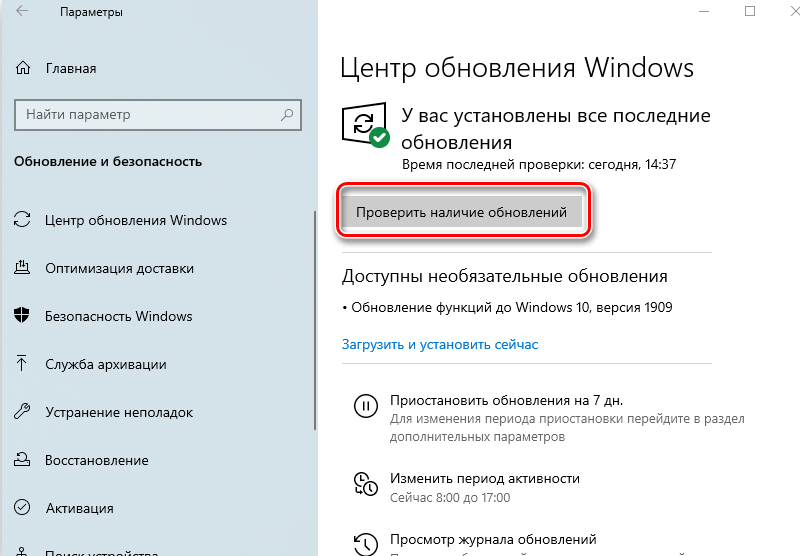
- After installing the update, restart your computer and re-launch the game or application that caused the error.
In addition to Windows, also make sure you have the latest version of the game / app installed.
Disabling the game bar
The Game Bar is a new feature in the latest Windows 10 updates. It automatically detects a running game and opens the “Game Bar” at the bottom center of the screen and lets you record, capture, or capture gameplay using hotkeys. The console can be easily accessed in-game by pressing Windows + G while playing any game in or outside the Xbox app. The practice of gamers has shown that the game panel often causes several errors and complicates the operation of the game. You can try turning it off and see if that helps. You can always turn the panel back on if that doesn’t work for you.
In recent updates, Microsoft has released a feature in Windows called Game Bar that allows users to record their process as they play games. This is a very useful feature and comes in handy because you don’t need to log out of the game or allow third-party software to record your session. Instead, the game bar automatically launches whenever you play any game and allows you to use tools via hotkeys. The gamebarpresencewriter executable is the process of executing the Game Bar functionality. You can easily access the Games bar while playing any game by pressing Windows + G. It includes options to take a screenshot, record your gameplay, or quickly launch the Xbox app.
However, there have been many users who reported that this application was causing abnormal CPU or memory usage when running any game on their computers. In addition, there was also a case where an error occurred because the Game Bar files were not available on the system for use. Aside from bugs, there have been serious cases where people were unable to disable the launch of the game bar when opening any game. It should also be noted that some Xbox games rely on a game DVR to run smoothly. If you disable it, they can become unstable and cause unexpected errors. If they do, you can always revert the changes using the same method.
Disable Game Bar in the Xbox app
The Game Bar is primarily a feature of the Xbox app present on your Windows. We will first try to disable the Game Bar directly from the Xbox app and see if that makes any difference. If that doesn’t work, we will consider disabling the Xbox DVR or Game Bar using the Registry.
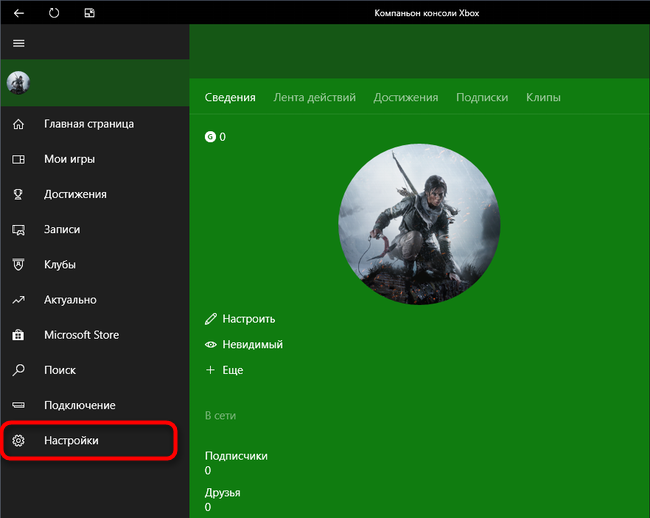
- Press Windows + S, enter “Xbox” in the dialog and open the app.
- Click on the “Settings” icon in the lower left corner of the screen. Now select “Game DVR” from the list of tabs and uncheck “Record game clips and screenshots with Game DVR”.
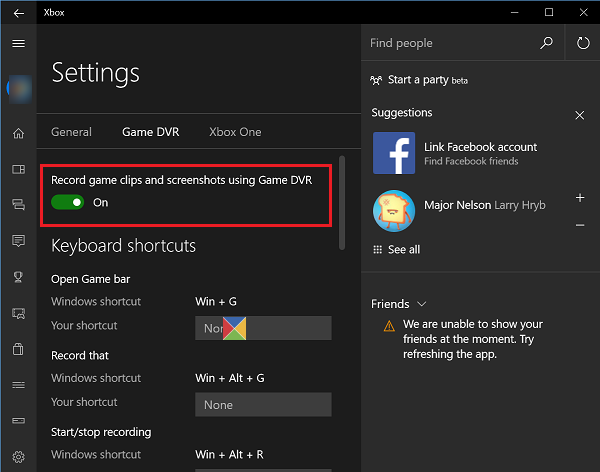
- Restart your computer for the changes to take effect and check if the issue is resolved.
Disable via settings
If you are still unable to disable features using the above two solutions, we can try to disable them using your default settings app. Please note that this feature was included in the settings after the developer update. If you do not have this version installed, you will not be able to follow the solution below.
- Press Windows + S, type “settings” in the dialog box and press Enter.
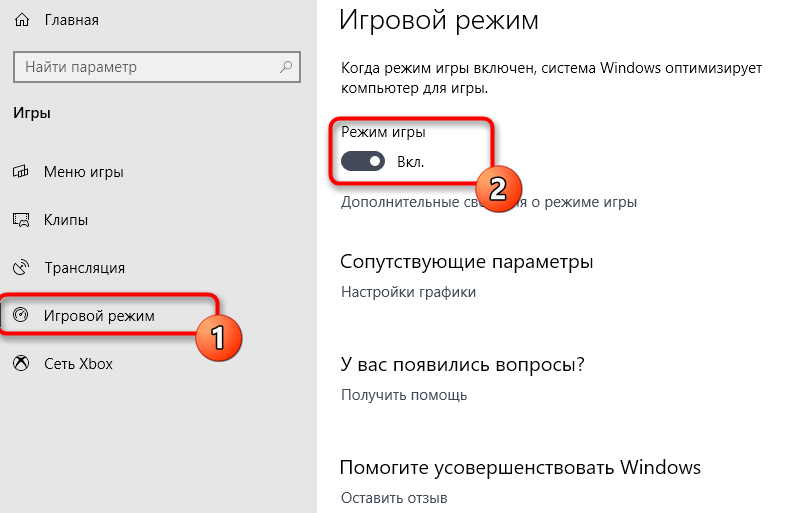
- In the settings, click on “Games” and select “Game bar” using the navigation bar on the right side of the screen.
- Uncheck the “Record Game Clips, Screenshots, and Broadcast Using Game Bar” checkbox.
Restart your computer and check if the problem is resolved.
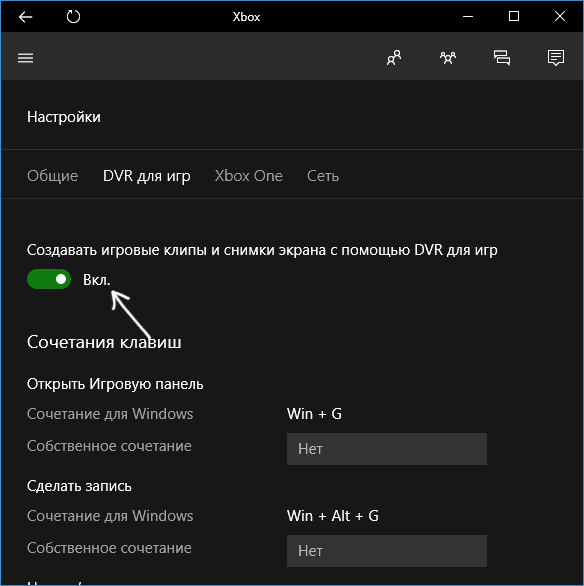
Disable game bar using pop-up settings
If you’ve uninstalled the Xbox app from your computer, you might not be able to change settings or disable Game Bar as described above. In this case, the fix is pretty simple; we will disable the launch of the Game Bar when you launch the game using our own settings.
- Let the Game Bar appear on your computer every time you launch the game, and if not, press Windows + G to launch it.
- After launching the game panel, click on the “Settings” icon on the right side of the panel.
- Uncheck all of the following options:
- “Open Game Bar when using (Xbox) on a controller.”
- Show Game Bar when I play full screen games that Microsoft has tested.
- “Remember this as a game.”
- After making the necessary changes, restart your computer and check if the problem is resolved.
There are also other workarounds like uninstalling the Xbox app, running gamebarpresencewriter.exe as an administrator, or modifying the registry files. In some cases they work, but in others they exacerbate the problem.
Update BIOS
BIOS stands for Basic Input / Output System. It links the components of your computer to the operating system. Outdated BIOS can cause errors and crashes, including during the game, such as “bad_module_info”. BIOS is a very small program up to 16MB in size. Modern BIOSes have a user interface, commonly referred to as the Setup Utility, where the user can configure a variety of hardware settings. On laptops or tablets, you often come across simplified BIOS versions in which the user can only set the time and a couple of other things, for example, the boot order. On more advanced motherboards like those found on desktop computers, the BIOS provides many options, including how to adjust the processor’s clock speed or voltage,shared memory between CPU and GPU, RAM latency, etc.
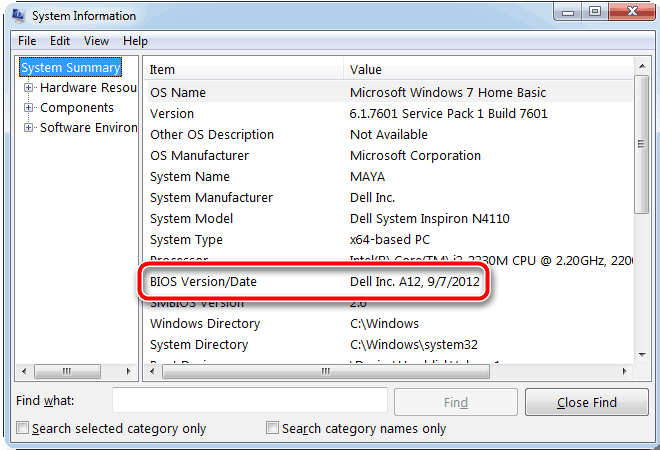
Configuring the Advanced BIOS can be dangerous if the user does not know what each parameter is doing and sets the wrong values, since system components have limitations in how they are installed. For example, accessing the processor at a very high frequency can lead to its overheating, which leads to an endless reboot of the computer. To make sure you are safe, adjust the BIOS settings only after reading your system manual and make sure you know the capabilities of the hardware components you are installing.
Another challenge faced by the BIOS is to retain these configuration settings when the system is turned off. For this, it has a small amount of volatile CMOS memory that is powered by a battery. The term CMOS stands for complementary metal oxide semiconductor, representing the manufacturing process used to make this memory chip. As applied to computers, CMOS is a memory chip that contains the hardware settings of a computer. If the battery in the CMOS memory chip is depleted and can no longer supply power, the BIOS will use the onboard defaults rather than the custom settings you set.
The most important task a BIOS needs to solve is to move from a mechanical hardware gesture, such as touching the power button, to a more abstract level, such as displaying the operating system logo on the screen. This means that when you turn on your system, the BIOS is started by the first program. Its job is to start up the coolers, check the power levels, run some quick tests that evaluate the health of the system hardware, then load the drivers and start the operating system boot process. If a failure occurs during this process, the BIOS will display a message informing you what is wrong. In the screenshot below, you can see an example of a possible error. If this memory chip fails, the BIOS can no longer be loaded and the motherboard cannot be used.This is why motherboard manufacturers use the Dual-BIOS system on their modern motherboards. Dual BIOS means there are two chips for storing the BIOS, one for the main BIOS and one for the backup. If the main BIOS chip fails, you are prompted to restart the computer, and the backup BIOS chip is used to boot the BIOS with default settings.
UEFI stands for Unified Extensible Firmware Interface and you can think of it as a modern and more powerful BIOS. It plays the same role as a traditional BIOS, but includes more features such as cryptography or remote diagnostics and computer repair, even if the operating system is not installed. This type of BIOS was invented by Intel and was first released in 2005. UEFI became popular after the launch of the Windows 8 operating system because it was the first Microsoft operating system to provide native support for it. As with a regular BIOS, UEFI is configured by the manufacturer of the motherboard being used. On tablets and laptops, the UEFI BIOS will display several setup options.
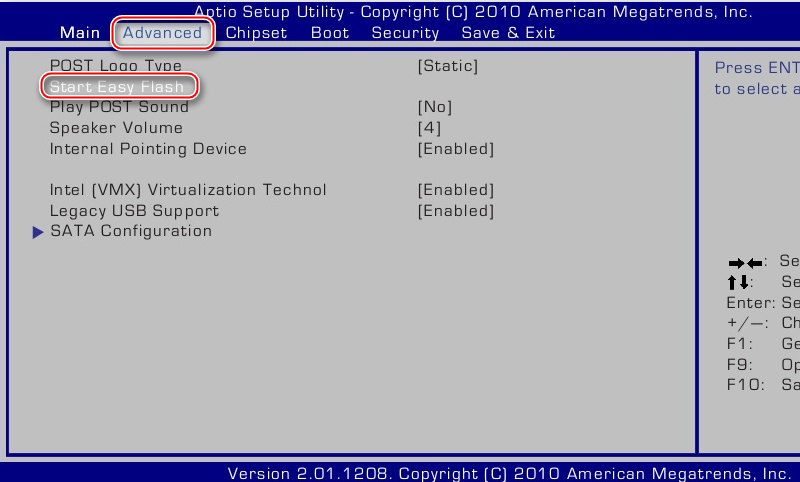
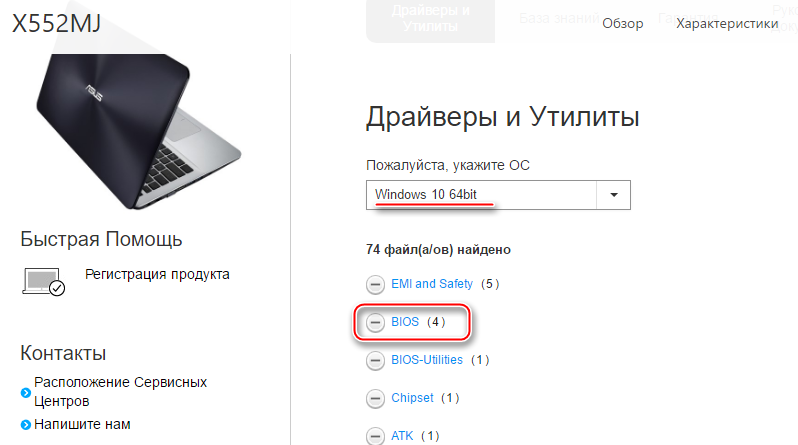
BIOS is a key component of any computer or device, and knowledge of its use can provide great flexibility and some performance benefits. Knowledgeable users and IT professionals can use the BIOS to squeeze the maximum performance out of their computers and devices. Unless you’re a big expert, that’s okay. The default BIOS settings are usually in line with the needs of the average user, and your system will work fine even if you do not use its settings. To update the BIOS, you can go to your motherboard support site and download the latest update from there. After that, just install the update on your computer and see if that solves the problem. The process for installing a BIOS update may differ depending on yourwhat motherboard are you using. Doing something wrong can have unexpected consequences, so do it carefully. You may need the help of a technician to update the BIOS.
Reboot and restore your PC
Resetting your computer can help you undo the changes you made (especially any updates you installed) that may have caused the bad_module_info error. But don’t worry, this will not result in the loss of all your personal files and data. This is how you can restart your computer:
- Click the Start button in the lower left corner of your screen and click the Power button. Then press and hold the Shift key on your keyboard and click Restart.
- Select Troubleshoot.
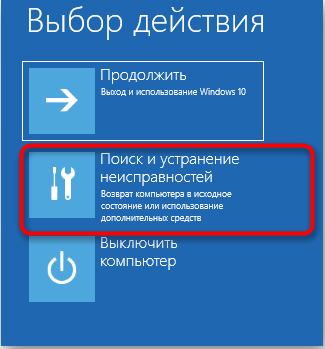
- Select “Reset this PC”.
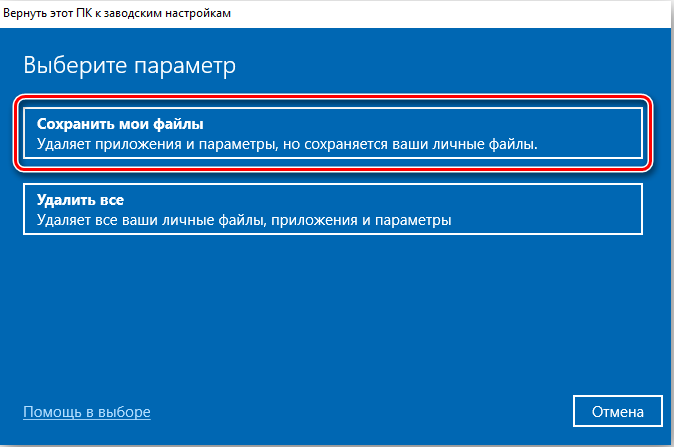
- Select “Keep my files”. Your computer will restart. This option will remove your apps. You will need to reinstall them after restarting your computer.
- Select your account and enter your password to continue the process.
- Click Reset.
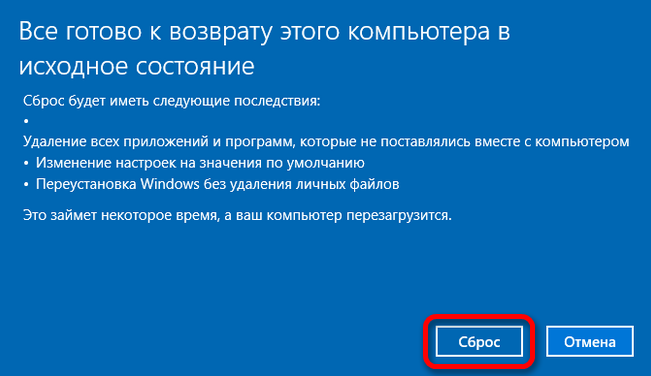
- Wait for the process to finish and then check if your problem is fixed.
In addition to the above methods, you can also try:
- Turn your computer on and back on.
- Install the latest versions of all drivers (other than graphics drivers).
- Make sure no other game is running in the background.
- Make sure you are logged in as an administrator.
As you can see, there are several ways to get rid of the error that are available to almost any PC user. If none of the solutions helped you or you got rid of the problem in another way, share about it in the comments below the article. We will try it out and in the next article we will definitely provide detailed instructions.