For large enterprises and small organizations, remote workers and even for subjective purposes, due to the progress of Internet technologies, an important element is the availability of access to a local network of a group or corporate type from anywhere. This kind of problem can be solved by creating a secure connection, which allows only those people who have access parameters to enter the local space. To create a local network and manage its settings, it is enough to have the necessary equipment in the form of a good router and the ability to use it correctly. In this article, we will consider how to organize work in a protected network space by creating a PPTP tunnel on MikroTik routers, which are one of the most powerful and demanded devices.

Contents
VPN tunnel: the need to configure the connection
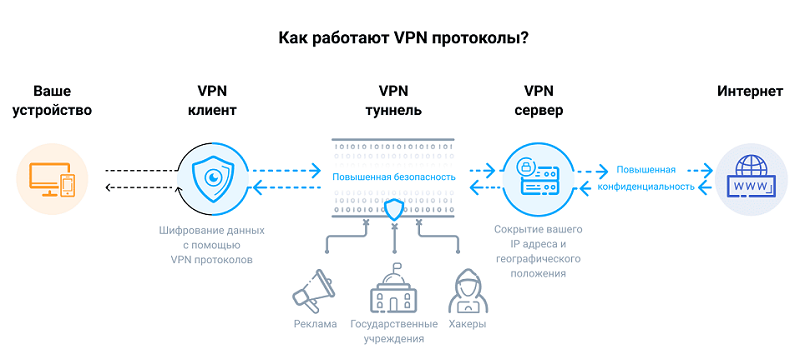
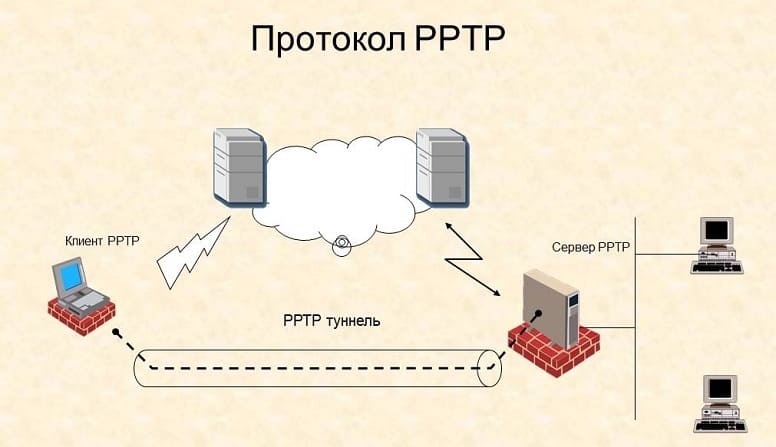
The most common type of point-to-point Internet connection in the world is a VPN tunnel. In simple words, if the user has MikroTik equipment, it is possible to configure a virtual, protected trunk inside the main communication channel through a router. The need to configure such a channel on MikroTik equipment may arise in situations:
- If it is necessary to provide access to the group network to employees of the organization, if they are supposed to frequently leave the office, long business trips, and with the ability to log in not only from a laptop or personal computer, but also from a mobile device.
- To provide a user with access to home computer equipment while away from home.
- To connect two remote agents via a secure channel, which will not be accessible to third-party users who do not have access to the portal. Both ordinary users and organizations can act as agents.
The advantageous feature of a VPN channel, as opposed to a standard network, is the security of information transmitted through the tunnel. The data security criteria depend directly on the selected type of connection, of which there are currently several types.
Types of VPN protocols available on MikroTik
MikroTik routers allow you to connect to a local network via VPN using the following types of protocols:
- Access in PPTP format, as in one of the most popular protocols for transferring data within a corporate channel.
- PPPoE format protocol, as a more secure and variable network connection, with the ability to encrypt, archive data, using dynamic IP.
- OpenVPN technology, as one of the most flexible in terms of settings and operation, a variation of the network protocol.
- L2TP channel protocol of the second generation, with high criteria of security parameters, with the ability to work in different networks.
- IPSec is a network protocol used for the transmission of IP packets in a secure manner, with the admissibility of tracking the source of data sending, high performance criteria in commercial and economic areas of operation. It is identified as the most secure modern protocol.
Let’s consider in detail the advantages of the protocol of the first format, detailing the nuances, how in practice the VPN channel is configured using the PPTP protocol on MikroTik devices.

PPTP Benefits and Priorities
Often, the choice of active Internet users, with the need to create a local “gateway” of a virtual category, as well as organizations and enterprises, falls on the PPTP format connection, despite the fact that the protocol of this category is currently considered, though not outdated, but slightly inferior to analogs in terms of criteria for protection. The popularity of the protocol is explained by its following privileged parameters:
- Simple and economical operation. Each user who has a MikroTik router will be able to independently create a secure communication line, according to the simple regulations according to which the PPTP channel is configured.
- Loyalty, expressed by interaction with a variety of protocols, characterized by diverse categories of internetworking of data.
- Binding to a specific, static IP address.
- Identification of packets during transmission over a network channel.
- Access to the local network from any device, regardless of the criterion which OS version is installed on the device.
Considering the priority aspects of the protocol, users often use a PPTP VPN channel for both corporate purposes and for organizing a private local network, despite its average security parameters.
PPTP Server Configuration Procedure
Configuring a VPN channel using PPTP protocol on MikroTik devices is not characterized by technological difficulties, however, it is done in several stages:
- Initially, a PPTP server is created on the MikroTik router.
- After the server is created, a list of profiles is formed according to which users will have access to resources.
- Next, the rules in the Firewall are established, which are necessary for the unimpeded connection of users through the firewall to the communication channel.
Setting up the PPTP server on the MikroTik device is performed through the WinBox utility: you need to expand the PPP menu in the right window, then in the section that opens, go to the Interface tab, expand the list by clicking the “+” button in the top line of the screen, where you select the PPTP Server branch. In the window that opens, you will need to set the parameters of the server being created:
- Check the box next to Enabled.
- Activate the required ciphers for client identification in the Authentication section by checking the boxes opposite all four items.
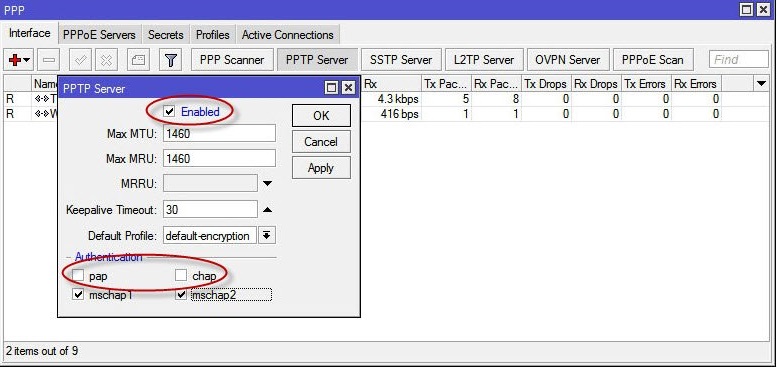
- Confirm the settings with the “OK” key.
Next, you need to return to the Interface section and expand the PPTP Client parameter. In the window that opens, further configuration of the new work profile will be performed. The task execution schedule is as follows:
- The General tab will open in the New Interface window: the Name column will automatically contain the name under which the PPTP client was created, and the Type, MRRU, Max RTU and MRU columns will be filled in. Experts do not advise making changes in this tab, you can only change the Name parameter, but it is better to leave everything in its original form in order to avoid mistakes.
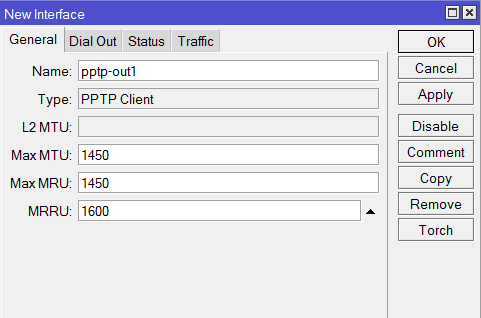
- The user needs to go to the Dial Out tab, where the server is configured, and the username and password for entering the local network are set. In the Connect To column, you must enter the server address, and in the User and Password fields, specify the login and password for connecting to the server.
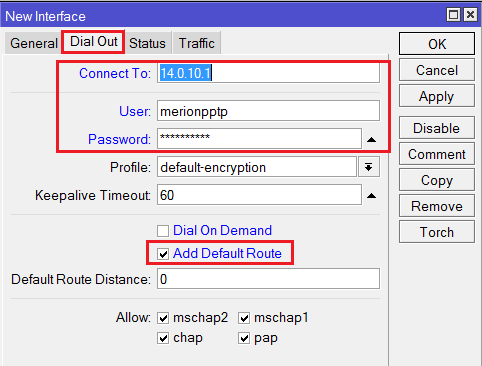
- A checkbox is put in front of the Add Default Route label. The entered data is confirmed by pressing the Enabled button located in the lower left corner of the window.
For the correct operation of the tunnel channel, it remains only to create the rules according to which the VPN connection will be performed using the PPTP protocol:
- To do this, you need to find and open the IP section in the list of the Interface menu, open the page for creating a new rule by going to the Firewall category and the NAT menu.
- In the New NAT Rule window, in the General tab, the following data is entered: the word INPUT is entered in the Chain line, the TCP item is selected from the drop-down list in the Protocol column, and Dst is opposite the inscription. Port code 1723, corresponding to the port of the VPN tunnel.

- In the Action tab, you must set the value accept.

- Similarly, the permissions for the GRE protocol are set: in the Protocol column, instead of TCP, the GRE value is put down, the remaining parameters are written according to the previous paragraphs, with the confirmation of the settings in the Action menu.
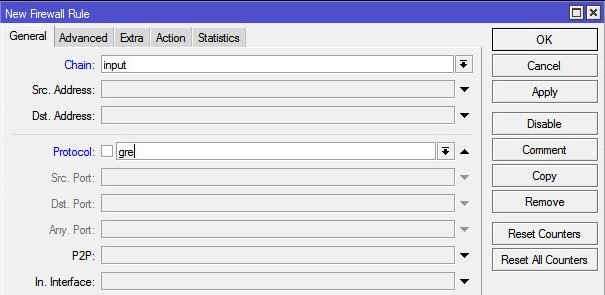
- In order for the created rules to take effect and become priority ones, they will need to be moved to the first two positions in the list of VPN connection regulations.
At this point, the work on setting up a VPN connection via a PPTP channel on MikroTik can be considered complete. It remains to check the result by setting up a VPN with the appropriate IP address on the client side, and connecting to the created local network using the previously specified username and password. If all points are completed correctly, the user will be able to enter the new network tunnel from any location and type of device. Adding local network users can be done through the Secret tab in PPP, by prescribing the login and password for a specific subscriber, filling in the Local Address field with the data of the IP router acting as a server, specifying the address of the registered user in the Remove Address line.
Summarizing
In the article, every user who wants to set up a VPN connection via PPTP on a MikroTik router will find answers to questions. The process is not accompanied by difficulties, it is intuitive, but in order for the work to be crowned with success, it is important to strictly adhere to the sequence of performing the manipulations. The instructions for creating a secure communication channel will allow you to complete the process yourself without difficulties.