The stable operation of the Windows operating system is ensured by hundreds of background services and processes that perform a variety of tasks. Among them is Tiworker.exe, which is responsible for the timely maintenance of most components and utilities.
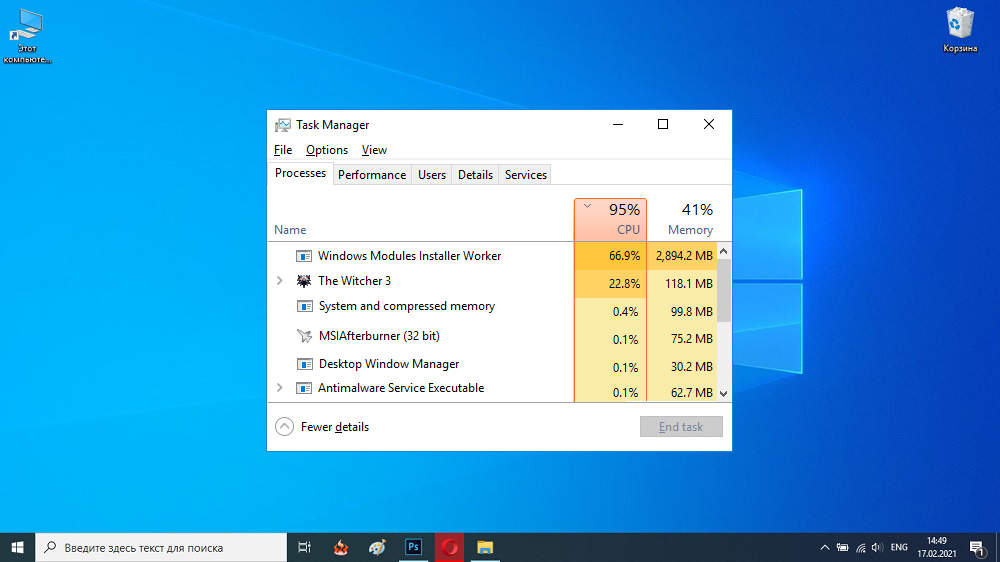
However, a number of users are not hearsay familiar with the problem when this element heavily loads the processor or hard disk, because of which the computer starts to slow down, periodically freeze, and serious applications stop opening. In this article, we will look at the causes of this phenomenon and how to fix the situation.
Contents
Why do you need the Tiworker.exe process
Before proceeding to the direct solution of the problem, it is necessary to have a complete understanding of what this process is and what its purpose is. TiWorker is a system file that automatically searches for and installs updates, as well as starts and deactivates the most important components of the operating system.
It is impossible to delete it, however, even if for some reason you succeed, most likely you will have to restore the OS. Another thing is that you can temporarily stop this program, and this will not affect the performance of the device in any way.
Why Tiworker.exe Can Load Windows 10 System
The main reason Tiworker.exe loads the processor, as a rule, is the standard maintenance operations of the “dozens”. Usually, these delays are temporary in nature and completely disappear after all the necessary procedures are completed.
Also, too much resource consumption for a long time is quite common among those who rarely check and load current versions of Windows. Other factors that can negatively affect the processor load indicator (75-85%) may be:
- Connecting incompatible hardware to the computer or the presence of outdated software in the startup directory (for example, drivers for an unused printer).
- The action of third-party applications that deactivate OS spyware options. If you have previously used such blockers, we recommend disabling them at least for a while, updating the system and again checking its state for the fact of an overload.
- Failures occur during scheduled operations. Sometimes it happens that an update is installed incorrectly or simply does not want to load.
- The presence of malware. Moreover, many viruses disguise themselves as the original component and begin to seriously load the system.
How to solve load issue due to Tiworker.exe process
There are several ways to solve this problem, from a simple reboot to completely disabling the installer. We will analyze each of them. We recommend that you go in order, sequentially moving from one point to another, until the load disappears.
Reboot your PC
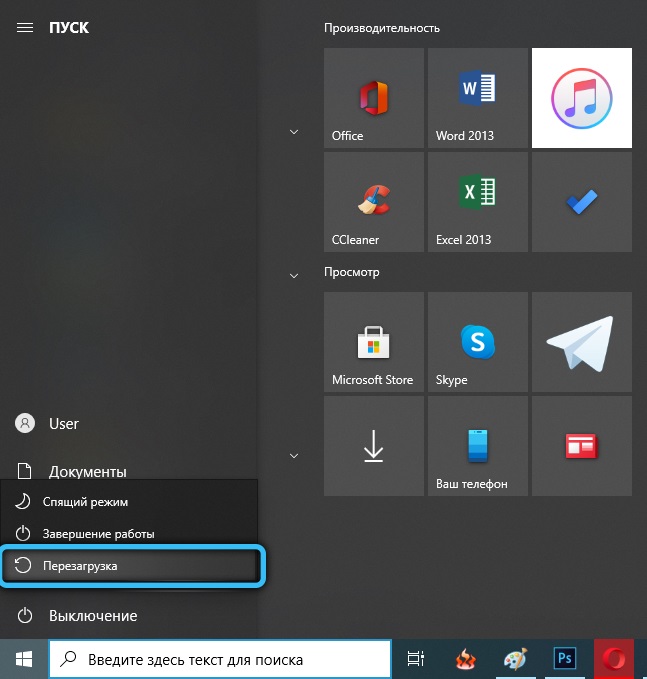
Before you restart your computer or laptop, you need to make sure that the update is being downloaded at the moment. By performing a reboot after downloading it, you can speed up the installation and thereby remove the increased load from the processor.
Automatic troubleshooting
If the reboot does not lead to the desired result: downloading the current version of Windows literally freezes in place, and the processor still consumes an excessive amount of resources, this may indicate an error in the Update Center. We have prepared a step-by-step guide to eradicate the current problem using a standard Windows tool.
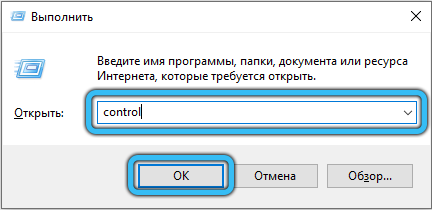
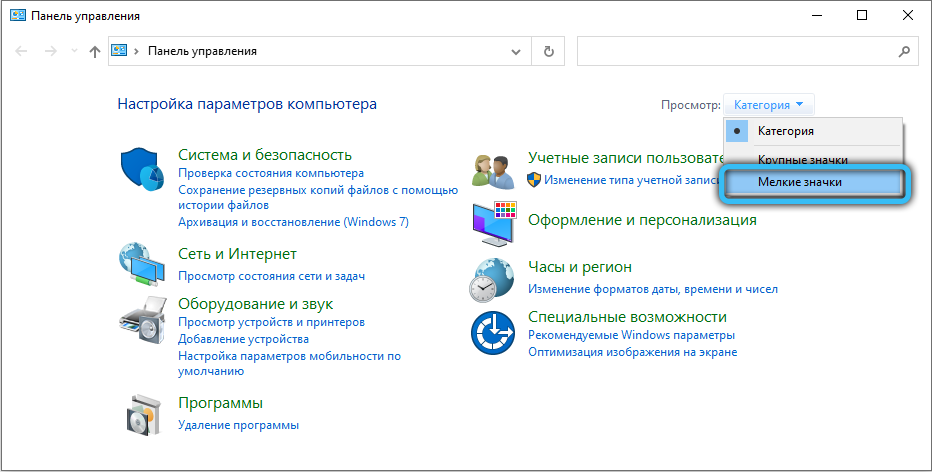
- Start the control panel first. To do this, press “Win + R”, and then in the window that appears, enter the command “control” and click “OK”.
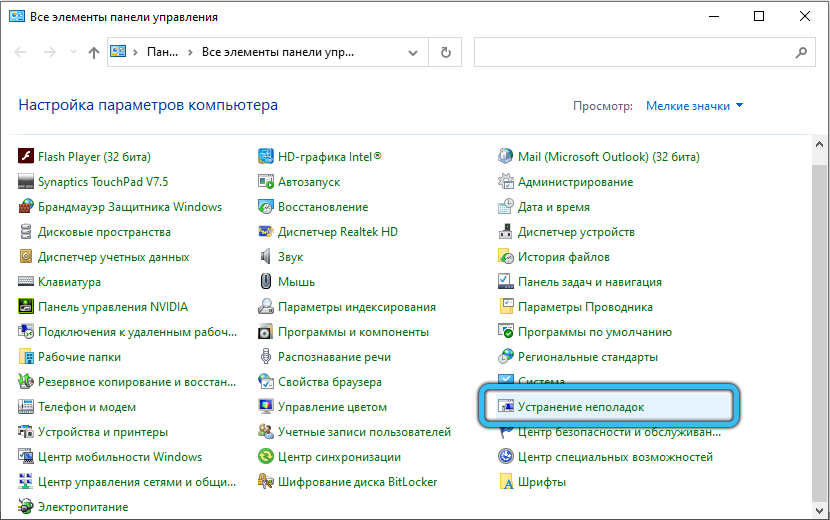
- Then, if necessary, change the display mode. At the top right corner, select Small Icons. After re-sorting at the end of the above list, click on the Troubleshoot link.
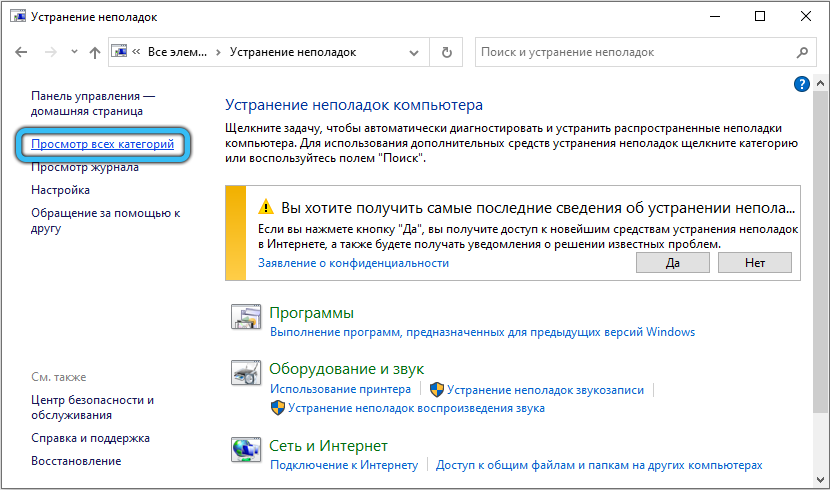
- On the left side of the screen, click on View All Categories. Wait for the self-test to complete, then run the scan one by one for the following fixes:
- System maintenance.
- Background Intelligent Transfer Service.
- Windows Update.
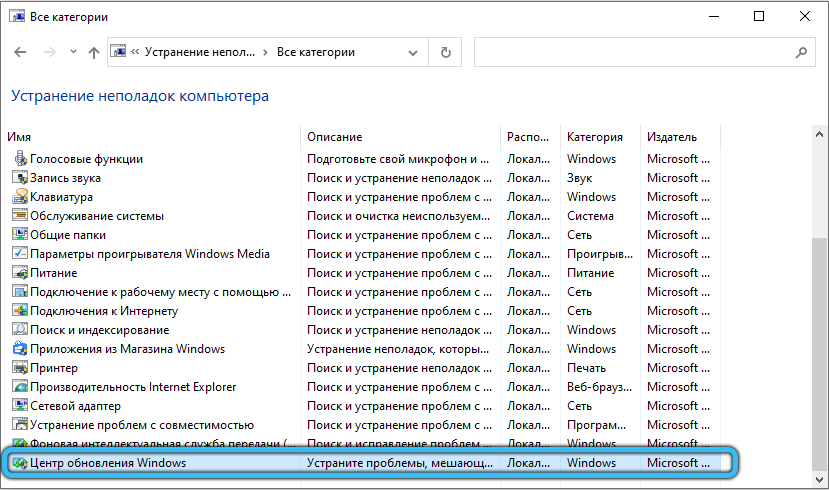
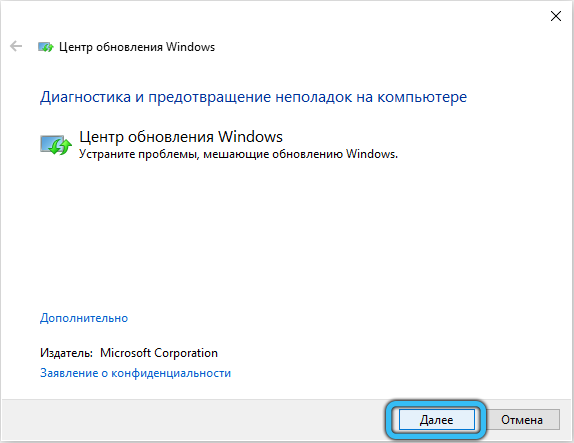
- If any errors are detected, the program will automatically make changes. However, sometimes the user has to give permission manually.
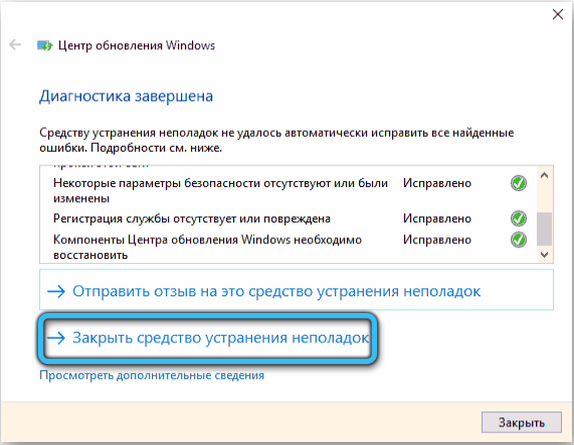
- At the end of this procedure, you will be able to view a list of identified issues that have been successfully resolved.
Self-service deletion of the update cache
If after automatic adjustment the situation has not changed, you should manually clear the cache. A full cache interferes with the normal course of the update process, so it is extremely important to periodically perform this procedure.
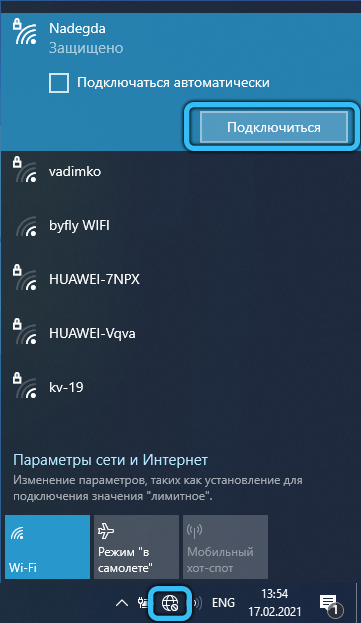
- First of all, you need to turn off the Internet. Find the network connection icon on the taskbar. Then select the name of your connection and click Disconnect.
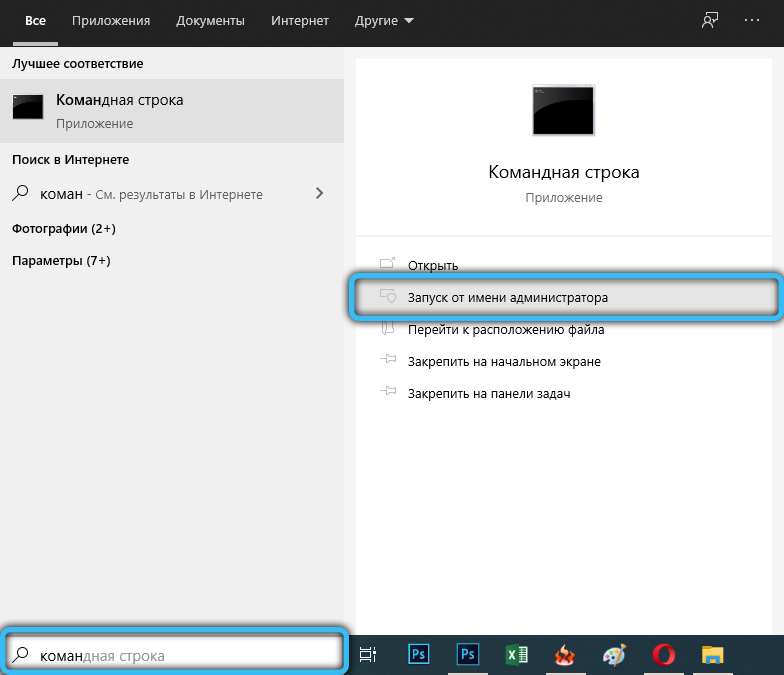
- Next, in the global search field on the main screen, enter “cmd” and press the “Enter” button. “Command line” should appear in the search results, right-click on it and select the line “Run as administrator”.
- In the black command line window, enter two lines in turn: “net stop wuauserv” and “net stop bits”. The input of each command must be completed by pressing “Enter”.


- Open the explorer through the special shortcut “My Computer” on the desktop. In it, go to the path “C: Windows SoftwareDistribution”, having entered this data into the address bar.
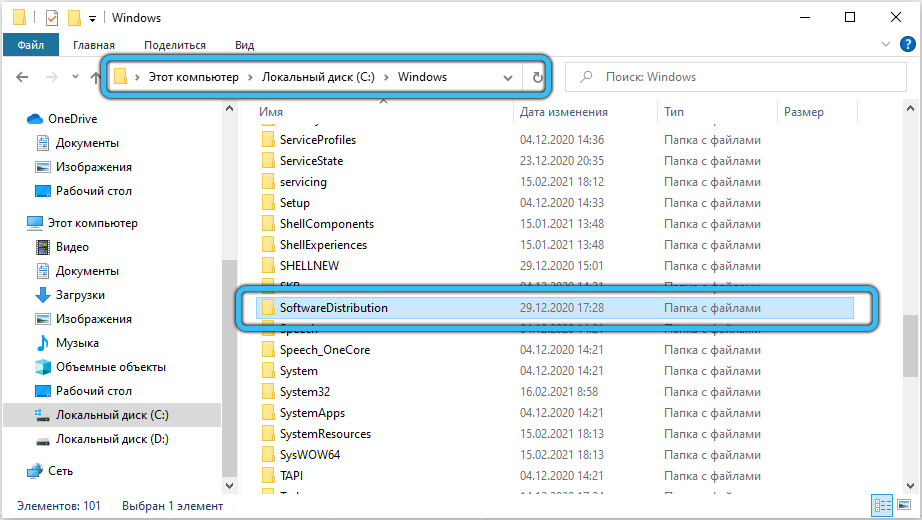
- Now delete the entire contents of the section using the standard function in the context menu (RMB → “Delete”).
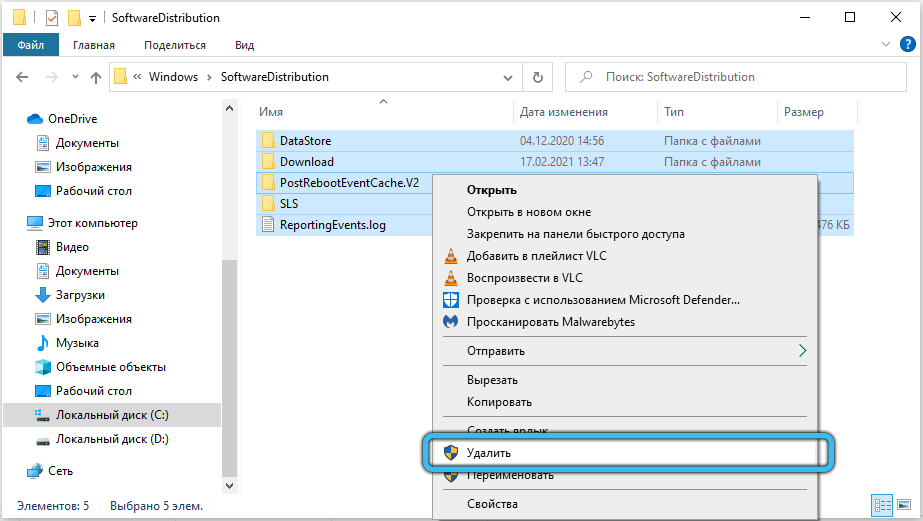
- Open the “Command Prompt” again and, as in the previous case, alternately enter “net start bits” and “net start wuauserv”.


- Close the console, then restore your Internet connection and try updating Windows again.
Checking and restoring the integrity of damaged files
If the problem persists, it is necessary to restore the integrity of the system files. This is done through the same console.
- First of all, run the “Command Prompt” again as an administrator.
- Activate the following commands one by one:
- “Dism / Online / Cleanup-Image / CheckHealth”

- Dism / Online / Cleanup-Image / ScanHealth

- “Dism / Online / Cleanup-Image / RestoreHealth”

- “Dism / Online / Cleanup-Image / CheckHealth”
- Ready! Now go to the “Update Center” again and try to install a fresh update.
System clean start
If the previous options did not bring the desired result, you can update the system in Windows clean boot mode (with this start, only critical drivers and programs are activated). Be sure to use an administrator account. If you still don’t have it, register. Then use the guide we have prepared.
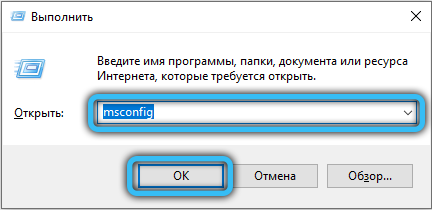
- Press the “Win + R” keys simultaneously to bring up the “Run” menu. In the empty field, enter the line “msconfig” and confirm the action with the “OK” button.
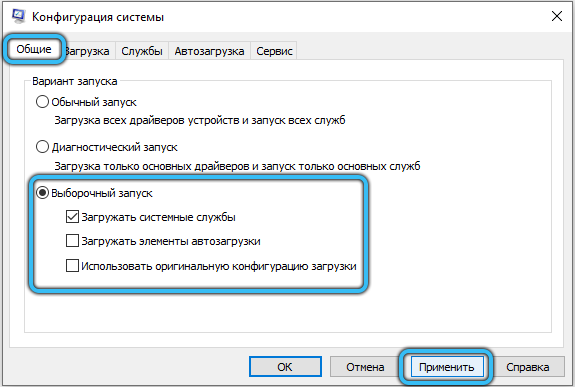
- The “System Configuration” window will appear in front of you. In the very first tab “General”, change the position of the switch to the position “Selective startup” and uncheck the box next to the item “Load startup items”. To save the settings, click “Apply”.
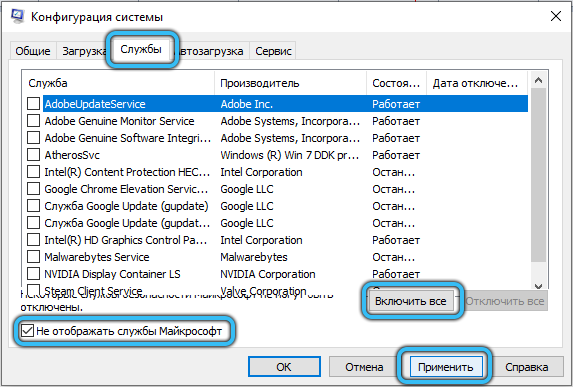
- Next, go to the “Services” tab and at the very bottom of the window, check the “Do not show Microsoft services” checkbox. Then uncheck all the presented objects by clicking on the “Disable all” button. Complete the operation with the “Apply” button.
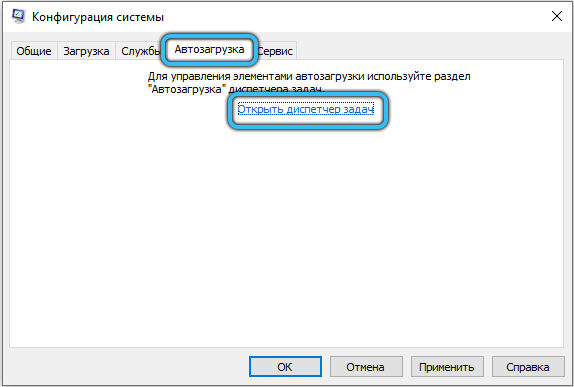
- On the same panel, open the “Startup” section and launch the “Task Manager” by clicking on the corresponding link.
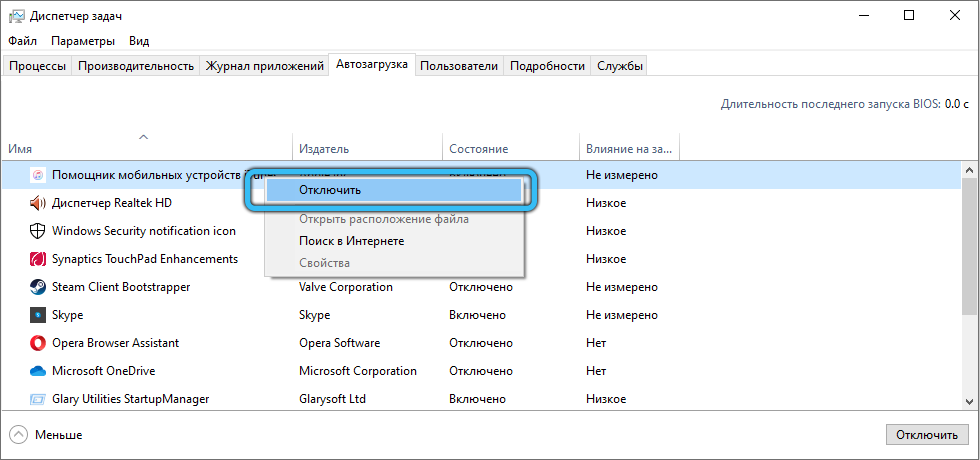
- All elements must be disabled in the manager settings. You can resort to the standard option (RMB → “Disable”), or use the special key located at the bottom right.
- Close all windows, restart the system and try again to install a fresh update.
- After the OS is updated, return it to its normal boot through the “System Configuration” and monitor the state of the processor.
Setting low priority
If the load on the processor is a temporary effect that appeared during active servicing manipulations ”, then it can be reduced by setting a low priority for Tiworker.exe.
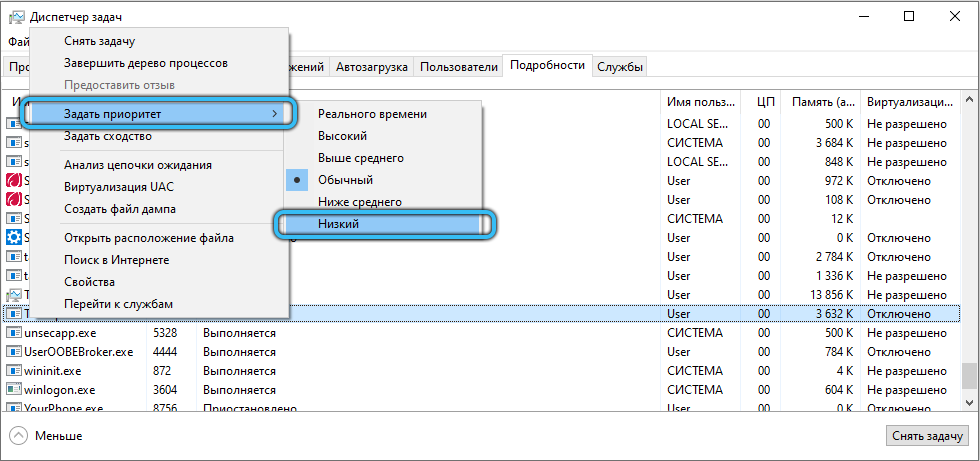
- Press Ctrl + Alt + Delete on your keyboard to display the Task Manager.
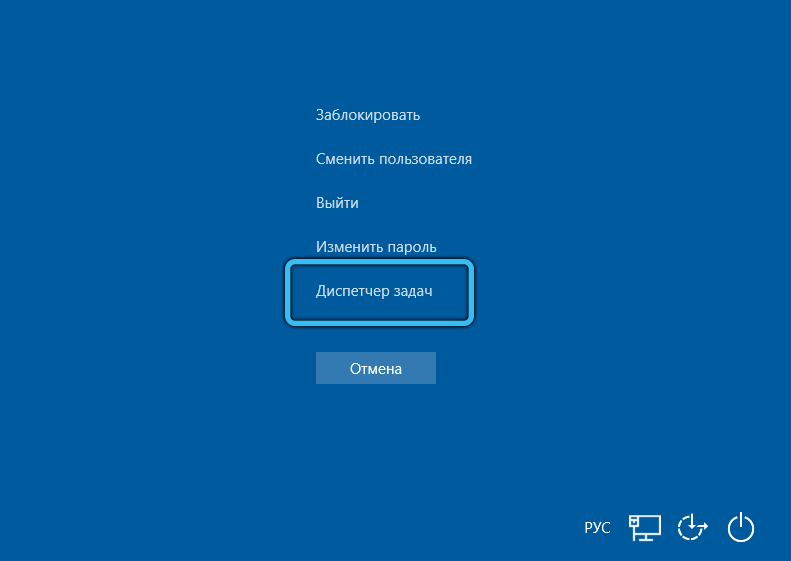
- Open the Details tab and find Tiworker.exe in the list that appears. To make it easier to search, sort by name, then all items are sorted alphabetically.
- Right-click on the desired position, then in the context menu, hover the cursor over the line “Set priority” and in the new list of settings put the “Low” parameter, or “Below average”.
Disable Tiworker.exe
This method is a radical measure, so we recommend that you first try all the above methods. Disabling the Tiworker.exe process will prevent the system from automatically downloading and installing fresh updates. You will have to do all the necessary manipulations on your own, manually.
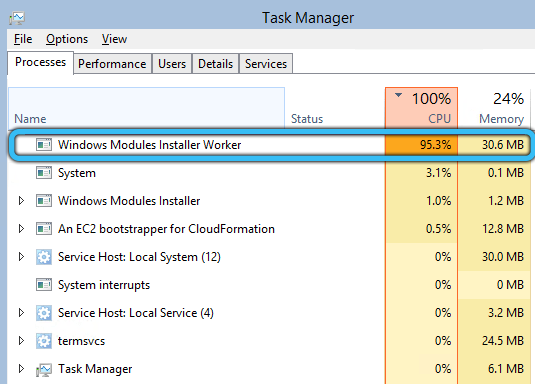
- Enter the “Task Manager” (we already wrote how to do this, read above), find the “Windows Modules Installer Worker” object there, select it and click on “End task” at the bottom of the window.
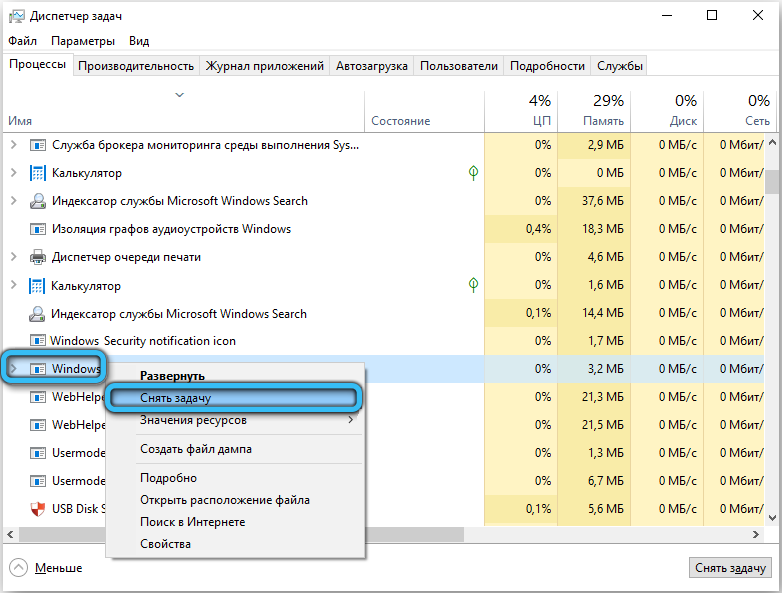
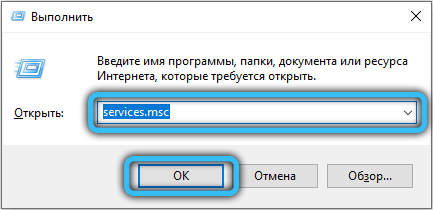
- At the current stage, its work is suspended, but it will become active again with a new session. To prevent this, call the “Run” panel and enter the command “services.msc”.
- In the services window, find the “Windows Modules Installer”, for this we advise you to immediately move to the very bottom of this list, since all positions are sorted alphabetically.
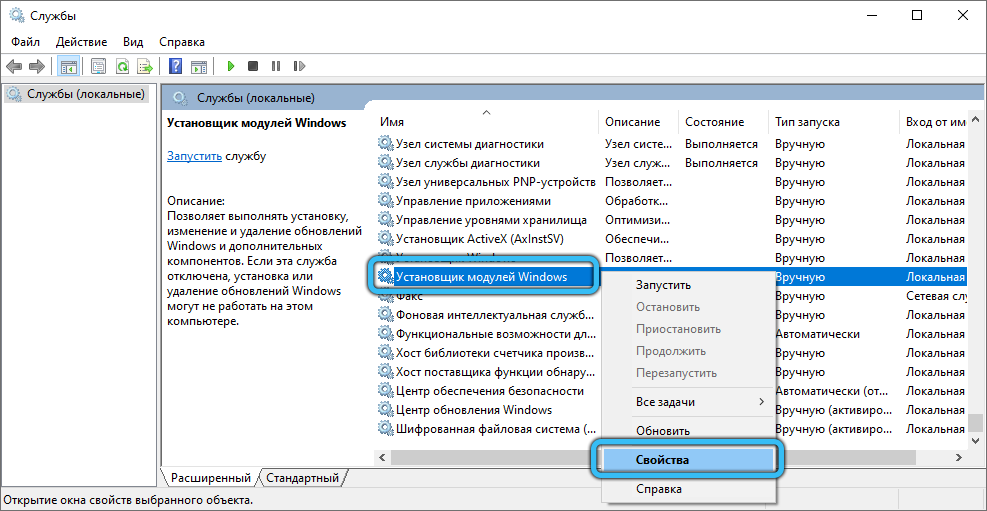
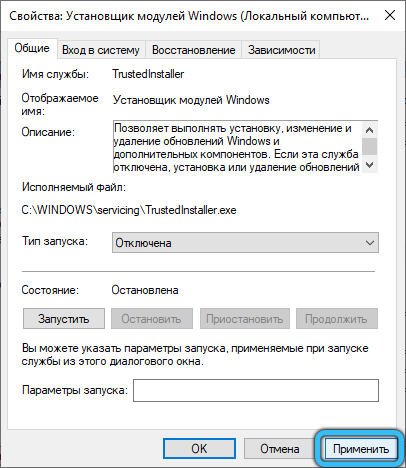
- Then double-click on it (or right-click) and select “Properties”. On the “General” tab, in the “Startup type” field, completely disable the service, or switch it to manual mode.
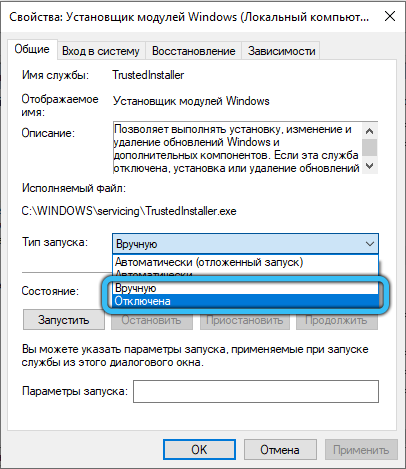
- To prevent the changes made to disappear, click “Apply” and then “OK”.
Stopping Windows Update
It is possible to relieve the load on the PC hardware with a guarantee not only by disabling Tiworker.exe. An alternative to this is to deactivate the Update Center. Here we will look at the method using the “Local Policy Editor”.
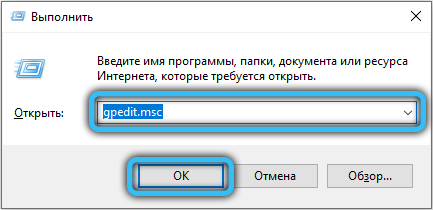
- Press “Win + R” and insert “gpedit.msc” into an empty line.
- Through the initial window, go to the “Computer Configuration” directory.
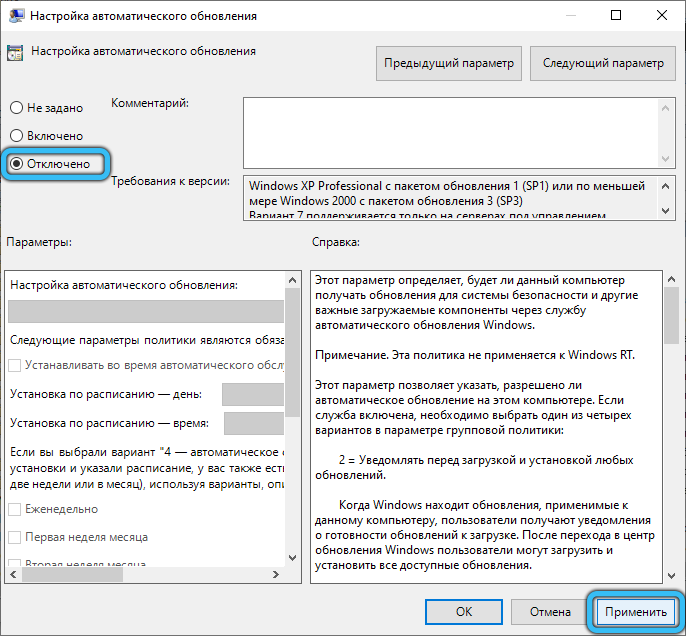
- Next, open the section “Administrative Templates” → “Windows Components” → “Windows Update”. Find the “Configure Automatic Updates” object and double-click on it.
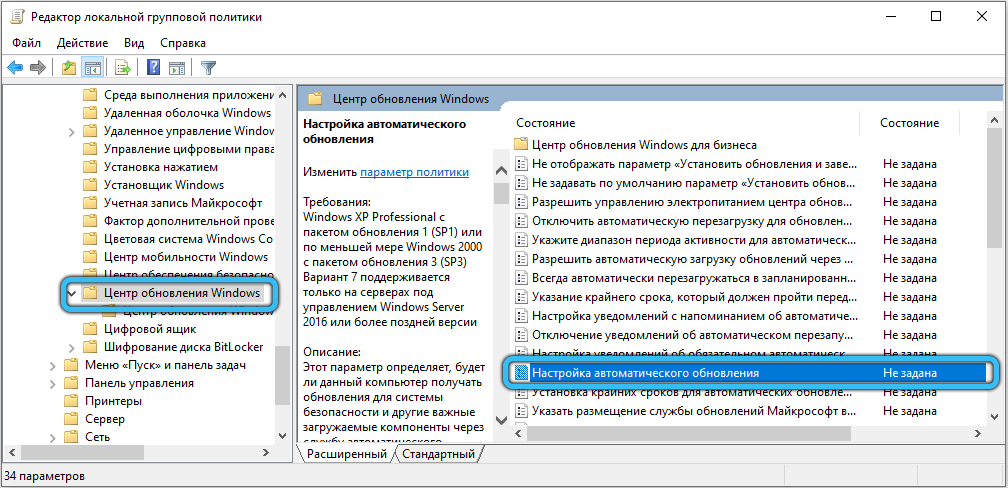
- Change the state to Disabled. Then save the perfect setting.
Viruses disguised as Tiworker.exe
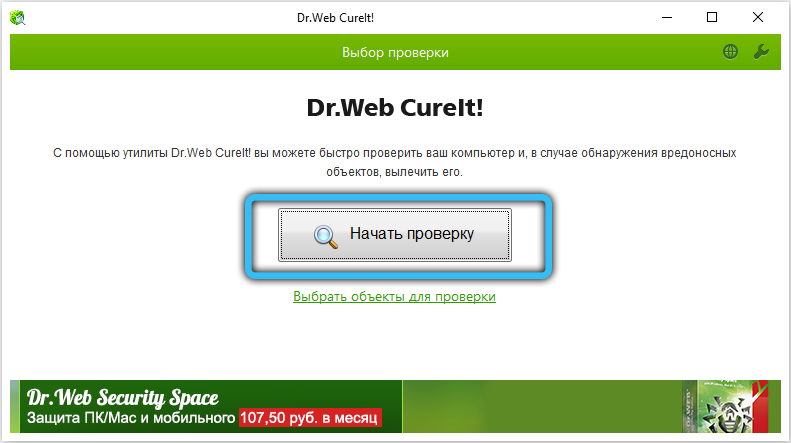
If none of the above tips helped to get rid of the problem, it is likely that Tiworker.exe is nothing more than a virus program. We recommend removing the infected module only using antivirus software. Moreover, you can use both paid and free applications (for example, Avast or Dr.Web).
Conclusion
For the most part, CPU utilization is temporary, so the best solution is to just wait until regular maintenance is complete. However, if you do not have time to wait or the Tiworker.exe processor is operating in an abnormal mode, there are a number of ways to reduce its impact on the computer. In some situations, the most effective method is to completely disable this item or to directly depend on the Update Center. Also, do not forget about the threat of infection by viruses that skillfully disguise themselves as important system files. Pre-scanning for such dangers with any proven antivirus can help avoid unnecessary manipulations.
We really hope that the above options for countering the load on the processor were useful to you. If you still can’t fix the situation, try to describe your problem in more detail in the comments: what preceded its appearance and what actions have already been taken. We will also be glad to learn from those who have already faced such difficulties and successfully solved them, which of the ways became salutary. Was the instruction set out by us useful, were there any additional difficulties? This information will help us create more detailed and informative articles in the future.