The development of software every year creates new unique opportunities for convenient and better management of various hardware. So, using the Nx Nomachine application, you can set up remote access to almost all the functions and capabilities of a remote PC. In this article, we will analyze the purpose and features of this type of connection, as well as provide a complete guide for its implementation.

Contents
What is Nx Nomachine for?
Nx Nomachine is a self-contained software package that is designed to control a remote computer located on the same local or private network with you. This is very convenient when you need to provide remote support to a colleague or collaborate on a project using a shared desktop. Moreover, this pairing can be useful at home, for example, if you have to constantly be distracted from one device to another located in different parts of the apartment.
Due to the fairly extensive functionality, the user is able to perform most of the standard tasks, view and reproduce the data stored on the PC, and also control the operation of the devices connected to it.

One of the key advantages of this application is that it can be configured for any type of connection and for any operating system. In addition, this type of connection has a high degree of security. Thus, remote access is organized through special NX servers and is encrypted using SSH and other modern technologies. Based on this, you can be absolutely sure that no one will follow your actions within the network.
Installing Nx Nomachine on Ubuntu Linux, Windows, and more.
Before proceeding to remote computer control, you need to install the client-server on all devices used. The program is cross-platform, so it runs without problems on most operating systems, including Windows, Mac OS, Linux, iPhone / iPad and Android, so that the user can choose the most preferable option from the presented solutions.
The installation procedure is extremely simple and almost identical on any system. At the same time, there are a number of points that you should pay attention to:
- We recommend downloading the application exclusively from the official website of the developer (https://www.nomachine.com/download). Once on the main page, just select your OS and click on the “Download” button.

- For Ubuntu, a selection of DEB packages is available for both 32-bit and 64-bit versions. You can install them in any convenient way, for example, through the Application Center. When this process completes, the NoMachine Service Server and Nomachine Client will appear on the screen.
- For Windows, all manipulations are similar. Just download the “.exe” file and follow the installation guide.
- Mobile device owners can use the Play Store or the App Store, depending on the platform. However, on the above site you can download and “.apk” file, and then independently install it through any file manager.

When you run the installer for the first time, you need to accept the license agreement and wait for the installation to complete.


Features of Nx Nomachine
The next step is to set up the Nomachine connection between the computers. This can be done in two ways. Let’s consider each of them in more detail.
LAN connection
The connection process is not very complicated, however, in some cases, it can cause difficulties and questions. We have prepared step-by-step instructions to make this task as easy as possible for you. This manual is divided into two parts: the first is for setting the parameters of the controlled facility, the second is for the manager.
The computer to be controlled remotely:
- To connect remotely, you will need user account data (login and password) and the local IP address of the PC. To find out, open the NoMachine app you just installed and overwrite (or save) the information you need from the welcome panel.

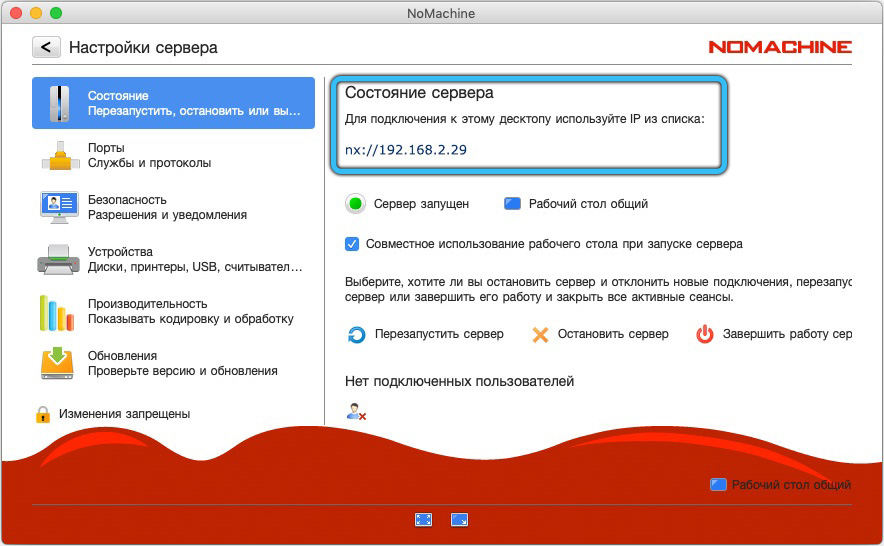
- The IP address of this desktop can also be found by clicking on the corresponding icon in the task area. The page that opens displays all information about the current state of the server.
- You do not need to perform any more actions. Close the utility and proceed to setting up the second device.
The computer from which the control will be carried out:
- Launch Nomachine from your desktop shortcut or from the applications menu.
- Then click the “OK” button to skip the start window. Then the “Machines” panel will appear on the screen.
- A new connection is created on this page. If you have already used this software, then this dialog will display all available and previously used connections. To sort the list of available connections, paste the IP address into the search bar.

- Then click “Add” and enter the IP address again in the empty “Host” field. The area with the name is filled in automatically, but you can assign a unique name to it to make it easier to navigate in the list of connections in the future.

- After these manipulations, click “Connect” to start the synchronization process. This action can also be done from the “Machines” menu by double-clicking the desired PC.

ATTENTION. As a rule, if the PCs are on the same local network, the device will be detected automatically. - Now enter the username and password for your profile that you prepared in advance, and click “Login”. Leave the rest of the parameters as default.

- Ready! At this stage, you can remotely control a worker, edit and play various files, work with office documents, use a browser to access the Internet, and much more.

Internet connection
The procedure for setting up via the Internet is not very different from the above algorithm. The only thing – in addition to the IP address, you also need a port, which is indicated along with the IP address after the colon.
Logging into the system of a paired device follows the same rules as in the previous case. No additional action is required.
From time to time, you will see tips on the screen that will help you get comfortable and further adjust any points. In the process of controlling a remote device, you can also call up a convenient submenu (move the cursor to the upper right corner), which allows you to quickly switch from one tool to another. For example, you can start recording from it or adjust the characteristics of the screen.
Configuring Nx Nomachine Server
In order to go to the settings of the utility in question, pay attention to the taskbar. After the installation process, a corresponding icon should appear there. Right-click on it and select “Show Server Status”. On this page, you can control the connection status, manage file transfers, download fresh updates, work with media data, turn off the screen, and the like.

If for some reason you did not find the mentioned icon, then you can launch the corresponding menu in an alternative way – directly through the application itself. In the “Machines” section, open “Settings” → “Server” → “Status”. Click “Restart server” and after a while check the operability of the quick access to the parameters on the OS panel.


In general, there are a lot of adjustable parameters. Of the main ones: the ability to set the launch at system startup, change the codec for displaying content on the screen and a list of devices used. You can familiarize yourself with the rest by switching between tabs.


Conclusion
Using a remote desktop is an extremely convenient and useful option. Nx Nomachine’s intuitive interface makes it easy to set up existing devices for remote control. As a result, the user gets full access to all the capabilities of the paired device, including listening to music, watching videos, editing any files, and even working with peripheral equipment, such as a printer.


We will be glad to know your opinion about this program from the comments. How do you rate the usefulness of this application? Are you having difficulty connecting? If you have something to supplement this article or something to share with other readers, then feel free to write, we will be happy to familiarize ourselves with each point of view.