You ran out of storage ? Transferring your games to the SD card, as well as your applications, is a good idea to free up a full memory.
These are 3 methods that you can apply to PASS your apps and games to the SD card. Normally you just need to go to the application manager and use the “Move” option. But we show you two other alternatives that you surely did not know, in case the first is not available.
Just be aware that when moving apps or games to SD, they may respond slow.
Contents
Article Index
- Three methods to move games or APPS to SD
- Change storage location
- Convert SD card to internal memory
- Link2SD application (ROOT)
- Part 1: Create partitions on external SD
- Part 2: Move apps to SD memory card with Link2SD
- Link2SD Plus
3 methods to move games or APPS to SD
1. Change storage location
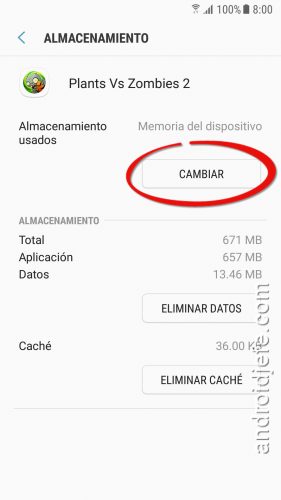
Images above: How to transfer a game to the SD card in Samsung Galaxy S7 Edge (Android 7.0)
- Adjustments
- Applications
- Choose the application or game
- Storage
- Tap on “Change”
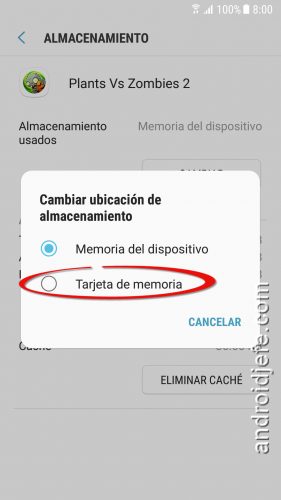
- Select memory card
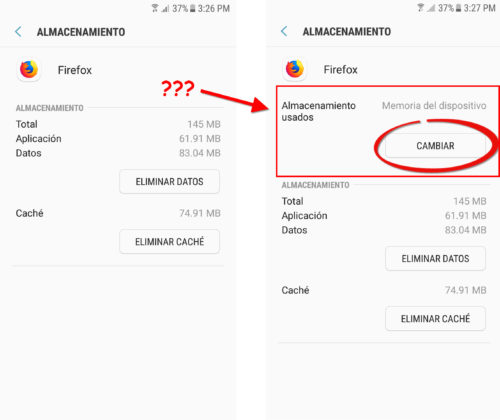
You may come across applications or games that do not have the “Change” option from step five. This may be because the creator of the app has restricted this procedure. However, some devices offer the option to bypass that restriction and force the app to move to SD. But I must clarify that when moving it in this way, in certain cases the app may not work as it should. I, for example, have had problems with notifications. Or sometimes the app may quit unexpectedly.
Such an option is found in Settings> Developer Options. There activate the option “Force permissions on external storage”. This developer menu is hidden but the link left indicates how to activate it easily.
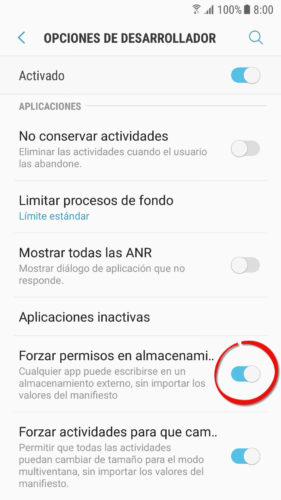
Some pre-installed or Google apps are not sensitive to this forced method and cannot be moved.
2. Convert SD card to internal memory
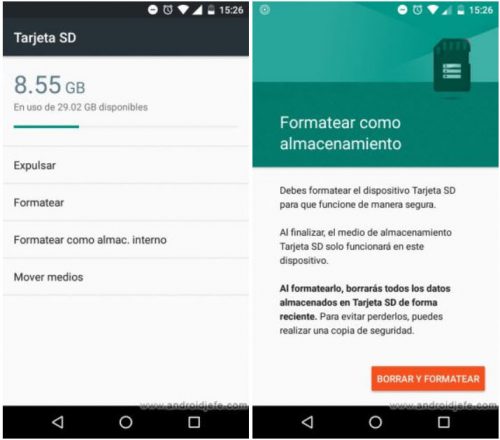
This is a function of the Android system (6 or higher). Once this process is done, the phone will give you the option to move data to the SD card, including applications and games.
- Adjustments
- Storage
- SD card
- Menu button (top right), “Configuration” option
- Format as store internal
- Delete and Format
After doing the above, try moving your games and apps independently, similar to what was said in method 1.
If this option does not appear on your Samsung Galaxy or some other cell phone, you will have to read the instructions here to force its activation.
3. Link2SD (ROOT) application

There are multiple applications of the APP2SD type on Google Play. The one that I have tried is Link2SD. Allows you to move practically any game or application to the SD card. Even if it was not possible with the previous methods. This tool “forces” your transfer.
Important : This method requires root permissions on the phone. If you don’t know what that is, please check the link on how to get that before reading the content below, otherwise you will waste your time.
Summary : The procedure is to divide the external SD card into two parts (create two partitions). The first part of the memory will work exactly like a standard SD (to save music, videos, photos, etc.). The second part will function as an extension of the phone’s internal memory. It is there where the applications and games will move. To move them we will use the Link2SD application (“Link to SD” in Spanish).
Part 1: Create partitions on external SD
This must be done on a PC using software such as Minitool, Easeus or Paragon. I am going to use Minitool on a Windows PC.
Partition 1 (the one that will work as a standard SD card) must have the FAT 32 file system. Partition 2 must have the ext2 or ext3 file system (you can use either). Both partitions must be configured as primary.
You can define the amount of memory you want to allocate to each partition, according to your needs. In my case, in my 8 GB memory (in theory. In practice it is only 7.28 GB), I have assigned 4GB to partition 1 (SD1) and the rest to partition 2 (SD2).
- Insert the card into the PC using a “microSD to SD” card adapter. This considering that your PC has a card reader. If you don’t have it, you should buy a “microSD to USB” adapter.
- Make a backup of the card data. Just open the SD on the PC and copy all the folders and files that are inside, on the computer.
- Download Minitool for Windows
- Open the Minitool software, locate the SD memory, right click and click on “Delete”. Right-click again on the same line as the SD and click on “Create”.
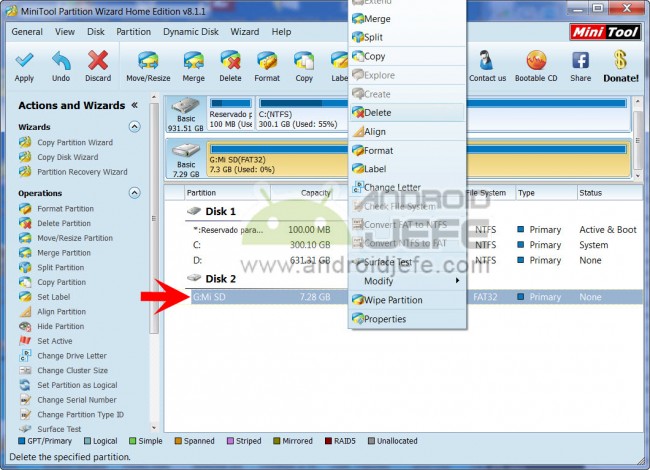
- In the next screen we are going to create the first partition with the indicated before. This is how the parameters should be configured in the software:
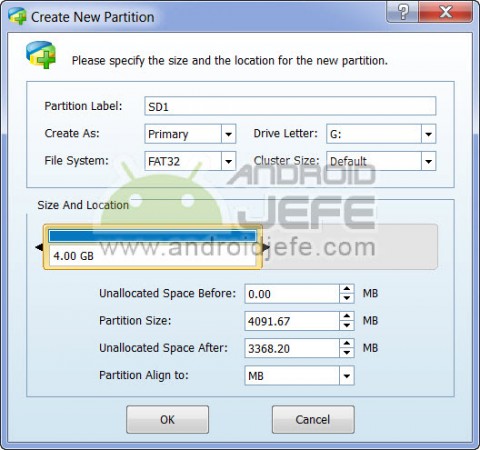
Adjust the amount of memory you want to allocate to this partition using the slider and click OK. You do not need to modify the rest of the MB data.
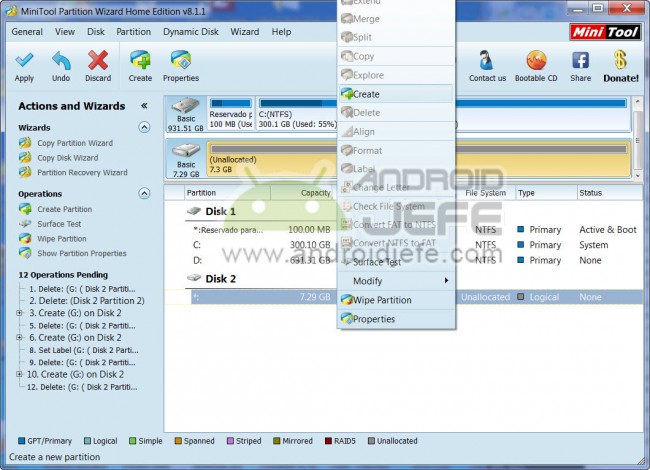
- A new line will appear under the created partition. Right click on that line and choose “Create” again. If you get a warning stating that “the new partition cannot be created and recognized by Windows”, accept it and click Yes to continue.
- On the next screen we are going to configure partition 2. This is how it should look in the software:

In this case it is not necessary to adjust the amount of memory. The rest of the memory will be assigned to this partition automatically by Minitool.
- Select with left click partition 1 and, in the left side menu of the software, click on the option “Set Active”.
- This is the most important step . At the top of Minitool, click on the option that says “Apply” (it has a go-ahead icon). If a warning comes out, accept it. Partitions will begin to be created, which may take an hour or more. Make sure the PC does not go to Shutdown or go to sleep during this process.
After the process is complete, eject and remove the memory card from the PC, insert it into the phone, and turn it on. We go to the next part and the easiest. We are almost done.
Part 2: Move apps to SD memory card with Link2SD
- Install the Link2SD app from Google Play.
- Open the app. If it asks for superuser permission, grant it.
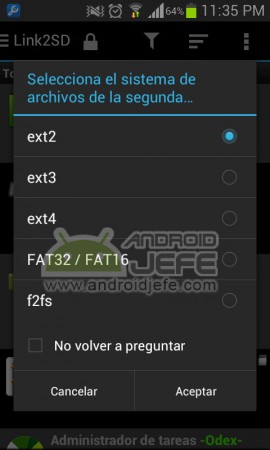
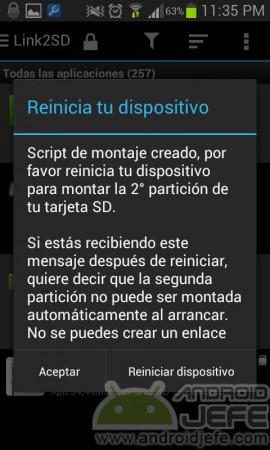
- On the screen that should automatically appear when you open the application, select the file system of partition 2 that you used when creating it with Minitool and then click on Restart device. If no such screen appears check the note below.
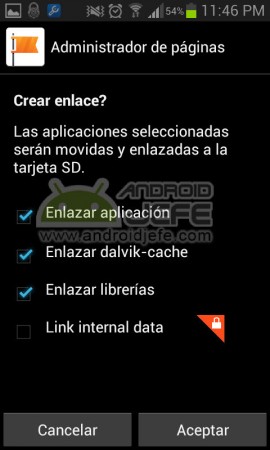
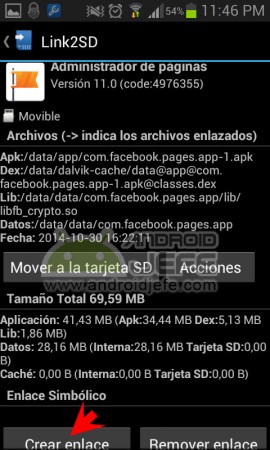
- After rebooting, open Link2SD again. Choose the application you want to move. Choose the “Create link” option, which will be at the bottom (the Move to SD card option uses the App2SD function, which is not supposed to work in our case). On the next screen leave the boxes as they are and click on OK. Once the application is finished moving to the SD card, a message will appear saying something like “Applications linked or moved to the SD card.”
Note : If you select a yellow or orange message when you select an application that says something like “Second partition not found”, it means that you probably did not create the partitions correctly. Be sure to follow all the steps outlined in the first section.
Now you can move all the applications you want to the external card (except the system applications, which are the ones that are installed from the factory on the phone). As you move applications, you can monitor how the available space in the internal memory increases, in Settings> Storage.
If at any time you need to return an application to internal memory, perhaps because you notice that it works faster when it is there, simply use the Remove link option. If you want to uninstall an application that you have moved to the external SD, you can do it in the usual way. There is no problem in this regard.
“Not enough storage space available” error when using Link 2SD
This message may appear when trying to install Google Play applications, update an application or even when installing an APK. It is an error that does not allow to install absolutely any application or game on the phone, EVEN THOUGH THERE IS A STORAGE SPACE AVAILABLE (AND ENOUGH!).
This problem occurs because Link2SD is configured so that new applications are installed on the SD card, in partition 2. Although there is space in that partition, this message that there is no space will persist.
The only solution that seems to have for this is to go to the Link2SD settings and, in the option “Installation location”, select “Internal”. Once the applications are installed in the internal memory, you can easily move them to the SD card as explained here.
Link2SD Plus
There is a paid version of Link2SD (Link2SD Plus). The great advantage of the Plus version is that it allows you to move data from the applications to the SD (user data), something that cannot be done with the free version. This is important because user data is often larger than the same application (that is the case of Facebook, FB Messenger or Pocket, for example).