
Do you need to scan a document, but don’t want to invest in a dedicated machine? Are you in an emergency faced with a paper that must be sent as soon as possible? Why not use your smartphone! Thanks to this tutorial and the ever more powerful sensors of your device, scanning documents will become a breeze.
In many ways, digital has completely killed paper. It must be said that it is superior on many levels: ecologically of course, since it does not kill a tree. But also on the practical, when it is much easier to download a book in a few seconds than to make the way to the store.
Where it becomes all the more true is in the context of administrative procedures. Although digital is coming for the government, many papers are still to be received by hand, sign, scan and send by email for more speed.
But when you are a student, or when you have to do it in an emergency for example, difficult to justify the purchase of a scanner. Why not use your smartphone in this case? It is entirely possible, and we will show you how.SUMMARY
Contents
Prerequisites
In itself, the use of this method does not require any prerequisite since it is based on the use of an Android application. However, keep in mind that this method obviously uses your phone’s photo sensor. Also, it must be a minimum performance to be able to capture a leaf. Test this method for yourself and make sure the document stays readable before sending it.
The environment in which you take this capture should also be taken into account. A dimly lit room will of course not give the same appearance as a room bathed in light. Also make sure to perform the scan on a neutral background to facilitate the work of the application.
How to scan a document with Google Drive
The easiest way is to use the Google Drive app which is already pre-installed on many smartphones. This allows much more than saving your important documents – and contains a very efficient scanning functionality!
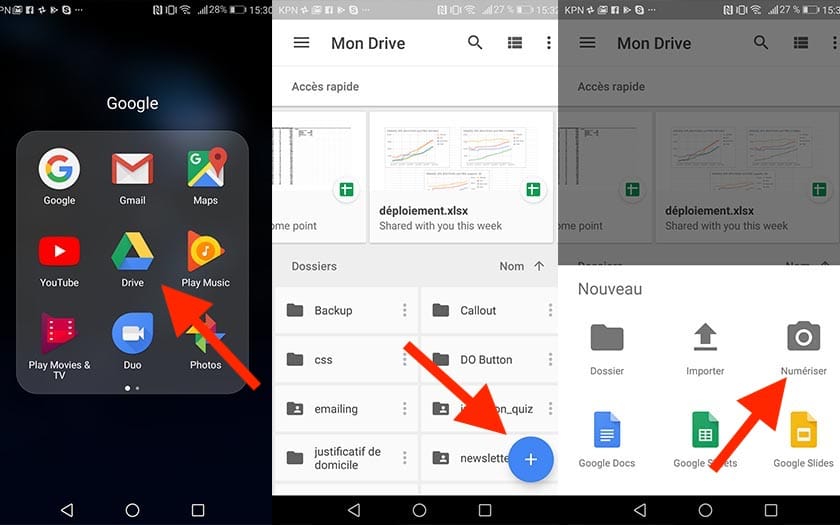
- Open the Google Drive app
- Press the + sign
- Tap Scan
The application will then request access to your camera – you must of course accept.
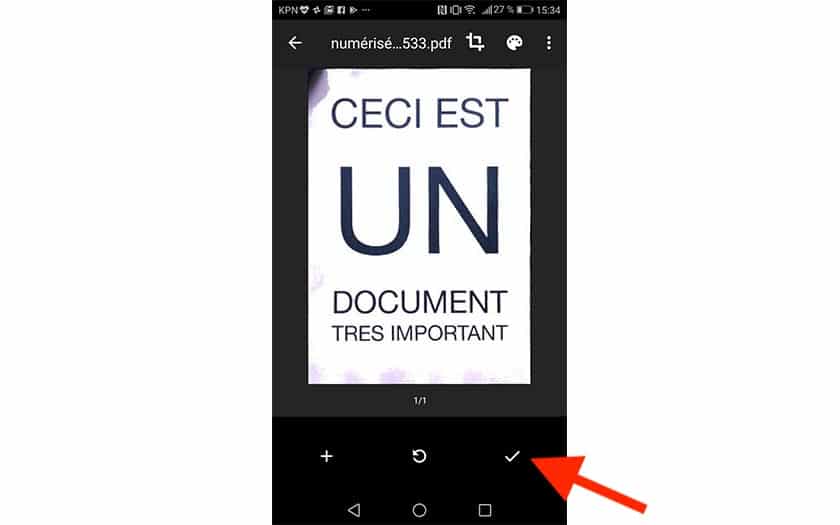
Once the document has been scanned, touch the V symbol on the right to validate and upload your scanned document to your Google Drive. It is automatically cut, the contrast is improved for easier reading, and the result is converted to PDF format. If you don’t like this scan, you can touch the middle button. Finally, to add other documents to the same PDF, touch the + symbol .
From there you can directly share your document from Google Drive. Or download it to your computer to do what you want with it.
How to scan a document with CamScanner
The other option for scanning a document from your smartphone is to use another application that provides a few more options. Here we have chosen to show you how to use CamScanner, available free on the Play Store here:
The free version will add an advertising banner on your scan. If you do not wish to have it, the paid version is available here for € 2.09 in limited promotion (usually € 4.99):
Test the application before anything else, but believe us: 2 € will quickly appear as a ridiculous sum compared to the service that the application will render you.
First launch
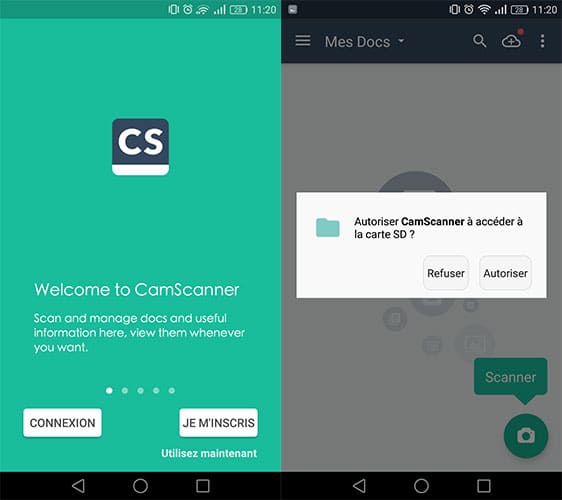
When launching the application, you will be able to create an account in order to save your scans online, for example. This step is optional, so we will not discuss it in this tutorial.
- Tap use now to skip this step
- Accept permission to access storage
- Tap the Camera icon , and accept the authorization request again
Scan with CamScanner

So here you are in the application’s scan interface. Please have a background that contrasts with your sheet, to help the app recognize it, and be in a well-lit room.
- Touch the document via your screen to best adjust the focus
- Take the picture
As with Google Drive, the rest is automatic. You can also capture in batches, to make a multi-page PDF file.
Edit capture
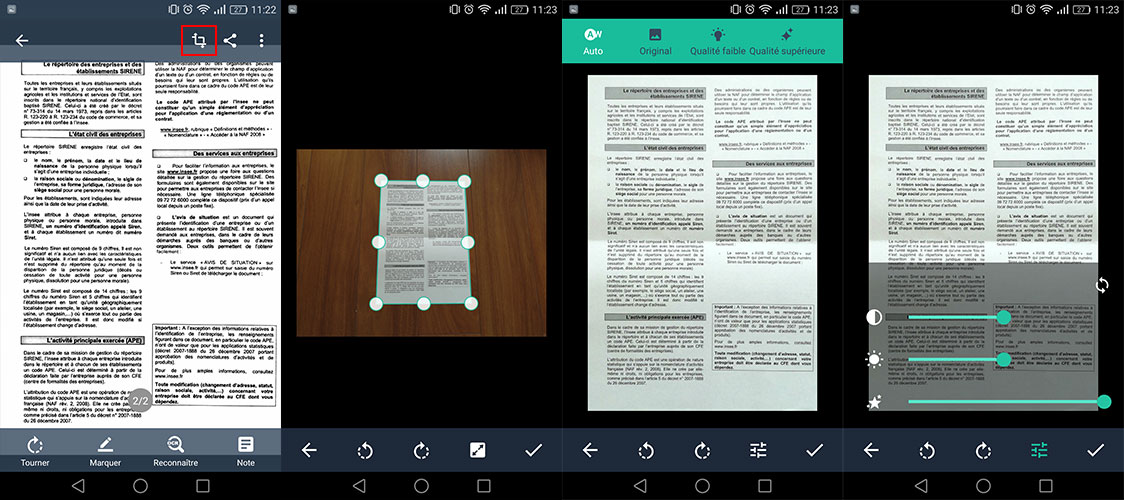
Basically, CamScanner’s performance is quite stunning. But if this one had made a mistake by automatically trimming a photo, or if you would like to touch up the contrast of your scan:
- Tap the icon surrounded by a red square in the preview (see above)
The first opening window will allow you to touch up the automatic clipping of your sheet. So, if you think the application has trimmed part of your document, you can find it here and edit it as you see fit. Once this is done, you will find yourself in the editing interface of CamScanner. At the top of the application, settings are available to you: Auto, which will touch up the contrast and brightness of the document for you to make it as readable as possible, original which will keep the source, low quality and higher quality including names are fairly ambiguous in themselves.
At the bottom of the interface, you also have the option of switching the image to the left or right, in order to find the document in its natural reading direction. By pressing the slider icon, you will have access to much more precise settings: those of contrast, brightness and finally details. Be careful to manage your balance between brightness and contrast, so that the document is readable without erasing certain elements of the document.
Scanning a document: some alternative applications
You already knew the two solutions exposed above and want an alternative? These are very numerous on the Play Store! Here is a non-exhaustive list of applications dedicated to free scanning worthy of the name:
- Office Lens
- Adobe scan
- Genius scan
And there you are, you’re ready to send it all to your bank, the state or whatever! You didn’t think your smartphone could be used like this, did you? These small devices know how to cope better than we think!