When GPU rendering came to Android, it was unreliable, to say the least. The official purpose is to improve application performance, but back then many graphical user interfaces did not know how to work with GPU rendering. In some cases, it was even slower than software rendering.
Over time, especially after the release of Android 4.0, the GPU became more reliable and gradually became the default for most applications. Now, most of the updated applications have the GPU rendering encoded in their builds.
But before we get to the bottom of how and when to activate this option, let’s find out how it works.
What is GPU Rendering?
The GPU is the Graphics Processing Unit. At its core, it is very similar to the CPU, but instead of doing calculations and performing tasks related to the operating system and hardware, the GPU handles graphical information. In other words, put things on the screen for your eyes to see.
Although the CPU is perfectly capable of handling graphical instructions, doing so will take up time to do other things important to the system, which can lead to lag. Furthermore, the way CPUs are designed makes them quite inefficient at processing graphics data, compared to GPUs that are programmed to handle graphical information.
This is where GPU rendering comes in, removing the graphics processing part of the CPU, freeing it up for more important tasks. Since the GPU is much better with graphics data, the end result is better performance for both the CPU and the GPU.
When to force GPU rendering
Enabling this setting will download window components such as text, buttons, and 2d graphics calculations to the GPU. This will make your device render UI animations better and feel less laggy. While it is true that you will achieve a smoother experience and a better frame rate in 2d applications, your device may end up using more battery. GPUs are known to consume more power than CPUs, so expect to see a 10-15% reduction in battery life if you leave it on all the time.
Forcing GPU rendering definitely makes sense on devices with a weaker CPU. If your device is anything less than a quad-core, I would recommend that you leave it on at all times.
But keep in mind that rendering on the GPU is only efficient with 2d applications. Large games that use 3D graphics can have lower frame rates with Force GPU Rendering enabled. The good news is that most versions of Android will not interfere with 3D applications and will only force GPU rendering in 2d applications that do not use it by default.
Since most new apps already have this option enabled in their code, you may only notice considerable differences when navigating through the phone’s menus. Your device will feel more agile and display information on your screen faster than it used to. Sure, some old or poorly made apps will achieve higher frame rates by forcing the GPU rendering, but those cases are rare.
In short, it’s up to you to decide if you want to trade the battery life for more fluidity and some extra frame rates. With this in mind, here is how to enable Force GPU Rendering.
How to enable force GPU rendering
- Go to Settings and scroll to the bottom.
Note: If you see an entry called Developer Options, tap on it and skip to step 5.

- If you don’t see the option, tap About phone (About device) and look for an entry called Building number.

- Tap on Build Number 7 times until you get a message saying »You are now a developer«.

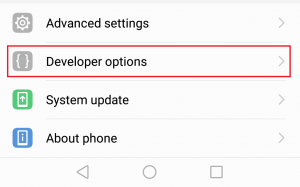
- Go back to Settings, scroll down and you should be able to see a new option called Developer options. Tap on it.
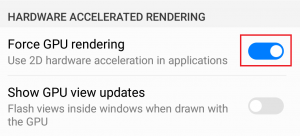
- Scroll down to Hardware Accelerated Rendering and enable the toggle next to Forced GPU Rendering.