To expand the signal of the WiFi network in your home you have several alternatives. The simplest is to relocate the router to a position that better covers the area where there is no signal, buy a signal repeater (easy to install, although it can generate instability in the network), buy another more powerful router or a system « WiFi mesh »(also easy to install, although more expensive but with better reliability), increase the power of your current router (reliable but somewhat technical to do) and perhaps the most technical, convert any old router that you have out there into a repeater (cheap, but with a similar disadvantage as a commercial repeater).
Generally, the two most common ways in which one router can repeat the signal of another is the “Access Point repeater” mode and the WDS ( Wireless Distribution System ), bridge or bridge repeater mode . Both will allow you to extend the signal of your main router, but the advantage of the second mode is that you will have the possibility to link both routers so that the devices can roam data , WiFi roaming or jump between them automatically depending on which one offer more signal, although this does not work well on many Android devices, as we will see later.
To configure your secondary router in WDS mode you will have to enter its internal configuration and make some changes, and possibly also make others on the main router. The manufacturer TP-Link has a good and detailed tutorial on how to configure WDS in this brand of routers, on which I have relied to configure my own routers of this brand and do this tutorial based on what I have been finding. The process should not be much different in other brands of routers or firmwares in them.
Contents
Requirements :
- This is a relatively technical article and you should have a basic understanding of some networking or networking concepts.
- It is recommended that both routers involved have a CPU or chipset made by the same manufacturer. This should improve link reliability, according to the creators of the DD-WRT firmware.
- The secondary router must be within range of the primary router.
- You must have the access data to the routers on hand: your IP, username, password, WiFi network and password. In the case of the secondary router, we will need its default data, which must be on the label affixed somewhere on the computer.
- Just in case you also have an internet cable on hand.
- In addition to the WiFi network name and password, you must also know the type of security and channel that the main router uses. With the exception of the password, you can obtain this information with a WiFi analyzer app like this one. The primary router may have an automatic channel configured. In that case you will have to change it to a fixed channel. If both routers are not on the same channel, WDS will not activate (unless you use DD-WRT, as I explain below).
- You will need to adjust the DHCP of the main router, to leave at least one IP available or not variable for the secondary router. That is, assuming that your main router has an IP of 192.168.0.1, you can set its DHCP address range from 192.168.0.2 to 192.168.0.250. So you can establish the secondary router with an IP 192.168.0.251, for example. This is necessary to prevent this IP from this “bridge” router from being assigned to another device by the DHCP of the main router.
How to configure WDS on the secondary router
1. Connect the secondary router to the power supply and reset its factory settings, holding down the Reset button that is usually on the back, next to the connectors, for about 10 or 20 seconds. The router lights usually turn on and off after this process.
2. Connect to the router’s WiFi network, which must have its default name and password. If you are successful, proceed to the next step. Otherwise, you will need to connect a PC to the router with the Internet cable and configure the IP of the PC in the same range as the default IP of the router. In other words, if the IP of the router is 192.168.0.1, you must configure your PC with the IP 192.168.0.2 (you can also replace “2” with any other number up to 255).
3. Open the web browser of the equipment connected to the router, enter the default IP address of the router in the URL bar. A page should appear where you must enter the username and password for access (requirement “4”).
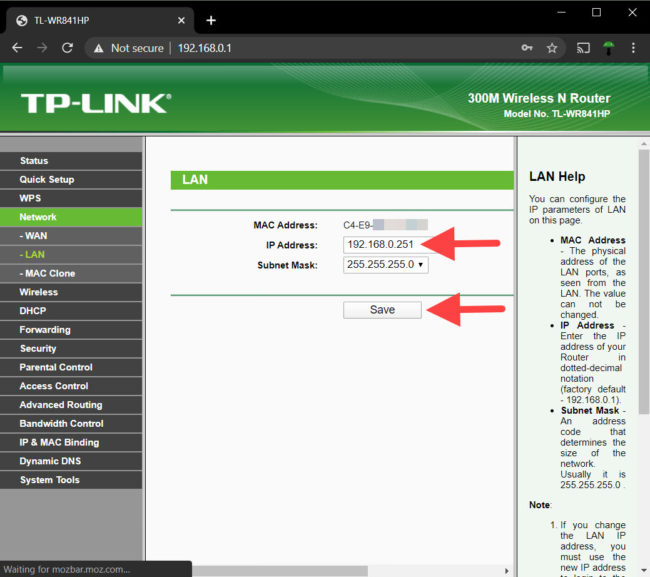
4. Once inside the router’s configuration page, in the “LAN Configuration” or “Network> LAN” of the secondary router, you must put an IP that is in the same range as the IP of the main router, but outside the DHCP range, as I explained in requirement “7”. Click on “Save” to save the changes (you must repeat this with every change you make).
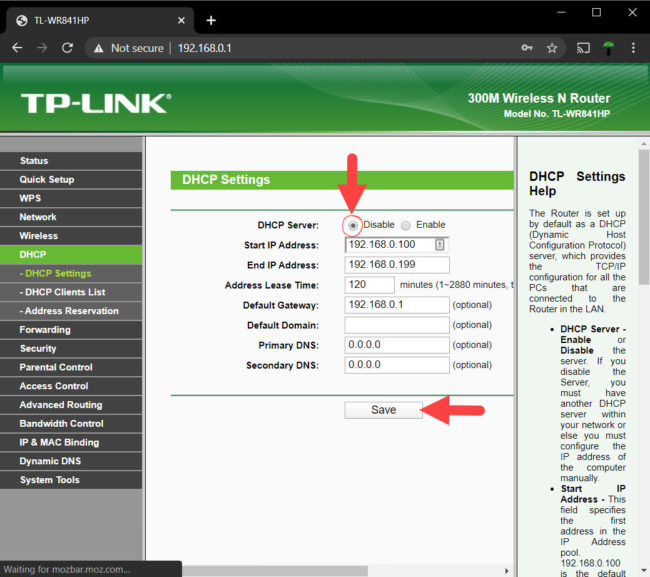
5. In the “DHCP” configuration of the router, you must disable the DHCP server, since this secondary router will only repeat the signal and the “data” of the main router.
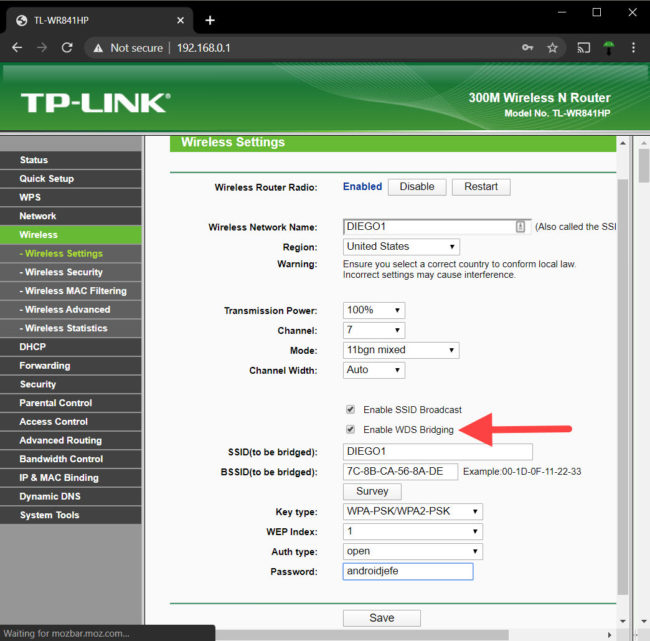
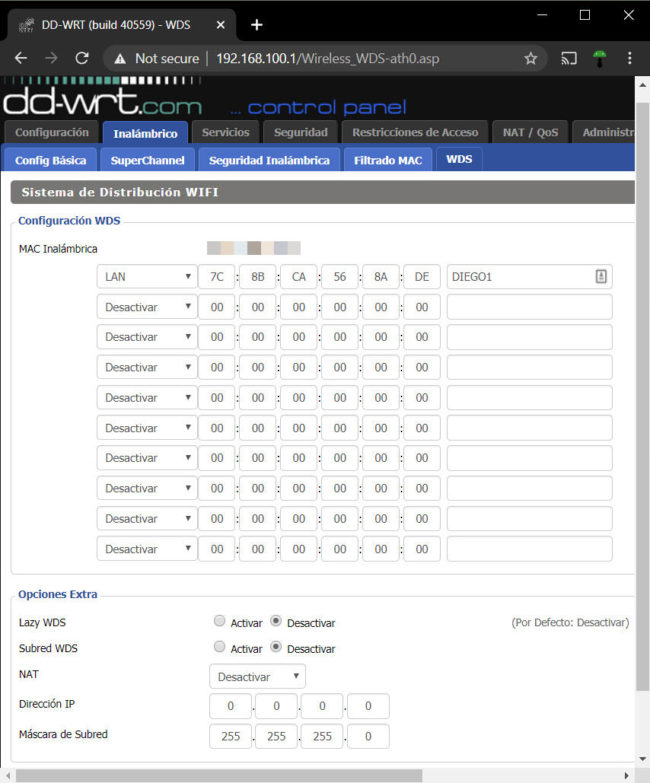
6. In the “Wireless” or “Wireless” tab, you must fill in the data of the WiFi network that this secondary router will generate. As I said in requirement “6” you must put the same data of the main router, that is, network name (SSID), password, security and channel to be able to roam WiFi. On the same screen you will find the WDS Bridging option , which you must leave checked. Below you will have to fill in the data of the WiFi network to which the router is going to connect, in this case the data of the main router. You can use the “Survey” option so that the router detects the signal from the main router and “copies” its data, except for the WiFi password that you must fill in on your own.
7. Restart the secondary router. Since you changed your IP (step 4), you may lose access to its settings. If this is the case, you will have to reconfigure the IP of the computer from which you are connecting to match the range of the new IP of the router.
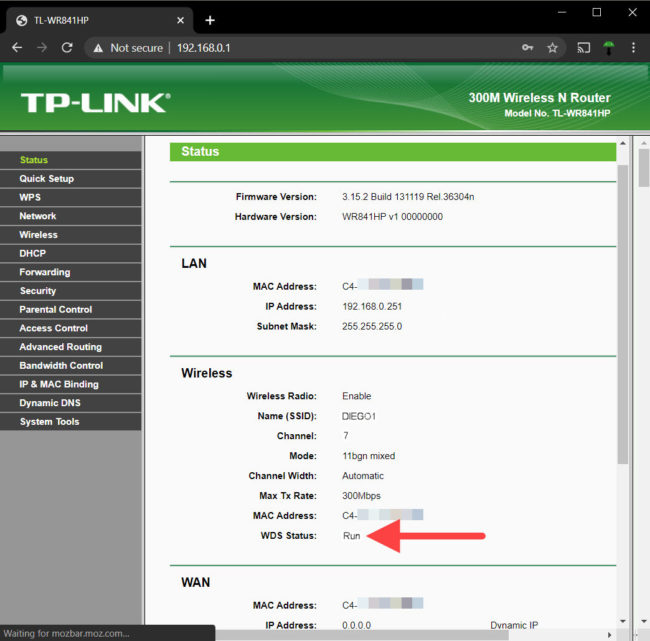
8. You can check in the router status, WDS Status, that the main router appears, or that it says active or “Run”. Another way to check a successful link between both routers is to ping the secondary router from a machine connected to the main router.
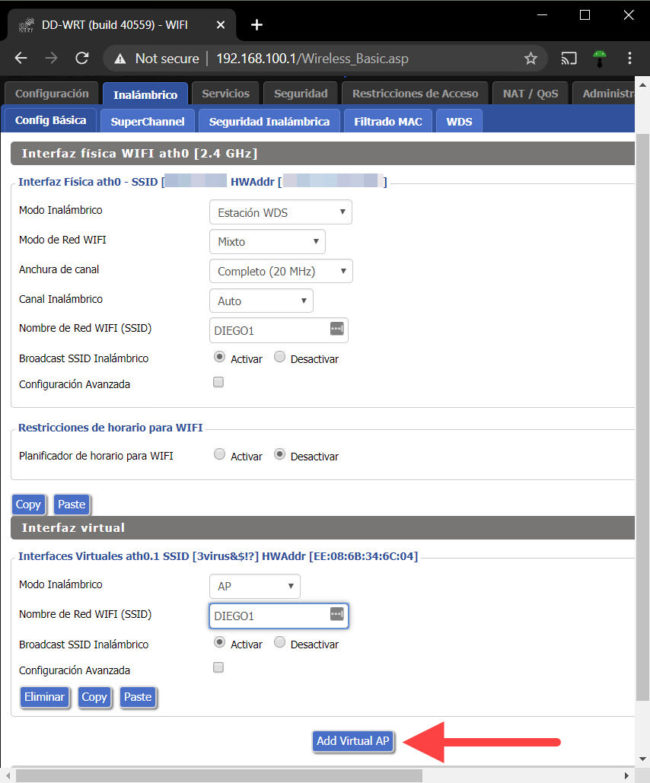
If just in case the secondary router has the DD-WRT firmware installed, on the configuration screen of your WiFi network you must add a virtual interface from the “Add Virtual AP” button with the data you want for the WiFi network, which should be the same SSID and password as the primary router. If you do not do this, the WiFi network of this router will not be generated and you will not see it.
How to configure WDS in DD-WRT
Roaming WiFi
If you have successfully linked, you will surely want to try WiFi roaming. You simply have to physically move from one router to another. Your device should show a good amount of signal at both points. If it shows a weak signal on one, then roaming is probably not happening. Turning WiFi off and on again should force a hitch to the nearest point. Sure, that’s not how roaming works. It should be automatic, but the fault is not with the routers, the WDS or its configuration, but Android. Roaming or automatically connecting to the most powerful signal from an access point is a matter for the customer to decide, in this case your cell phone, and Android devices do not make this change or at least do not do it correctly (with certain exceptions) . This does work very well on iPhone (tested on iOS 11.1.2 ). There are also reports that it works well on Windows.
To force roaming on Android there are applications such as WiFi Roaming Fix , which unfortunately in my case does not work and I had to open the app to change the network. It does not work WiFi Strongest Signal , a “simple” version of the above. Some teams have the option of ” WiFi Roaming ” in developer mode, which unfortunately I do not have on my Samsung Galaxy S7 and I have not been able to test.
Disadvantage
My internet connection was down when I was doing a WDS between a TP Link WR940N and a TP-Link WR841HP, both with a processor or SOC from the same manufacturer (Qualcomm Atheros) and the official firmware. It is difficult for me to explain the cause of this, but I solved it by changing the official firmware of the secondary router for the DD-WRT firmware. The WDS setup procedure is similar, but this firmware has an important option called STP that should be activated. I assume it was one of the factors for the problem to be solved.
Another potential cause for the link or connection to drop when using WDS is using a congested channel in the zone. And here is another great advantage of DD-WRT to reduce that congestion or interference: it can work in WDS with a channel configured in automatic mode, regardless of the channel that the main router has (which can also be in “Auto”), which The original TP-Link firmware does not allow as explained above.
Possibly using AES encryption instead of TKIP in WPA security can improve performance and reduce the probability of link failure.
References : TP-Link (WDS Tutorial); DD-WRT: 1 (repeater modes), 2 (WDS configuration); Secure Technology (WiFi Roaming)
Increase the WiFi signal by installing other firmware on the router
How to open ports on your router so that you can access or “see” you from the Internet
How to fix a SLOW Internet service
Receive updates: SUBSCRIBE by email and join 10,000+ readers. Follow this blog on Facebook and Twitter.