If you cannot surf the Internet despite having a balance, credit or an active mobile data plan, you probably need to configure the APN on your cell phone.
The APN ( Access Point Name or name of the access point ) is information that must be entered correctly in the settings of the device so that it can engage in the network of the operator and to have mobile internet (3G / 4G).
The APN values vary from one operator to another and from one country to another. However, you don’t need to know them since there is a trick that allows you to load the correct data from your operator’s APN in a few taps. Although you can also enter the data manually, in case that method does not work.
Contents
How to configure the APN
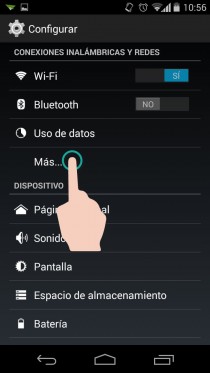
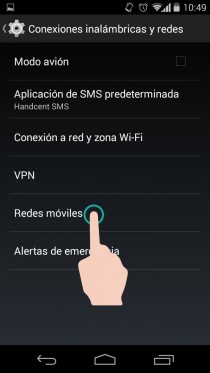

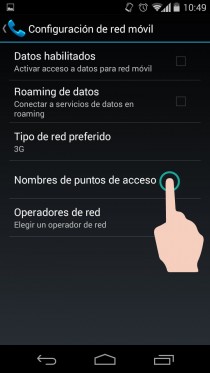

To configure the APN on Android, go to:
- Android system settings
- Wireless Connections and Networks
- Plus
- Mobile networks
- Access point names
- Tap the “+” button at the top to create a new APN.
- Fill the APN values with the correct data.
The values must be requested from your operator. This is the most reliable, because if you search the Internet it is likely that you will find outdated or imprecise information that will not allow the cell phone to hook into the network.
It is possible that the operator can send you the settings in an SMS, so that when you touch on it, the settings are established and you do not have to do anything else. If you use a new SIM, this SMS usually arrives automatically.
Trick to automatically configure the APN
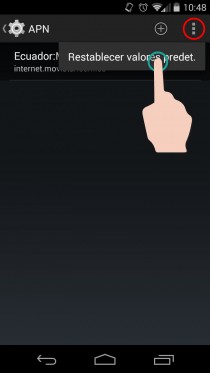
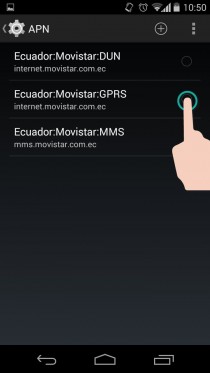

As we said at the beginning, there is a way to avoid manually configuring the APN in the way indicated above. Once you have reached step 6 in the above procedure, do the following:
- Tap on the menu button (top right).
- Select the Reset Defaults option . This will load the correct APNs from the operator you are hooked to.
- Finally, leave the APN that refers to “internet”, “3G / 4G” or “GPRS” checked. That is the APN that must be used for the mobile internet. Ignore APNs that say MMS or DUN / Tether.
Don’t forget to activate mobile data.
Whatever method you have followed, that is all you will have to do. Finally, activate the mobile data on the phone ( Configure > Wireless and Networks > More > Mobile networks > Mobile data ). If everything is fine, it should be possible to surf the internet by the operator (disable WiFi to check that this is the case).
Additional settings on DUAL SIM phones
These phones have an independent control for each SIM. In other words, each chip manages its own mobile data connection.
In addition to configuring the APN on the desired SIM (which we already mentioned above) and activating mobile data on that SIM, it may be necessary to configure the following:
1. Activate the appropriate Network Mode
Enables the GSM / WCDMA mode (automatic mode) in the SIM that will handle the internet. Activate the GSM Only mode on the other SIM.
This is done at: Configure > Wireless & Networks > More > Mobile networks > Network mode .
2. Select the SIM to be used by the mobile data connection
Configure > My device > SIM card manager > Data service network .
APN of Movistar and Claro Ecuador
As of the date of this article, these are the APN data for Movistar and Claro Ecuador. These are only necessary if you have had to configure the APN manually . It is important to clarify that these data vary from operator to operator and from country to country.
APN Movistar Ecuador
Name: movistar INTERNET
APN: internet.movistar.com.ec
Proxy, Port: Not defined
Username: movistar
Password: movistar
APN Claro Ecuador
Name: Claro Internet
APN: internet.claro.com.ec
Proxy, Port: Not defined
Username: Not defined
Password: Not defined
For both operators, the rest of the fields do not need to be modified. They should remain as they are, that is:
Server, MMSC, MMS proxy, MMS port: Undefined Service
provider: empty
MCC: 740
MNC: 00
Authentication type: None (For Movistar, you could also try “PAP” instead)
APN type: default,
supl APN protocol: IPV4
Carrier: Not specified
Network operator type: None
Network operator value: Not defined
APN CNT
APN: internet.cnt.net.ec
Apparently in this case you just have to save this data. It has worked correctly on an HTC One M9 and the operator says to do it this way on the iPhone.