
The Free network is down due to problems encountered with the operator’s DNS servers. To be able to surf the internet while waiting for the ISP to correct the problem, you will have to change the DNS servers. We explain how to modify the DNS servers on an Android smartphone in this tutorial.
Web browsing as we know it would be nonexistent without the DNS (Domain Name System) servers . Domain names allow Internet users to go exactly where they want to go by giving a unique identity to each website. However, the web browsers and servers to which they refer can only interpret the IP addresses specific to each website. Difficult for the internet user to memorize blocks of numbers.
For a more humanly convenient experience, the DNS servers are used to convert the classical domain names entered by Internet users into IP addresses capable of being interpreted by computers. Because you do not have to stay on your operator’s default DNS servers, you can change them.
Changing DNS servers can be particularly useful during a failure . Since last night, Free subscribers have been struggling to access the internet due to problems with the operator’s DNS servers. This failure greatly slows down or prevents access to websites. If this is the case, we advise you to change the DNS by following this tutorial.
How to change the DNS servers on your Android smartphone?
DNS servers can also serve as filters or parental controls, preventing access to certain categories of sites. This is the case for some OpenDNS servers, for example. This is also a reason that can lead to changing the DNS on an Android smartphone. The system only allows you to change the DNS for WiFi networks.
Here is a non-exhaustive list of the best DNS servers:
- Google: 8.8.8.8, 8.8.4.4
- Cloudflare: 1.1.1.1 1.0.0.1
- FDN: 80.67.169.12 and 80.67.169.40
- DNS.Watch: 84.200.69.80 and 84.200.70.40
To change the DNS servers for WiFi connections on your Android smartphone , follow these steps:
- Long press on the WiFi icon by scrolling down the notification bar. You access the WiFi settings.
- Connect to an available network. Then make a long press on it.
- In the contextual menu that opens, press Change the network or Change the network settings .
- Select Show advanced options .
- Change the IP Settings option from DHCP to Static. It takes a static local IP address to modify the DNS servers
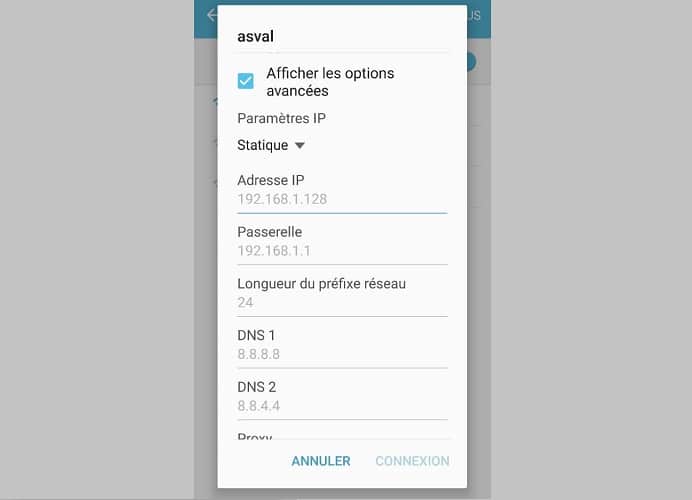
- Enter an IP address or keep the one proposed by default.
- In the DNS 1 and DNS 2 fields, enter the DNS of your choice and then save the changes.