The appearance on the market of the RT-AC51U router from ASUS is an attempt to correct the errors of the previous model with a higher index (RT-AC52U), which, although it had good functionality, was not sold very actively due to its high price. The router really turned out to be more affordable, with practically the same characteristics as its predecessor.
Contents
Description and specifications Asus RT-AC51U
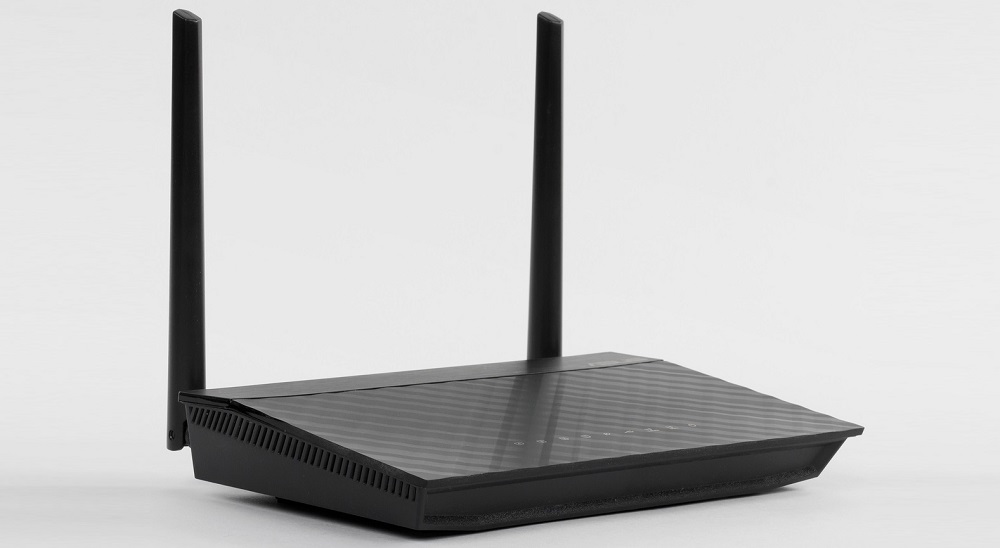
In terms of design, the manufacturer decided to keep the corporate “diamond” design, which really looks quite attractive. Many users first of all pay attention to the number of external antennas, believing that the more there are, the better the wireless connection will be. This model has two of them, but there is also an internal one, which has a slightly lower gain.

In addition to antennas, the rear panel contains 5 Ethernet ports (one of them is WAN), a USB 2.0 port, power buttons, WPS and a recessed one for factory reset. The location of the USB port in the center cannot be called successful – for some devices an extension cable may be required.
In terms of speed parameters, the Asus RT-AC51U router is fully consistent with its older brother: 100 Mb / s for wired connections and up to 433 Mb / s for wireless ones. The Wi-Fi transmitter is able to operate in two bands, which is important if the 2.4 GHz band is very noisy, which is not so rare.
Among the features, it is worth noting support for IPTV, and with the ability to allocate a separate port for set-top boxes. Support for UDP proxies and Multicast broadcasts is also announced. The volume of the device’s RAM is 64 MB, the rewritable flash memory is 16 MB.

Key features of Asus RT-AC51U:
- support for the 802.11ac standard;
- max speed in the 2.4 GHz range – 300 MB / s;
- max speed in the range of 5.0 GHz – 433 MB / s;
- speed of 4 LAN and one WAN port – 100 MB / s;
- internal antenna gain of 2.4 MHz – 3 dBi;
- gain of external antennas 2.4 / 5 MHz – 5 dBi;
- transmitter power –19 dBm.
Setting up the Internet on Asus RT-AC51U
Since the router is shipped with factory settings, for it to work correctly with a particular provider, you will need to enter the parameters via the web interface, first connecting the router to the input cable of the service provider and to the computer using the supplied patch cord.

If this condition is met, we launch any Internet browser on the computer and enter the numeric (192.168.1.1, it is easier to remember) or symbolic (router.asus.com) address to enter the administrative panel of the device in the address bar.

A page with a request for authentication will appear, the default administrator login and password are admin / admin, they are indicated on the router label in case you reset the settings to the factory settings.
If this is the first time you turn on the router, the Quick Internet Access Setup Wizard will start. You can use it, or you can go directly to the fully functional menu of the device.
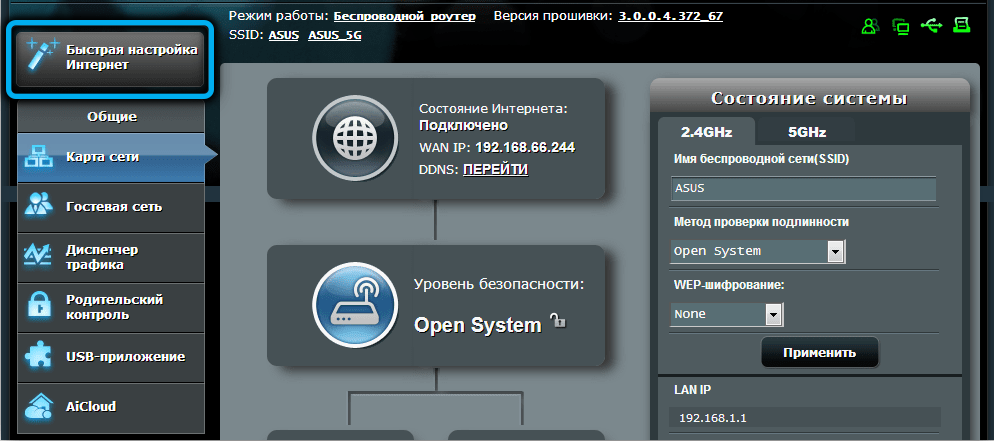
The main parameter that determines all subsequent actions is the type of connection, which can take different values and which is indicated in the provider agreement. Let’s consider all possible options.
PPTP setup
Of the major Internet providers, this protocol is used by Beeline.
Step-by-step instruction:
- on the main page of the web interface, go to the WAN tab (or “Internet”, depending on the firmware version);
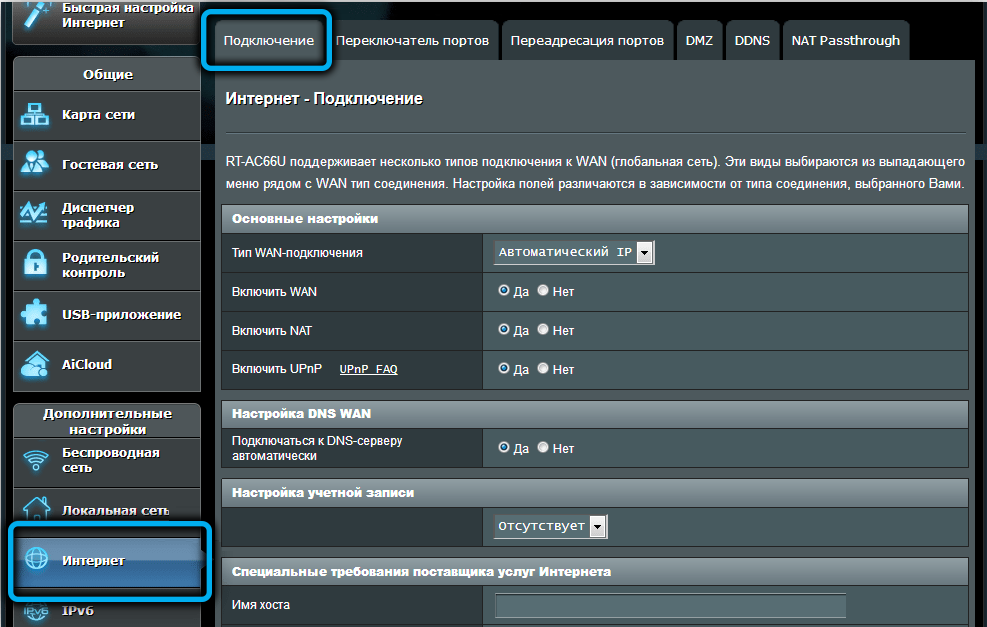
- in the settings block, in the “Type of WAN connection” field, specify the PPTP value;
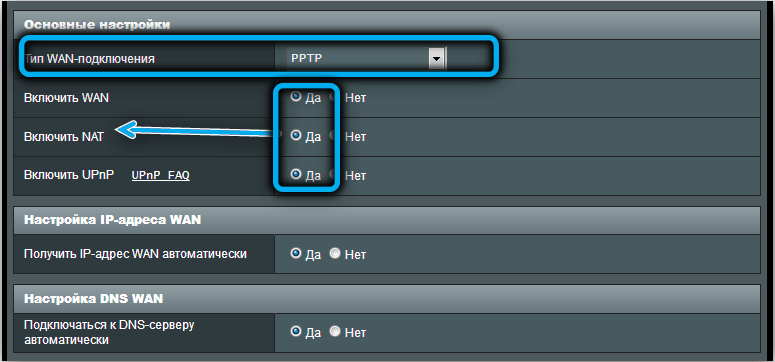
- in the field “Obtain an IP-address automatically” indicate “Yes”;
- we make a similar setting for the “Connect to DNS server automatically” field;
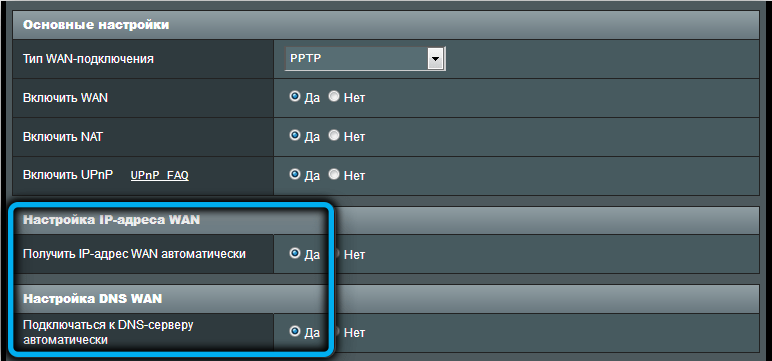
- we enter the data provided by the provider for authorization on their server (name and password are specified in the contract);
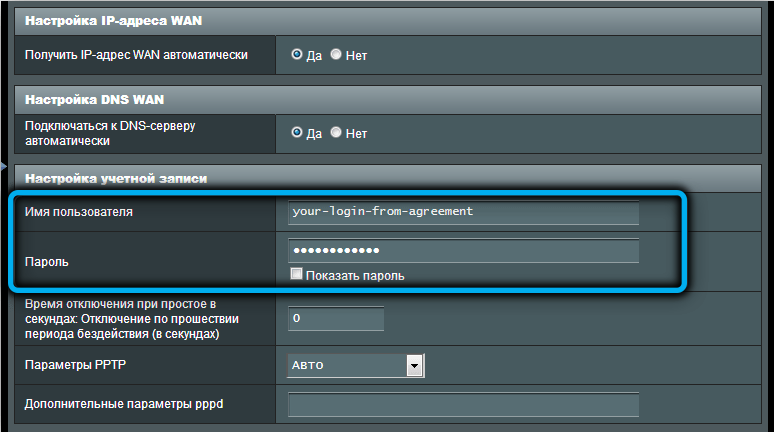
- we also enter the VPN server address provided by the service provider;
- in the “Host name” field, write the name of the connection (any, only it did not contain Russian letters);
- press the “Apply” button.
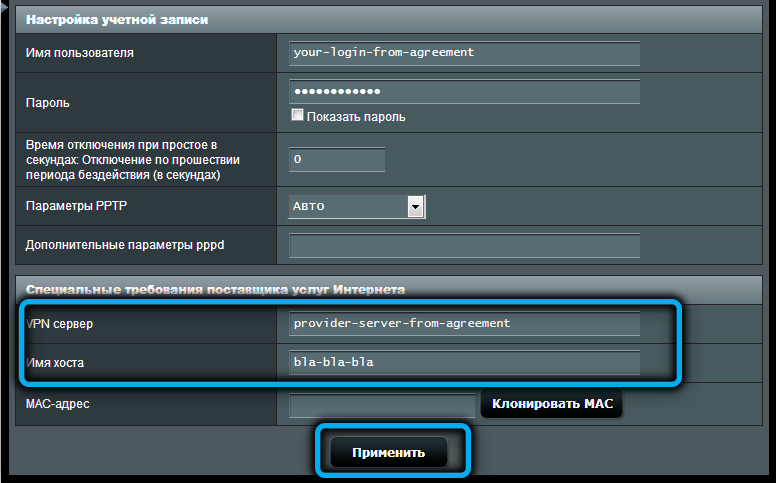
If your local ISP provides PPTP access with a static IP address, the procedure will be slightly different:
- the first two steps are similar: go to the “Internet” tab and specify the required type of connection;
- in the fields where we indicated “Yes”, now you need to put down “No”;
- in the “IP-address” field, we indicate the static IP that the provider provided to you (as a rule, you can connect this service later and refuse it at any time);
- we also prescribe the parameters “Subnet mask”, “Main gateway” “DNS server 1”, if there is data on the second DNS server, enter them too, this is a fallback if the first one turns out to be inoperative);
- then we again write the name and password provided by the provider, and also indicate the address of the VPN server;
- come up with and drive in the host name;
- press the “Apply” button.
L2TP configuration
Consider the instructions for connecting Asus RT-AC51U via L2TP, which is relevant for the same Beeline or the capital provider Avelacom:
- select the “Internet” tab on the main page;
- in the “Connection type” field, specify the L2TP value;
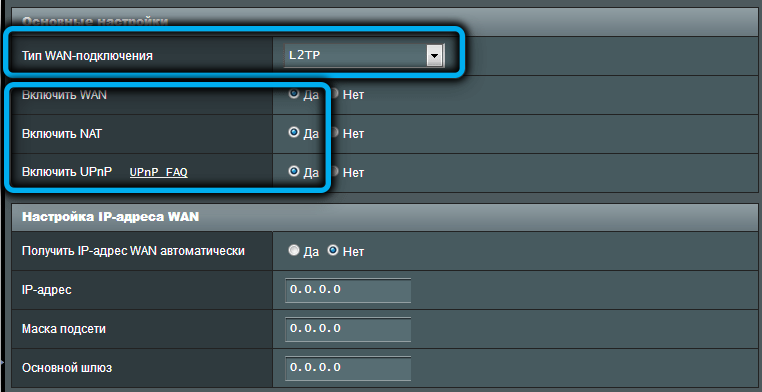
- for the field “Obtain an IP address automatically” and the “Connect to DNS server automatically” located below, specify the value “Yes”;

- enter the provider’s username and password (we remind you that these are not the values indicated on the device label);
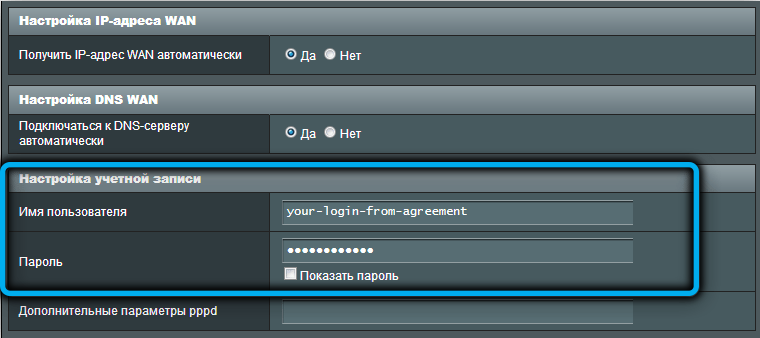
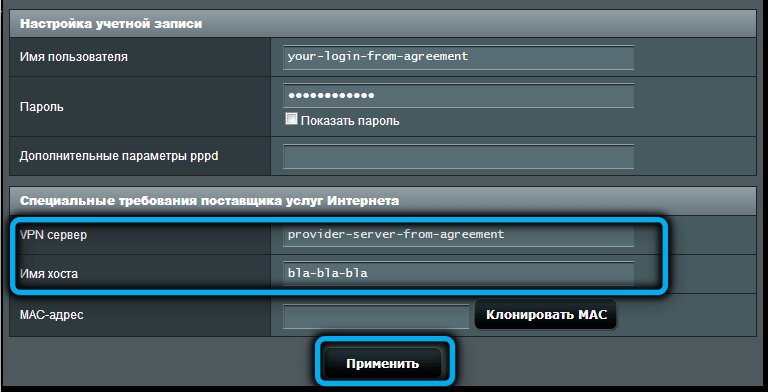
- enter the value of the VPN server address (for Avelacom it is 95.143.0.247 or l2tp.avelacom.ru);
- specify an arbitrary hostname;
- press the “Apply” button.
If you need a static IP address (for legal entities it is provided automatically), the Internet connection scheme will be slightly different: in the fields “Obtain an IP address automatically” and “Connect to a DNS server automatically” the value “Yes” should be replaced with “No” “And additionally specify the” IP address “parameters, specify the subnet mask and the addresses of the primary and secondary DNS servers provided by the provider.
PPPOE setup
Now let’s consider how to connect an Asus RT-AC51U router to the Internet using the fastest and most widespread PPPOE protocol today:
- in the “WAN” tab (“Internet”), in the “Connection type” field, select PPPOE;
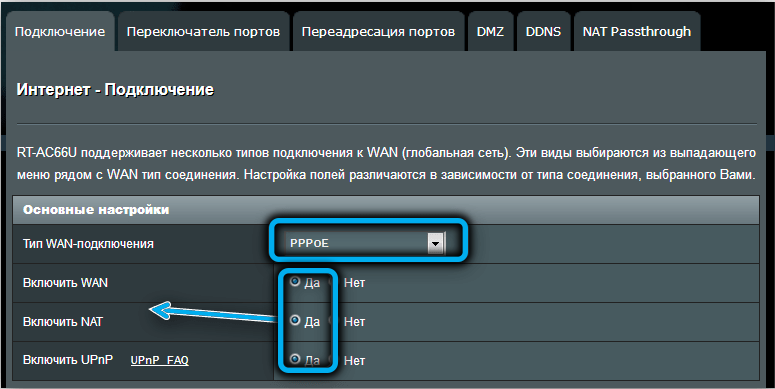
- specify “Yes” for the “Obtain WAN IP address automatically” parameter if you are not using static addressing;
- “Yes” must also be specified for the “Connect to DNS server automatically” parameter;

- we enter the login and password provided by the provider of access to the network, prescribed in the contract;
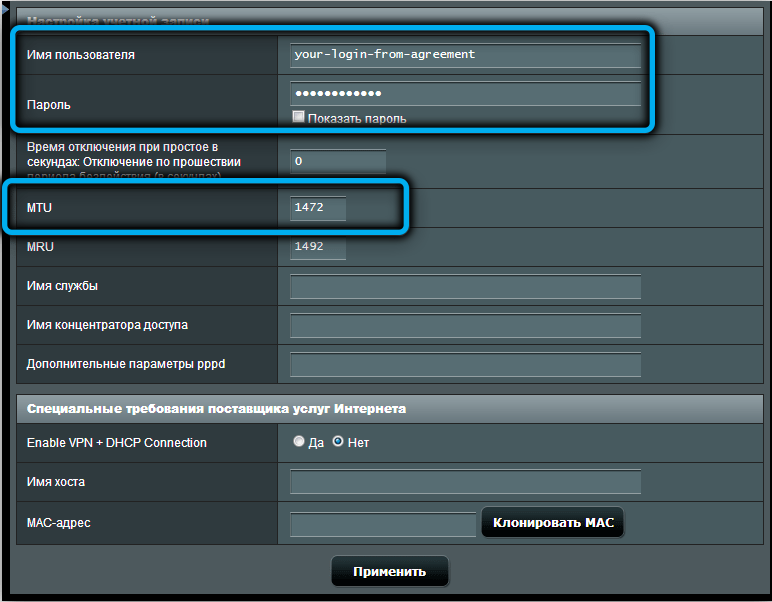
- you do not need to enter the IP-server address, since this protocol is able to detect it automatically;
- press the “Apply” button.
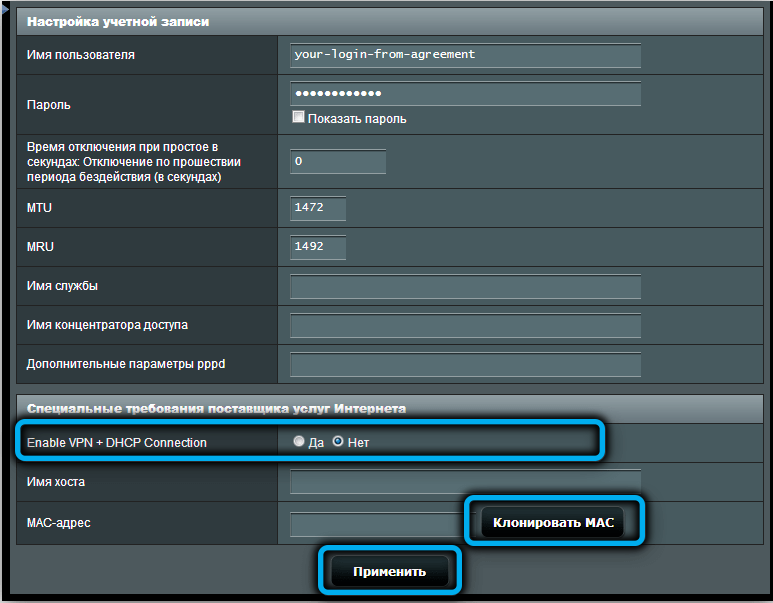
If you use a static IP-address (for individuals the service is paid), then for the fields “Obtain an IP-address automatically” and “Connect to DNS-server automatically” you need to set the values ”No”, and in the field IP-address specify the one provided by the provider permanent IP address of the server, also filling in the fields “Subnet mask”, “Main gateway”, primary and secondary DNS. You also need to specify the login and password.
Note that for any type of connection, entering a username and password may not be required if the provider uses a connection with binding to the MAC address of the router, although some, for greater security, practice both methods of identifying the connection.
Some providers use the “Dynamic IP” connection type, which also does not require a username and password (“Beeline”, “Online”). In such cases, connecting the router to the wire from the provider is enough to raise the Internet.
Configuring an Asus RT-AC51U router for distributing Wi-Fi
If you did everything correctly in the previous section, after pressing the “Apply” button on the front panel of the router, the blue WAN indicator (symbol of the globe with a satellite orbit) should light up. This will indicate that the device is connected to the Internet, which can be checked on the computer. But that’s not enough for wireless devices, so the next step is to set up your home Wi-Fi network.
This can be done through the same web interface. Strictly speaking, you don’t need the Internet to set up wireless access, but without it, such a connection will be meaningless. In other words, you can start by setting up your home network, so that mobile devices can connect, but without access to the Internet.
The Asus RT-AC51U is a dual-band router capable of operating in the 2.4 and 5 GHz bands. The lower frequency is usually more noisy, and most wireless devices work on frost. The 5 GHz band is characterized by a higher data transfer rate, but a shorter range, and besides, not all gadgets support it.
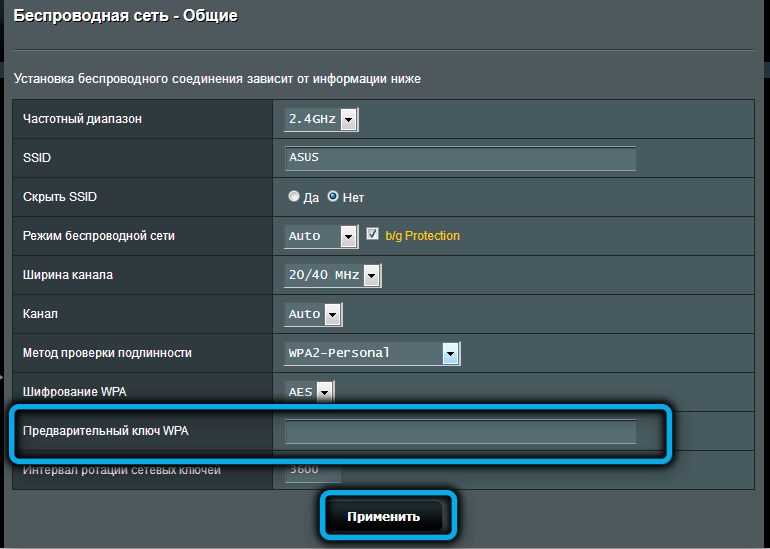
But it is better to configure both networks, and on the end devices choose what will work best. First, let’s look at the Wi-Fi setup algorithm on the Asus RT-AC51U router for the 2.4 GHz frequency:
- go to the “Wireless network” tab;
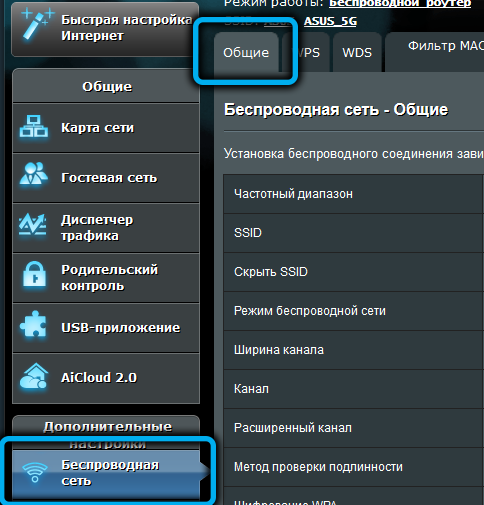
- in the right window in the top menu, select the “General” tab;
- in the “Range” field we indicate 2.4 GHz;
- in the “Network name” field, enter the name that will be displayed on mobile devices when searching for available networks;
- the Hide SSID field is set to None by default. If you select “Yes”, then your network will be hidden for strangers, and you and your household can connect to it by entering a name and password;
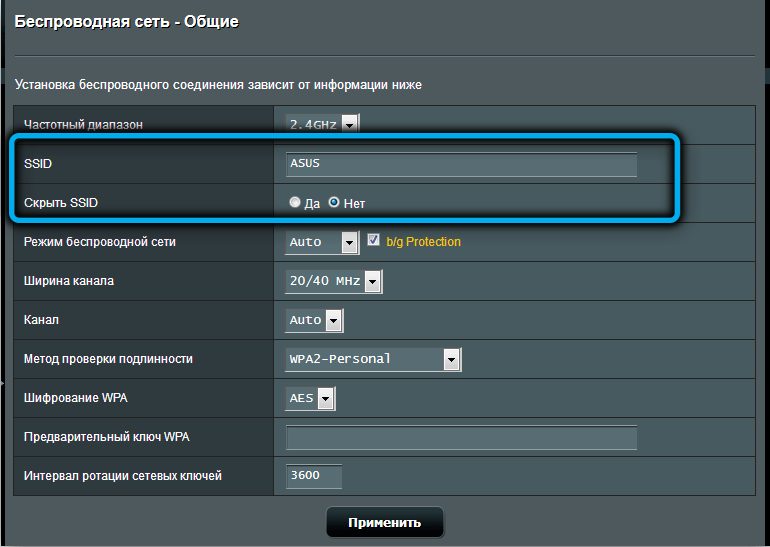
- in the “Channel width” field, set the value to 20 MHz;
- make sure the “Authentication Method” is set to WPA2-Personal;
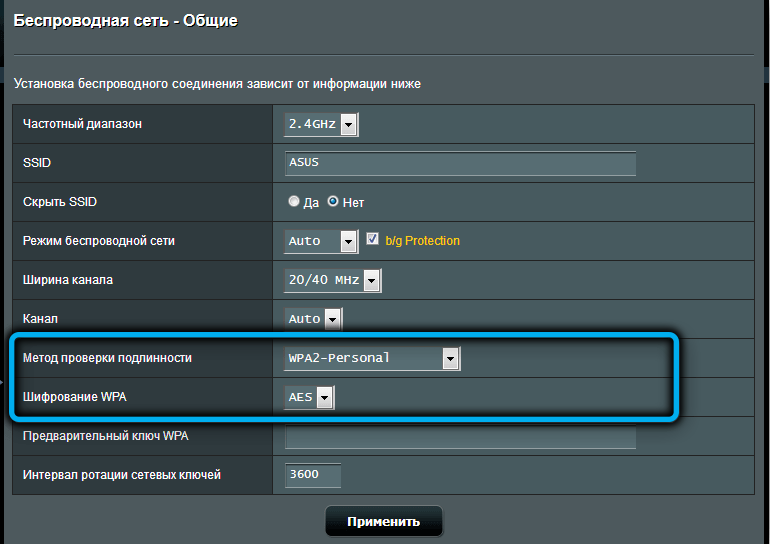
- in the “Pre-shared WPA key” field, enter the password for the network. We think that there is no need to remind you of the recommendations once again when choosing a password;
- press the “Apply” button.
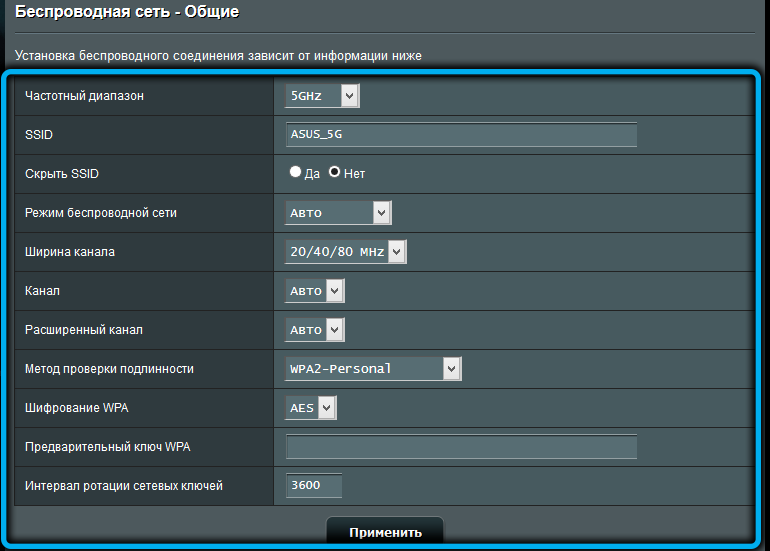
In the same way, we set up the second network by selecting 5 GHz in the “Range” field. When entering the network name, choose one so that it is clear to you that this is exactly a 5 GHz network, that is, absolutely identical names cannot be given. In the “Channel width” field, set the parameter value to 20/40/80 MHz. We fill in the rest of the fields identically to setting up the 2.4 GHz network, and the password can be set the same so as not to get confused. But remember that if one network is hacked, then the second one too.
Reboot Asus RT-AC51U, factory reset
A reboot is useful when the router starts to work oddly, which will be reflected when surfing. You can simply turn off the device and turn it on again after 5-10 seconds. You can also reboot remotely by clicking on the corresponding button in the web interface – it is located in the upper status bar, next to the “Exit” button.

If you messed something up with the settings and do not know how to restore the router’s performance, it makes sense to reset the settings. To do this, there is a recessed Reset button on the back, which you need to press with a thin object and hold it in this position for 10 seconds. You can also reset the settings to the factory settings through the administrative panel by going to the Administration tab and in the right window – to the Settings Management tab “.
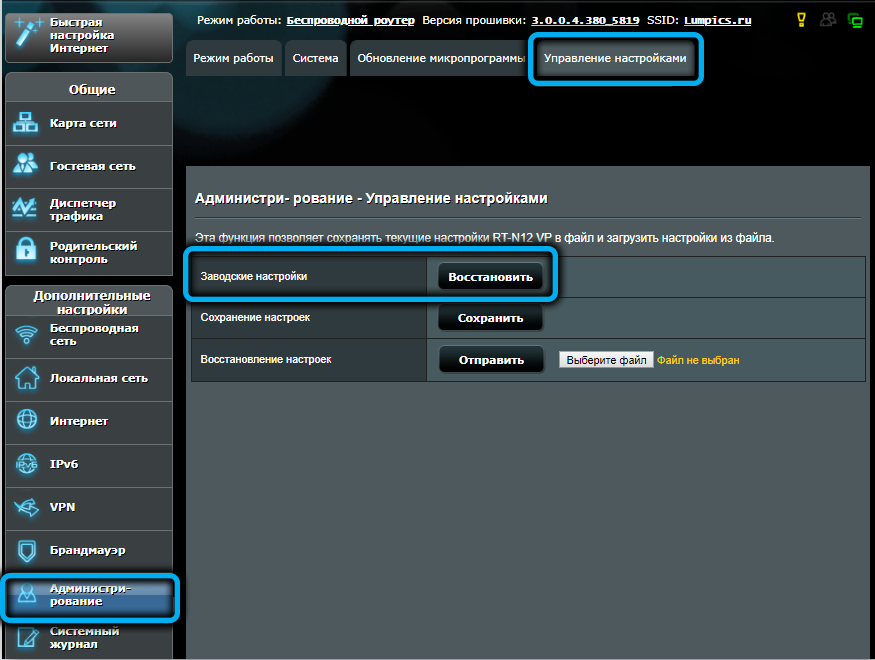
There is a reset button here, we press it. Previously, the current settings can be saved, for example, to a USB flash drive, and, if necessary, restore.

Note that a factory reset will require you to repeat the procedure for connecting to the Internet and setting up the wireless network.

Firmware upgrade
Most routers in the budget and mid-priced category do not know how to update automatically, including the Asus RT-AC51U router. And since this is a useful option, let’s describe the procedure for manually updating the firmware:
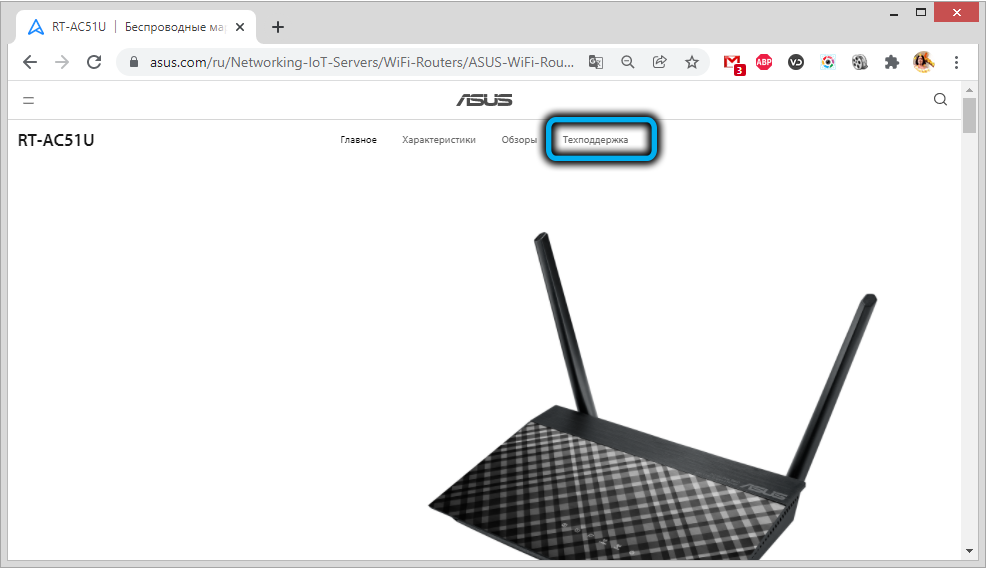
- go to the official website of the manufacturer;
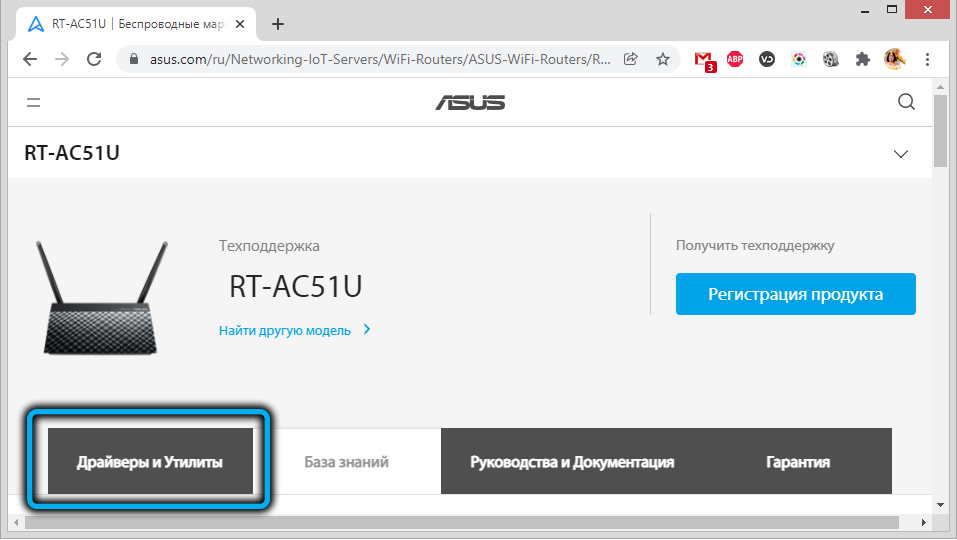
- click on the “Technical support” tab;
- in the bottom menu, select the “Drivers and Utilities” tab;
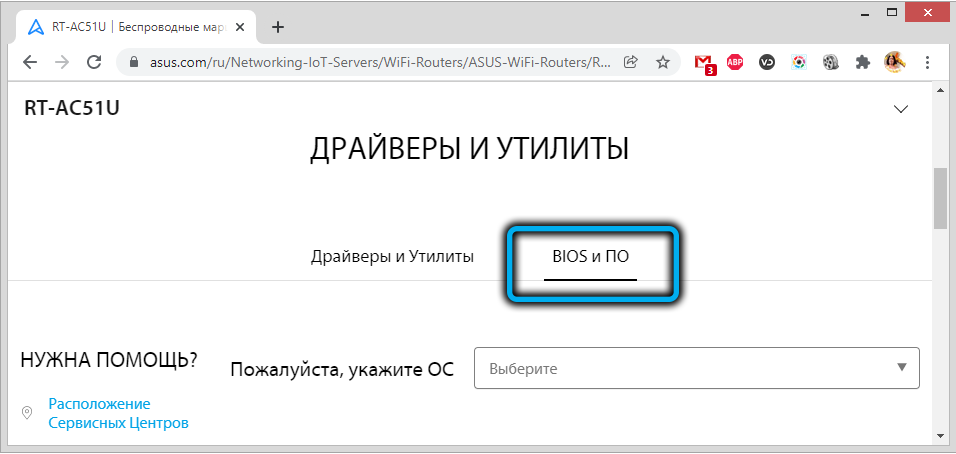
- even lower, click on the “BIOS and software” button;
- the latest firmware will be shown with a Download button. If desired, you can install earlier versions by clicking the Show all link;
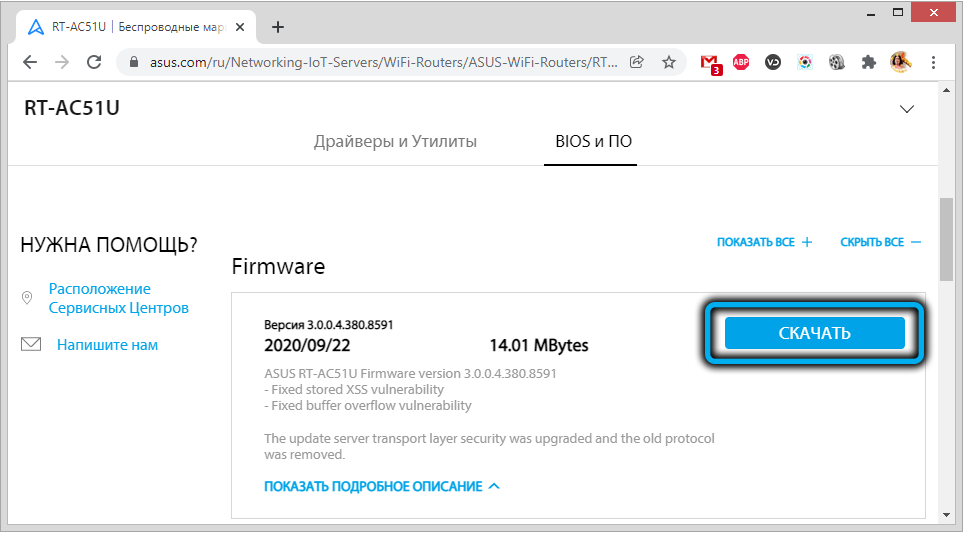
- unzip the firmware after downloading;
- to flash the router, go to the web interface, select the “Administration” tab;
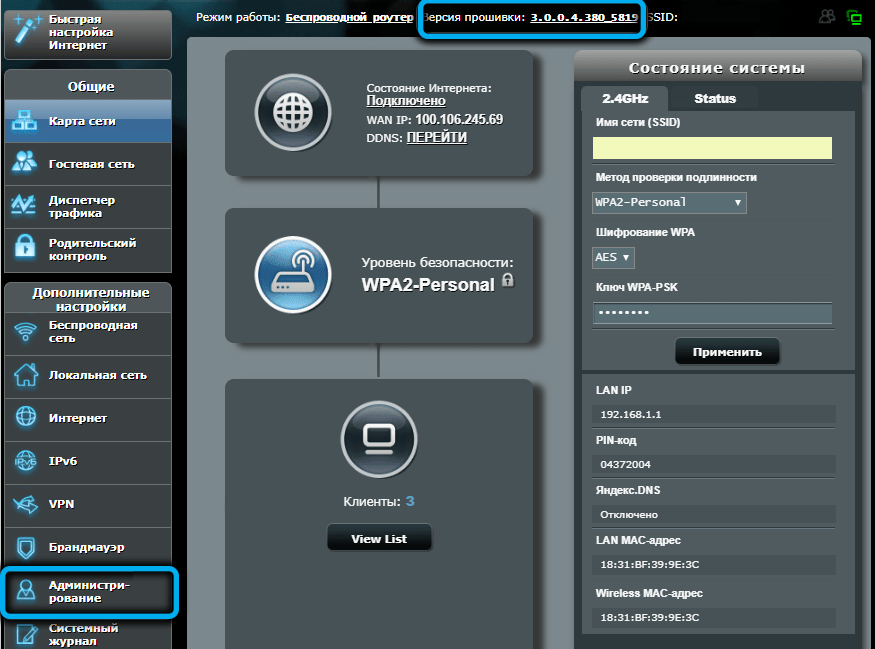
- in the left block, select the “Firmware update” tab;

- press the button “Select file” and in the explorer window specify the path to the firmware, confirm by clicking “Open”;

- press the “Send” button;

- we are waiting for the end of the procedure, after which the router will reboot with the new version of the control software.

Typically, user settings remain the same.
We hope that after reading our article, you will be able to independently flash and configure the Asus RT-AC51U router. But if you have any difficulties, we are waiting for you in the comments.