The TP-Link brand is well known to the domestic consumer for its communication devices – modems, routers, hubs. All of them are characterized by high reliability and excellent performance. Today we are going to take a look at the inexpensive TL-WR840N router. At an affordable cost, it has an extensive package of functions and settings.
Contents
TP-Link TL-WR840N Wireless Router Product Overview
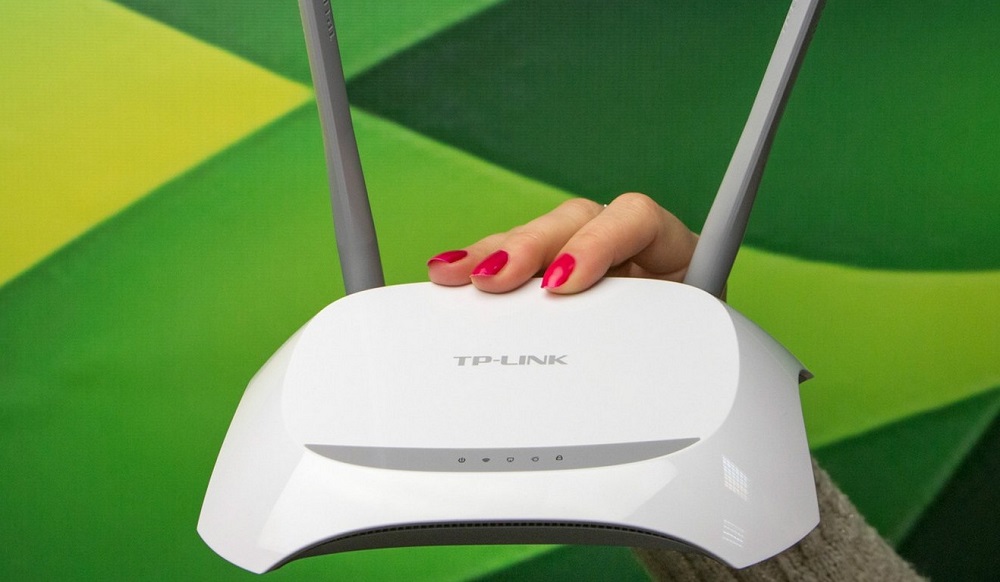
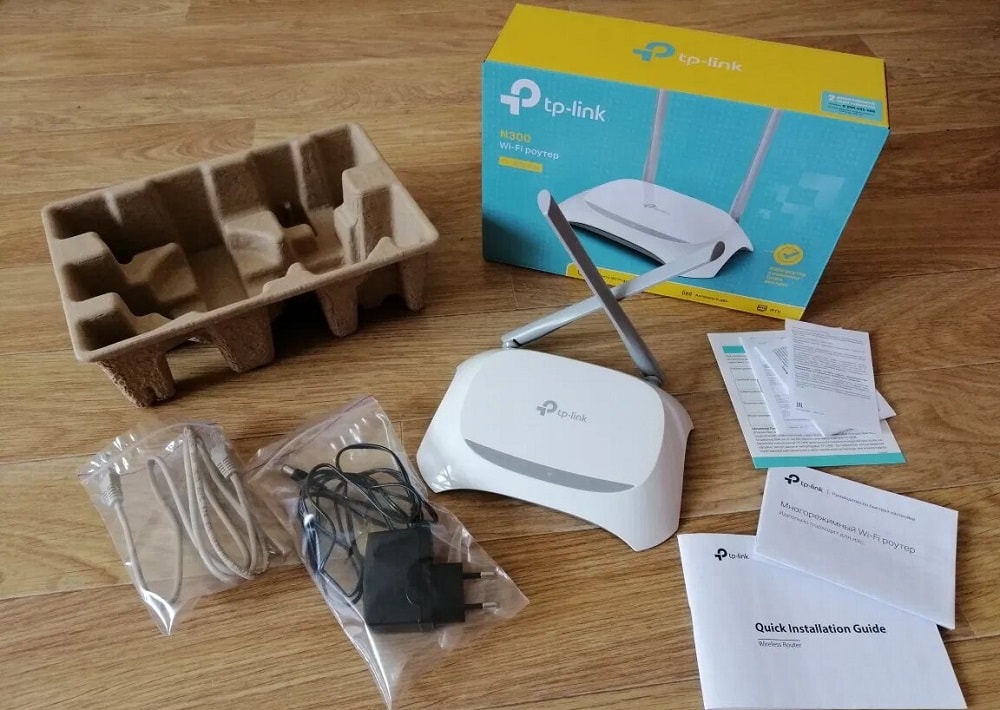
The company tries to adhere to its recognizable corporate identity, so almost all brand routers are easily recognizable. This model was no exception. Although its specific shapes are quite individual, the snow-white color and two characteristic rather massive antennas give out TP-Link products in the router. The router looks solid, better than many more expensive “brothers”. The delivery set is usual: a router itself, a power supply unit, a CD with a utility for configuration and a patch cord of about a meter in length for connecting the TL-WR840N to a computer.
There are no buttons other than WPS / RESET to reset the settings. There are four 100-megabit LAN ports and one WAN port; the front panel has LED indicators that display the device’s operating modes.
Key features of TP-Link TL-WR840N with a brief description:
- 4 LAN ports (100 Mb / s);
- 1 WAN port (blue) with the same speed;
- Wi-Fi network bandwidth – 300 MB / sec;
- operating frequency range: 2.4–2.484 GHz;
- two non-removable antennas with a gain of 5 dBi;
- built-in transmitter power – up to 20 dBm.
Additional functions supported by the router include:
- support for port forwarding;
- firewall;
- filtering by IP and MAC address;
- guest network;
- IPv6 support.
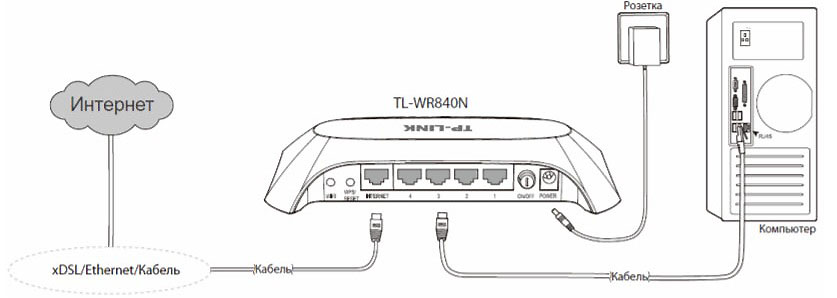
There is no USB port – this is the prerogative of more expensive routers, so, alas, you won’t be able to use the TL-WR840N to connect via a GSM modem.
Connecting the TP-Link TL-WR840N router to the Internet
To enter the web interface on this, as on other models of the brand, the address 192.168.0.1 (or tplinkwifi.net) is used with the default username and password admin / admin.
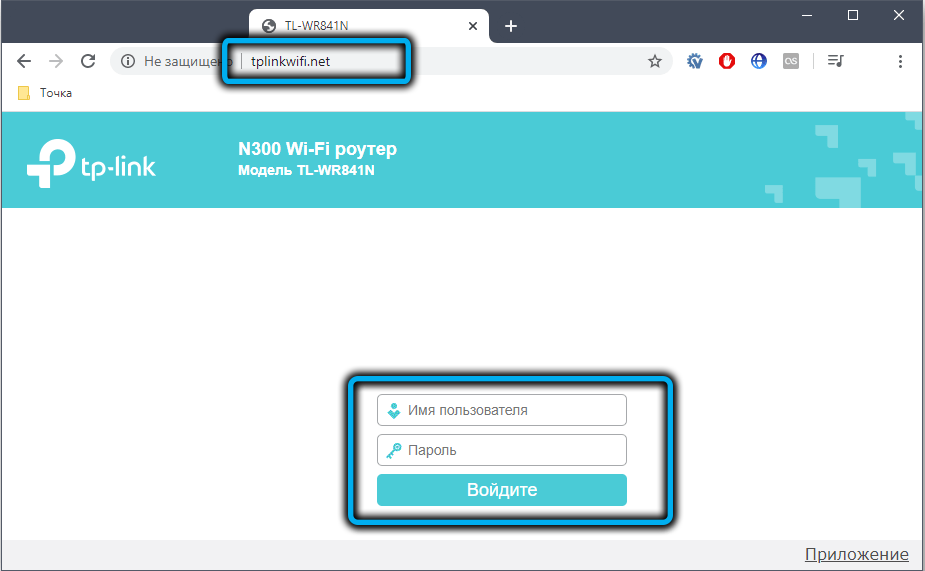
You can configure the Internet in automatic and manual modes, the first is usually used when setting up the router for the first time.
Automatic tuning
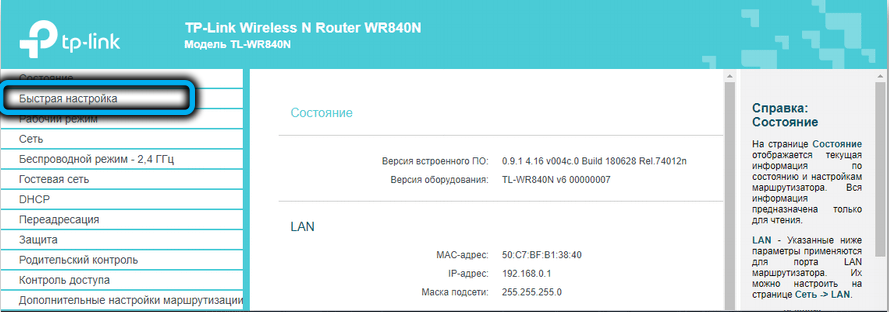
After entering the web interface, a start window will appear, in which you need to click the “Quick setup” button.
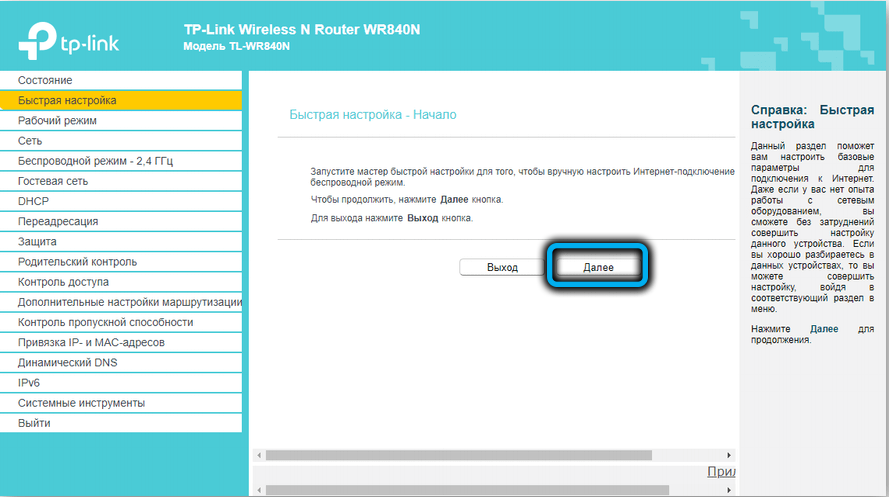
A wizard will start, which will help you connect to the Internet, even for those users who have never done this.
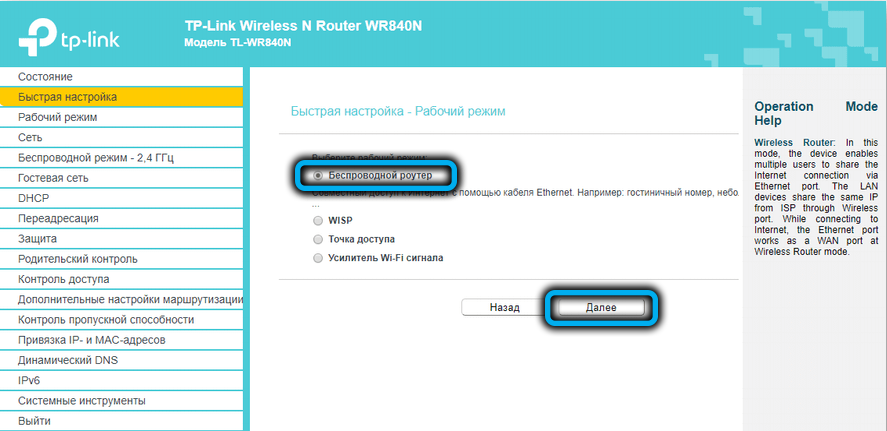
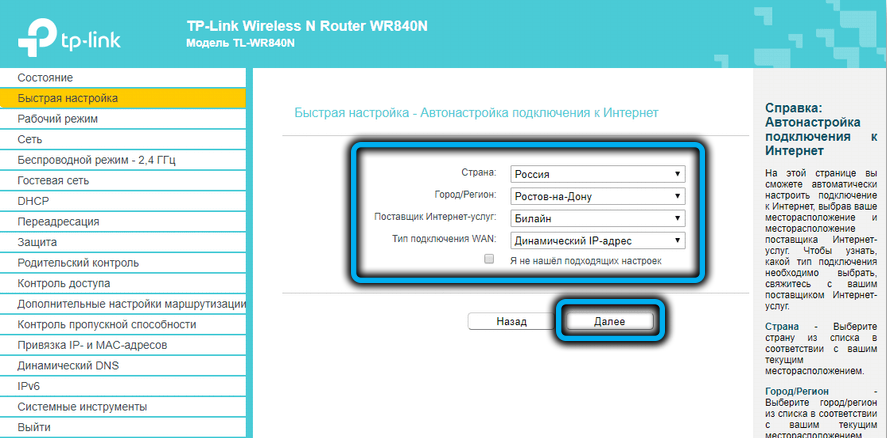
In principle, in this mode, you just need to follow the instructions, but we will not dwell on this, since manual configuration is much more interesting, where you can enter more parameters.
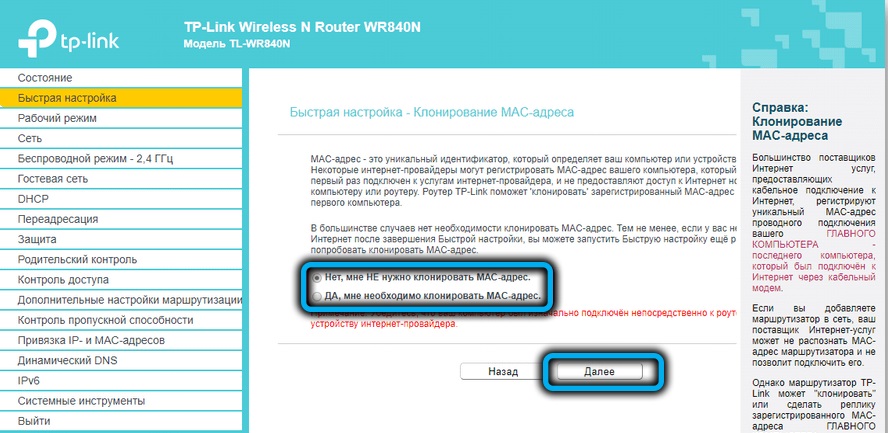
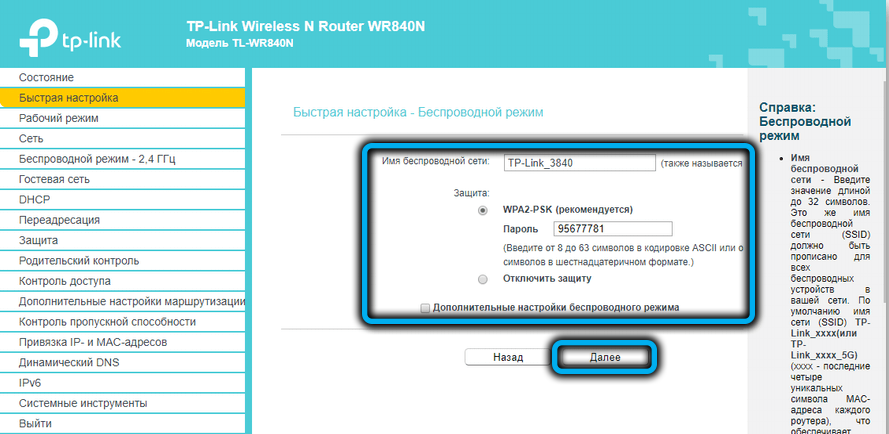
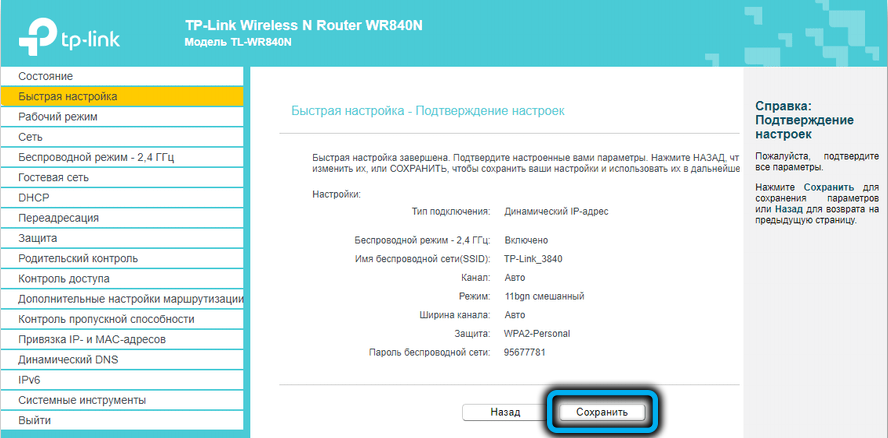
Manually connect to the internet
Some of the information required for setup is indicated on the device label, some must be provided by your Internet service provider. Usually they are indicated in the agreement or in a special booklet (login, password for entering the network, IP-address of the provider’s server, gateways, etc.).
Let’s consider the features of connecting to the most popular domestic providers.
How to set up the Internet on a TP-Link TL-WR840N router for Dom.ru
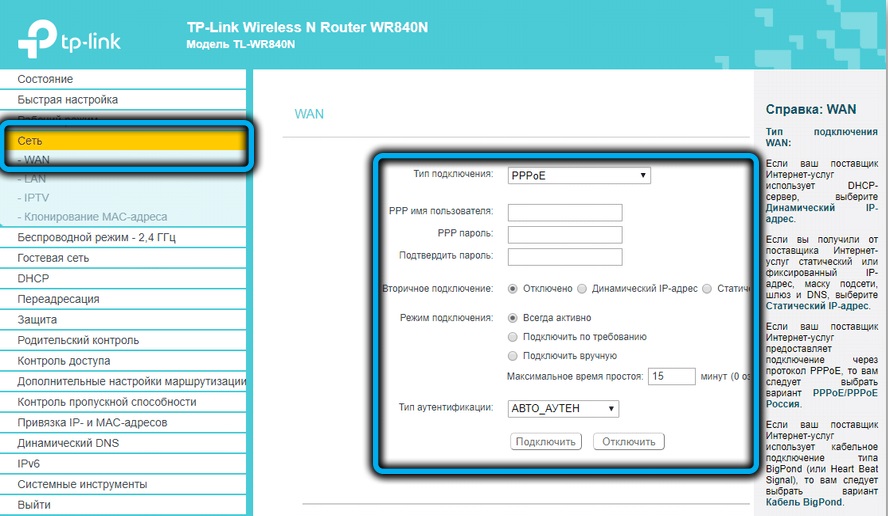
Step-by-step instructions for one of the most popular Russian providers:
- go through any browser to the router’s web interface, go to the “Network” tab;
- click on the WAN menu item;
- in the “Connection type” field, select PPPoE;
- enter the provider’s username and password, confirm the correctness of the password by re-entering it;
- in the “Secondary connection” field, put the switch in the “Disabled” position;
- the value of the “Connection mode” field must be “Always active”;
- do not touch the “Authentication Type” field, the value “Automatic” should be there;
- click the “Save” button.
Setting up the Internet through Rostelecom
It’s a paradox: this provider is the absolute leader in terms of the number of subscribers, but it is also ahead of the rest of the planet in terms of the number of user complaints: it is scolded for poor technical support, for the complexity of settings and poor connection quality. True, the initial settings for connecting to the Internet are usually performed without problems.
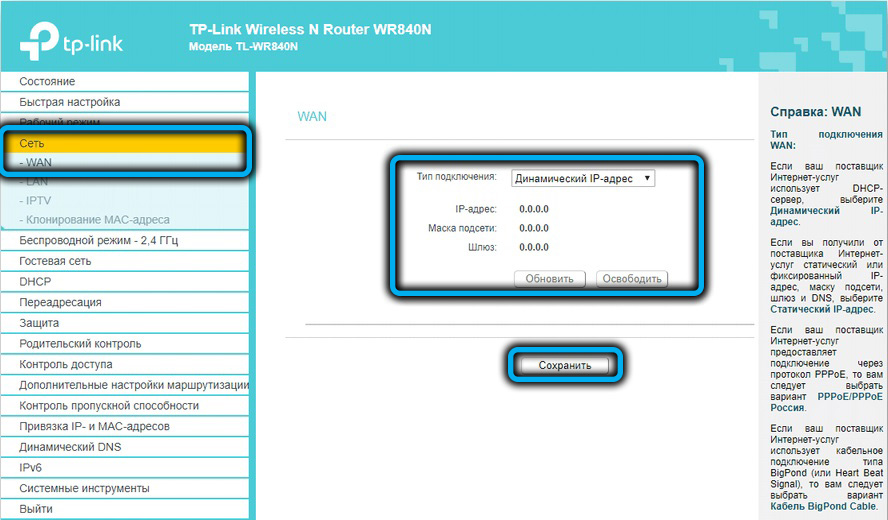
As in the previous case, go to the “Network” tab and select the WAN subsection. The connection type can be different, most often it is PPTP. In addition to the standard username and password, you will need to specify the type of IP-address (usually dynamic, static – for an additional fee), if it is static, we also prescribe it.
All other parameters must have the same values as in the example above.
How to connect TP-Link TL-WR840N to the Internet from “Beeline”
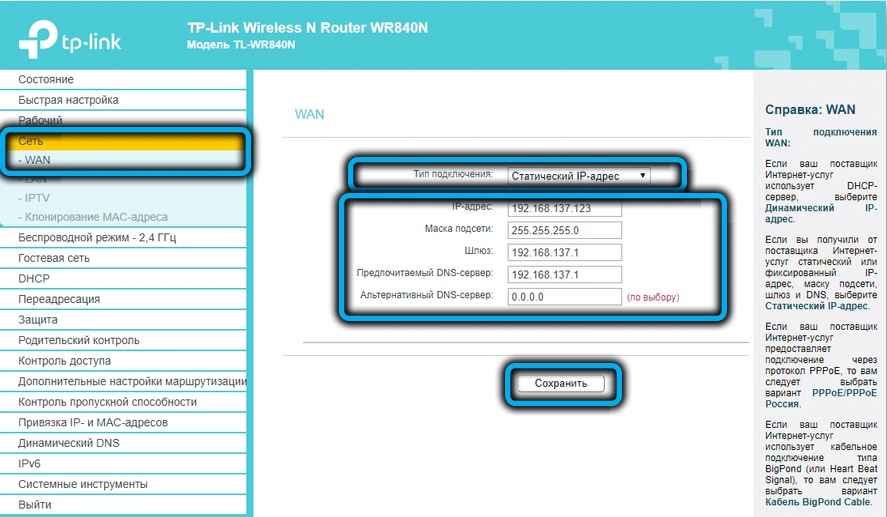
This provider is one of the few that uses the L2TP connection type. But in terms of settings, it practically does not differ from PPPoE or PPTP, that is, you need to enter the same data provided by the provider, and do not touch the rest of the parameters, for which the default values are optimal.
NetByNet
He, like Dom.ru, uses the PPPoE connection type, so the settings will be identical. Just make sure that the Secondary Connection field is set to Dynamic IP. We do not touch the rest of the settings.
Setting up Wi-Fi on a TP-Link TL-WR840N router
Instructions for manually connecting a wireless network:
- in the main menu, select the tab “2.4 GHz wireless mode” and the submenu “Basic settings”;
- in the right block, enter the name of your network in the form in which it will be displayed on smartphones, laptops and other devices that are in the range of the router’s signal. The name must contain only English letters, numbers and some punctuation marks are allowed;
- the top switch must be set to the “Enable” position;
- we leave three parameters under the network name as it is, and put a check mark next to the text “Enable SSID broadcasting”;
- click on the “Save” button;

- go to the sub-item “Wireless protection”;
- at the top, switch to WPA / WPA2 mode, as recommended by the manufacturer;
- the “Authentication Type” and “Encryption” fields must be set to WPA2-PSK and AES values, respectively;
- we enter the password for our wireless network. Its length must be at least 8 characters, the use of Russian letters is unacceptable. Do not use a password that is too simple – your advanced neighbors can crack it using special programs;
- Leave the rest of the parameters unchanged and press the “Save” button.
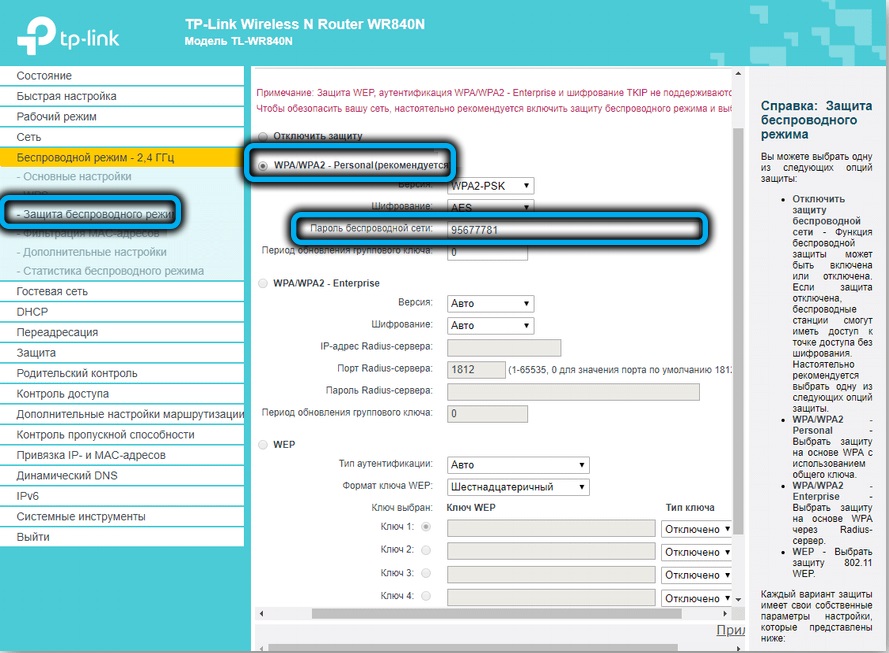
Now you can try to connect any of your wireless devices to the network.
Digital interactive television
In principle, when using a set-top box or receiver, the IPTV settings are entered on these devices. But for some providers it is possible to connect the service directly to the router, which is a more reliable method. For example, if you subscribed to one of the QWERTY.TV tariffs and installed the STB AmiNET decoder.
Setting up IPTV on TP-Link TL-WR840N is quite simple:
- go to the “Network” tab, select the “IPTV” sub-item;
- make sure that the “IGMPProxy” parameter, like “IGMP Snooping”, is enabled;
- set the value of the “Mode” field to “Bridge”;
- indicate which of the 4 LAN ports your set-top box is connected to;
- press the button “Save”.
Setting up in repeater mode
In TL-WR840N routers before version v6, there was no possibility to use it as a repeater – you had to make settings as an access point, and it was difficult and at the same time you got two networks, which also created certain inconveniences.
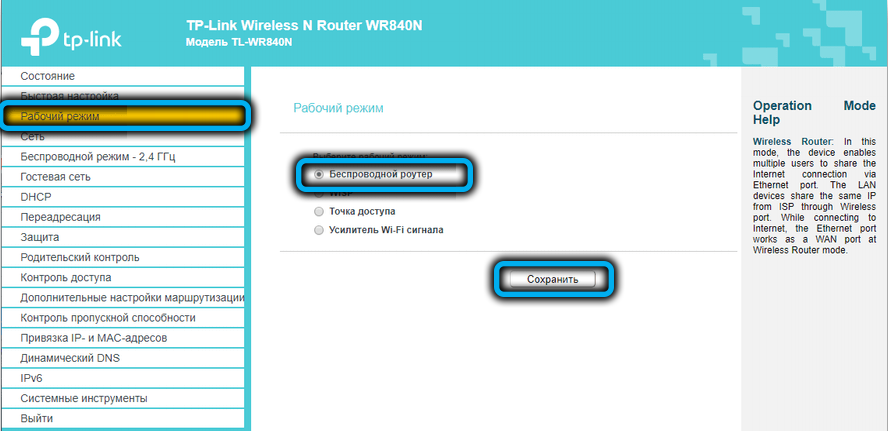
In new versions, such an opportunity is available, it is hidden in the “Working mode” tab. We go into it, set the switch opposite the text “Wi-Fi signal booster”, press the “Save” button. A reboot of the router will be required, we answer “Yes” to the corresponding request.
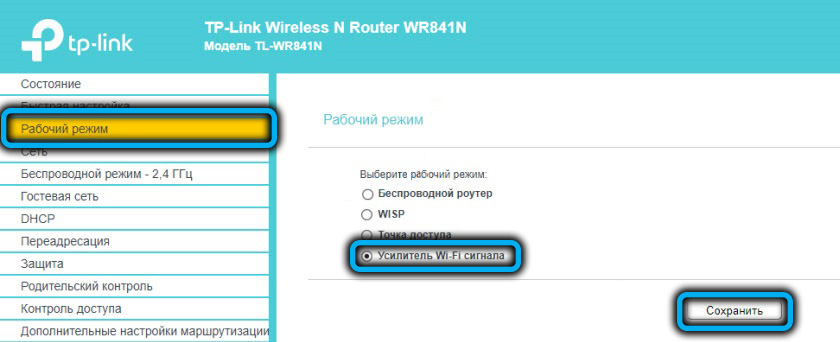
After the reboot, the interface of the admin panel will change, it will become much easier, many unnecessary settings for this mode of operation will disappear.
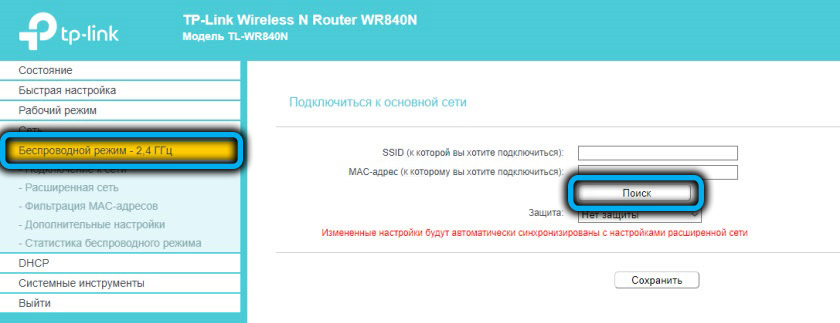
All that remains is to connect TP-Link TL-WR840N, operating in repeater mode, to the main wireless network. Go to the “Wireless mode” tab, select the “Network connection” sub-item, press the “Search” button, as we do on smartphones or other devices, select the desired network from the available ones (if it is hidden, just enter the SSID) and press the button “To plug”. Enter the password and click the “Save” button.

The advantages of using this mode over the “Bridge” mode are obvious: TL-WR840N will copy the wireless network settings of the main router and will work as a simple signal amplifier, that is, no additional networks will appear, and you will not have a chance to get confused with networks either.
Reboot the router, reset to factory settings
This router model does not have a reset button, so if necessary, you will need to either turn off the device from the outlet and turn it on again after half a minute, or use the web interface for this. Which, of course, is far more convenient. The Restart softkey is located in the System Tools tab.
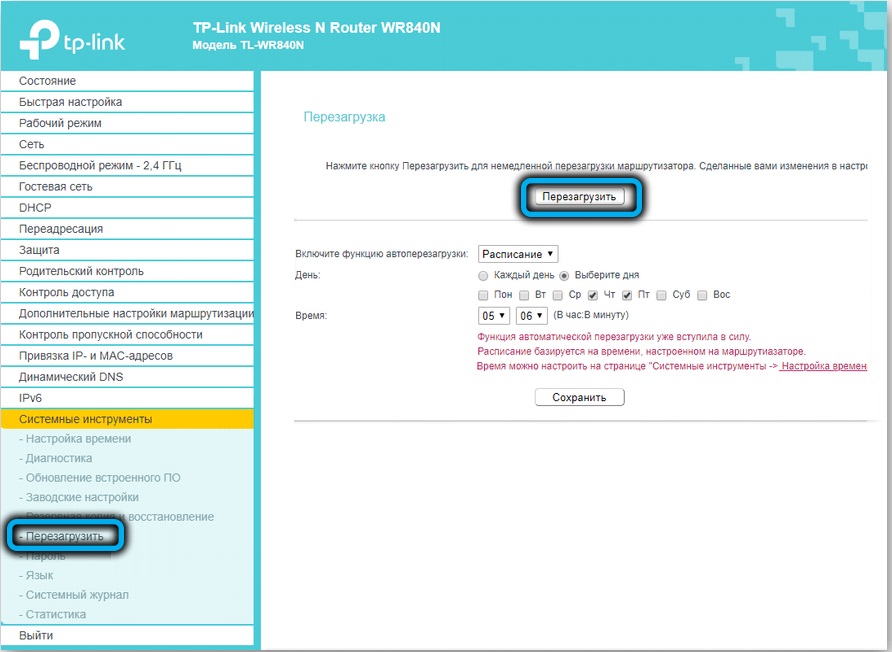
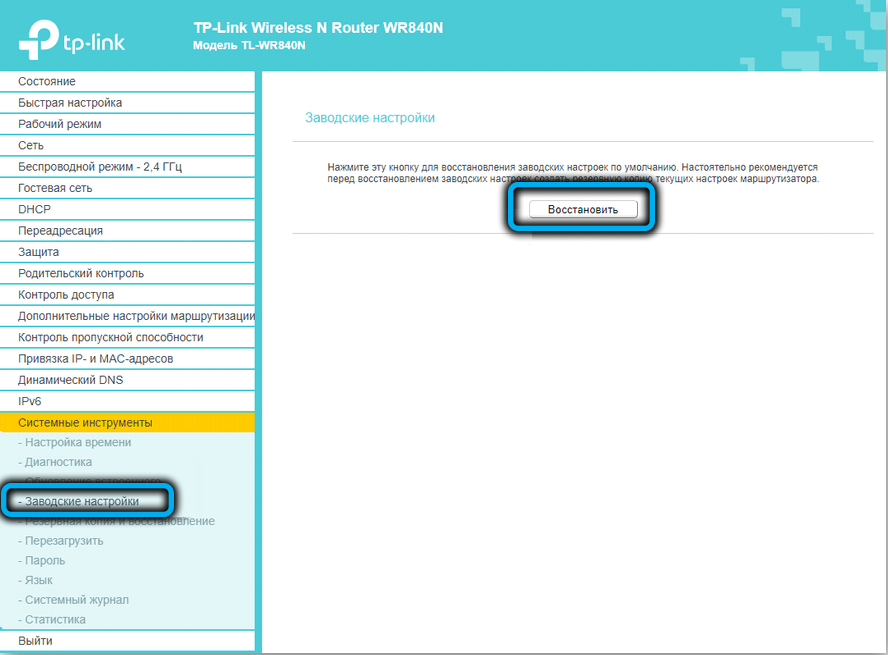
If there are any problems with the router, which cannot be eliminated by a simple reboot, the only way out is to reset the device to the factory settings. If you have forgotten the password for entering the web interface, then this can only be done using the WPS / RESET button, drowning it and holding it down for about 10 seconds until the indicators on the front panel start blinking. If you have access to the administrative panel, you do not need to physically climb to the router: go to the thief in the “System Tools” tab, select the “Factory Settings” item and press the “Restore” button. If the router does not automatically reboot, we do it manually. All previously entered settings will be reset and will need to be performed again.
Firmware upgrade
Sometimes problems are solved by installing a more recent version of the software. Since the TP-Link TL-WR840N does not have a USB port, you will not be able to reflash the device using a flash drive. But this is not a problem, since this operation can also be performed using the web interface.
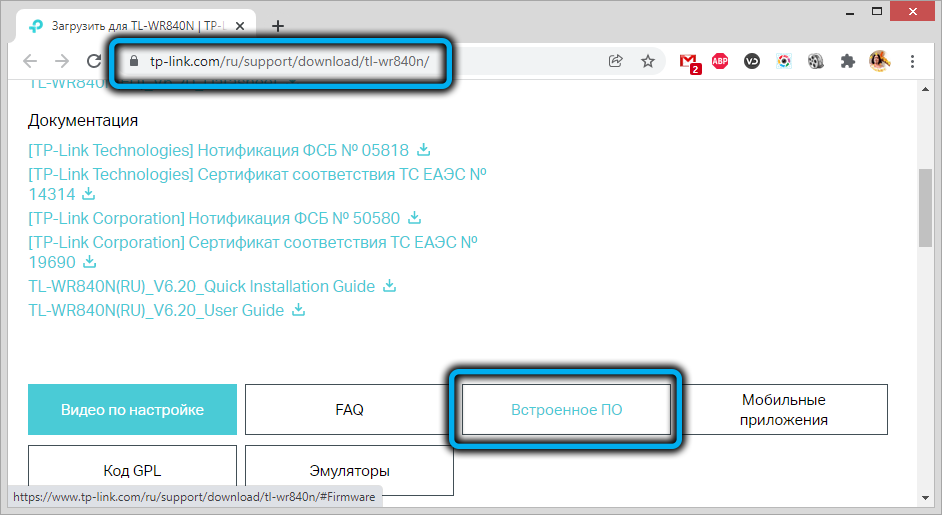
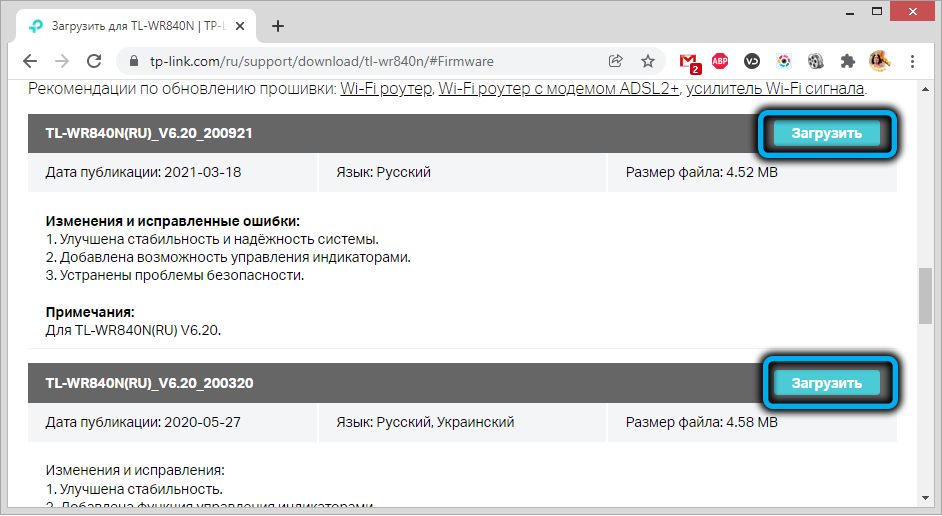
First, we need to download the latest firmware from the official website and unpack it. Then go to the web interface in the “System Tools” tab in the “Firmware update” subsection, click on the “Browse” button, find the unpacked firmware on the disk and open it, click on the “Update” button. When replacing the firmware, it is advisable not to perform any more tasks on the computer.
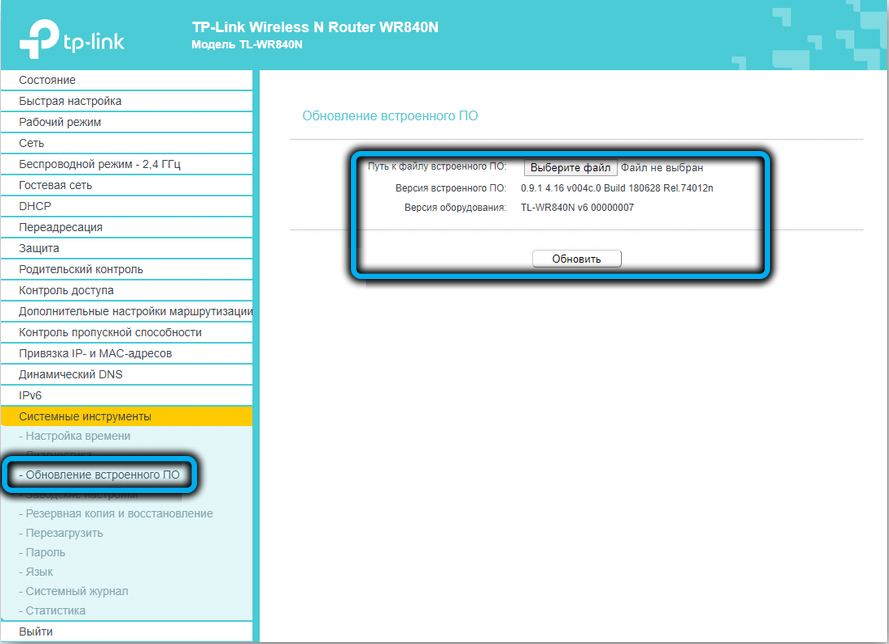
You can also flash the router using the TP-LINK Tether mobile application, the algorithm will be about the same.
As you can see, in the TL-WR840N settings there are some features that you need to know in order to use all the capabilities of the router to the maximum.