Not every modern user is aware of the issues of setting up a VPN connection through the PPTP protocol and delves into the essence of the connection. Some do not even understand what it is, even using this opportunity every day. Let’s take a look at what PPTP is and how to configure parameters for this type of connection.

Contents
What a PPTP Connection Gives
PPTP (Point-to-Point Tunneling Protocol) in translation from English sounds like “point-to-point tunneling protocol”, it allows the computer to establish a connection with the server. The connection is made by implementing a secure line, that is, a tunnel in a standard unsecured TCP / IP-based network. If we take a deeper look at what kind of connection it is, PPTP encapsulates PPP frames in IP packets, they are encrypted and in this form are transmitted over a channel, wired or wireless network. Despite the low level of security compared to other connection options, for example, with IPSec, PPTP is widely used.
The considered connection type allows you to implement basic data protection, as well as significantly save users on calls, since a direct connection is not involved here and communication is carried out through a secure line (tunnel). PPTP is also used to organize communication for two local networks. Thus, they do not contact directly, but use the transmission of packets over a secure line. Using this protocol, it is also possible to form a client-server connection, then the user terminal is connected to the server via a secure channel.
PPTP connection rules
For a correct connection, it is necessary to set up and adhere to some initial conditions. So, to configure a PPTP-based VPN server, it is assumed to use TCP port 1723 and IP GRE 47. Accordingly, it is unacceptable for a firewall or firewall to block the flow of IP packets; by configuring the parameters, you should ensure the smooth sending and receiving of data. This condition applies not only to local configuration. To successfully complete a PPTP connection, the freedom to transfer packets through the tunnel must also be implemented by the provider.
Details of the connection process
Now let’s take a closer look at the basic principles of PPTP and communication based on this protocol. The point-to-point contact is based on a PPP session based on GRE (Generic Routing Encapsulation). The second TCP port connection is responsible for monitoring and initiating GRE. An IPX packet that is transmitted from one point to another is called a payload, and it is also supplemented with control information. So, when data is delivered on the recipient’s side by a programmatic method, the IPX content is extracted and sent for processing, carried out using the integrated means of the system in accordance with the specified protocol.
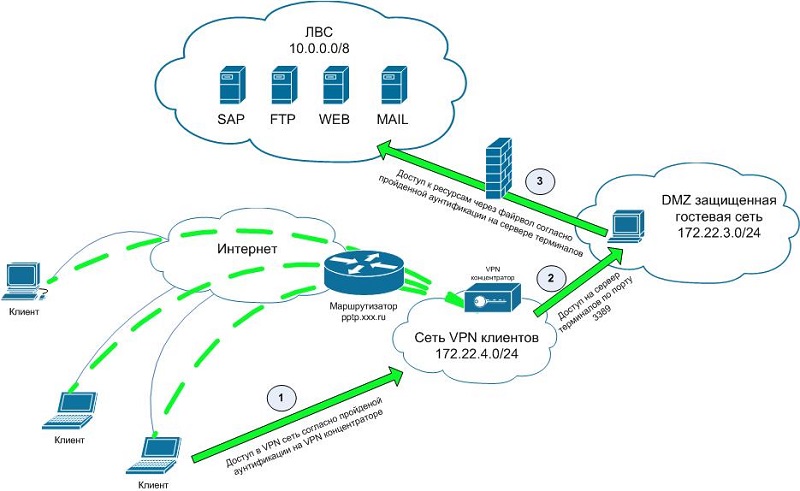
It is possible to hack data during the process of receiving it; during the transfer, security is ensured by the tunnel. To protect the sending and receiving of information, the PPTP setting assumes the mandatory use of a username and password. To set up the best security, you need to use identification with a complex symbolic combination. Of course, this will not save the guaranteed transmitted data, but it will make it much more difficult to crack.
Securing the connection
Although the data is sent as an encrypted packet, it is not possible to consider a fully secure PPTP-based VPN network. EAP-TLS, MSCHAP-v1, MSCHAP-v2 and MPPE are involved in the encryption process (the full list can be seen in the settings of the created connection). In addition, in order to increase the security of PPTP, callbacks are used, when the parties perform a confirmation of the connection and data transfer in software, which will ensure the integrity of the transmitted packets.
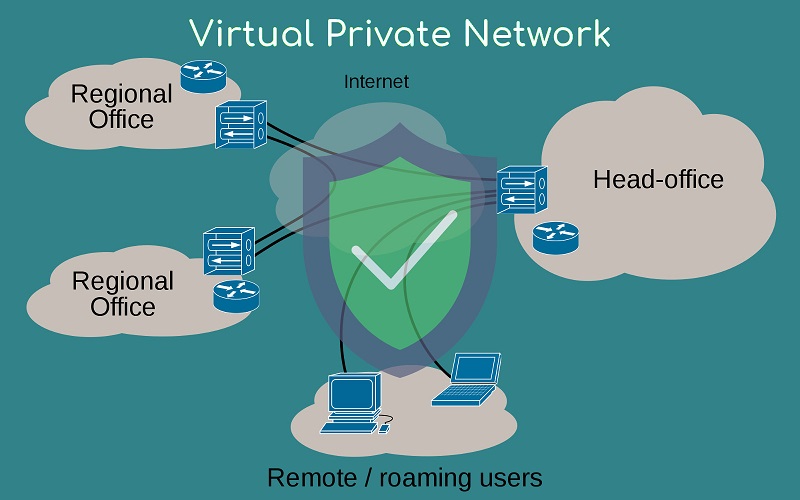
Connoisseurs of information decryption methods, without having access to the key, are also able to decrypt the original data from MPPE using the RSA RC4 algorithm, for example, using the bit substitution method. So, encryption protocols, even with a high degree of security, used over PPTP, can be bypassed, for this reason, to strengthen the security of the connection and information, there is a need for additional protection when creating and configuring PPTP on Windows 10, 7 or another OS.
Configuring Settings for VPN Network Connections
Operating systems of the Windows family have a number of distinctive features. But they are all united by the ability to connect and configure a VPN PPTP connection. The only question is which version of the OS from Microsoft is used on a particular computer or laptop.
In this regard, several instructions are offered at once, relevant for the most popular versions of Windows. Namely:
- XP.
- Windows 7.
- Windows 8.
- Windows 10.
Each of them has its own order and configuration settings.
Configuring for Windows XP
The first in line will be the outdated, but still actively used by users with weak computers operating system in the face of Windows XP.
Here, to set up a PPTP VPN connection, you need to:
- open the control panel by clicking the “Start” button;
- select the “Network and Connections” section;

- click on the option “Create a network connection” on your desktop;

- 2 options will be offered to choose from;
- this is a remote access connection, as well as to a virtual private network;
- you need to select the second option and put a tick in front of it;
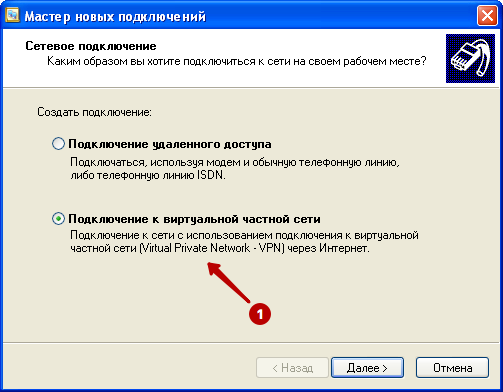
- then you should specify any name you like to connect;
- in parallel, open my account, where there should be a list of IP addresses for PPTP VPN services, username and password;
- register the found IP address in the connection creation line;
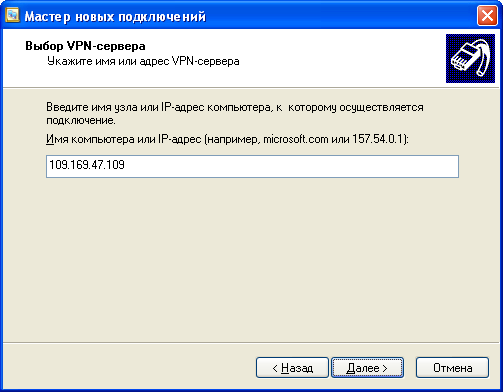
- add a check mark opposite the item with a proposal to create a connection shortcut;
- then the “Finish” button.
It remains only to click “Start”, enter the “Connection” section and select the new created network.
When connecting for the first time, you will definitely need to specify a username and password, after which you can save the entered data.
If all operations were done correctly, the connection will be completed successfully.
Setup for Windows 7
Despite the end of support, Windows 7 continues to be popular.
Configuring PPTP on your own on Windows 7 shouldn’t be too difficult either. The instructions can be presented as follows:
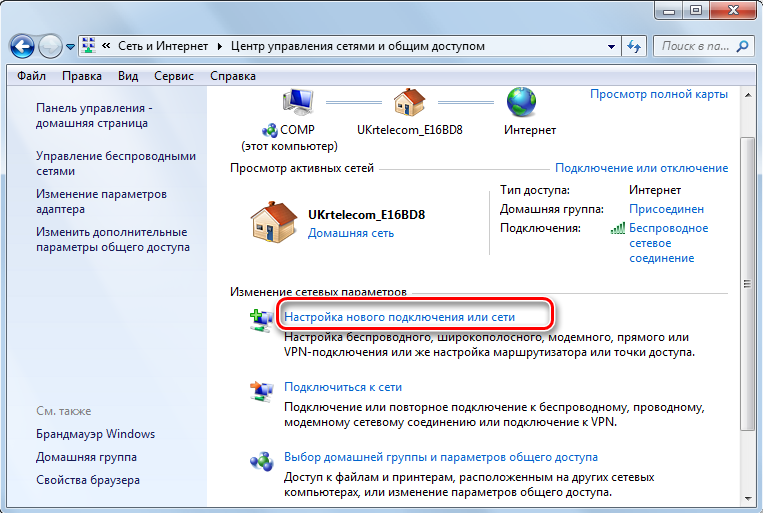
- Open the Network Control Center menu from the Start menu or the network connection in the lower right corner.

- Here you should click on setting up a new connection or network.
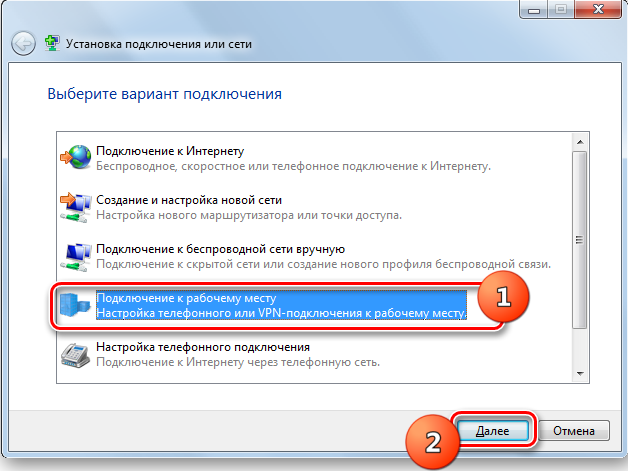
- Among the proposed options, look for a connection to the desktop, and then click “Next”.
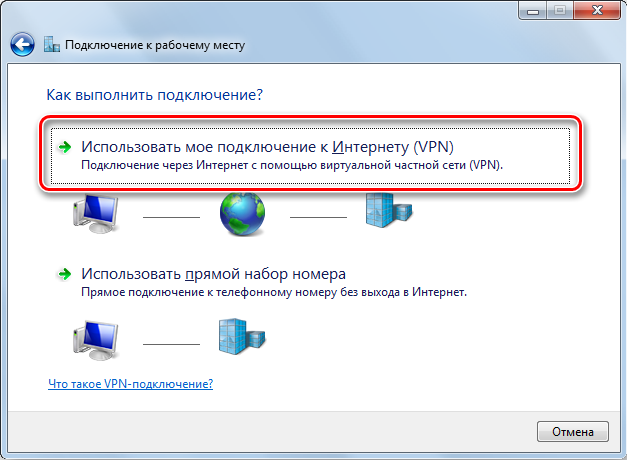
- Now 2 options will appear. This is direct dialing, or using an existing VPN connection. You need to choose the first option in the list, that is, your connection to the Internet.
- Now you will again have to go to “My Account”, where you should look at the list of PPTP VPN servers, login and password from VPN. Copy them or rewrite yourself.
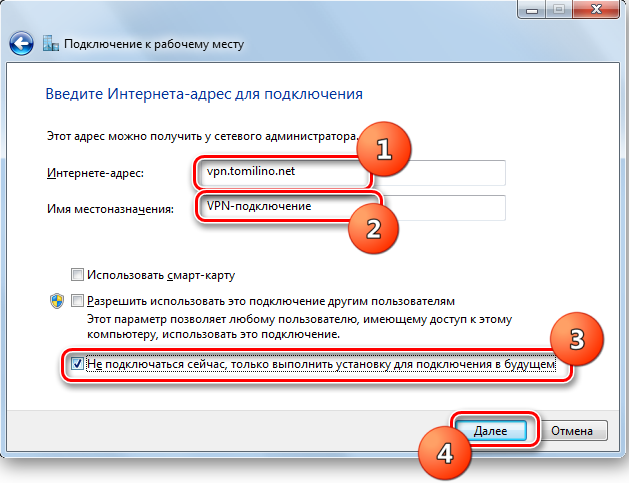
- In the next settings menu, you just need to specify the IP address, come up with a name for the connection and put a tick in front of the “Do not connect now” item.
- Next, you need to specify a username and password for the VPN. In order not to re-enter the same data with each new connection, put a tick on the “Remember password” item.
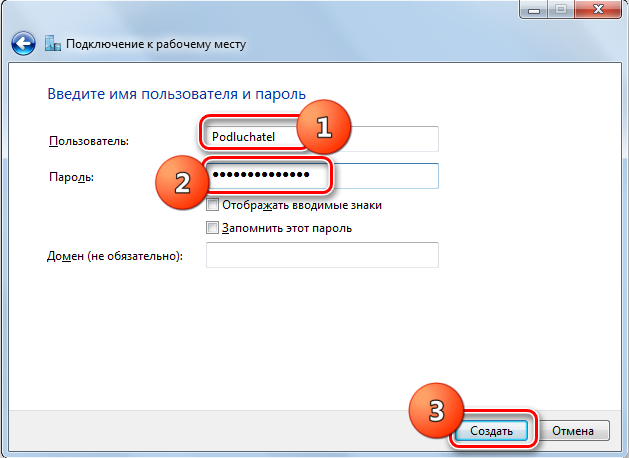
That’s it, the connection is created, you can close the window.
Next, right-click again on the network connection icon at the bottom of the screen and look at the list of current connections. The previously created VPN network should appear here.
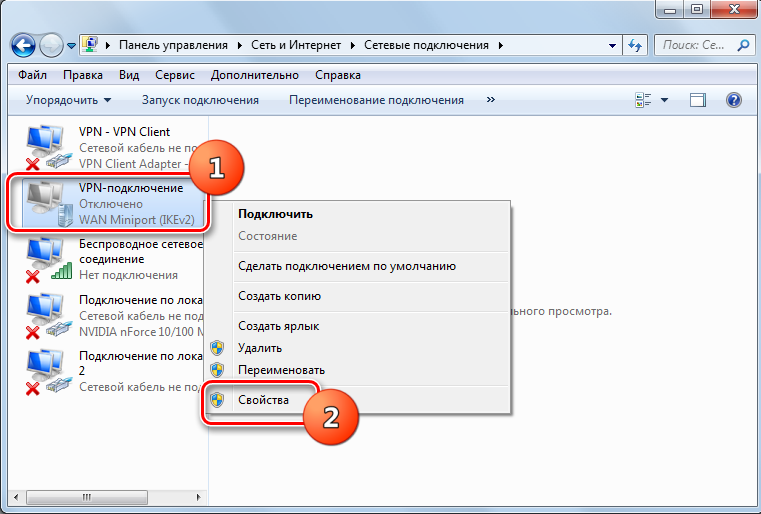
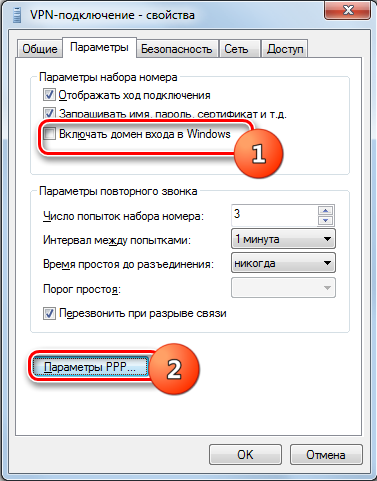
Click on the “Connect” button. In the window that opens, click on “Properties”. Look at which items in the “Parameters” section are checked. They need to be put on the first two lines and removed from the last one, where it says “Include login domain”.
Go to the “Security” section. The VPN type must be PPTP and data encryption is required.
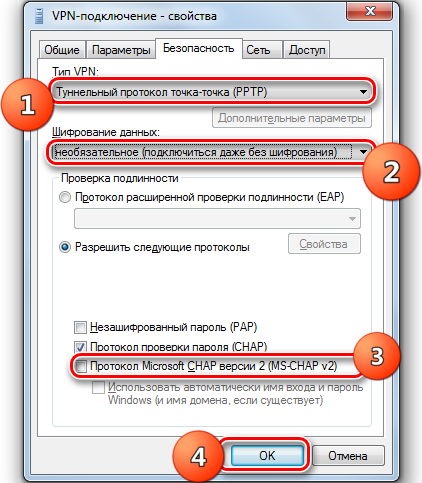
It remains only to click “OK” and in the main connection window, click the Connect button.
This completes the setup. You can safely use PPTP VPN on your Windows 7 computer or laptop.
Setup for Windows 8
The Windows 8 operating system is still up-to-date and supported.
PPTP configuration may also be required here.
A user of a PC or laptop running Windows 8 will require:
- open “Networks” by clicking on the network connection icon at the bottom of the screen;

- select the item to view the connection parameters;

- then click on the plus sign in the VPN section, thereby proceeding to add a new connection;

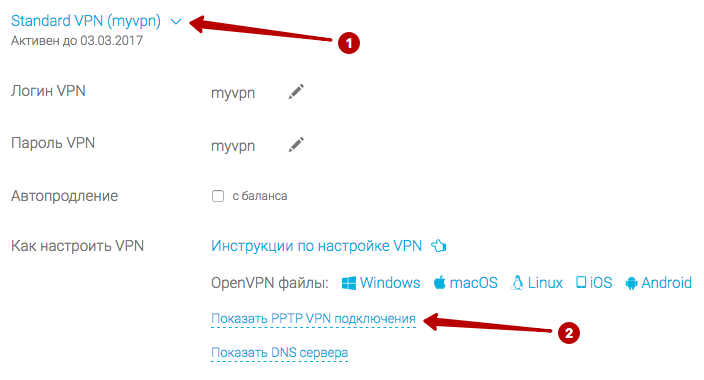
- having opened “My Account”, copy the login and password from the VPN, see the list of PPTP servers.
When adding a new VPN connection, you will need to specify a number of data. Namely:
- the OS developer, that is, Microsoft, is indicated as the service provider;
- come up with the name of the connection yourself;
- insert or write down the IP address of the used PPTP VPN server;
- for authorization, choose a username in combination with a password;
- then the username itself, as well as the password;
- do not forget to check the box to remember your login details;
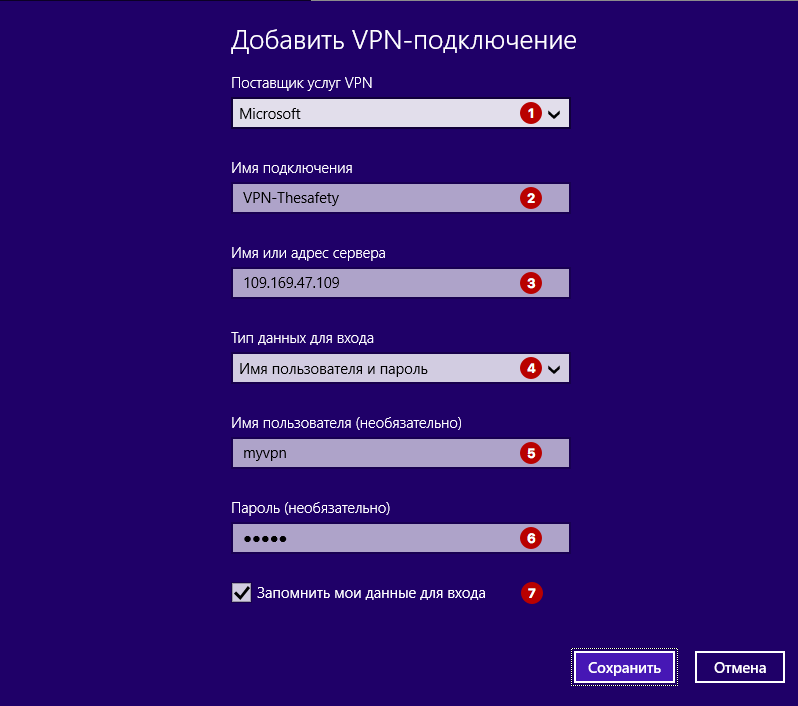
- now on the “Save” button.
Then again click on the network connection icon, and the connection created in the previous step will appear in the “Networks” section. Here you should click on “Connect”.
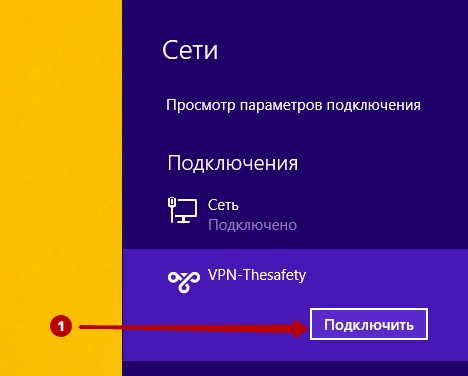
If the status displays as “Connected”, you did everything right.
Setup for Windows 10
Now to the question of configuring PPTP for Windows 10. The task is not the most difficult. Especially if you already have experience with tuning on other versions of operating systems.
To create a PPTP connection for Windows 10, you will need to follow several sequential procedures. Namely:
- click on the notification icon located in the lower right corner of the computer or laptop screen;
- choose the option with a virtual network, that is, VPN;
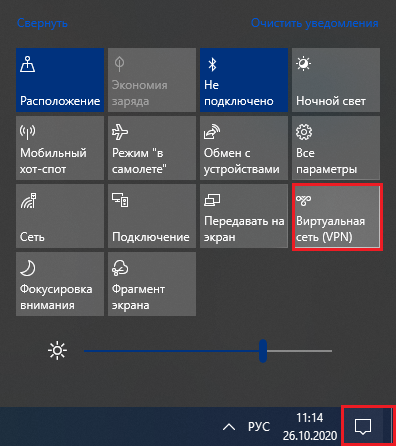
- a new window with parameters will appear, where you need to click on the add connection button;
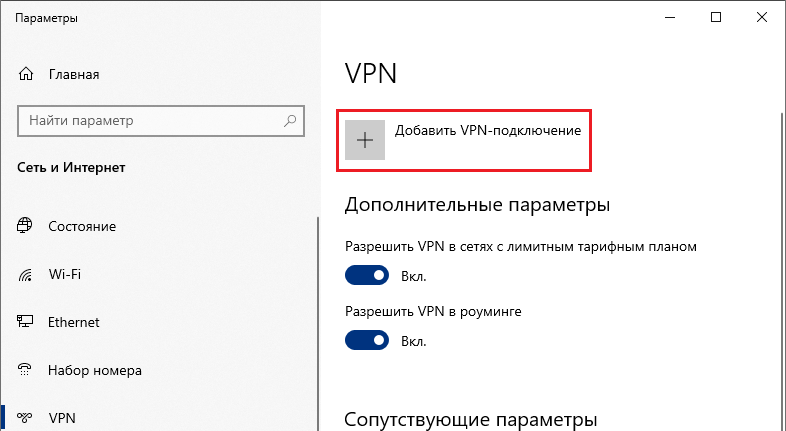
- Choose Windows as your service provider;
- think of the name of the connection yourself, which one you go;
- specify the existing VPN server address by looking at it in your account;
- the connection type will be PPTP;
- to enter, it is better to use a username and password;
- come up with a complex password;
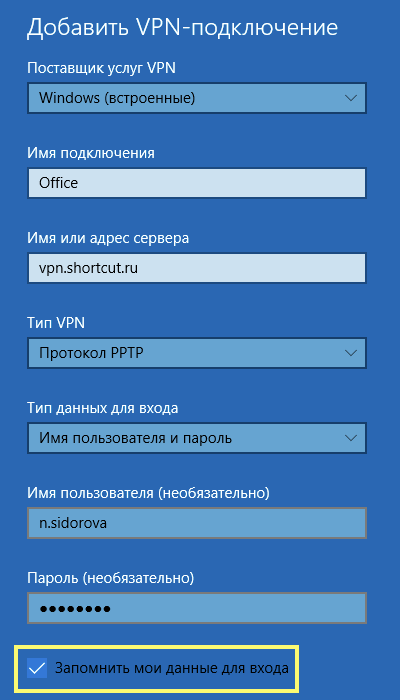
- check the box to remember the entered information;
- save the changes in the settings of the new connection.
Now that PPTP VPN is created, you should connect to it by clicking the corresponding button. It may take some time to establish a connection. When the connection is completed, the window with parameters can be closed.
Other ways to configure PPTP connection
In addition to the integrated OS tools, special third-party programs are also used to configure connections. At the same time, problems in the form of an unstable connection are not excluded. In addition, the inexperienced user can be confused by the numerous parameters that require adjustment. For these reasons, you should be more careful when choosing specialized software.