The Snipping Tool is a program that is part of Windows Vista, Windows 7 and Window 8. The Snipping Tool allows you to capture the windows or desktop of your choice and save them as snippets or screenshots on your computer. In the past, if you wanted a fully functional screen capture program, you had to spend a little money to buy a commercial copy of the application.

Contents
What is it for
If you needed basic screen capture, in previous versions of Windows you could capture screenshots by clicking PrintScreen to capture the entire screen, or Alt-Printscreen to capture only the active window. This screenshot will be placed on the clipboard, which can then be pasted into another imaging program of your choice.
What makes the Scissors tool so attractive are:
- Its price is a free tool.
- Its functionality.
This allows you to capture screenshots only from certain areas of the screen, and not from the entire window or screen. This guide will walk you through the steps required to use the Snipping Tool to save screenshots of your running programs, snippets of other images, and your desktop as images on your computer.
Where to find the utility
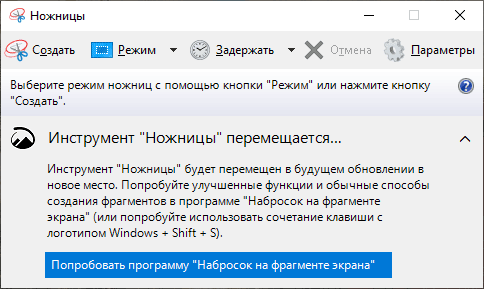
Note that the Snipping Tool will not be available on your computer if the Tablet PC Add-ons feature is not enabled in Windows Vista. The Snipping Tool is automatically installed on Windows 7 and Windows 8. Before we dive into the details of how to use the tool and its options, it’s worth explaining how the tool works. The Snipping Tool allows you to capture portions of your screen using four methods and then save those portions as a JPG, GIF, PNG, or MHT file. Capture methods that can be used for capturing fragments are free, rectangular, windowed, and full screen. We’ll take a closer look at these various methods.

However, it is important to know that when you launch the Snipping Tool, it automatically enters capture mode using the last selected selection type. This means that while the Snipping Tool is in capture mode, you will not be able to use Windows normally unless you cancel the capture by pressing the Capture button or Alt-Tabbing from the tool. Now that we understand this, let’s move on to finding and launching the Snipping Tool. Scissors in Windows (including 10) is in the same place as the rest of the built-in tools. To launch the Snipping Tool, please follow these steps:
- Click the Start button to open the Start menu.
- Then select the “All Programs” menu item.
- Then click on the accessories group.
- Finally, click on the Scissors icon.
If you’re on Windows 8, you can simply find the Snipping Tool on the Windows 8 start screen. Now let’s move on to exploring the different types of choices available to us. When you start Scissors, you can click on the Options button to specify how the program should work. Below we explain what each of these options does and how they affect the snippets or screenshots you create. The parameters are divided into the “Applications” and “Elections” groups. Hotkeys are also available.
Application options:
- Hide Instruction Text – If enabled, hides the instruction text in the main Snipping Tool window.
- Always copy slices to clipboard – if enabled, it will copy all slices to the Windows clipboard so you can paste them into another application, such as word processors or other imaging programs.
- Include URL below snippets (HTML only) – if enabled, if you are saving the snippet as a single file HTML document or MHT document, and the snippet was taken from an Internet Explorer browser window, it will display the URL of the page where the snippet was located …
- Offer to save slices before exiting – if this option is enabled, when exiting the Crop tool, it will offer to save all created cuts.
- Quick Launch Icon – When this option is enabled, an icon for the Scissors tool will be placed on the Quick Launch.
- Show screen overlay when Snipping Tool is active – If this option is enabled, the Snipping Tool interface will disappear when taking a screenshot.
Choice options:
- Ink color – changes the color of the selection border when creating a fragment.
- Show selected ink after capturing fragments – when this option is enabled, the border of the selection will be displayed using the color selected in the Ink Color option around the fragment.

We recommend that you enable all application options except “Include URL Below Snippets” (HTML only) and “Show Screen Overlay” when the Scissors tool is active. For selection options, you can turn off Show Selected Ink After Capture for Better Slices Display. Now that we understand the options, let’s learn about the different types of snippets that can be used.
How to customize the Scissors tool
There are four different types of selection you can use to take a screenshot using the screen scissors. To change the type of selection that the Snipping Tool uses to take the screenshot, you need to click on the small down arrow menu next to the New button. A description of each type of selection and an example snippet are given below:
- Freehand Cropping – This method allows you to draw a shape around a selection using your mouse or stylus. Once the selection shape is drawn and you close the shape so that there are no open sides, a screenshot will be created and shown to you.
- Rectangular Slice – This method allows you to simply create a rectangular selection around a portion of the screen, and whatever is in that rectangle will be used to create the screenshot.
- Window Cropping – When using this method, the cropping tool grabs the contents of the entire selected window.
- Full Screen Screenshot – This method allows you to capture the entire screen on your computer.
Now that we know everything there is to know about the Snipping tool, let’s learn how to use it.
How to work with Scissors
In this part of the article, you will learn how to take a rectangular screenshot using the app for Windows 10 and other versions. So pick a picture and let’s get started! The first step is to open the picture we want to cut and then launch the Snipping Tool as described above. Once the program is open, select the Rectangular Section type by clicking the down arrow next to the New button and selecting Rectangular Section. With the Rectangle Segment option selected, click on the image and drag a rectangular selection around the object by clicking somewhere in the image, and while holding down the left mouse button, drag a rectangular box around the area you want to create. After making the selection, release the left mouse button and the rectangular region will now be sent to the scissors tool. When the fragment is created,the tool will show the fragment in a small window, where you can save it as an image, write text on it using the mouse or stylus, select areas of the fragment.
Now that the snippet is created, if you want to draw a picture using your mouse or stylus, you can click on the Tools menu and then select the pen you want to draw with. If you want to highlight specific parts of the image, you can click on the Tools menu and choose Highlight Color. Last but not least, if you want to delete anything drawn with a pen or selection, you can click the Tools menu and select Eraser to do so.

Finally, when you are happy with how the snippet will look like, you can:
- Email it as an embedded image or attachment by clicking the mail icon or clicking the File menu and choosing Send.
- Save the snippet as a file on your computer by clicking the File menu and choosing Save As. When saving a snippet, the following options are available: JPG, GIF, PNG, or HTML with one file (MHT). For photographs, it is always best to use “Save your snippet as JPG”.
You have finished taking your first screenshot. Now start sending your snippets to your friends and family or embedding them on such sites! The program works on both the latest OS versions and Windows XP.
An alternative to the built-in tool – third-party applications
If you are a Windows user, you know that MS Windows has its own screenshot tool. However, this tool has relatively limited options for capturing and editing the desired image. You will probably have to use a different graphics editor to get the job done. It doesn’t matter if you’re writing a post based on a textbook or assigning your friend or colleague to do a task that he or she doesn’t know. screenshots are very helpful! There are also a few other cases where screenshots will be helpful, such as when you have complaints about the software or need confirmation of something for future reference. To do all of this, you need a screenshot capture tool! By default Microsoft Windows 7 and above comes with the Snipping Tool,which is the main screenshot tool you can use. However, there are times when the Windows Snipping Tool becomes a little ineffective, such as when you need built-in screenshot editing functionality or built-in sharing functionality. Also, it is not available for Macintosh or Linux, which is pretty much a reason to look for alternatives.
Picpick
Picpick is highly recommended for PC for many reasons. It is a full featured screen capture tool. Picpick has been dubbed the Swiss Army Knife for Capturing Screenshots on Windows. It is a very powerful and brilliant tool with incredible performance. Picpick is full of features and user friendly. He creates images that are suitable for home users, graphic designers and software developers.
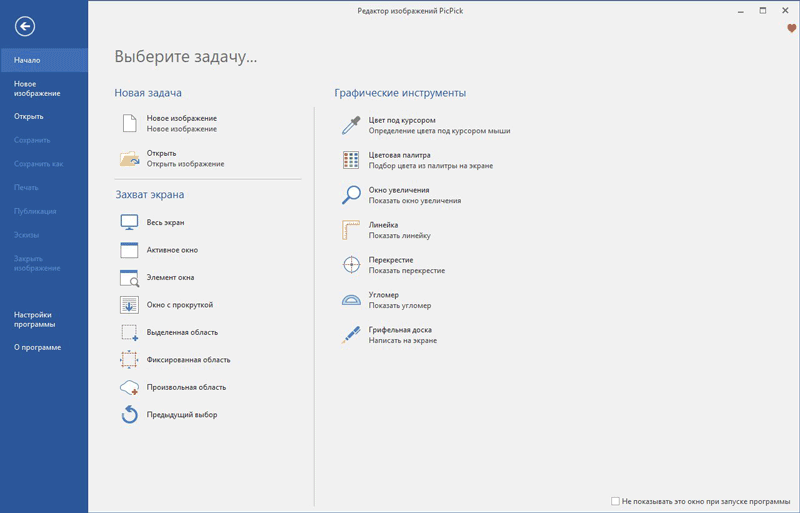
Specifications:
- The standard of this application is three times higher than the built-in tool.
- It can also take screenshots of full screen, scrolling windows, active windows, fixed areas, and freehand.
- It enhances images with effects such as mosaic, watermark, blur, and has editing tools.
- You can customize hotkeys, filenames, image quality, and many other aspects to suit your needs.
The program is a great opportunity for you to share your creation on social networks, Google Drive, Dropbox, cloud storage and others.
PicPick is a complete screen capture tool and alternative snapshot tool that takes editing aspects to the next level! When you need a screenshot with a rich graphics, you can choose PicPick. The screen capture tool allows you to do this in a variety of ways, such as full screen, active window or scroll window, etc. On the other hand, when we go to the PicPick graphics accessories section, there are options such as Magnifier, Pixel ruler , CrossHair, as well as WhiteBoard – each of them will be useful in different cases. The editor also includes all the necessary elements to create an effective screenshot. In addition, PicPick allows you to export your screenshot in various formats such as image files and PDFs, as well as web integration.PicPick is only available for Microsoft Windows.
Price: Free for personal use. $ 21.99 for a single-user license.
Snagit
Snagit has a lot of power when it comes to taking screenshots. Snagit has long been one of the top 5 Windows tools. Snagit is a popular Mac tool. For Windows, it’s more or less the same. It has a lot of potential when it comes to capturing screenshots and editing images, and has been recommended by millions of users. Snagit not only takes screenshots but also:
- Adds shapes, notes, and arrows to the screenshot.
- Adding visual elements to a document takes just a couple of clicks.
- Easily create high quality images and go beyond conventional screen capture.
- It also serves as a video recording utility for Windows and is suitable for most versions of Windows (7, 8, 10 and XP).
- It also allows you to capture all in one, scroll the screen and grab text.
- It can provide you with a full screen, handwritten, all-in-one, PDF web page, and you can copy text to the clipboard.
- The profile has custom settings with which you can take screenshots from videos and games.
- It includes a built-in editor that you can use to annotate and add additional effects when taking screenshots.
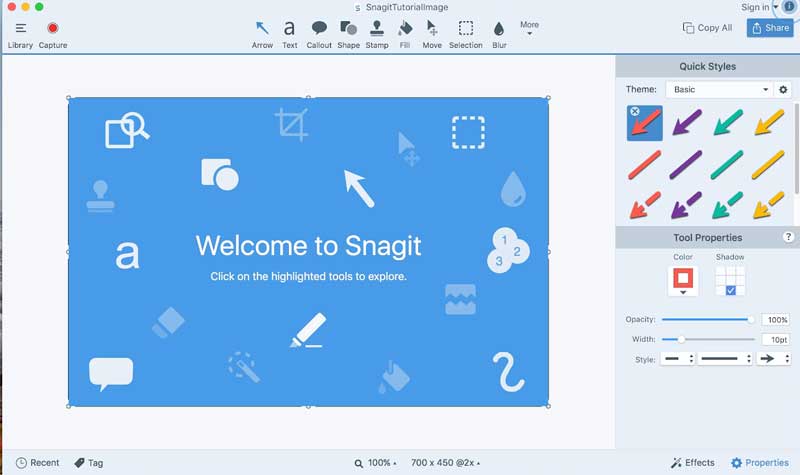
Sangit makes it easy to add videos to your emails, documentation, blogs, tutorials, and social media. The Snagit editor has options for text and highlighting. In addition, you can use the blur, crop, border and shadow options to create the best effect. Snagit is one of the best and most professional screen capture tools you can find and is powered by TechSmith, one of the leading software developers in the industry. The software allows you to take both screenshots and videos. Once you have Snagit installed, you can set a hotkey and press it to start a full screen capture of Snagit – there are many customization aspects as well.
Other features include scroll capture, which allows you to take screenshots of the entire page, even when part of it is visible (for example, a web page). Plus, Snagit has a built-in editing section that has all the shapes and other things you need to make a screenshot really useful. Speaking of accessibility, Snagit is available for Mac and Windows – Snagit 12 for Windows and Snagit 3 for Mac. Thus, when you need a professional alternative to Windows scissors, Snagit is the best choice.
Price: $ 49.95 for a single-user license. The free trial is available for 15 days.
Screenshot Captor
Screenshot Captor resembles Superman because that’s how it works. Plus is a free slicing tool. It is the best offering on the market when it comes to manipulating, annotating, capturing and sharing screenshots. Screenshot Captor supports most Windows versions from XP to 7, 8 and 10.

There are portable versions that can be downloaded by clicking on the portable zip page link on the Screenshot Captor home page. Screenshot Captor features are listed below:
- Complete set of scanner tools along with scanner image correction.
- Has excellent support for multiple monitors.
- This cropping tool has a toolbar with different grab options that can be very helpful to you.
- It has the most standardized capture options such as active window, desktop mode, region, and window object.
- This allows the user to capture images using a webcam and import images using a scanner.
Because of its editing, it beats other programs that can be used to add shadows, text boxes, blur and glow to an image. And even has its own gallery of pictures for screenshots.
SHAREX
ShareX is a fully featured open source free screenshot and screen capture application for Windows. Its GIF and video capture tools are very handy. ShareX is not just a screen capture program. It will also help you capture video. And it is absolutely free, therefore it makes its users happy. All these features make ShareX the perfect choice for those who love different types of editing.
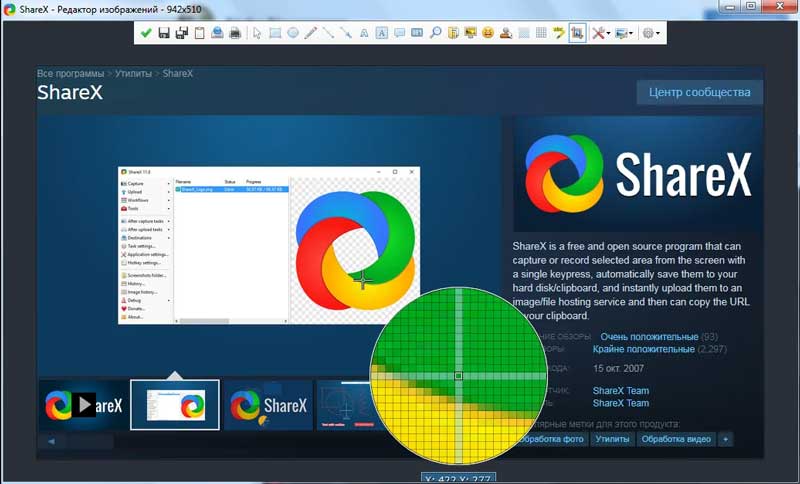
Features of the program:
- ShareX is an extensive post-capture software that gives you the ability to take snapshots.
- Its main editor helps you add text, borders, arrows, and highlights the image.
- The functions of this super tool include full screen, window areas, handwriting, web page capture, scroll capture, and more.
- You can use it to create screenshots with alternate shapes like diamond, triangle, rectangle, and circle.
- You can apply a filter to images to add a watermark effect.
- ShareX includes web page capture, scroll capture and image annotation.
It has customizable keyboard shortcuts and can define borders for easy grip.
LightShot
LightShot is a favorite when it comes to capturing screenshots, probably because the program is free and easy to use! It is an extremely simple installation procedure after which it can replace the scissor tool, with some excellent features. One of the most important things we found in LightShot is the simple interface, which still includes a built-in editing option, one-click upload, and a method to find similar images.

LightShot действительно работает, когда вы нажимаете клавишу Prt Scrn, но вы можете установить конкретную горячую клавишу в соответствии с вашими требованиями и удобством. Кроме того, есть несколько опций для настройки вывода LightShot, например, формат выходного файла, нужен ли курсор в кадре и т. д. Программа бесплатна для Windows и Mac, плюс есть расширения браузера. Другим фактором является то, что вам не нужно открывать специальный редактор для редактирования – всё это происходит на одном экране.
Цена: бесплатно.
Greenshot
Greenshot – ещё один полноценный инструмент для захвата скриншотов, который вы можете получить бесплатно! Хотя Greenshot доступен только для ПК, работающих под Windows, он бесплатный и с открытым исходным кодом и размещается на SourceForge. Каждая часть Greenshot – раздел скриншотов, редактор изображений и экспорт – содержит впечатляющие возможности.

Например, вы можете сделать много скриншотов, используя разные методы, тогда как редактор изображений позволяет добавлять аннотации и выделения к конкретному скриншоту, чтобы сделать его более информативным и эффективным в конце. С другой стороны, раздел экспорта будет полезен, если вы хотите сохранить скриншот для последующего использования. Greenshot чертовски полезен в том смысле, что у вас могут быть специальные горячие клавиши для определённых режимов захвата. Таким образом, инструмент с открытым исходным кодом также включает в себя некоторые весьма впечатляющие и адекватные функции, которые ожидают разработчик или обычный пользователь.
Цена: бесплатно, с открытым исходным кодом.
DuckCapture
DuckCapture – это полноценное решение для захвата скриншотов, которое вы можете найти, когда вам не хватает инструмента Ножницы! Он имеет все функции, необходимые для захвата, редактирования и обмена снимками экрана, которые вы делаете. В разделе захвата у вас есть возможность делать скриншоты на основе окон, скриншоты на основе регионов и скролл-скриншоты, в которых вы можете охватить одну целую веб-страницу. Раздел редактирования впечатляет, так как DuckCapture поставляется с достаточным количеством инструментов аннотаций, а также с возможностью уточнения нескольких снимков.

In the end, you have the opportunity to make the screenshot as informative as possible! You can also share the screenshot in different ways. DuckCapture is now available for both Windows and Mac OS X. There is also a command line version of DuckCapture. Despite all the features, it has an impressive user interface. The program is especially recommended for those who prefer a simple but effective way to create and edit screenshots.
Price: Free.
Jing
Jing is another screenshot capturing solution and alternative tool from TechSmith, one of whose products was mentioned earlier. Jing is a simplified screenshot and screencast capture tool, so it lacks the professional features you’ll find in Snagit. Regardless, you can use the software for a variety of purposes, including work, education, and personal use.

Jing’s user interface is so simple that you will never get confused. nor will you have any problems editing or transferring the captured content. As with Snagit, Jing is available for both Windows and Mac, and has a relatively smaller set of configurations. It should be noted that Jing is completely free, but you still get support from TechSmith. If you prefer a simple yet effective screen capture tool, Jing deserves a spot on the Recommended Apps list.
Price: Free.
Screenpresso
Screenpresso is the best screen capture tool. Used by many popular companies, Screenpresso is an excellent screen capture solution for Windows devices (compatible with all versions including Windows 10, 8.1). It is also available as an iPhone and iPad app. Screenpresso includes various capture modes, support for hotkeys, the ability to capture content in scroll windows, and more. It also supports HD screen recording, which means you can use it for different purposes. Like the other tools mentioned here, Screenpresso comes with a built-in image editor where you can annotate the screenshots you have taken and then save the screenshot in the format that suits you best.

It should be noted that Screenpresso has some visually superior features that are productive as well, such as workspace support. There are advanced features like Android capture, portable mode, multilingual support, and built-in data sharing in various ways.
Price: Free. premium versions are also available.
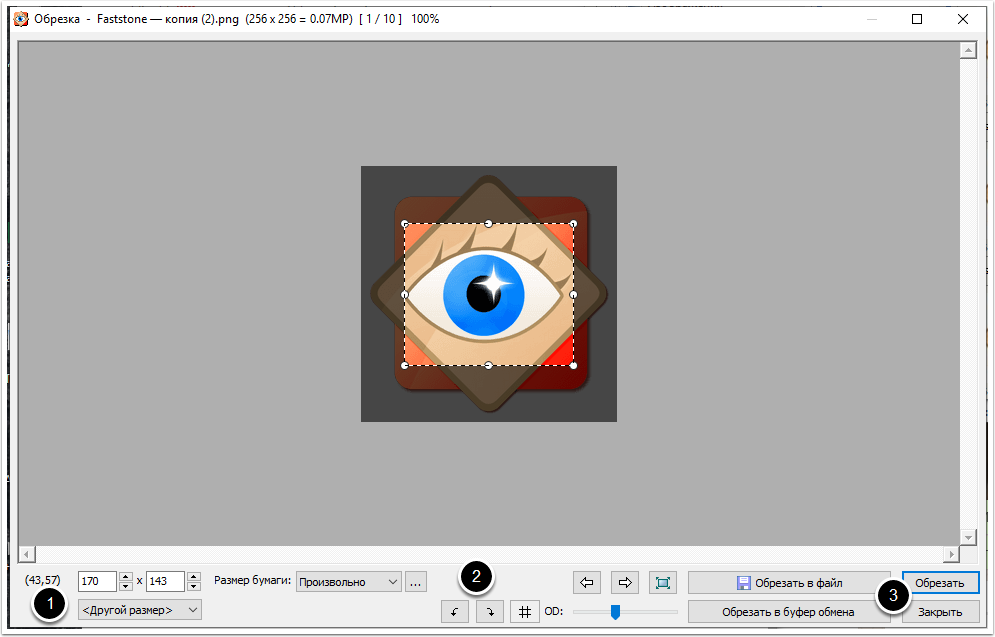
FastStone
Last but not least, there is a Windows tool called FastStone, which is actually quite similar to ShareX. It is a reliable tool that even lets you shoot videos. It comes with a 30 day trial. There is also a portable version of FastStone that you can carry around on a USB stick. The types of screenshots this app offers are active window, freehand area, full screen and scroll window.
Specifications:
- You can share your work with the social networks you need, as well as copy the results directly to the Internet.
- Works with email, Word, Excel, clipboard and other applications.
- It also supports multiple file formats like PNG, JPEG, GIF, BMP, etc.
- It also offers standard options like cropping, resizing, rotating, and color adjustments.
- You can also apply sketch, oil, blur and black and white filter effect to images.
- Instantly activate screen capture with global hotkeys.
These features make it a unique tool for Windows.
Now that you know how to create snippets with the Windows Snipping Tool, there is nothing stopping you from taking great screenshots from your photos, work, or even your desktop. If you’ve worked with Scissors before, share with our readers in the comments below this article.