The Windows operating system has powerful recovery tools that can help you solve many of your problems. Everyone knows about restore points and the ability to independently roll back the system to the state before the failure. But when especially critical errors occur, the system initiates a process called automatic recovery. This happens when the OS starts, and sometimes ends fatally – the appearance of a black screen or the corresponding inscription, which will hang for hours until you turn off the computer. And the next time you turn it on, the picture will be repeated.

This does not mean that you have to reinstall Windows – the problem is fixable, although not always. Today you will find out why the loop occurs during the preparation stage of automatic recovery and what to do to restore the normal boot of the operating system.
Contents
What Happens When Windows Recovery Is Interrupted
To return to a working state, Windows uses system restore points – special folders into which system files and other important data necessary for loading are copied:
- system registry as of the current date;
- local user profiles;
- up-to-date databases of COM / WMI system tools;
- DLL cache;
- installed drivers, etc.
In short, those files that help restore the Windows operating environment at the time the restore point was created.
If the user initiated a system rollback or the OS decided to start the automatic recovery procedure on its own, all the necessary data is taken from a hidden directory reserved for these purposes. Interrupting this process is fraught with the fact that the integrity of some of these files will be violated, and then there is a high probability that all subsequent switching on of the PC will lead to a freeze.
So be patient if you first see an inscription about preparing for automatic recovery. The procedure is really long, it takes about 20-45 minutes to recover, depending on the OS version and its “age”. Focus on a time of about an hour, and if during this time the inscription has not changed or a black screen appears, most likely you will have to “repair” the operating system.
Fixing the problem
The reasons for the freezing of the automatic recovery procedure are various: frequent incorrect shutdown of the computer, damage to files included in the backup, the appearance of “bad” sectors on the disk, lack of free space on the system partition, “activity” of updated drivers or viruses. And this, of course, is not a complete list. Accordingly, there are several scenarios for solving the problem. So, let’s take a look at what to do if Windows 10/8/7 automatic recovery preparation hangs.
Booting in “Safe Mode”
The first thing to try in a situation like this is to boot into Safe Mode. The operating system will use only the most necessary system files and drivers without which it cannot function. The chances of successfully starting a minimal Windows configuration will definitely be higher than with a standard boot.

Many tools will not be available on a trimmed OS, but a set of basic utilities, as well as the command line that you may need to restore system files, will work.
Since it will not be possible to boot into “Safe Mode” by standard means, we need a bootable USB flash drive. If it is not there, then it is not a problem to prepare it on another computer, and we told how it is done.
So, the algorithm of actions:
- insert the USB flash drive into the connector (preferably on the back panel, if it is a stationary PC);
- go to the BIOS, change the boot order;
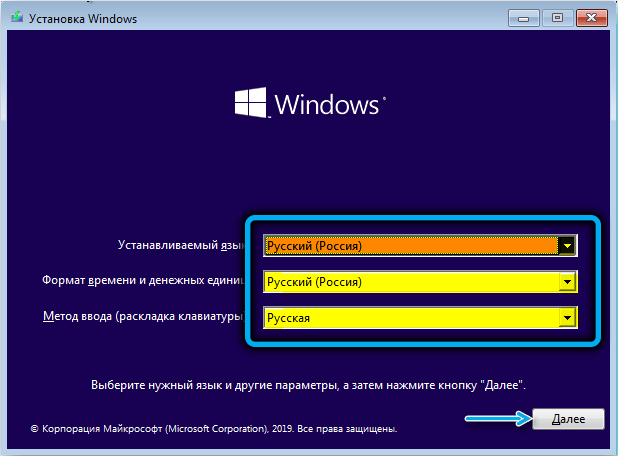
- when the download starts, select the preferred language settings (as when installing Windows), click “Next”;
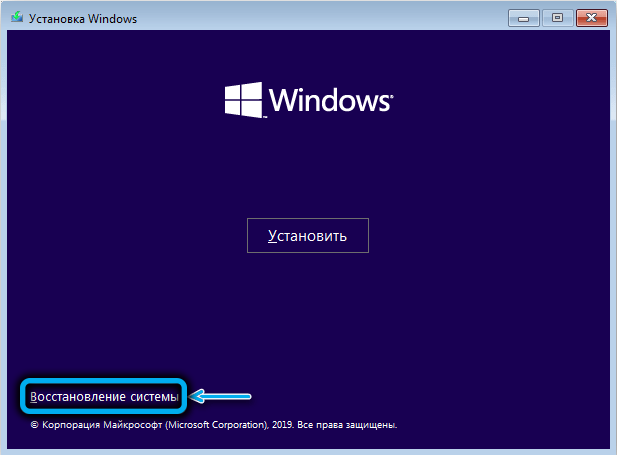
- click on the “System Restore” button;
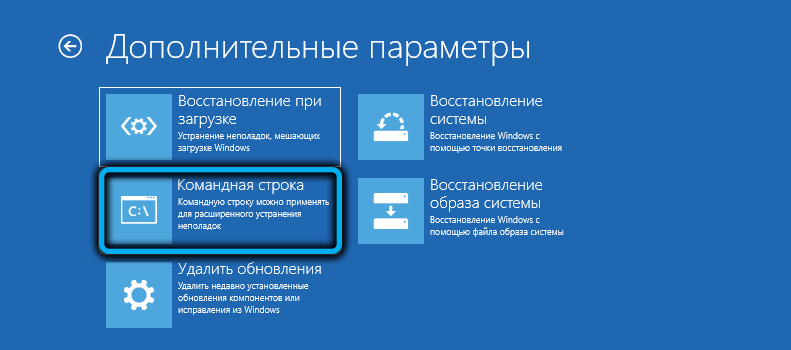
- click on the “Troubleshooting” tab;

- on the next screen, select the “Command Line” tab;
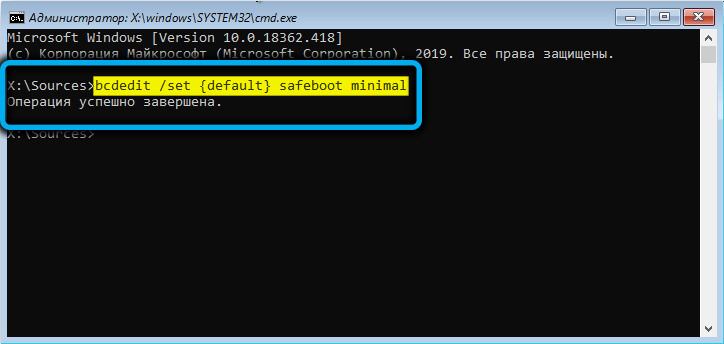
- when the command console starts, enter the bcdedit command with the parameters / set {default} safeboot minimal (braces are needed as part of the command), press “Enter”;
- close the console and again go to the start page of Windows boot;
- we press the button “Continue”.

If the download is successful, you may be required to enter your account password (regardless of which authentication method was used before the system crash).
Now you can run Command Prompt again as an administrator and perform a system check with chkdsk, sfc, and dism.

The chkdsk c: command will check the file system of the computer and the disk itself for errors (for example, the use of the same sector by several files or unreadable sectors). If any are found, it is worth starting a scan with additional parameters:
chkdsk с: /f /r

In this case, an attempt will be made to correct the detected errors.
The next step is to check for corrupted system files. This is done using the sfc / scannow command, preferably with additional parameters / offbootdir = c: (here c is the letter of the boot drive, it can be different) and / offwindir = c: Windows (directory with the installed operating system). This will speed up the check.

The dism command with the / Online / Cleanup-Image / RestoreHealth parameters completes the scan. It will check the presence and integrity of the storage of system components and will try to restore damaged or inaccessible components by downloading them from the Internet. Of course, if you have access to the network.

After completing the check, we try to boot in normal mode.
But not always in a situation where the computer freezes at the stage of preparation for automatic recovery, it is possible to get into “Safe Mode”. In such cases, proceed to the next step.
Special means
We repeat the first four steps of the previous section, but instead of the “Command Line” tab, we press another button – “Startup Repair”. This is a special tool for finding and eliminating the reasons that make it impossible to start Windows normally.

All that remains is to select the desired OS (if you have several of them) on the next screen and wait until this operating system recovery tool completes.

Using restore points
System rollback is a powerful and fairly effective means of restoring the operating system to operability, regardless of the reason for the failure. In our case, when Windows 10 does not boot at startup (a message pops up about preparing for automatic recovery or a black screen appears), this tool is definitely worth using. Yes, it has drawbacks – the state of the computer will be restored at the time of creating the backup, that is, all programs installed later will disappear without a trace, along with entries in the registry, but user data (documents, photos, videos, audio recordings) will remain intact, even if they appeared on the computer later.

The main condition is for the restore point creation tool to be activated. In later versions of Windows, the backup tool is enabled by default, but you could have disabled it – unknowingly or in order to reduce the load on the PC or save disk space.


The procedure itself is quite simple to start. You need to boot from the USB flash drive again, select the “Next” and “System Restore” tabs, and then click on the “System Restore” button.

On the next screen, select the OS version, click “Next” (twice) and get into the window in which there will be a list of restore points available for the system.

It is generally recommended to choose a date prior to the occurrence of problems, if you can remember when they started. In our case, most likely, this will be the nearest date. We click on it and click “Next”, we wait for the completion of the procedure.


If the list of restore points is empty, then you are out of luck and will have to try other ways to solve the problem with endless preparation (looping) of the automatic system recovery procedure. And this should serve you as a good lesson for the future: creating backups should be active, and Windows will take care of creating them. This usually happens when installing programs, updates, or drivers that affect important system files.
Equipment check
If all of the above steps were unsuccessful and the computer or laptop still does not turn on, freezing up with a message about preparing for automatic recovery, you should think about checking the equipment. Especially in cases where you recently installed a new device on your PC that requires the latest drivers for stable operation. Failure to comply with this condition can lead to instability of the operating system and, ultimately, to an error in automatic recovery. Usually, a system rollback solves such problems, but if it is not activated for you, try removing this hardware along with the installed drivers.
An approximate procedure for checking the performance of the rest of the “hardware”:
- disconnect from the computer all external devices connected through the connectors on the rear and front panels, with the exception of the mouse (you can also leave the keyboard). If the problem with restoring Windows as a result of the efforts made is resolved, you need to use the elimination method to determine what exactly became the culprit of your troubles, connecting these devices one by one;
- the next step will take some experience as you will need to dig into the insides of your PC. First you need to determine the operability of the RAM. If you have multiple planks, remove one at a time and check the result. If it’s the only one, borrow a known good one from a friend and try to boot with it. You should not ignore the OP check, it becomes a source of problems quite often;
- the hard drive must also be checked. It is possible that simply disconnecting and reconnecting the HDD will fix the problem. If there are several drives, it does not make sense to disconnect the non-system drives – they are not involved in the initial stages of Windows boot.
Reinstalling the system using the installation flash drive
This cardinal step is worth resorting to if all of the above methods did not work, and the equipment check showed that it was completely serviceable. If there is important data on the system disk, it will most likely be lost. That is why it is recommended to store user files on a separate disk, volume, or at least a partition.

How to disable automatic repair in Windows 10
Although it is strongly discouraged to do this, especially if the operating system is stable and not satisfactory, in our case such a step makes sense. Windows have been known to boot normally when automatic repair is turned off. That is, the error occurred due to a failure in the procedure itself. But if this does not happen, you will have a chance to more accurately diagnose the problem.
Here is a step-by-step algorithm:
- insert the bootable USB flash drive into the PC;
- go to the BIOS, change the boot order;
- click on the “System Restore” button;
- click on the “Troubleshooting” tab;
- on the next screen, select the “Command Line” tab;
- in the console, type bcdedit / set {current} recoveryenabled no, confirm by pressing Enter;

- exit the console, click on the “Turn off computer” tab.
When you turn it on again, either normal boot will continue or a black screen will appear.
You can return automatic recovery with the same command, replacing the no parameter with yes. But it will work if the console is launched as administrator.

We really hope this article helped you get rid of the loop while preparing for automatic recovery. This means that we did not try in vain. And once again we remind you: the appearance of this message when starting Windows only means that the system itself will try to find and fix errors, and this can be a lengthy process.