The performance of the computer largely depends on the RAM. Therefore, it is especially important that the RAM installed on your PC is working properly. Unfortunately, it is not uncommon for users to find that the computer does not recognize the installed OS. In this article, we will figure out what to do if the computer does not see the RAM.

Contents
Bit width and revision of the operating system
The first and most common reason is the 32-bit version of Windows. Not all users know and understand the difference between 32- and 64-bit versions of Windows. You should be aware that a 32-bit system will not see more than four gigabytes of RAM. Therefore, if your computer has 6 or more gigabytes of RAM, do not install Windowsx32. Otherwise, 2 gigabytes will not be used. If this is your case, installing Windows x64 will fix the problem.
In the event that you do not know which OS is installed, go to the path “Control Panel” → “System”. At the bottom of the window, in the “System type” item, all the necessary information is indicated.


Another important point, which is also overlooked by many, is the importance of the release of the operating system. “Initial”, “Maximum”, “Home” – these are not just names. The maximum available RAM depends on the release. For example, in the basic home version of Windows 7, only 8 gigabytes of RAM is available to the user, even if a 64-bit operating system is installed. So be sure to read all the restrictions that are in the version of the OS you have installed or the one you intend to install.

Motherboard limitations
In addition, a motherboard can have a limitation on the maximum amount of RAM. The number of slots for OP modules does not guarantee that the “motherboard” will work with all of them. You can find out through the BIOS. To do this, press the F2 or Delete key on the keyboard (there may be another, depending on the brand of PC). Once in the BIOS, you can see how much RAM your computer’s motherboard sees.


If you’ve checked compatibility and everything is in order, try downloading an update for the chipset. Go to your board manufacturer’s website, download and install the driver, and then restart your PC.

Disabling the “Maximum Memory” setting in MSCONFIG
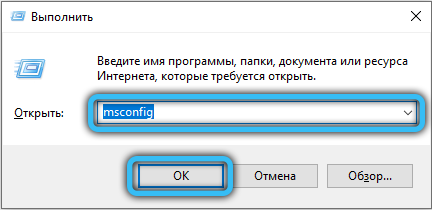
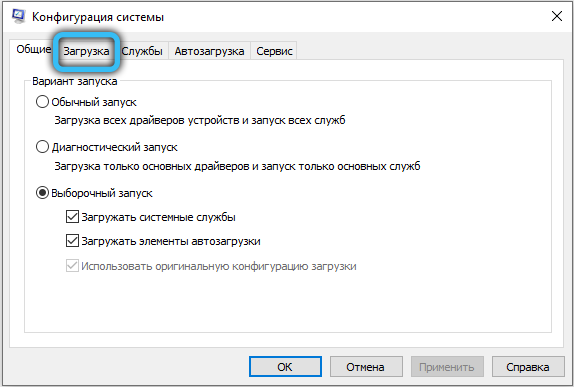
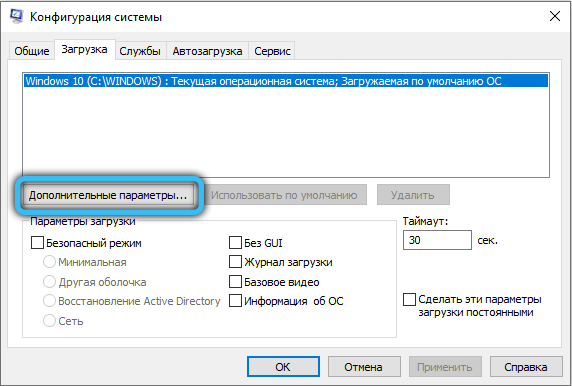
Quite a common case when the maximum available memory is limited by the system itself. To remove this restriction, press the “Win + R” key combination and enter “msconfig” in the corresponding field (or enter “System configuration” in the Windows search bar). In the window that appears, go to the path “Download” → “Additional parameters”, then make sure that there is no check mark in front of the “Maximum memory” item or the specified value is not less than the amount of your RAM.

Allocating memory for the integrated video card
Part of your computer’s RAM can be used by various equipment for its work, in particular, an integrated video controller. You can check the amount of RAM that the built-in video card consumes by going to the “Control Panel” → “System” section or by right-clicking on the “My Computer” icon and selecting “Properties”. In the event that the hardware actually consumes any amount of memory, in the open window you will see two parameters: installed RAM and available for use (in brackets). By calculating the difference between these values, you will get the size of the RAM required for the operation of the devices.


Any video adapter built into the motherboard takes up a small amount of memory, since it does not have its own resources. To see which GPU is currently in use, open Device Manager → Display Adapters. Laptops often automatically switch to the integrated graphics card under low load. This can be fixed by setting the priority in the BIOS settings.


Memory reservation for system needs in BIOS / UEFI
In order for your computer to fully utilize the full potential of your RAM, sometimes you have to perform additional BIOS / UEFI settings. Going there, find the “HPET Mode” counters mode and set the “64 bits” parameter for it. Then for “Memory Hole” select “Disabled”. Set the “Memory Remap Feature” option (there are other similar variants of the name) to the “Enabled” state.


Disable virtualization
This technology is also capable of affecting the allowable amount of RAM. Therefore, we recommend that you try to disable this feature and check the RAM status again.
Disabling is carried out through the BIOS in the “CPU” section (or another similar name). Typically, it is located under the “Advanced” subcategory. The option we are looking for has different names, depending on the manufacturer. For Intel – “Intel Virtualization Technology”, AMD – “SVM Mode”. This function should be set to “Disabled”. Save the settings and check the RAM again.


BIOS update
Very often, updating the BIOS version helps to fix problems with a computer or laptop, including the visibility of RAM.
An equally effective method is to reset the settings to factory defaults. This can be done from the BIOS menu by going to the “Exit” tab and selecting the “Load defaults” item. Alternatively, remove the battery on the motherboard for a few minutes.

Cleaning ports and contacts
The reason for the incorrect display of memory can be contamination or damage to the modules themselves and ports on the motherboard. Just in case, try blowing dust out of the slots, as well as cleaning the contacts with a regular eraser. Please note that in some cases it is necessary to install modules in certain slots. This information can be found in the instructions for the “motherboard”.
Checking the connection
Do not forget that RAM modules may be incorrectly installed, as a result of which they are not detected by the system. If you already had experience in disassembling a computer, disconnect it from the network, disassemble the case and remove, and then reinsert the OP brackets. You can also rearrange them, sometimes it works.
In addition, remove the processor and check the condition of the legs, if they are bent. Not the most obvious way, however, in some cases it is decisive.

In some situations, especially if you are assembling a new computer yourself, overly tightening the cooler can lead to problems with the visibility of the RAM. It bends the motherboard, so it is likely that unwanted malfunctions will follow. Therefore, we strongly advise you to check this moment and, if necessary, loosen the mount.
In addition to all of the above reasons, the case may be in the banal failure of any OP module. To verify this, it is recommended to test the RAM for operability. You can read more about this in the article “How to check the computer’s RAM”.
Now you know what to do if the PC does not see the RAM. Write in the comments if this article helped you, share with other users your experience in solving similar problems and ask any questions of interest on the topic considered.