Users accustomed to the Windows graphical interface are wary of the command line, avoiding using it if possible. Indeed, most system utilities that run through a text-based interface have equivalent methods of execution through the Run console, or even directly from the desktop or through the Start menu.
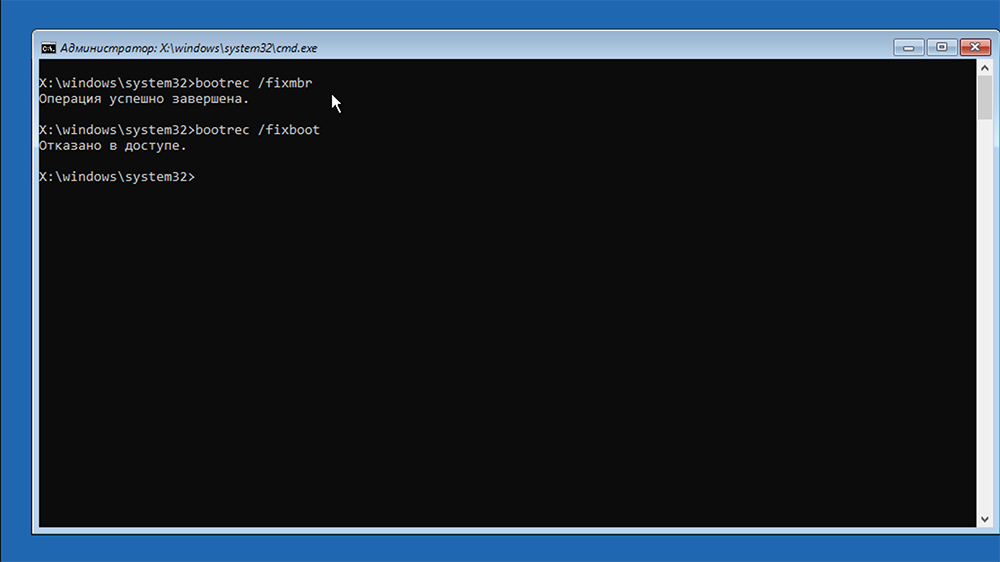
But it is the command line that becomes indispensable if there are problems when starting the operating system. All you need to do is start Windows in this mode and use the boot record recovery tools. But sometimes failure awaits at this stage, when, when starting the command line, an access denied message appears.
Today we will look at the reasons for this failure and how to fix the problem.
Contents
Reasons for denial of access
Most users have at least once faced the blue screen of death when the computer flatly refuses to boot. There are many built-in tools that can solve the problem in the most painless way that are part of the Windows Recovery Environment. One of them is the “bootrec / fixboot” command, which is executed in command line mode. You can enter it from the boot menu, which is called when the PC is turned on by pressing the F8 key (usually, for some BIOSes, this may be a different key or combination).
Strictly speaking, the bootrec.exe system utility with the / fixmbr and / fixboot parameters simply takes the files needed to boot the operating system from a USB flash drive or external drive and overwrites them on the PC’s system drive. So if the boot files have been damaged, for example, by viruses, this command is able to restore the ability of Windows to boot.
Another thing is that in some cases, launching bootrec / fixboot ends up with the “Access denied” line.
The reasons may be different:
- there are bad sectors on the system disk;
- an error occurred while writing a system image to a USB flash drive;
- the virus was present on the computer where you created the bootable media;
- you forcibly rebooted the computer that was in the process of recovery at the time.
In any case, this is not fatal, but in order to fix the error, you will have to try.
What to do if access is denied when executing bootrec / fixboot
Most of the tools used to troubleshoot an access error (bootrec / fixboot may also receive an item not found error) are performed using the Windows Recovery Environment. This means that you first need to prepare a system image recorded on an external drive, as well as figure out how to enter the Boot Menu.
Integrated boot loader repair
The most effective way to restore the boot of the operating system, including when bootrec cannot be performed, is to use the recovery environment by booting from a USB flash drive.

During the download process, you will need to select a language (of course, Russian), and then, instead of the “Install” button, click on “System Restore”.

In the new window, select the “Troubleshooting” tab, and then “Startup Repair”. In the next window, you will be asked to specify the OS for which you want to restore (the choice will be if you have several operating systems installed on your computer).


In principle, this is where your intervention in the recovery procedure will end. Then the system will reboot, after which the troubleshooting procedure will start. The hard disk or SSD will be scanned for unreadable sectors, if errors are found, the utility will automatically fix / eliminate them, prompting you to reboot again. Agree.


If the result of the Windows recovery tool is negative, a window with a corresponding message will appear. In this case, go to the next item, having previously clicked on the “Additional parameters” button.

Overwriting the system boot sector
This method should be performed if the previous one failed. In principle, you can start with it, following all the points in the previous section, up to selecting the “Troubleshooting” tab, and then, in the advanced options window, instead of restoring at boot time, click the “Command Prompt” button.


When the KS console appears, type the bootsect / nt60 sys command and press <Enter>.

If you have Windows Vista or earlier, type / nt52 instead of the / nt60 parameter. The result of working out a correctly typed command (you need to follow this very carefully) is the line “The boot code has been successfully updated …”

After that, we type bootrec / fixboot again, and almost certainly the Windows 10/8/7 Access Denied error will not occur. When the utility runs, the message “Operation completed successfully” will appear. We close the command line window and click the “Continue” button, after which Windows should successfully restart.


Restore boot records
Another effective way to get rid of the fixboot runtime error is to update the Windows Master Boot Record along with the boot parameters. This is done as follows:
- we perform all the steps of the previous methods up to opening the command line;
- in the terminal window of the COP, type the command bootrec / rebuildbcd, confirm by pressing the <Enter> key. As a result, the utility will try to find installed versions of Windows on all partitions of the disk, and if none are found, it will offer to use the current one. We agree;

- now we run bootrec with the / fixmbr parameter (hereinafter, any command requires pressing <Enter> to confirm). This parameter is responsible for overwriting the master record (MBR) on the system partition;

- you can now try to repair the boot record again with the bootrec / fixboot command. If the previous steps were unsuccessful, then this method is likely to succeed.

Formatting the boot partition
In recent versions of Windows, a separate section is allocated for the operating system loader. If you encounter critical errors that make it impossible to boot normally, you can try to delete this partition in order to recreate it.
To do this, we will need the command line again, and you already know how to enter it. Further actions:
- in the terminal window, type the command diskpart – this is a utility for working with disks (partitioning, formatting, etc.);

- then we type list disk, which will show what disks are in the system. We need a system disk, usually it comes first and has number 0;

- go to this disk by typing sel disk 0 (instead of 0 there may be another number);

- we type list vol to see what partitions are on the selected disk. If there are several of them, you need to determine which one contains the bootloader. It is usually small, no more than 500 MB, marked Hidden, and uses the FAT32 file system type. We also remember the names of the remaining volumes, designated in Latin letters;

- select this volume by typing the sel volume X command (where X is the number of the boot partition);

- we assign a unique name to the boot partition in the form of a Latin letter, which should not coincide with the existing ones. This is done with the assign letter = X command. To check, we execute list vol again, as a result, our volume will receive its letter;

- exit diskpart by typing exit.

Now the system partition with the bootloader can be formatted (without assigning a unique name, we would not have done this), for which we type format X: / FS: FAT32. Here, instead of the letter X, you need to substitute the name assigned in the previous step. It is important not to mix it up, otherwise you will format another partition where data important to you may be located – it will be lost. Press “Y” and then <Enter> to confirm the operation.

After formatting, you will be prompted to assign a label (name) to that – full, not just one letter. But this is not necessary, so feel free to press <Enter>. The penultimate step is to create a bootloader “from scratch” on the newly formatted system partition, because without it, Windows will not boot. This is done using the bcdboot C: Windows / s X: / f UEFI command.

Here, instead of X, we put the name of our volume, the / s parameter means that all boot records will be deleted when creating a new storage, that is, we create a “clean” version of the BCD bootloader. The / f UEFI option specifies to copy the bootloader EFI file to the new section. As a result of executing the command, the message “Boot files have been successfully created” should appear. The final step is the bootrec / fixboot command, in this case the “Access denied” error, as well as “The specified file cannot be found”, should not appear with a 99% probability.

As you can see, the recovery of a damaged boot record is possible, even if it is completely corrupted, here it is important to follow the instructions exactly and not to make mistakes when entering commands.