Using software drivers to ensure the compatibility of the operating system with computer hardware is not only an effective tool, but the only one possible. But it is also the source of many problems that, unfortunately, occur quite often. One has only to install the “wrong” driver or other program. Most of these problems are solved by booting the system in safe mode, when only the main drivers are used, without which Windows cannot function.

As BIOS boot speeds increase, getting into it becomes more and more difficult, and some PC manufacturers disable this feature altogether. But it turns out that there are other ways to get into a mode designed to protect the computer from failures. We will talk about them today.
Contents
How to boot Windows 11 into safe mode
For the convenience of users, there are 3 options for safe mode:
- normal startup with a minimum configuration of loaded drivers;
- launch with an internet connection (which should be used with caution);
- start with command line.
Unless otherwise stated, we will assume that we are interested in the first option.
Using the Start Menu to Start the OS in Safe Mode
The easiest way to enter Safe Mode in Windows 11 (also referred to as Windows RE) is to use the Start menu, in which you need to click on the Shutdown button and, while holding down the Shift key, select the Restart menu item.

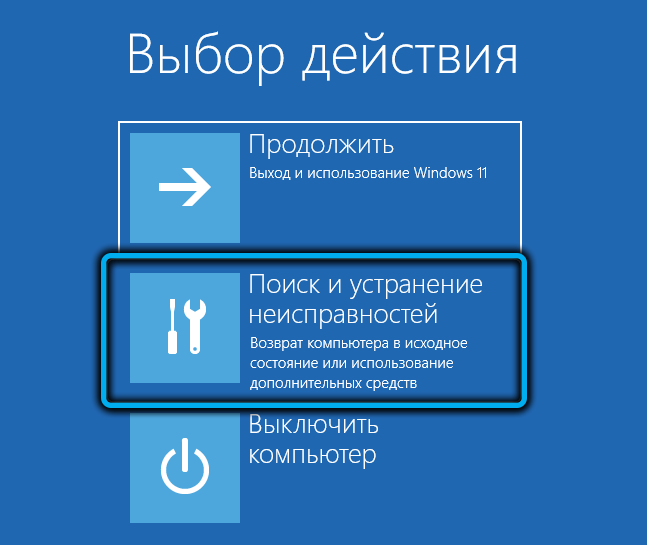
As a result, the OS will boot into the recovery environment, and our further actions will be as follows:
- select the “Troubleshooting” tab;
- click on the “Advanced options” option;
- on the next screen, select the “Download Options” tab;
- this screen will be informational, listing further possible actions. Click “Reload”;
- select safe mode (there will be a hint on the screen which key to press for this).
Starting safe mode through the system configuration window
Another well-known method on how to enter safe mode in Windows 11 (and other versions of the OS) is to use the system configuration utility. As in the previous case, it only works if Windows boots to the desktop stage.
Step by step algorithm:
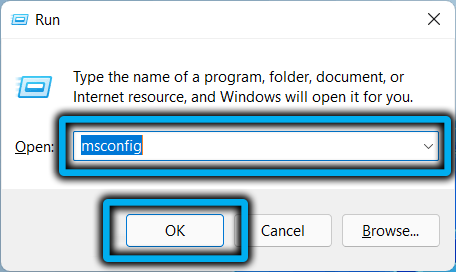
- launch the Run console by pressing Win + R, enter the msconfig command, confirm by pressing Enter;
- the Windows 11 configuration window will open, select the “Download” tab;
- if you have several operating systems installed, select the desired option in the window that appears;
- check the box next to the “Safe Mode” parameter and select the desired submode (in our case, the minimum one).
It remains to click OK and reboot the system.
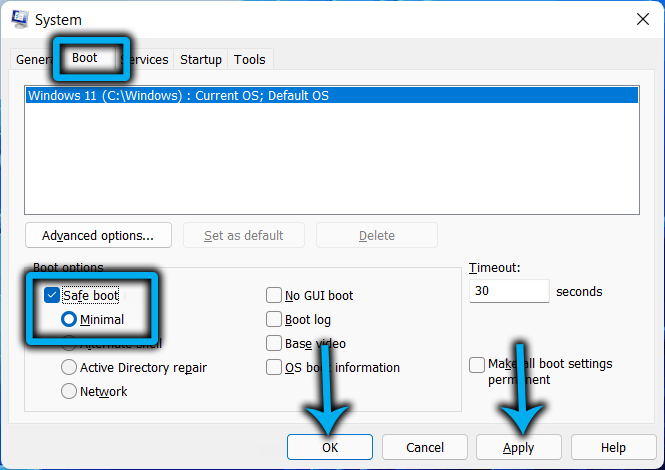
If you check the “Make settings permanent” checkbox, then the computer will restart in safe mode each time, and in order to return to normal boot, you will need to run msconfig again and disable this option.
How to start the PC in safe mode through “Settings”
Another way to get Windows 11 into basic driver download mode is to use the Settings app.

To call it, press the combination Win + I or through the menu of the Start button, click on the gear icon. In the “System” tab, scroll down the right block to the “Recovery” item.

In the new window, select “Advanced Startup Options” from the available system recovery options and click on the “Restart now” button, confirm by clicking on the “Restart” button.

As a result, Windows 11 will boot into the recovery environment, and then safe mode is started according to the worked out algorithm.
Download via command line
There is a category of users who prefer to use the command line to solve various problems that arise in the operation of the operating system. Especially for them, we have prepared a step-by-step algorithm on how to properly boot into safe mode using the Windows Terminal.
True, in this case, you will again find yourself in Windows RE, that is, in the recovery environment, but you already know how to proceed further. So, the sequence of actions:
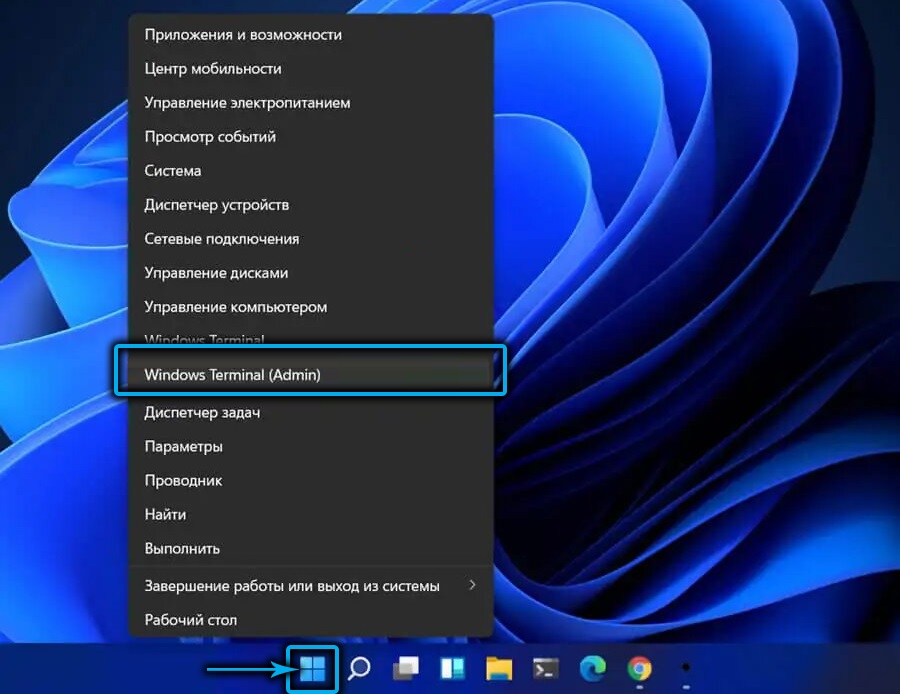
- launch the Windows Terminal application using the Start button menu (required with administrator rights);
- By default, in Windows 11, when you start the terminal, the PowerShell utility starts. To switch to the command line, in the upper status bar, press the down arrow, a context menu will open, in which we select the “Command line” item;
- in the welcome window of the command line, type the command shutdown.exe / r / o, confirm by pressing Enter. Here the command itself is to end the session of the computer, the / r option indicates that a reboot is necessary, and the last option indicates that as a result, Windows RE will be logged in;
- we enter the command line from the recovery environment in the manner described in the first section.
In principle, you can use PowerShell, but then we need to enter two commands:
reagentc /boottore
and
shutdown, но уже с другими параметрами: -r -f -t 0

How to enable safe mode if booted from the lock screen
All previous methods described entering the recovery environment if Windows 11 booted normally. Unfortunately, this is often not the case. If you are stuck on the lock screen when you turn it on, your actions will be as follows:
- at the bottom right, click the icon with the image of the power button (a circle with a vertical line at the top);
- in the menu that appears, while holding down the Shift key, click “Reboot”.
As a result, you, as in all previously described cases, will enter the recovery environment, from which you can easily get to safe mode.
How to boot into safe mode if Windows 11 won’t start
But what if you don’t have the opportunity to get to the recovery environment using any of the described methods, that is, the loading of the operating system stops on a black screen and does not respond to keystrokes?

There is a way out in this case too. True, it is not only unofficial, but also potentially dangerous, since you have to turn off the computer in an unrecommended way, which can lead to damage to system files.

The method is as follows: when you turn on the PC, as soon as the splash screen flashes, turn off the PC with the Power button on the system unit or laptop, holding it down for 5-10 seconds.
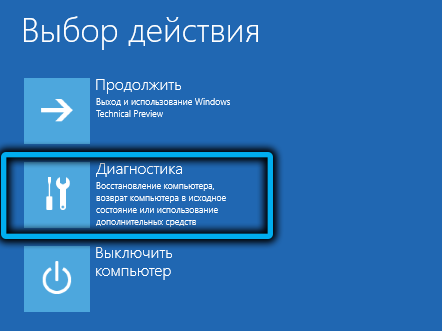
We repeat the procedure again, as a result, after the third power-up, an attempt will be made to restore the system with a message about incorrectly turning on the computer.

There will already be an “Advanced Options” button, by clicking on which, we follow the usual path, up to the “Download Options” screen and pressing the “Restart” button.

The second method is more complicated and troublesome, but reliable: you need to log in using a bootable USB flash drive, and when the installation screen opens, press the combination Shift + F10 (for some laptop models – Shift + Fn + F10). As a result, the command line will be launched, and you need to enter a command of the following form (enter exactly as described, with curly braces):
bcdedit /set {default} safeboot minimal
As always, confirm by pressing Enter.

Now you can restart the computer, but in normal mode, removing the USB flash drive – if the bootloader is not damaged, the operating system will start in safe mode.
True, not only this one, but all subsequent turning on of the computer, so if we have solved the problems that have arisen, you can return the normal boot of Windows using the methods described in the next section.
How to get out of safe mode
Normal work in safe mode is very difficult, and in some cases even impossible. The reason is clear – not all drivers are loaded, which causes conflicts when starting some programs. In principle, it is needed mainly to run system utilities or perform other actions (for example, scanning the system with antivirus software).
When using some methods to enable secure startup (for example, by changing the system configuration), it will be activated every time the PC is turned on, and it will no longer be possible to get into the system configuration again: the Run console will not work.
Consider a more sophisticated method on how to disable safe mode in Windows 11:
- launch the “Task Manager” using the combination Ctrl + Shift + Esc;
- go to the “File” menu;
- select the item “Start a new task”;
- enter the msconfig command, click OK;
- click on the “Boot” tab, uncheck the “Safe Boot” option, click OK.
- a confirmation window will appear – click the “Restart” button, wait for Windows 11 to load in normal mode.
The second way to disable safe mode is to use the command line. The command will look like this:
bcdedit /deletevalue {current} safeboot

It remains to confirm by pressing Enter, close the system configuration window and restart the computer in a regular way.
Adding Safe Mode to the Standard Boot Menu
If you have to deal with safe mode relatively often, it’s better to add ego to the boot start menu.
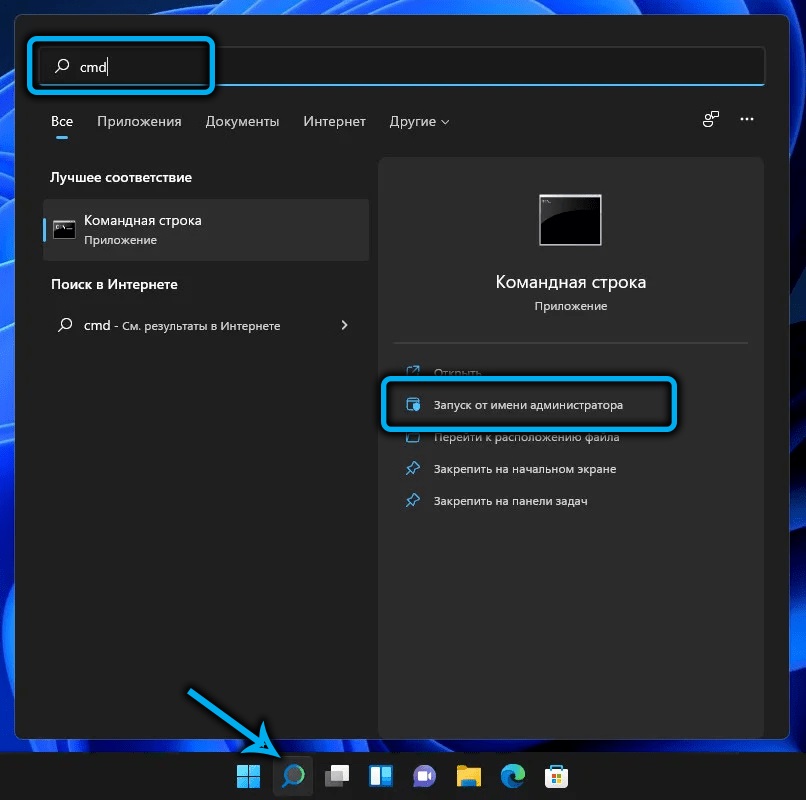
It is not difficult to do this: we launch a command line with privileged rights in a convenient way, enter the command
bcdedit /copy {current} /d "Safe Mode"
As a result of executing the command, it will report on the successful copying of the record, indicating the identifier of this record, enclosed in curly brackets.
We enter a new command:
bcdedit /set {идентификатор_записи} safeboot minimal

And instead of the words record_id, we substitute the name of this identifier obtained by the previous command.
Instead of entering the second command, you can run msconfig, select the “Boot” tab, check the box next to the “safe mode” option with the choice of the desired option from among those offered, click OK.
As a result, each time the PC is turned on, a screen with a menu will appear, where the second item will be the required one.

Conclusion
The abundance of ways to boot the system in safe mode should not scare you – you just need to remember one, the most convenient one. It is desirable that after the next reboot of the OS, the computer boots in the usual way, otherwise you will have to deactivate this function.
