HDMI technology allows you to connect different devices together. For example, if you do not have enough dimensions of a computer monitor for comfortable viewing of game or video content, you can display the image on the TV screen. Sometimes, with this pairing, the sound disappears and a notification appears that the device is already in use by some other application.
Even restarting the OS does not guarantee normal playback – the sound will appear for a short time and then disappear again. Let’s see what can be done in such a situation.
Why HDMI audio may not be missing
The message that the device is already in use by some other application appears for two reasons:
- the device is not configured as a sound translator;
- the drivers are out of date or having problems.
Also, sometimes the wrong connection of the connecting cable is to blame – this is the first thing to check before moving on to other actions.
How to fix a sound problem if “The device is already in use by another application”
If everything is connected correctly, but still no sound, try the following:
- In the system search, enter: Device Manager and click on the corresponding icon.
- Find in the list the name of your TV or other device that you are trying to connect to your PC. If not, then reconnect the HDMI cable.
- Click Update The Hardware Configuration at the top so that the system will recognize the device and it will start working normally.
Check if the error has been fixed. In case of failure, proceed to the settings in the “Control Panel”. The procedure for setting up HDMI audio in Windows is as follows:
- In the system search, enter the word “Sound” and click on the icon that appears.
- Look where the green circle with a mark is located – it should be opposite the device that you connected to the PC.
- If not, then right-click on the desired device and select “Enable”, and the rest – “Disable”.
If this does not help, then you need to check the driver of the sound device. Popular companies supply their equipment with special contact software, which is installed at the first connection. For simple no-name products, Windows has a standard driver in store. And with that, and with another, a nuisance can happen – a loss of relevance, a problem with a signature, a failure, and so on.
- Connect to the Internet – preferably unlimited and high-speed.
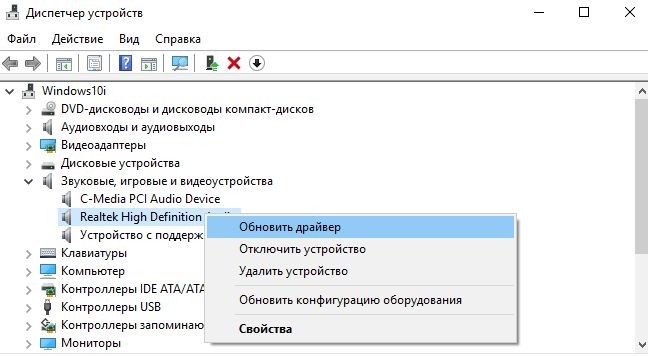
- Enter again in the system search: Device Manager and find your device in the list.
- If it is not there, then it is indicated by a question mark and is called Other Device.
- Click on the name with the additional button of the manipulator and select Update Driver.

- Wait for the update to complete.
- If the problem persists after the update, then select Roll Back Driver.
There are other ways to set up HDMI correctly:
- disable all extraneous sound output devices;
- use a system restore point.
Try the first as the simplest first:
- Open Device Manager and look at the list in the section with audio devices.
- By clicking the additional button and the Unplug option, turn off the speakers, headphones, speakers and everything else, except for the connected device.
- If it is not active at all, then select Enable and check for sound.
Sometimes it happens that problems with sound were not initially observed, but it appeared after some operations: you made changes to the OS registry, used an optimizer program, deeply cleaned memory, installed a new application, etc. Recall the date when everything was fine and try this:
- Disconnect your HDMI device from your PC or laptop.
- Click on the “Computer” icon with the additional button of the manipulator.
- Select the Properties tab.
- On the left you will see the sections, you need to expand System Protection.
- Look in the window that appears to see if there is a “Enabled” mark in front of the C drive (or other system drive). If not, then it can be installed, but now we will not be able to restore it. If so, proceed to the next step.
- Click the “Recovery” button. The recommended OS date will appear – remember if it suits you, whether the sound via HDMI worked that day. If everything is in order, agree with the operation or choose another point
- A rather lengthy regeneration process will begin. At this time, it is better to connect the charger to the laptop so that the battery does not run out at a crucial moment. The system itself will notify you when everything is over.
After that, reconnect the device and check the sound – it should work fine.