During their work, many programs create temporary files that are stored in special folders. With various failures and errors, some applications do not clean up the “garbage” in the form of these temporary files. They can also remain if the application is uninstalled incorrectly. In this article, we will find the folders you need and figure out how to delete temporary files in Windows. We will learn how to clean in two ways: on our own (manually) and using built-in Windows functions.

Temporary storage of files is a necessary practice in any Windows, but you need to delete these files regularly, otherwise there is a high probability of clogging up your hard drive, this problem is especially relevant for owners of hard drives with little memory reserves. There are times when users accumulate 50, 70 or more gigabytes of temporary files, perhaps you are one of such users.
Contents
Manual way to clean up the folders you want
First of all, we are interested in two Temp folders of the same name, which are located in different directories and you can get to them in different ways. Go!
C: / Windows / Temp
So where are temporary files stored in Windows 7? We shouldn’t have any special problems with the first folder, open “My Computer” (“This Computer” to delete temporary Windows 10 files), go to the system drive, usually this is the drive (C :). Open Windows and look for Temp. Before deleting content, you can check how much junk you have accumulated here. Right-click on the folder and select the “Properties” item, one of the items will indicate the amount of content. We are surprised at the contamination, if any, and remove everything that is inside. Some files will not want to be deleted, because they are used right now for the operation of one of the programs, do not touch such files. On the path to the folder, you may be asked for administrative rights, to get them go to the administrator account, if you are already in it,then just click “Continue” or “Allow”.

C: / Users / Our user / AppData / Local / Temp
With the first folder sorted out, it’s time to start the second, which is hidden. What does hidden mean? And so, this is a hidden element, you just can’t get to it. We have two options: enter the folder via “Run” or enable hidden folder detection. Let’s consider both methods.
We open “Start” and in the search bar we hammer “Run”, one single application will appear in the results, launch it. You can also call it with the Win + R keyboard shortcut. The Win button is usually found between the left Ctrl and Alt and looks like four windows, hence the name Windows. In the window that appears, write the phrase “% TEMP%” without quotes. We press “Ok” and we are transferred to the desired folder, we are inside. You can also measure the amount of content by going up one level and calling the context menu by right-clicking on our folder, select “Properties” and observe the degree of contamination. We act with the insides in the same way as last time, delete everything that is possible.

Now let’s consider the second option to get into the folder, it is a little trickier. We need to enable the display of hidden folders and files. Follow this path Start / Control Panel / Appearance and Personalization / Folder Options. In the window that opens, we need to go to the “View” tab and scroll the slider to the very bottom, where to rearrange the radio switch to the “Show hidden files, folders and drives” state. Now we can see all the hidden objects and can hit the road. We open our system drive, then “Users”, “Our user” (this is the username of this account), “AppData”, “Local”, before we turned on the detection of hidden objects, we simply could not enter this jungle , now it is available to us. We are looking for the cherished “Temp” folder and use the usual movements to clear it of debris.

We have cleaned Windows 7 temporary files in “manual” mode, but this is not all that can be done. Windows provides special tools that will more effectively cope with our task, let’s figure it out.

Cleaning with built-in Windows functions
In the interface of our operating system there is a disk cleaning function, and we need it. So, let’s get down to deleting temporary files in Windows 7. Right-click on our system disk, a context menu appears where we need to select the “Properties” item. A new window will appear, where we should find the “Disk Cleanup” button.

Some people are afraid of this button, as if it deletes the entire contents of the disk, this is not at all the case, just the trash folders with temporary contents are deleted, including the recycle bin, the necessary files will in no way be affected. Just click on this button, and the estimation of the amount of space that can be freed begins. After that, a new window appears, where we are offered to select specific sectors for cleaning. In the general case itself, you can tick off each item, but if, for example, you need to leave the basket untouched, then do not tick the corresponding checkbox. If you have not performed such a procedure before, then it may drag on for a certain amount of time, but more than a dozen gigabytes of space may be freed up.

After the end of cleaning, you can exit (the article on temporary files), but we are advanced users, so we will immediately click on the “Clean up system files” button, this will allow us to get rid of the update installation files, old updates and other garbage. There is no extra space, does it? After cleaning, it would be nice to do defragmentation, it will redistribute data across sectors, after which the system will work faster due to faster data acquisition and processing.

Removal methods on Windows 10
As is the case with other operating systems, when working with Windows 10, when you start programs, computer games, update the OS, a large number of temporary files are created on the computer. But only some of them are removed automatically.
Therefore, every user who wants to maintain a high speed of a PC or laptop, as well as to keep enough free space on the hard disk, must know about the peculiarities of the procedure for deleting temporary files.
It is immediately important to focus on the fact that it is the temporary files that are being deleted. Unnecessary data may also be collected on the PC, but other cleaning methods are already being used.
The following methods are safe for the operating system. Therefore, they can be used without any fear. The main thing here is to follow the instructions.
Via Options
In the Windows 10 operating system, the developers have added a new dedicated tool. It analyzes the contents of hard drives on computers and laptops, plus helps in cleaning up garbage.
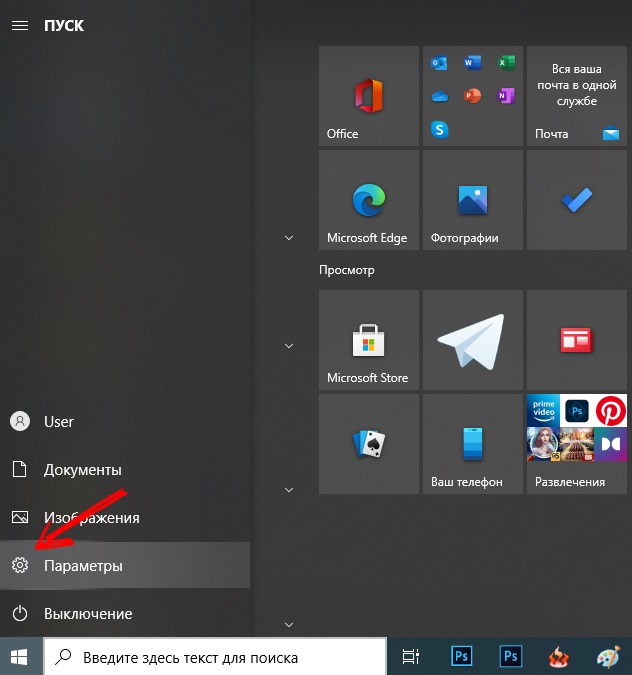
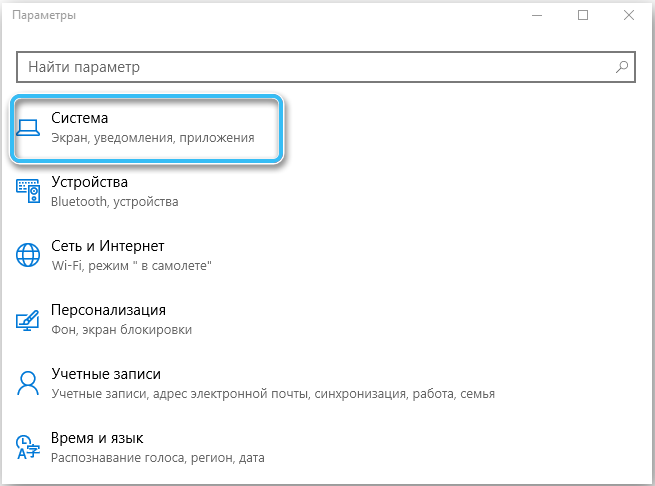
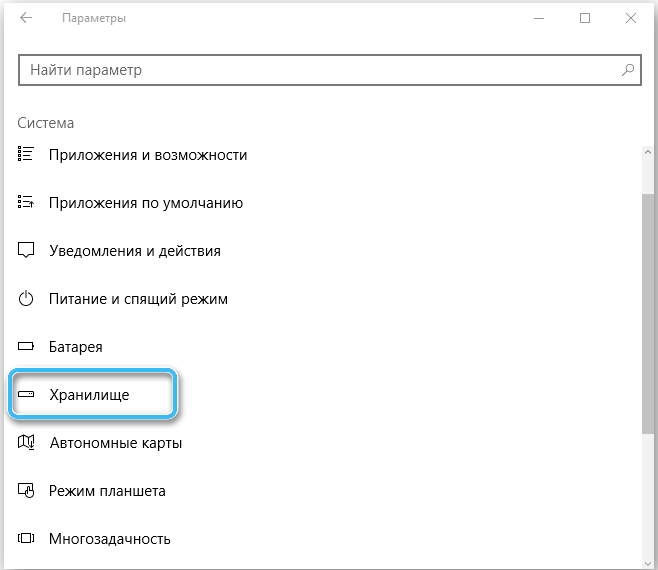
To find this tool, you need to open the Start menu, or press the Win and I buttons, thereby getting into the “Settings”. Next, select the “System” item, and from it go to the “Storage”.
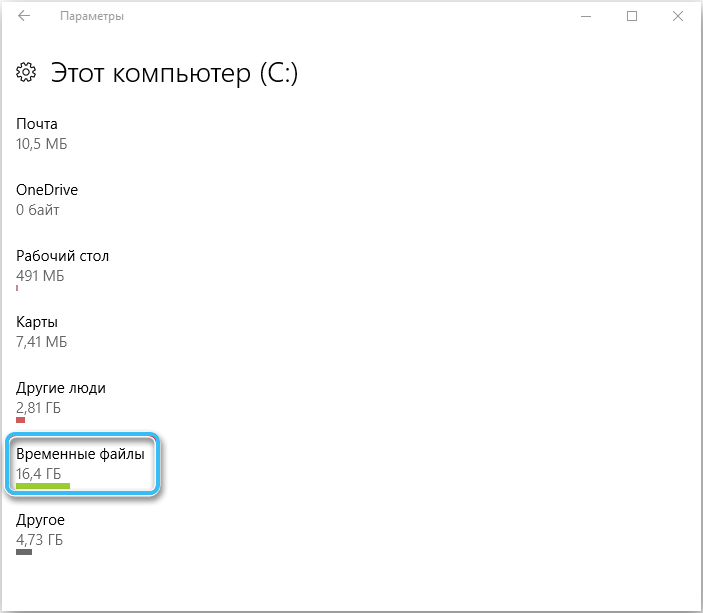
All hard drives and solid state drives that are connected to the computer device are displayed here. To be more precise, their sections.
By choosing any of the disks, you can check what exactly is stored there and which files are using free space.
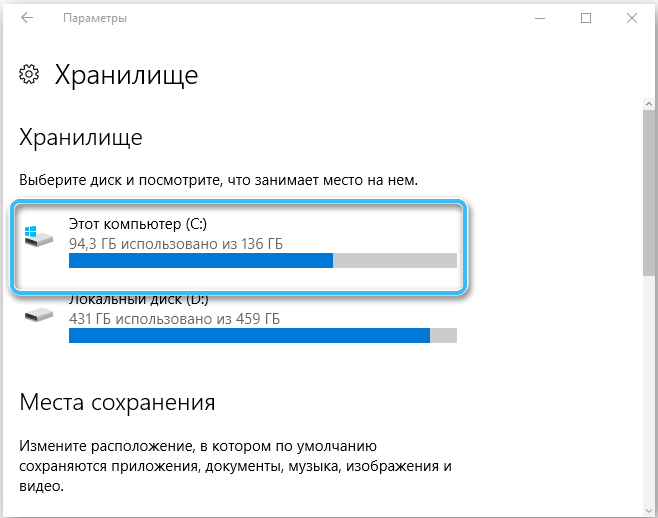
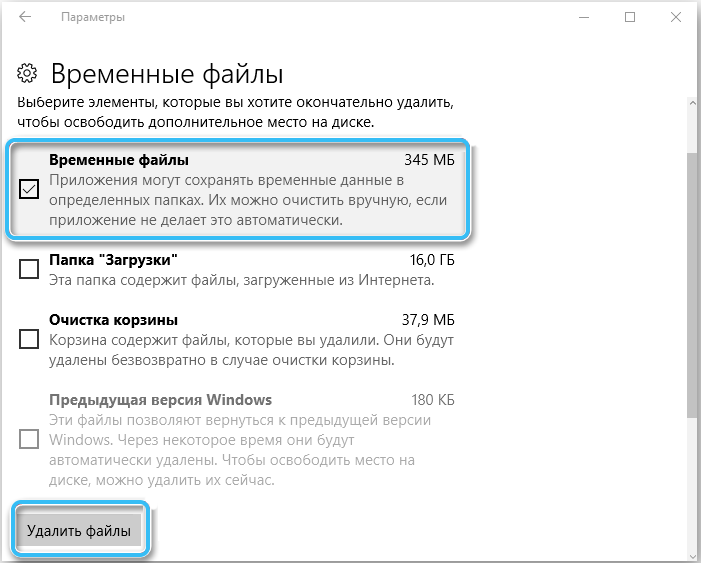
Since most of the temporary files are located on the system C drive, you mostly have to work with it. Click on the system drive and scroll down the menu. Here you will see the item “Temporary files” with an indication of how much space on the hard disk they take up. Click on this section, after which the following window will open. Temporary files, download files, and also the basket are already separately registered here. The tool allows you to learn in detail about each of the items, to study what takes place and where these files are located.
By clicking on the “Clear” button, the deletion procedure will start. Since these are temporary files, they are of no value to the operating system. You can safely delete. After that, nothing will happen for sure. The computer will continue to work normally. And if there was a lot of this garbage, then the OS will work faster.
When the procedure is completed, go to the “Storage” again and check if it is really empty now. Separately open the system disk and see how much space is left after the operation.
Built-in utility
Windows 10 also offers a functional tool in the form of a built-in utility called Disk Cleanup. It is also present on earlier versions of Windows. Although some argue that the application works more efficiently at the top ten.
The advantage of this method is that it deletes all existing files that are displayed in the “Storage”, plus other data is additionally cleared. That is, this method is really better. They can be used in combination.
You don’t have to do anything complicated to launch and use the built-in utility. The instructions can be presented as follows:
- press the combination of the Win and R buttons, and in the window that opens, write the cleanmgr command;

- or just open the search box and start typing “Disk Cleanup”;

- run the corresponding built-in application;
- select the disk on which you want to check and free from all unnecessary;

- then you will need to check the boxes that you want to clear;
- go through all the points and see what takes up the most space;

- where there is a value of 0 bytes, you do not need to check the box;
- confirm your intentions with the “OK” button.

The process will start. How long it will take to completely clear Windows 10 of temporary files depends on several factors. This is the amount of data to be deleted, the speed of the PC, etc.

Manual deletion
An alternative solution would be to manually intervene in what is happening. In order to delete these files that are not needed by the system and the user himself, you need to know where they are located.
There are usually 2 directories where they can be located:
- system drive, then the Windows folder, and then into the Temp directory;
- system drive, then to the Users folder, Username, then the AppData / Local / Temp folder.
Just keep in mind that the AppData folder is hidden by default. It will have to be displayed first.

This is a step-by-step yet handy tutorial for beginners. No supernatural effort to remove temporary files is needed.
There are some nuances here. But even a beginner can handle it all perfectly.
In the case of temporary files, you do not need to use third-party software.
Conclusion
We figured out how to delete temporary files on a computer with Windows 7 or 10. The actions seem to be not complicated, but few of ordinary users perform them, moreover, few do it regularly. But it is simply necessary to clean the disks from debris, take it as a rule. We have not touched on cleaning using specialized programs, but this is a topic for a separate article.
If you have any questions, ask them in the comments!