Even not very computer savvy users have heard of overclocking processors and video cards to improve PC performance. Few know about monitor overclocking, and the question immediately arises: why increase the screen refresh rate? The answer is simple: to improve the smoothness of the display of dynamic frames. If you spend many hours every day at the computer, looking at the monitor, this overclocking will also come in handy. In short, the higher the monitor frequency, the better.
Contents
Is overclocking harmful
The evolution of monitors is a story no less fascinating than the improvement of any other component of a personal computer. In the first CRT displays, the refresh rate parameter of the monitor screen was at a low level, because of this, the image flickered, which led to rapid eye fatigue. Therefore, the task of increasing the number of issued hertz was very urgent.
Today, in the era of LCD monitors, flickering is no longer a problem even at low hertz. Why, then, is the topic of overclocking so popular and what does the increase in the monitor frequency affect now? It’s simple: we are talking about improving another important indicator, the smoothness of displaying dynamic video sequences. This is especially true in modern games, where this parameter can fly far beyond 100, and sometimes even 200 Hz. Discretization of the image display on standard 60 Hz monitors is easy to observe with the mouse cursor: the faster you move it, the less smooth the image will be.
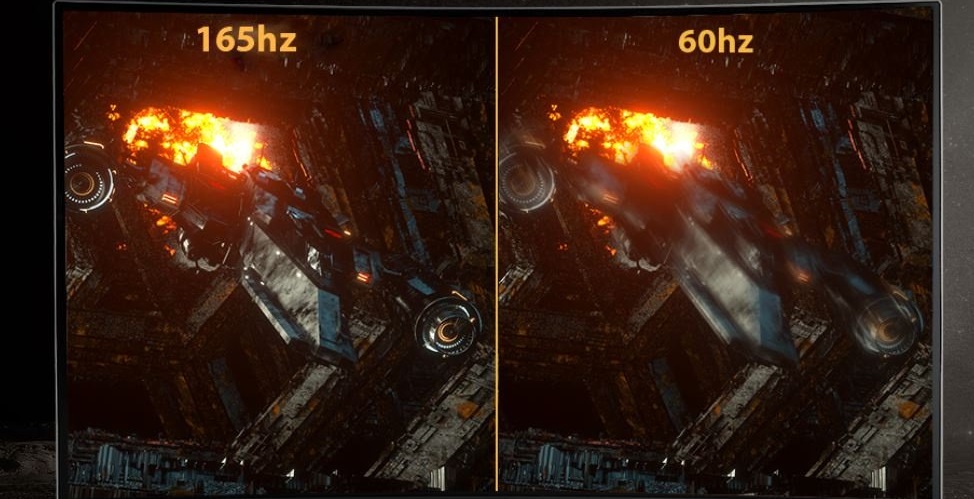
Therefore, overclocking monitors is hardly worth ignoring. But why is it possible? The fact is that the passport characteristics by no means reflect the physical capabilities of the matrix – they are obviously higher, sometimes even multiples. Then why don’t manufacturers set the highest possible frequency right at the factory? The point is not that at high values the monitor resource decreases, it is not. It’s all about maintaining accepted standards. There is a 60Hz standard – get it and sign it. And in fact, the same monitor, but with a higher frequency, is positioned as a gaming monitor and is already much more expensive. So it’s also a good marketing ploy. Finally, do not forget that users are demanding these days, and, God forbid, the characteristics will be lower than the stated ones – claims cannot be avoided. So it turns outthat almost all modern monitors are manufactured with a large frequency margin.
We already know what improves with increasing hertz. But will the increased frequency be pulled out by the video card? Here the situation is similar – video adapters also have a performance margin, and are able to operate at a higher frequency, if necessary. The interface is another matter. Both DVI and HDMI are unable to operate at frequencies above 65 and 75 Hz, respectively. Although the HDMI cable version 1.4 and higher “pulls” twice the frequency.
As for overclocking the laptop display, such tuning is used much less often, because this reduces the battery life.
Finally, let’s allay your concerns about the safety of overclocking. They are not groundless in the case of an increase in the frequency of the CPU or video card, but in the case of a monitor, the increase in hertzovka does not cause overheating. If you overdo it with the frequency – the monitor simply will not be able to produce a picture, that’s all. So the question of which screen refresh rate is better has only one answer: the more the better.
How to find out the refresh rate of your monitor
The easiest way is to look at the instructions. If the paper is lost somewhere, you should search the Internet, usually it is presented in the form of a pdf file.
If the instructions did not work out, you can also see the monitor frequency using Windows tools.
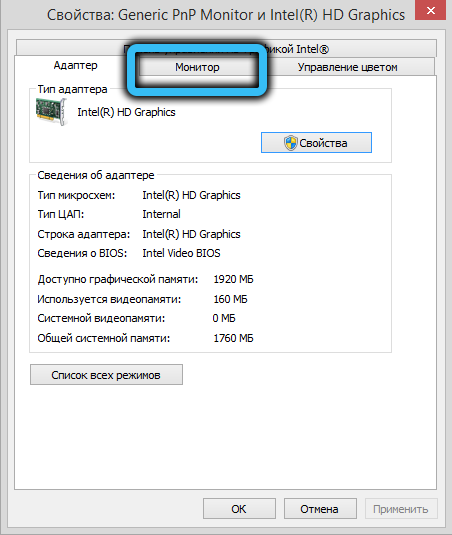
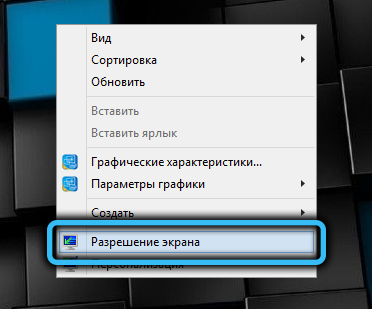
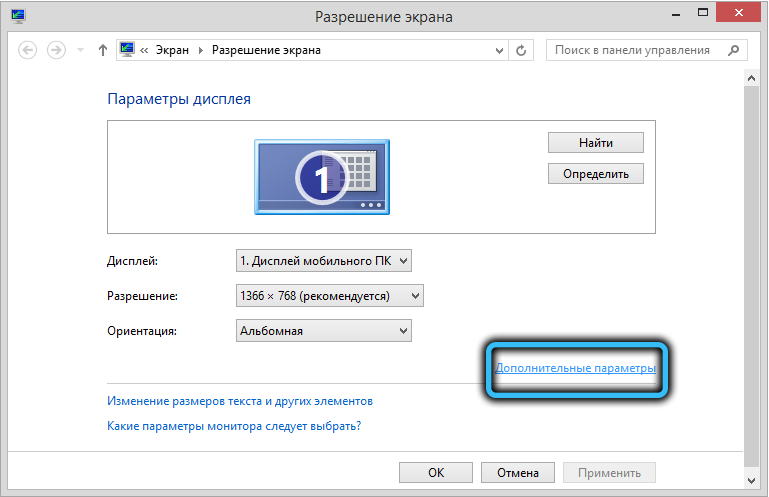
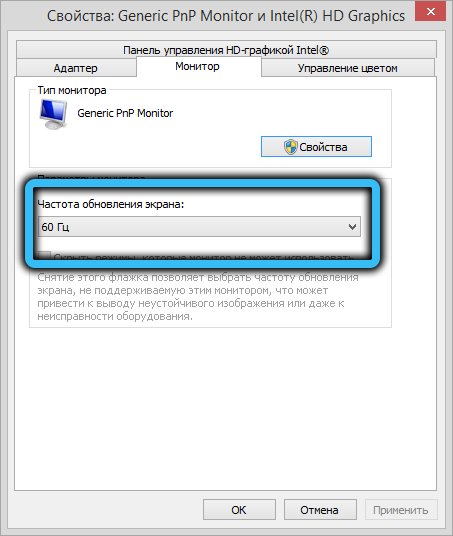
To do this, right-click on the desktop in the area free of icons. A context menu will appear, in which we select the item “Screen resolution”. In the new window, click on the inscription “Additional parameters” and in the properties window of the graphics subsystem, select the “Monitor” tab. This is where the operating refresh rate of the screen will be indicated.
Method of overclocking the monitor to 75 hertz and above
Increasing hertz is possible on almost any monitor and regardless of the video card used – even the built-in Intel video chip provides such an opportunity. Each of the video cards from well-known manufacturers (meaning the AMD / Nvidia / Intel trinity) has its own control panels, in which it is most convenient to overclock. This can be done with the help of special programs for overclocking the monitor from third-party developers, we will get acquainted with one of them today.
Note that the overclocking results may be different even for monitors with similar parameters. But do not hope that a 60 Hz monitor will be able to overclock up to 144 Hz, although in nature there are models with such a frequency.
Usually, when changing the hertzovka, as well as when changing the resolution of the monitor, it goes out for a few seconds – this is normal, you should not be afraid. But a change in color or the appearance of artifacts indicates that the video card is not able to work normally at such a frequency, and it should be reduced.
Make sure you have the latest graphics chip driver installed before proceeding. And if possible, replace the DVI cable with HDMI (if available).
Overclocking the monitor on an NVidia video card
So, let’s start overclocking the monitor matrix if the computer has a chip from Nvidia, and this is the most common option:
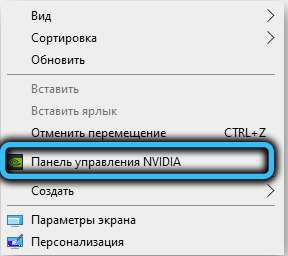
- right-click on an empty space on the desktop, click on the item “NVidia Control Panel”;
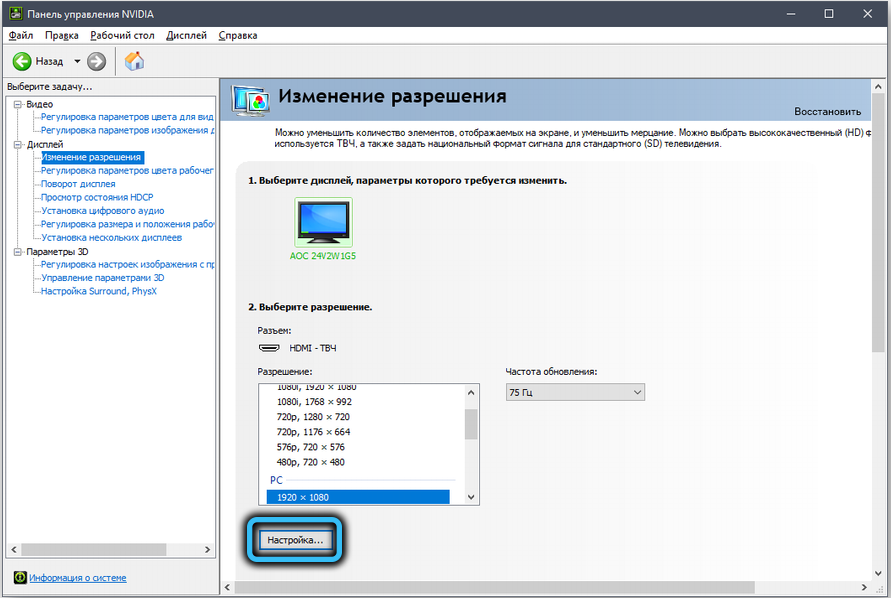
- in the left pane in the “Display” block, select the item “Change resolution”;
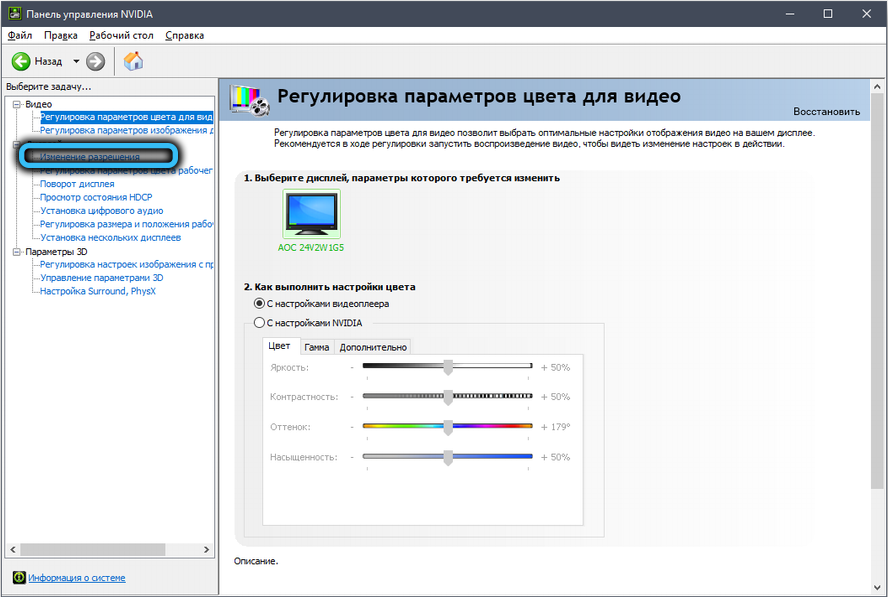
- in the right panel, click the “Settings” button;
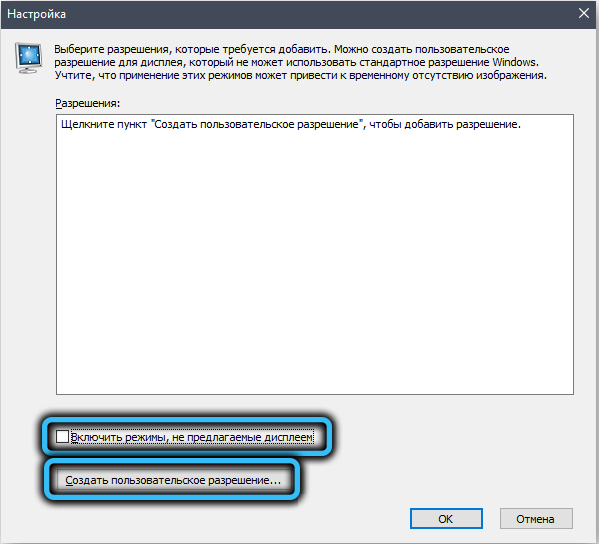
- a new window will open, in which there should be a check mark opposite the text “Enable modes not offered by the display”;
- press the button “Create custom permission”;
- in the new window we are interested in the “Refresh rate” option. Leave the scan type, resolution and color depth as is. We try to set the frequency to 75 Hz and press the “Test” button;
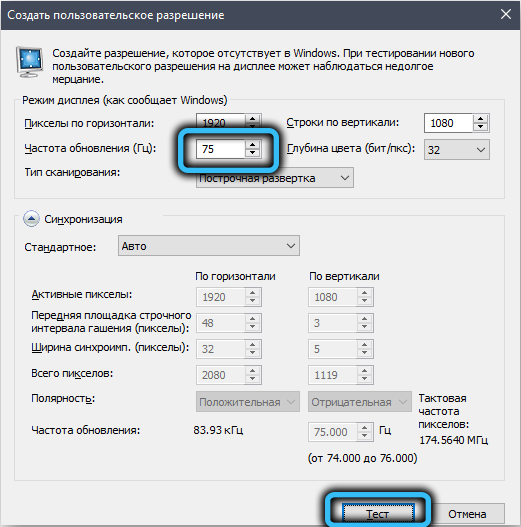
- if everything is fine, after a second of disappearance of the image, it should appear without artifacts and distortions. Try to increase the hertz again with testing – until the image remains normal or a message appears stating that the monitor does not support operation at this frequency;
- save the frequency, go to the “Settings” window, mark the changed parameters in the upper block and click OK;

- now in the window “Change resolution” in the list of possible resolutions will appear custom, select it and click on the button “Apply”.
You can check whether the monitor frequency has actually increased through its menu or “control panel” in the “System” block by selecting the “Display” tab, and in it the item “Additional display parameters”.
How to overclock a monitor on an AMD graphics card
Now let’s look at how to increase the monitor frequency in Windows 7/810 if you have an AMD graphics chip. The principle of changing the hertzovka is the same:
- launch the Radeon Settings utility;
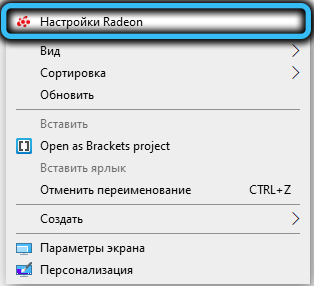
- click on the “Display” tab in the lower menu, and then in the middle block – on the “Create” button;
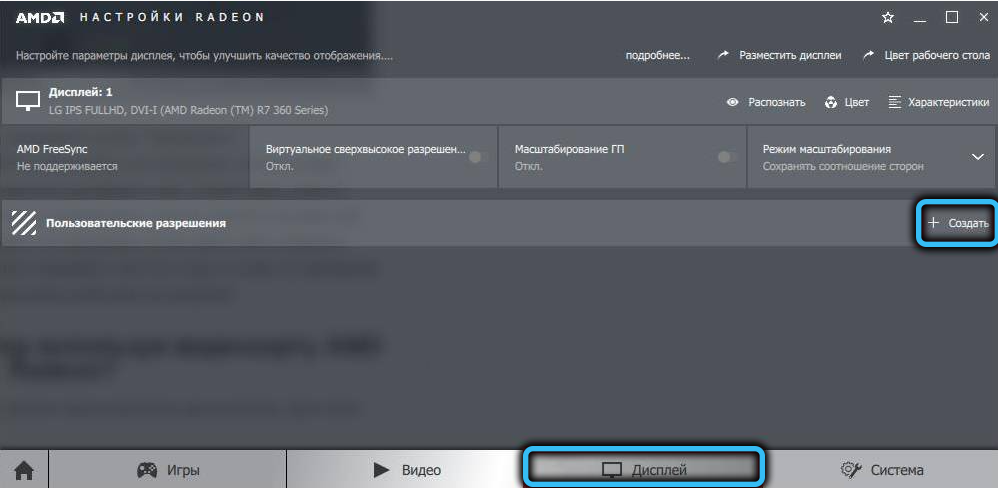
- a new window will open with the ability to select custom parameters, change only the frequency, and also by successive iterations – first increasing by 5 Hz, and then giving increments of 2 Hz. The principle of determining the maximum possible frequency is the same;
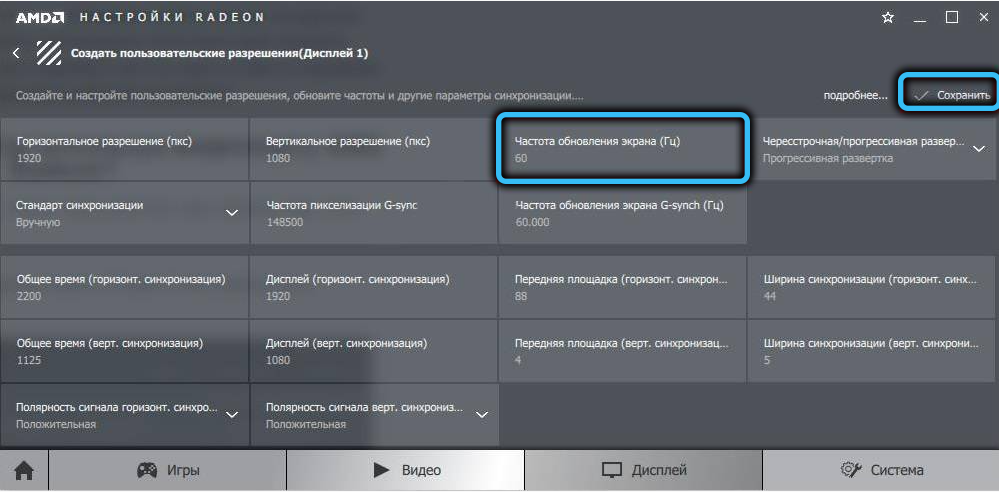
- save the parameters, check the actual frequency using one of the methods suggested above.
How to overclock a monitor on an Intel graphics card
The Intel graphics card control panel has its own interface, but in terms of changing the display parameters, the principle remains the same:
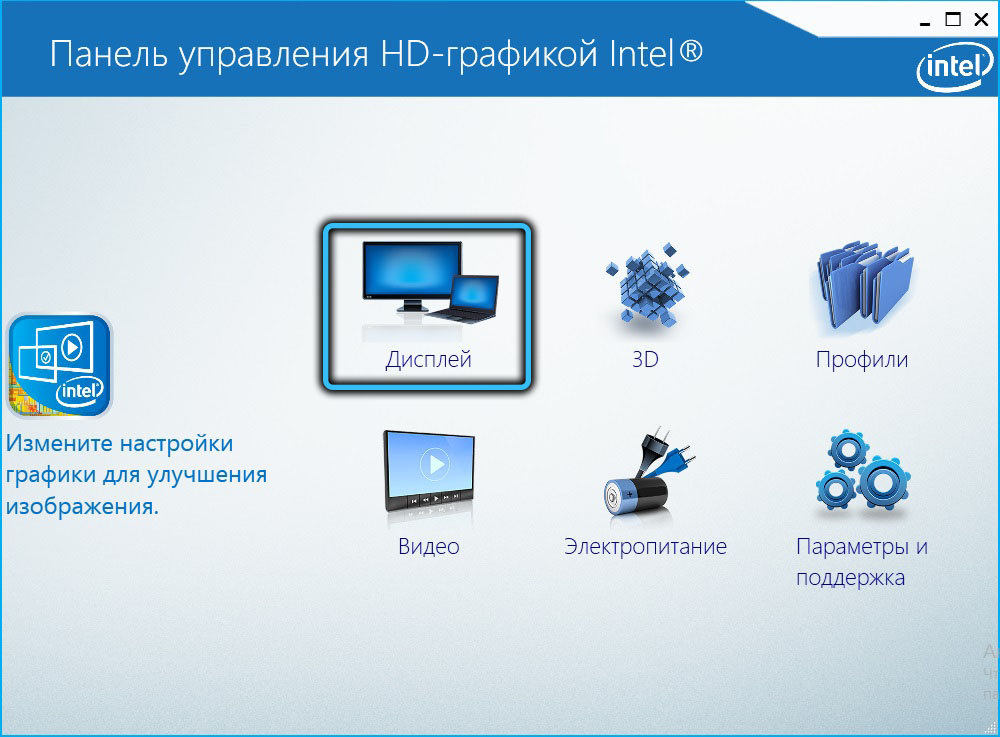
- run the utility:
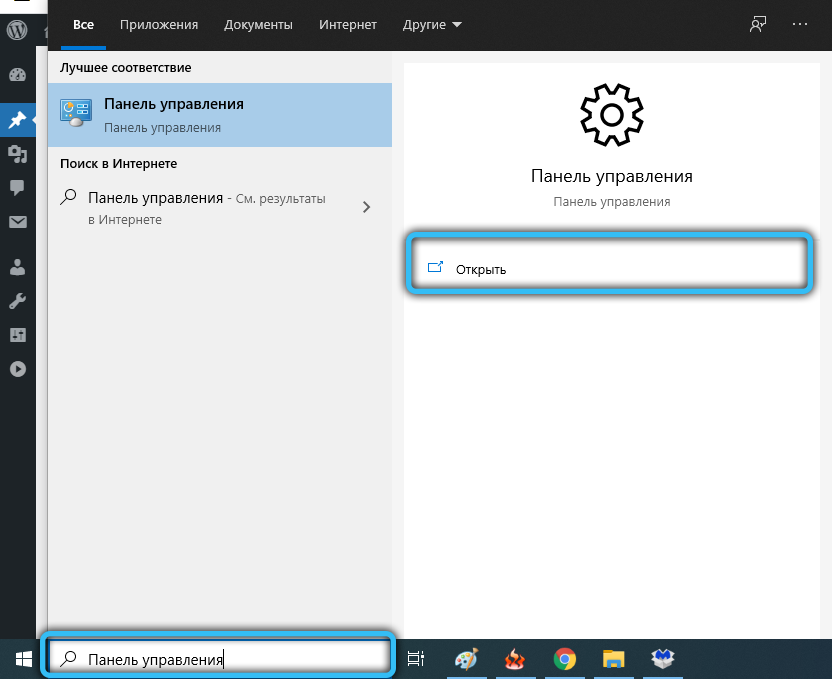
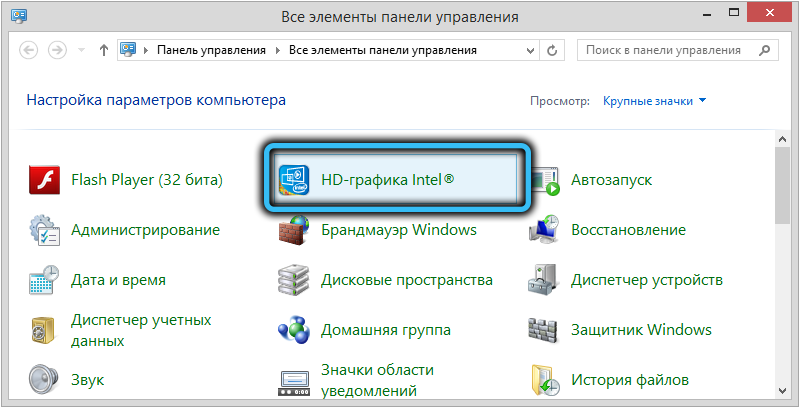
- select the “Display” tab;
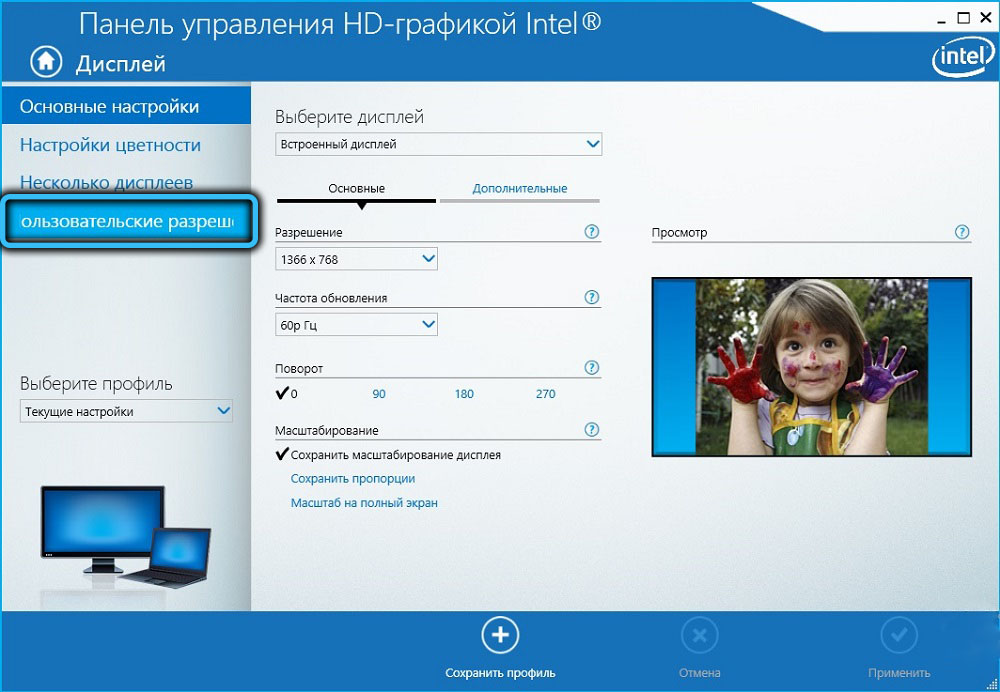
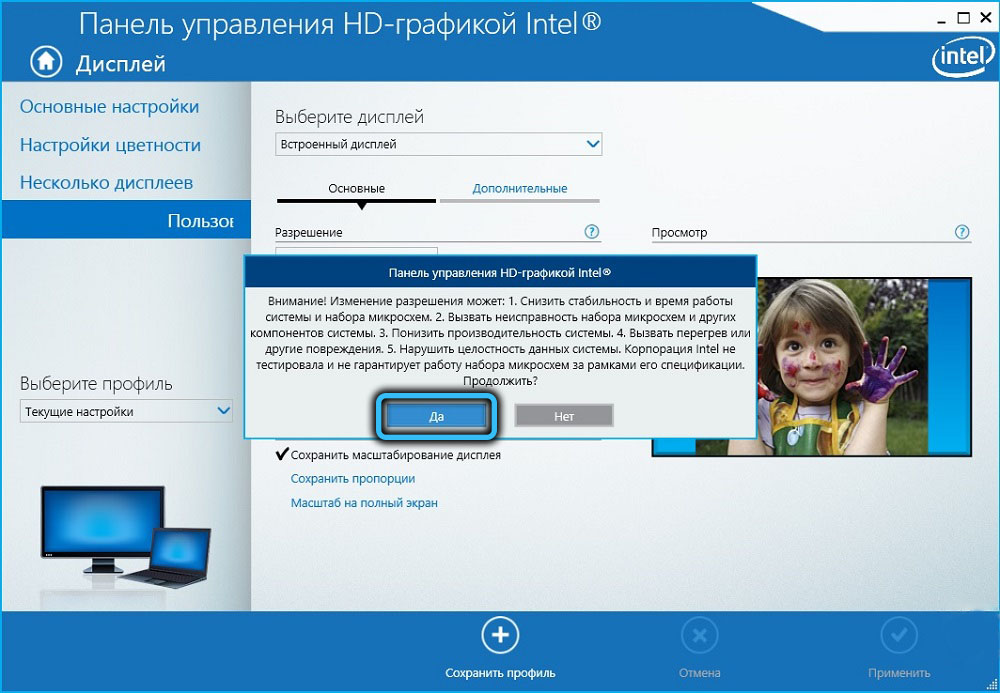
- click on the item “User permissions” in the left block, a warning window will pop up, select “Yes” (Continue);
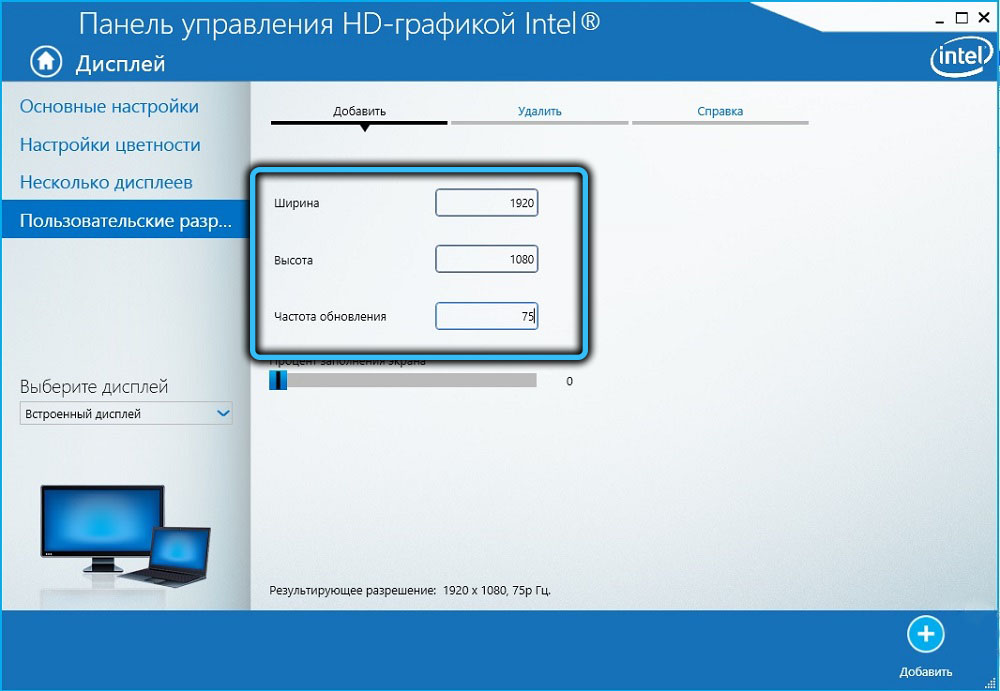
- click in the main block on the “Add” tab and do the same operations as above, each time confirming our actions by clicking the “Add” button below.
Note that the stability of the monitor overclocking can be checked through this service for all types of video adapters.
Overclocking the monitor with CRU
If you are unable to change the monitor frequency through the standard control panel of the graphics chip, you can try a third-party application, for example, the free Custom Resolution Utility.
The disadvantage of this method is that each parameter change requires a Windows restart, so this method should only be used as a last resort.
Step by step algorithm:
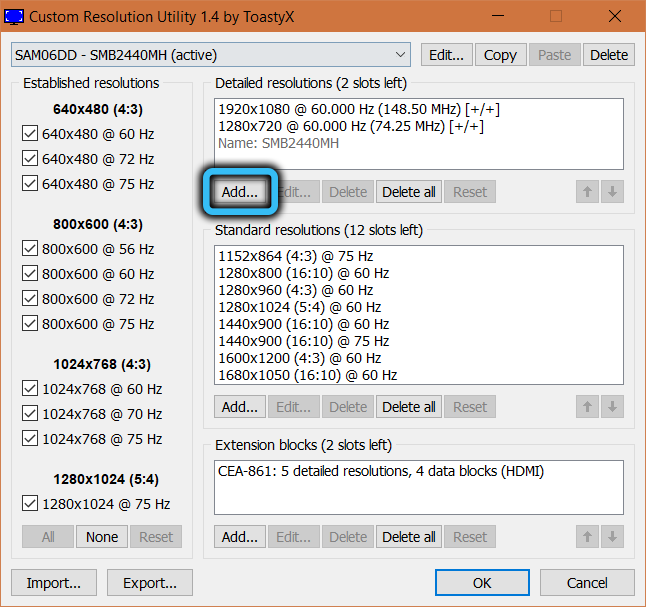
- download the program from this site , unpack it, run it with administrator rights;
- in the upper block of Detailed Resolutions, click the Add button;
- in the new window, click on the arrow opposite Timing and in the list that appears, select the Automatic – LCD Native item;
- do not touch the screen resolution, change only the frequency in the lower Frequency block in the Refresh Rate field. Click OK twice, restart the computer;

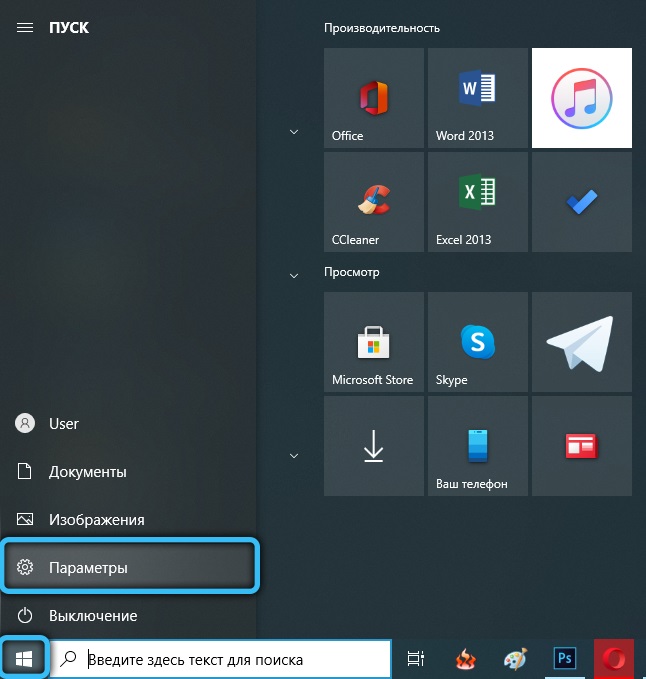
- go to “Parameters”, select the “System” tab, and then “Display”;
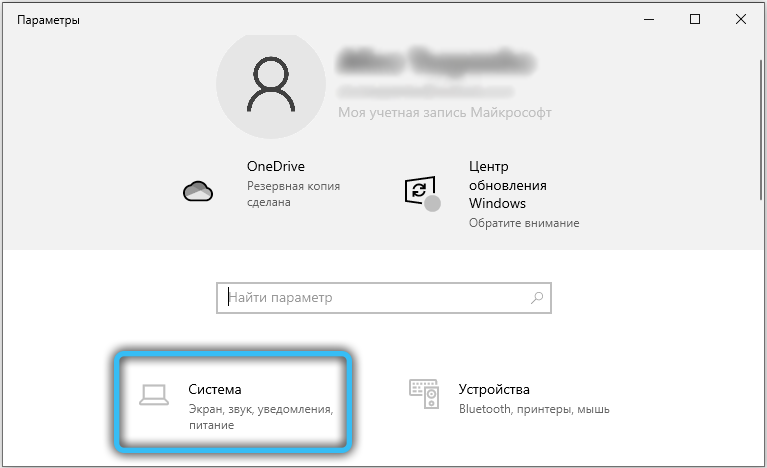
- click on the bottom button “Additional display parameters”;

- go to the “Properties of the video adapter” by clicking on the corresponding button;
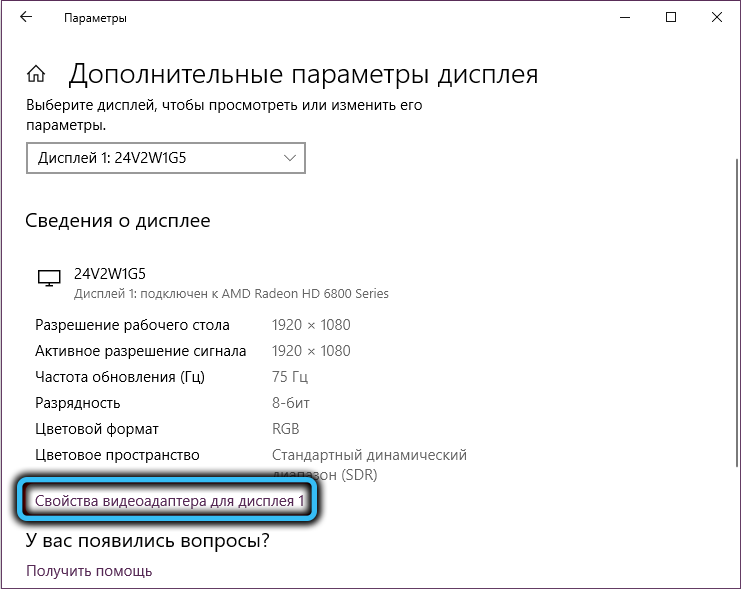
- select the “Monitor” tab and select the one that we added from the list of available frequencies;
- Click OK.
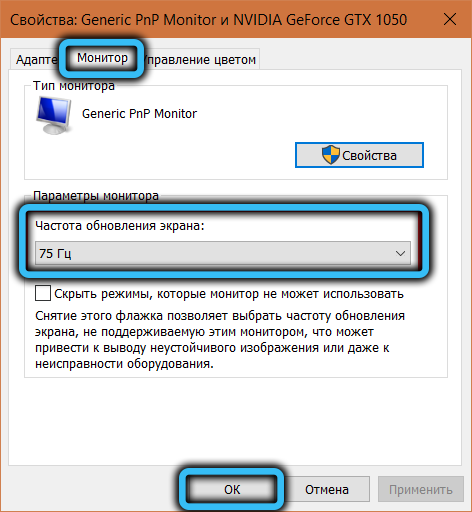
Be sure to check the stability of the monitor at the highest available frequency.
How to increase the frequency of the monitor on a laptop
You can change the hertz of the laptop display in exactly the same ways as for a desktop computer. The only “but” – the overclocking potential of the laptop display will be less than that of a conventional monitor.
If you were able to increase the display frequency, but the video card was unable to work with this FPS, you should try to overclock the video card itself. But that’s another story.
Possible consequences of overclocking
In general, increasing the hertz of the monitor is a useful thing, but you need to understand that you can overdo it here too: the display seems to support high frequencies, but when it comes to testing, freezes appear (slowdown of the video sequence). This is evidence that the video card cannot cope with the increased frequency.
The appearance of artifacts (several blurry images in one frame) indicates the opposite situation – the monitor cannot cope with the frequency suggested by the video card.
In both cases, the frequency should be reduced until the problem disappears.
If, as a result of your experiments, the screen turns black, you have chosen a frequency that is not supported by the monitor. Usually such moments are determined by the control program, and you have the ability to rollback, but if you used third-party software, then this will become a problem. There are several ways to solve it. For example, boot into safe mode and roll back to safe screen refresh rate settings. Or use a second monitor if it is able to operate at the frequency of your choice.
But, we repeat, there are no physical contraindications for overclocking that can harm the monitor.