The computer may refuse to boot for various reasons. One of them is bootloader corruption. Since the bootloader files are well protected from accidental deletion, such an abnormal situation is quite rare. A typical case is the removal of a hidden partition with a bootloader when using a special utility for working with the file system. Sometimes this situation occurs after trying to install a second operating system on a PC.
A diagnostic message about such an error is not always informative enough. For example, a phrase like No bootable device or Operating system not found can indicate other problems, including hardware ones. But if you see something like BOOTMGR is missing, you can be sure that we are talking about the bootloader.
Let’s consider the main ways to restore it in Windows 11, which are also suitable for the “dozens”.
Contents
Automatic bootloader recovery
This is the easiest way to return the system to working capacity, but it cannot be called the most effective: it does not always work. And yet we advise you to start with it.
So, let’s look at how to restore the Windows 11 bootloader using the recovery environment:
- if the system does not boot, but when a diagnostic error message appears, the “Advanced Options” button will be present at the bottom of the screen, you can enter the recovery environment using it;
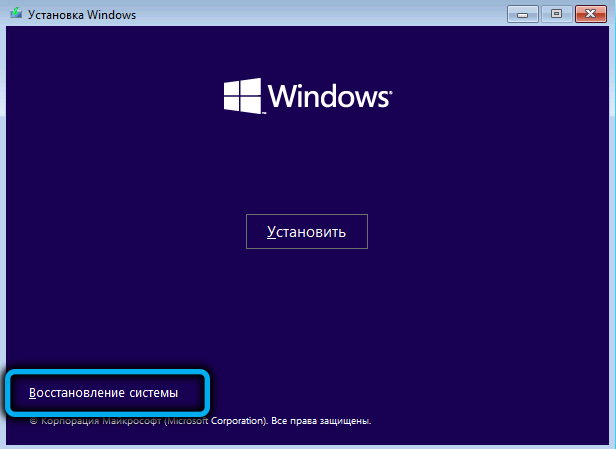
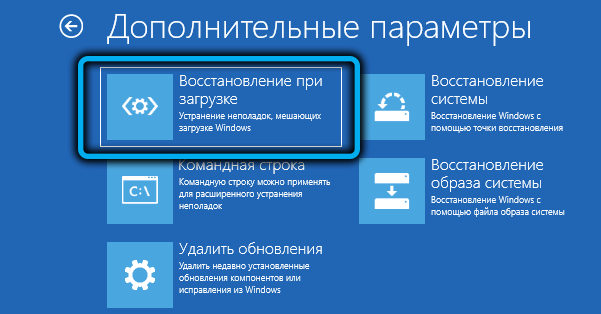
- sometimes the damage to the bootloader files is so serious that it does not reach the appearance of this button. In this case, you can get into the recovery environment using a bootable USB flash drive. If it is missing, you can create it on another working computer. When the PC starts to boot from the flash drive, after selecting the language on the next screen, you need to click on the phrase “System Restore” (located at the bottom left), then select the “Troubleshooting” option, and on the next screen – “Startup Repair”;
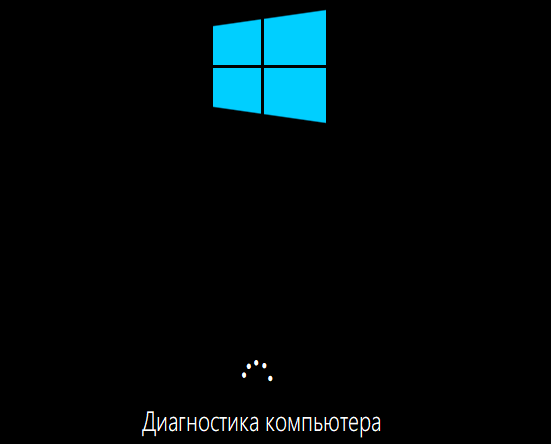
- as a result, the procedure for automatically restoring system files will start, after which you can try to reboot the system in the usual way.
If after that you get a message about the inability to boot due to a failed recovery attempt, you need to proceed with an advanced, complex, but also more effective method of manually repairing the bootloader.

Windows 11 bootloader recovery via command line
To fix the bootloader in Windows, there is a special utility, bcdboot, that must be run from the command line. But the method will only work if you have not disconnected the drives or changed their configuration.
Step by step algorithm:
- insert a bootable flash drive into the USB connector of a PC or laptop, change the boot order and boot from this removable media (if you don’t have such a flash drive, you will have to create it on another computer);
- as soon as the installation starts, to launch the command line console, press the combination Shift + F10 (or Shift + Fn + F10 on certain laptop models);
- in the terminal window, enter two commands in sequence, completing the input by pressing Enter:
 diskpart
 list volume
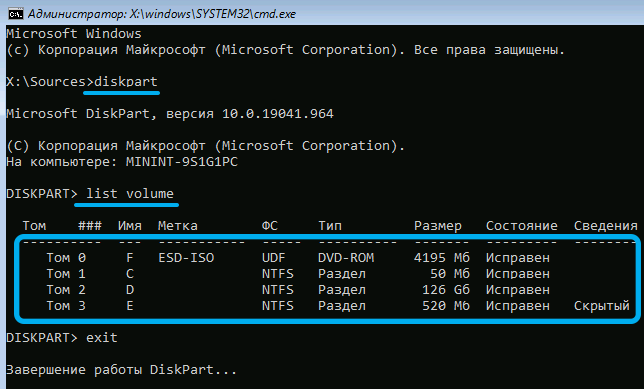
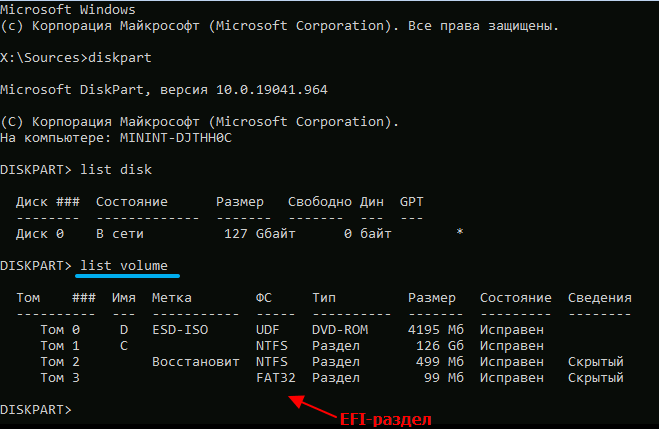
As a result, a list of partitions will be displayed in accordance with the layout of all disks on the computer. We carefully study this list, we should be interested in the following nuances:
- whether the list contains a partition formatted under FAT32 with a size of 100 MB;
- whether this section is assigned a letter (as a rule, it is absent);
- is there a section with Windows in the list (you should know its approximate size);
- whether this section has a letter and what (not necessarily C).
The absence of a letter for a partition formatted under FAT32 means that we need to assign this letter. To do this, first enter the select volume N command, where instead of N we substitute the partition number displayed in the second column of the list. After pressing Enter, we enter the second command, assign letter = X, thereby assigning the specified letter to the section or any other, but always free.

For the partition with the system, the letter must also be present, if not, it is assigned in the same way. Exit the diskpart utility by typing exit and pressing Enter.

And now we proceed directly to restoring the bootloader by entering the command:
bcdboot C:Windows /s X: /f ALL

Here the letter X corresponds to the letter that we assigned earlier to the partition with FAT32. The letter C can also be different if Windows is installed on a different partition.
As a result, if you did not make a mistake in typing, the text “Boot files were created successfully” will be displayed, after which we close the command line window, exit the installer, change the boot order to normal (by setting the boot disk on which the system is located). And finally, we reboot the computer.
Advanced bootloader recovery option
If the previous method was unsuccessful, you can try using the bcdboot command in advanced mode, with a large number of parameters. For example, specify the type of firmware you are using: UEFI or BIOS.
The initial steps here will be the same as in the previous case: boot from the installation flash drive, switch to command line mode, type the command:
diskpart

After that, we execute a command that will show a list of connected physical media (SSD / HDD drives, DVD drive, flash drives or memory cards):
list disk

Finding the disk on which the system is installed is obviously not difficult – be guided by its size. But we should also be interested in the contents of the GPT column: if it is empty, then the MBR is used, if there is a mark, then this is a GPT disk.
After that, we type a command that displays a list of sections, which is guaranteed not to match the result of the previous command:
list volume

Here we pay attention to the section with the system, it is important to remember its letter. Further actions depend on the type of drive partitioning.
Restoring the MBR Boot Loader
If the system disk is MBR, we need to find the active partition. The search is performed as follows:
- type in the command select volume 1, press Enter;
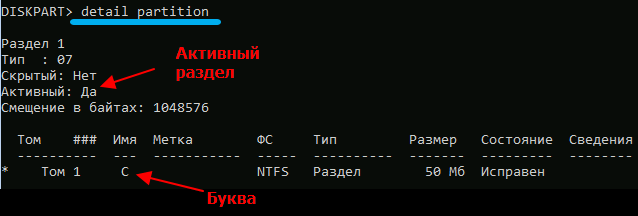
- enter detail partition, also confirm by pressing Enter.
The first command navigates to the partition marked with 1 in the list volume list, the second displays detailed information about this partition. If the line opposite the text “Active section” is “Yes”, then this means that we have coped with the task: we have found an active section. If there is nothing there, we repeat the sequence, indicating two instead of one, and so on until the active volume is determined. It is he who must be specified to restore the bootloader.
Exit the diskpart command by typing exit and pressing Enter.

Now we proceed to the actual recovery of the bootloader by typing the command:
bcdboot d:windows /s C: /f BIOS

As you can see, its format does not differ from what was described in the section earlier, with the exception of the letter of the system and active partitions.
Let’s look at the rest of the options.
/ s – if after it there is a letter with a colon (in our case, C :), then the loader will be written to this section. If there is no letter followed by a colon, the command will be interpreted as follows:
- for computers with UEFI / GPT, the bootloader will be written to the EFI partition;
- otherwise (BIOS/MBR) – to the active partition.
The /f option can take the following values:
- BIOS – if the computer is equipped with an MBR disk and BIOS firmware;
- UEFI – for UEFI/GPT systems;
- ALL – both types of bootloader will be recorded.
If you do not specify anything for the /f parameter, the recording will be made to the partition selected by the /s parameter, the type of which will be determined automatically.
After processing the command, you can reboot the system in normal mode, remembering to change the boot order in the BIOS.
UEFI/GPT bootloader recovery
Officially, Windows 11 supports GPT disks with UEFI, while the bootloader recovery procedure will differ from the previous one.
We need to determine which volume is an EFI partition, format it to FAT32, and assign a unique drive letter to the partition. As a rule, the EFI partition is small, it has a hidden attribute and is about 100 MB in size.
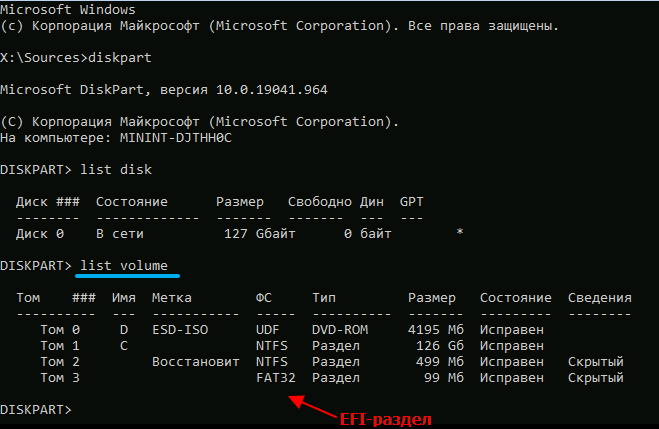
Having entered diskpart, we type list volume and find the volume by these signs, remembering its number. Then we type the command select volume N, where we substitute the desired number instead of the number, and start formatting the partition with the command format fs=fat32.
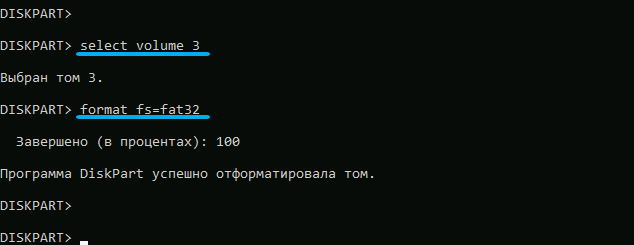
We complete the preparation of the partition with the bootloader with the command assign letter=X (the letter can be any of the unoccupied ones as a result of the list volume command).
We exit diskpart to the command line by typing exit, and start the formation of the bootloader:
bcdbootc:Windows /s X: /f UEFI

We discussed the parameters of this command in detail in the previous subsection.
We exit the command line, restart the PC, restoring the desired boot order. If everything was done according to the instructions, there will be no problems with loading Windows.
We hope that following our instructions you were able to restore the damaged Windows 11 bootloader. But if you have any problems, write about it in the comments.
