Do you have a set of photos and want to make a video out of them? Then you need editing software. Downloading or buying them is optional. The Windows operating system has a built-in media editor. There is also a function to convert a presentation to .wmv (Windows Media Video) format in the PowerPoint utility. Learn how to create a video from photos and music, as well as cut from media files, add effects, titles or captions to them.

Contents
Microsoft PowerPoint
This product is included in the Microsoft Office suite. Typically used to decorate slideshows. The application has a built-in toolkit for working with diagrams, graphs, autoshapes, WordArt (labels with original design) and SmartArt (beautiful diagrams). You can also insert a photo, various graphic elements, titles, form an album.
The interface is in a sense similar to Word. To add photos to PowerPoint, you need to do the following:
- Run the utility.
- In the “Menu” tab, go to File – New.
- Choose a template for your new presentation. You can specify a blank document.

- Open Insert – Photo Album.
- In the Add Picture From Source area, select File or Disk.
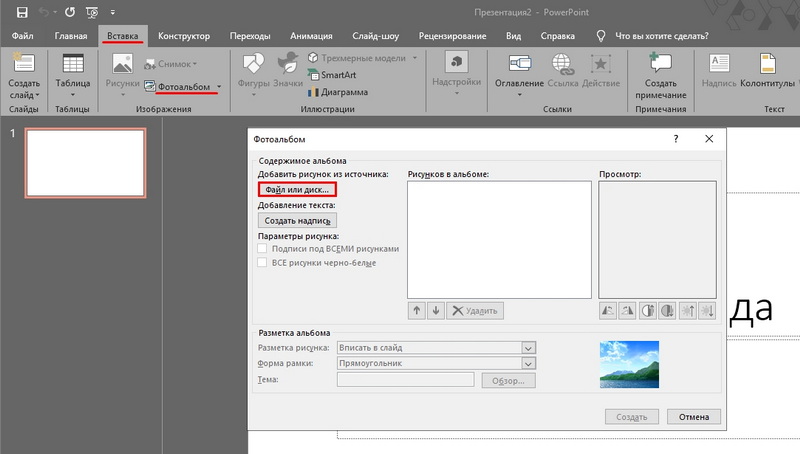
- Specify the path to the desired picture. To select several photos, select them with the mouse or click on them while holding down the Ctrl key. Better to put them in one folder beforehand.
- Click on the “Insert” button. Then confirm the action by clicking on “Create”. All images will appear in the presentation. The pages will be displayed on the left, and the currently selected fragment on the right. The title page with the album name and username will fit on the first slide (you need to enter them yourself)

- To swap photos, just drag them with the mouse in the left block.
- To delete a picture, select it in the same block and press the “Delete” key.
- To add a new slide, go to the Insert menu. There is a corresponding item and several templates to choose from. The blank sheet is labeled “Blank”.

- To estimate how the video will look, click on the small “Slide Show” button at the bottom right. It is next to the scale. There you can enable different viewing modes.

- To change the interval between frames in your presentation, open the Slide Show – Time Settings menu. Pictures and a timer appear. Just click “Next” on it when you need to go to the next photo. When finished, change the view mode to one that is convenient for you.

- Use tables to make a signature. It is enough to insert one line or column and set the transparency effect to it.
- You can add objects to your presentation manually one at a time. To do this, go to “Insert – Illustrations – Picture” and select the file.

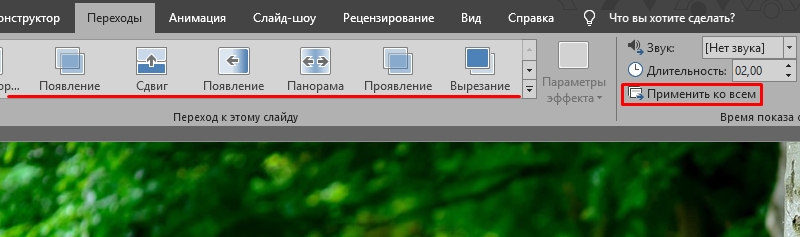
- In the Transitions – Transition Scheme menu, set the animation for changing photos (for example, dissolve, smooth shift, spread, checkers). Otherwise, they will simply follow each other. Click Apply to All if you want the same effect for all slides.
- To set the soundtrack, open Insert – Sound. The audio track will be anchored to the selected page.
Save the document when finished. It will be in PowerPoint format by default. Therefore, some parameters need to be changed. Here’s how to make a video from a presentation:
- In the “Menu” tab, go to “File” and hover over “Save As”.
- Click on “File of a different type”.
- Select Windows Media Video from the File Type drop-down list. It is a popular media format. Played by many popular players. You can upload such a video to YouTube, upload it to your phone, transfer it to a TV screen, or simply add to your family archive.

Windows Movie Maker
Windows has a built-in video editor – Movie Maker (WMM). It is also called “Film Studio”. If it is not installed on your system, you can download it from the official Microsoft website (the studio includes a set of “Windows Essentials”).
Unlike PowerPoint, which only has photo-based presentations, WMM is an editing application. It has quite extensive functionality that allows you to work not only with images, but also with audio and video. Some formats may require an additional codec pack to run. For example, K-Lite Codec Pack – it is better to install this program before making a video. Many file formats cannot be opened without it.
WMM has an internal library of themes and templates. Select one of them, and all transitions, effects will be installed automatically. You just have to add a photo and some music. And you don’t need to configure anything. Fast publishing of movies to the following social networks and storages is available: YouTube, Facebook, Vimeo, Flickr, OneDrive.
Here’s how to make a video in WMM:
- To insert files into the project, simply drag and drop them into the working area of the program. Or, on the toolbar, click the corresponding button to add media and photos.
- The images will be visually displayed in the utility. You can swap them, delete them, turn them over.
- To edit a single fragment, click on it. The Edit section appears on the menu bar. There, set the duration, speed, volume (if this is a video with its own audio track).

- Transitions are available in the Animation tab. In the menu “Visual effects” – effects (blur, outlines, filters, reflections, black and white tones, and the like). This is a good tool for photo collages.

- In the “Home” section there is a button for adding music. The track also appears in the work area. In the sound, you can adjust the volume, fade in and out, synchronize it with the video.

- To add text, use the buttons “Title” (placed at the beginning of the project), “Titles” (at the end) and “Title” (for captions on the photos themselves).
The capabilities of WMM are enough to create a simple movie. But for serious work with media you need professional software.
Other editing programs
If you are interested in how to make videos, and decided to tackle it closely, the built-in OS tools will not be enough. Try specialized editing utilities.
VirtualDub
Designed for editing and slicing AVI and MPEG-1 files. There is a set of filters, a function of scaling and changing the frame rate. The program does not need to be installed. It does not require a lot of resources – it will work even on a “weak” computer. It will not work to collect collages from photographs. But it is suitable for surface mounting.
Pinnacle studio
An application where you can make a full movie. Has its own library of effects, titles, transitions. DVD menu creation is available. You can download and add additional content to the utility, which will expand its functionality and add new features. It is suitable for working with video and photos.
Sony vegas
Popular editing software. It is used by both professionals and amateurs. In it you can add several video and audio tracks at the same time. There is a huge editing toolkit and an extensive library of effects. However, many features of the application are not obvious. To use it, you need to study the instructions.
Before making a video from a photo, audio, media or presentation, decide what kind of result you want in the end. If a simple slideshow is “for your own”, without complex effects, designer titles or menus, the built-in Windows tools are for you. If you want to get a full-fledged film, it is better to use professional editing software.