Putting the Ñ on the keyboard of your Android mobile is easy. We explain how to do it on Samsung and any brand of cell phone, or third-party keyboard such as Gboard or SwiftKey .
Normally it is not necessary to do something to put the letter Ñ on the Android keyboard (the factory keyboard or any third-party keyboard). If the system language is in Spanish, applications generally inherit this language. Therefore, the keyboard should also be in Spanish and have the Ñ key.
The absence of the Ñ on the keyboard occurs when the Android system language is in English or another language. If you cannot or do not want to change the language of the device, surely if you can configure the letter Ñ on the installed keyboard, from its settings.
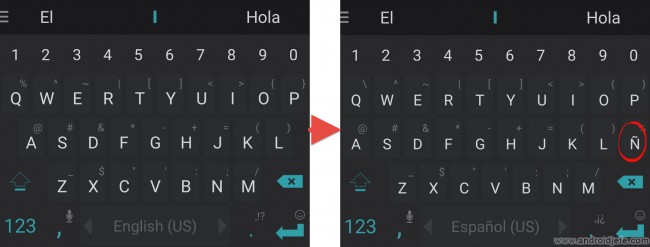
The following explains how to configure the letter Ñ on various keyboards. The procedure will be basically the same in any other case.
Contents
How to add the letter Ñ to the Android keyboard

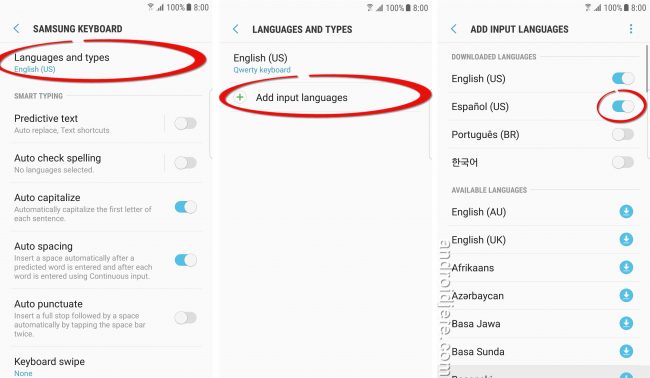
How to put the Ñ on the keyboard of the Samsung Galaxy mobile
- Adjustments
- Language and Input
- Virtual keyboard
- Samsung keyboard
- Languages and Types
- Add input language
- Add Spanish
Optionally you can delete the keyboard in English language, although it is not necessary. On the keyboard space bar, you can quickly switch between that keyboard and the added Spanish, which is the one with the letter Ñ.
Put the Ñ key on Google Gboard keyboard

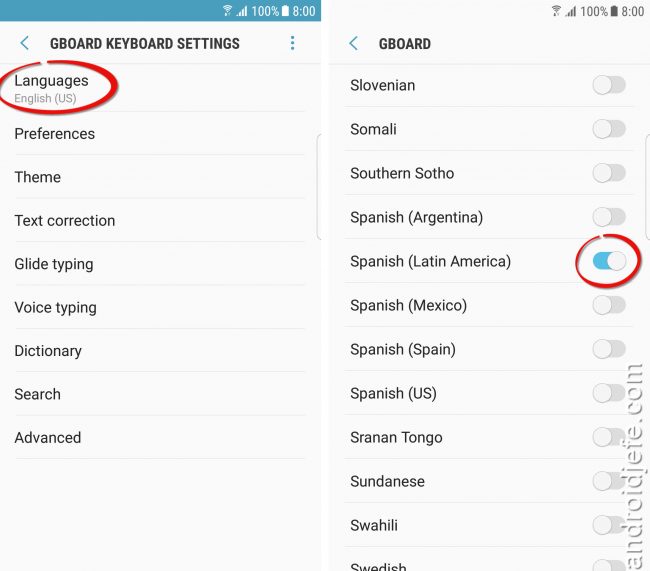
Keyboard with Ñ on Android
- Open Google Gboard keyboard settings (from its icon in the app drawer)
- Select «Languages» (or «Languages»).
- Deactivate the “Use system language” or “Use system language” switch (if this switch is enabled).
- On the same screen, in the list below, activate the Spanish language switch (conventional Spanish, Latin American Spanish, or whichever is desired), as shown in the illustration above.
If you still do not see the Ñ key, when the Google keyboard appears on the screen, hold down the space bar and select “Spanish Google Keyboard” or “Spanish Google Keyboard”. This is necessary when multiple languages are activated on the Google keyboard. If only Spanish is to be used, simply deactivate all other languages, except Spanish.
Make Ñ appear in SwiftKey
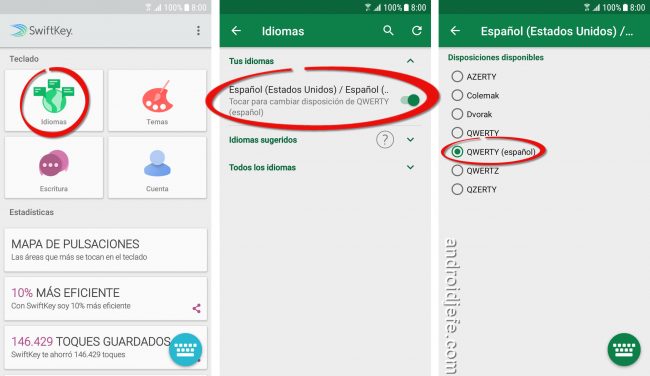
- Open the SwifKey keyboard settings (shortcut in the applications menu).
- Playing in Languages (or Languages).
- Activate the Spanish language (if it does not appear, download it by searching for it in the list of languages below).
- Click on the language and make sure that QWERTY Spanish is selected.
If the letter Ñ still does not appear, press and hold on the space bar. Swipe to the side to select the Spanish language. This is necessary when there is more than one language installed in SwiftKey and other keyboards.
Set the Ñ on the GO keyboard
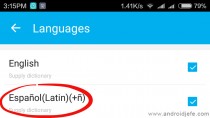
We do not recommend using this keyboard, but if for some reason you use it and want to put the Ñ key on GO Keyboard, let’s do it.
- Open keyboard settings.
- On the menu screen select «Languages» (or «Languages»).
- In the list of languages, check the box to the right of any of the Spanish languages that have the letter Ñ (Spanish + ñ) to download and enable it, as seen in the image above.
If the Ñ key still does not appear, when the keyboard is visible on the screen, touch in the upper language box. Select the language previously marked, that is, the «Spanish + Ñ» (this is necessary when there are several languages installed in GO Keyboard).
Entering the keyboard settings
To enter the settings of any keyboard installed on Android, you have to touch the keyboard icon that should be in the application drawer, or go to the general Android settings, “Language and Introduction” option and select on the keyboard name.
In case you cannot put the Ñ key on the keyboard that comes from the Android cell phone, it can always be replaced by one of the keyboards mentioned above. You can also choose to hold down the letter N to bring up the Ñ.
Related articles :
How to change the keyboard BACKGROUND
How to change Android keyboard
How to write small numbers on the cell phone (Superscripts)
Receive updates: SUBSCRIBE by email and join 10,000+ readers. Follow this blog on Facebook and Twitter.