Android devices already have a basic recovery system or “recovery”, an independent software from the Android system that usually lodges in an exclusive partition in the internal storage. From its options you can reset the computer if it has a bootloop problem, boot failure, when it stays on the logo, or to install official images of the operating system (updates, firmware).
You can replace that recovery with TWRP (Team Win Recovery Project), the best and only custom recovery that currently exists. It is an open source software with several years of existence that is very popular. The idea of this is to have other advanced possibilities, in addition to those of the official recovery, such as flashing firmware and ZIPs from third parties (eg Lineage OS or Magisk), creating a complete backup image (nandroid backup) and restoring it.
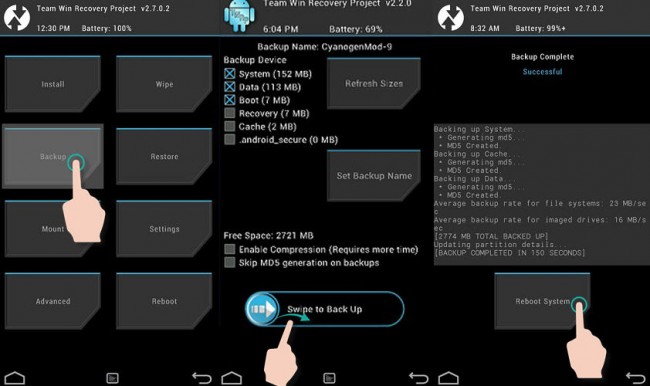
TWRP Nandroid Backup
Important : Keep in mind that after installing a custom recovery, you may stop receiving updates from the manufacturer or you may not be able to install them. Also, this is an unofficial and technical modification that can render the device unusable if done wrong. Therefore, find out as best as possible and proceed under your sole responsibility.
Contents
How to install TWRP
Root
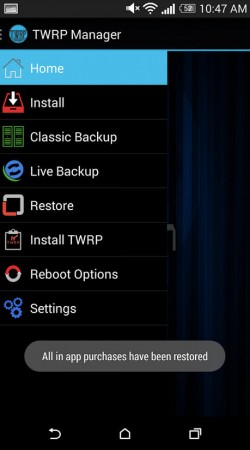
If your Android already has root permissions, the simplest is to use the TWRP Manager application, although TWRP also offers another “dd Install Method” method for many devices, which is done from the PC with a simple command using ADB / FastBoot.
No root
If you do NOT have root, the alternative is to install TWRP from the PC :
Requirements
Before you start you must unlock the bootloader . This will depend on your Android device. On a Samsung Galaxy it is as simple as activating the ” OEM Unlock ” option in the developer options. In other brands such as Xiaomi or Motorola you must request the unlock code from the manufacturer and then send a command from the PC using ADB / Fastboot.
Once the bootloader is unlocked, the process varies from device to device, but thankfully TWRP offers a quick explanation on how to proceed in each case. As you will generally have to connect the cell phone to the PC, make sure to previously install all the necessary USB drivers (Windows only).
Samsung Galaxy J7
For example, to install TWRP on a Samsung Galaxy J7 SM-J700 (Exynos), download its .tar file to the PC. Download and run the Odin program. Turn the device on in “Download” mode (off, press and hold the Power + Volume Down + Home buttons). Connect the cell phone to the PC with the USB cable. From Odin’s “PDA” button choose the aforementioned .tar file and start the flashing process.
Motorola Moto G7
If it is a Motorola Moto G7, you will need the ADB / Fastboot tool on your PC and the respective drivers (Windows). According to the TWRP information, you will have to download the .zip file in the mobile’s storage. It also downloads the .img file to the PC (rename it to “twrp.img”). Start the mobile in Bootloader mode (off, hold down the power button + decrease volume). Connect both computers with the USB cable, open the ADB / Fastboot command line and run the command “fastboot boot / de / twrp.img directory” (without quotes). This will start TWRP on the device temporarily. From that TWRP screen, use the “Install” option to install the .zip file that you saved on your phone.
Samsung Galaxy S10
In the case of a Samsung Galaxy S10 (Exynos variant) things get complicated. Previously, it is essential to root the device with Magisk. Then, from Magisk Manager, pre-root TWRP. Finally, the obtained image is flashed in the recovery partition, executing a command through a terminal app. Probably, instead of this complicated process, once rooted it may be better to proceed with TWRP Manager.
Notes :
- If you can’t find the EXACT technical model or “code name” of your cell phone in TWRP, *** DO NOT *** use the tutorial and files from another similar model because you could seriously damage your Android.
- After finishing the process, it is highly recommended to restart the phone from the newly installed recovery (Reboot> Reboot system now) to prevent the device from re-flashing the original recovery and losing everything done.
CWM Recovery
If your phone is an older model (2014 or earlier), you can probably also install the custom CWM recovery (ClockWorkMod), discontinued for several years. The procedure would be similar, only in this case using the official Rom Manager application.
If you cannot find your model in the application, the option is to manually search for the Recovery.IMG file and install it using an application like Flashify. Unfortunately, there is no longer an official website for these files because the developer removed it. You should expose yourself to files and tutorials from third parties on the Internet.