Experienced or inquisitive users who often use the “My Documents” folder, when invoking the “Properties” option from the context menu in the main “General” tab, probably noticed the line “Allow indexing of file contents” with a checkbox on the left. By default, there will be a checkmark, but it may not. The material below will acquaint you with what this option is needed for, whether you need to check or uncheck it and how this will affect the performance of the operating system.

Contents
What is file content indexing and what is it for?
Under an inconspicuous check mark is a fairly active Windows system service, which is designed to speed up the search for files on the hard disk of a computer, and often their contents, if we are talking about, for example, a text document. If you have a lot of files and you often search for the necessary ones among them, then it is considered that with the indexing function activated, you will spend a minimum of time searching.
Let’s see now how the indexing service works in Windows 10 (it is also present in previous versions, but it was endowed with the greatest intelligence in 8.1 and 10). Each time a new file is added or an existing one is modified, data about it in an encoded (indexed) form is entered into a special database, which helps to speed up the search. Have you noticed that by using search and typing just a few characters, you already get a list of results that match your set. If there is a required one among them, you no longer need to enter characters further, and you save time (taking into account the likelihood of making a mistake somewhere in the middle or end of the line).
Although the process of indexing files on the hard disk itself occurs in the background, if you perform bulk operations with files (for example, copying from a flash drive or downloading a new application), the indexing service can slightly reduce the performance of the computer, with the same intensity performing read / write operations in index database.
By disabling indexing, you can slightly increase the speed of your PC, and in some cases it is noticeable, and in some you will not feel the difference at all.
To make an informed decision about the need to activate or deactivate this option, you should also take into account the processor power, and the number of RAMs, and the type of disk (hard or SSD).
If the CPU is fast (i5, i7 or higher), and the HDD is normal, indexing will not hurt. If the processor is slow, regardless of the type of disk, indexing the contents of the files should be removed. A check mark will be superfluous for SSD-type disks, and for processors of any performance.
That is, the conclusion is obvious: disabling the option is justified for weak CPUs and solid-state drives. But another question is also interesting: how much will the search function slow down when indexing is disabled? You should not worry about this: the difference will, of course, be noticeable, but not always. And most importantly, the quality of search will not suffer from this.
And one more nuance. Why index files if the average user tries to store their files (music, pictures, movies, documents) in several folders, which are also located in one place?
The answer is also quite obvious: for the sake of contextual keyword search. But this function works tolerably well only in Windows 10 / 8.1, already in the G7 it is implemented so poorly that there will be no point in using such a search.
But if there are a lot of files in your custom folders, then you can enable indexing only for these folders. The processor load will be much less and the search will be faster.
As you can see, there are nuances, and there are many of them. Let’s recap the pros and cons of using this feature.
Pros and cons of File Indexing Service
There is one drawback – almost constant writing of data to the index file about the location of other files can really slow down your computer. On SSD drives, file indexing is also not necessary – solid-state drives themselves are much faster than classic hard drives, so the search will be fast and without indexing. But constant writing is harmful for SSDs, because they have a limit on the number of such operations in their life cycle.
The merit is also the same: the acceleration of the search when using the built-in Windows tools, it becomes a little smart and is able, as it were, to predict your intentions.
How to enable search indexing in Windows 10
This is done literally in a few clicks:
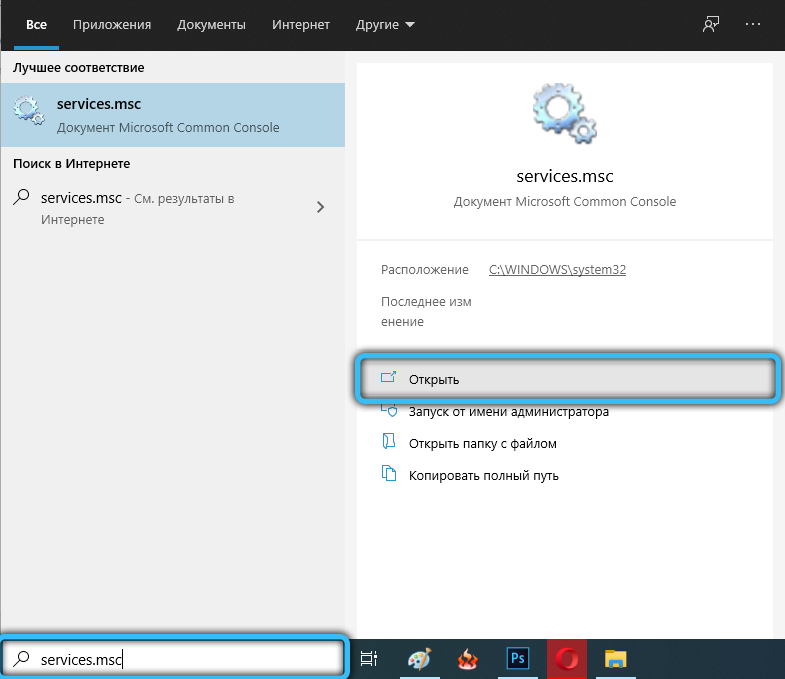
- press the “Start” button and enter the services.msc command in the search and program execution console;
- the name of the Services utility will be displayed in the search results, click on it;
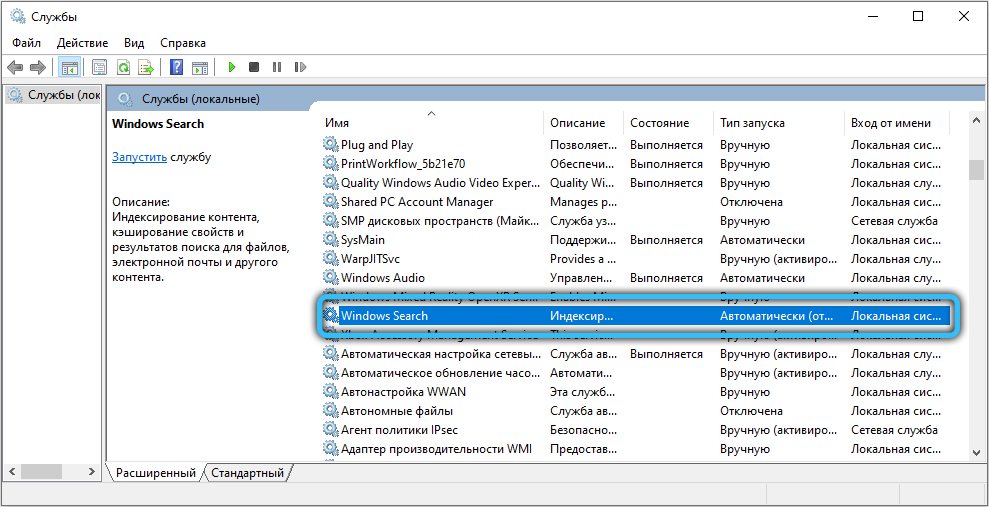
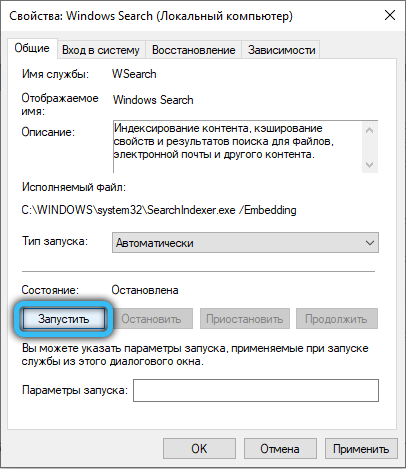
- the Services window opens with a list of running services. We are looking for the Windows Search line and double-click on it with LMB;
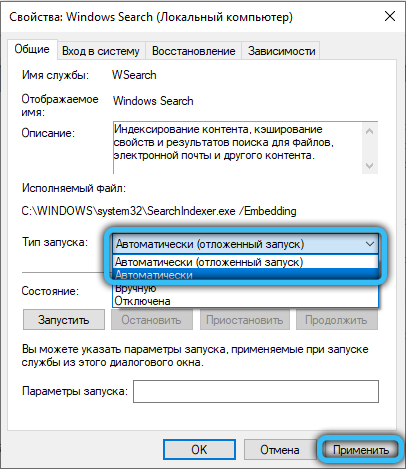
- a new window will appear, in the “General” tab, which opens by default, there is a line “Startup type”. Select the item “Automatic” and press the button “Apply”;
- we complete the action by clicking the “Run” button.
How to disable disk indexing in Windows 10
As usual, the creators of the operating system have provided several options for accomplishing this task.
Through Services
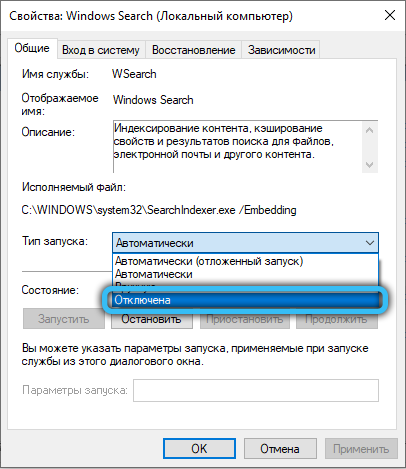
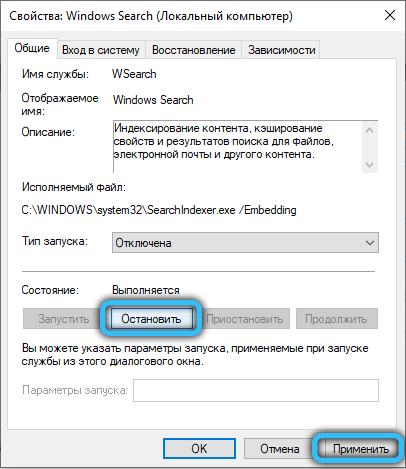
We do everything as described in the section above, but at the stage of choosing the startup type, instead of “Automatic”, select the “Disable” option, press the “Stop” button, and then “Apply”.
But for the changes to take effect, you will have to restart your computer, after which you can try to evaluate how much faster it has become.
If you think that the performance of the PC has not changed in any way, then you can enable the function in the same manner as described above.
Through the command line
Experienced users prefer not to open multiple windows, but to use the command line, entering a single command. True, this method is also not without its drawbacks – the command must be remembered, plus there is always the possibility of making an error in the typing. Nevertheless, she has a lot of fans.
How it’s done:
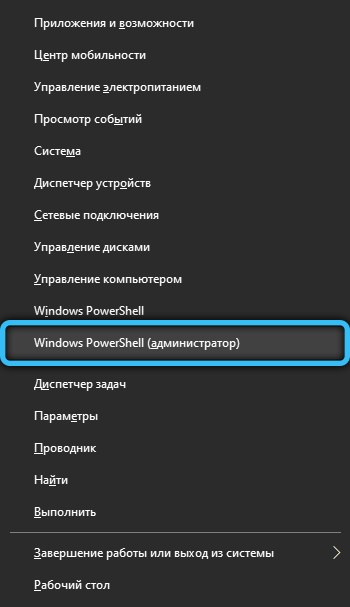
- press the Win + X combination, in the menu that opens, select the PowerShell item with administrator rights. The same menu can be accessed by right-clicking on the “Start” button;
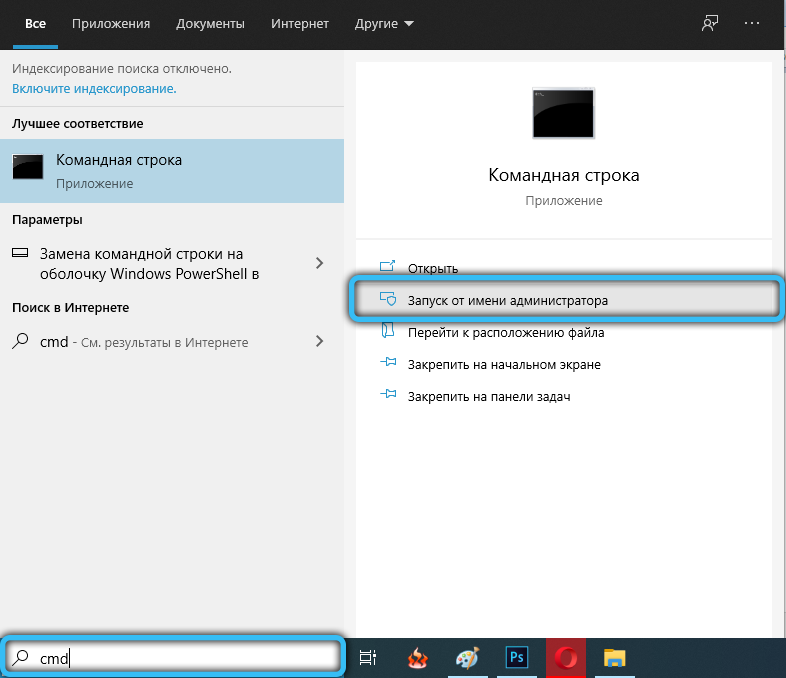
- you can run the command line through the search console by typing cmd in it;
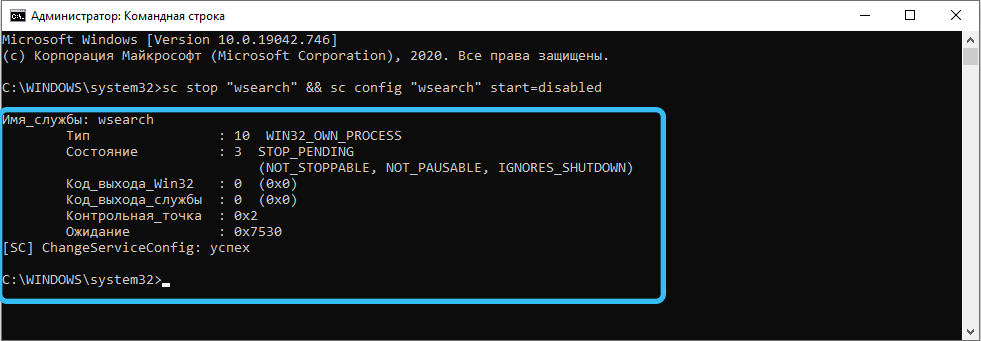
- in the console window, type the line sc stop “wsearch” && sc config “wsearch” start = disabled, confirm by pressing Enter.

- as a result, the search service will be stopped and, accordingly, indexing in Windows will be disabled.
If it becomes necessary to reactivate the indexed search service, in the command line, type the modified phrase: sc config “wsearch” start = delayed-auto && sc start “wsearch”.

How to change indexing options
You can also selectively disable file indexing in OS Windows 10/8/7. This, in theory, will improve the performance of the PC, since you leave only those locations for indexing that you consider important from a search point of view.
To do this, we perform the following actions:
- press the Win + S combination and type the word “indexing” in the search bar;
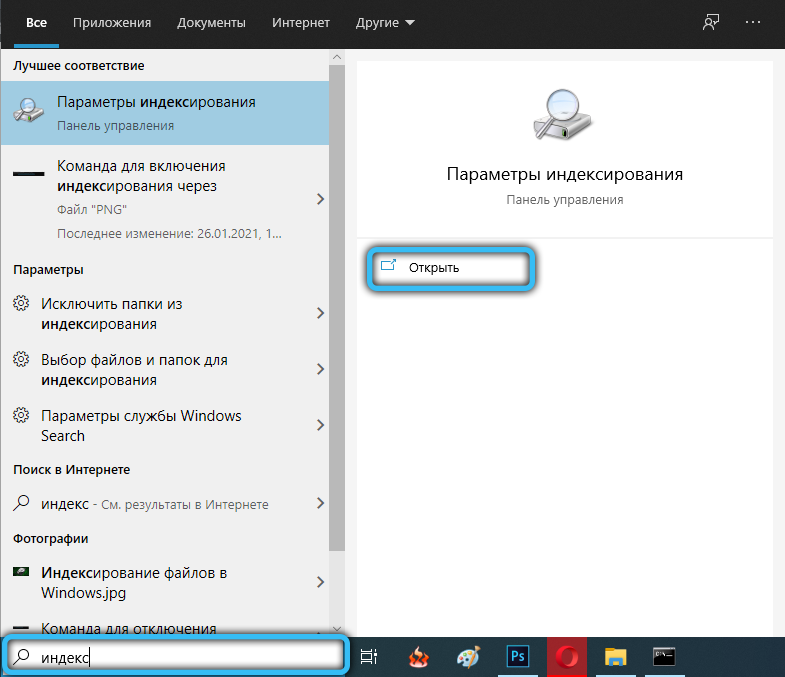
- in the search results, select the line “Indexing parameters”. If there is no such line, it can be found in the “Control Panel”;
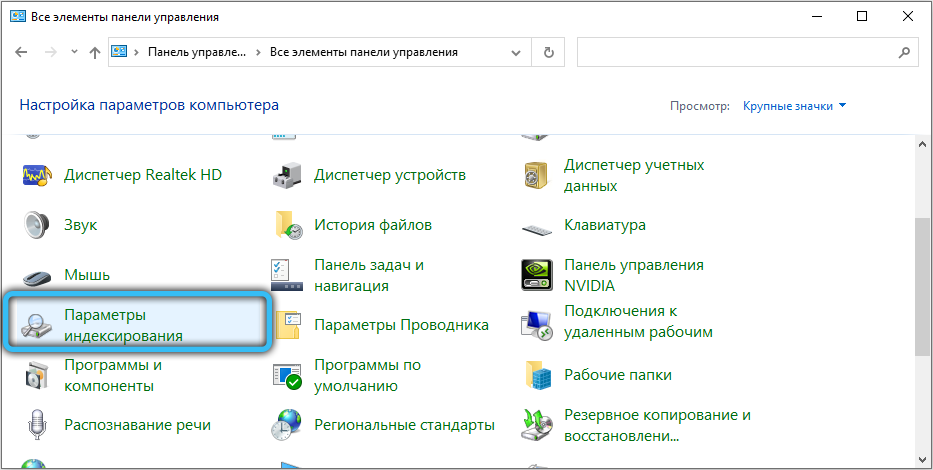
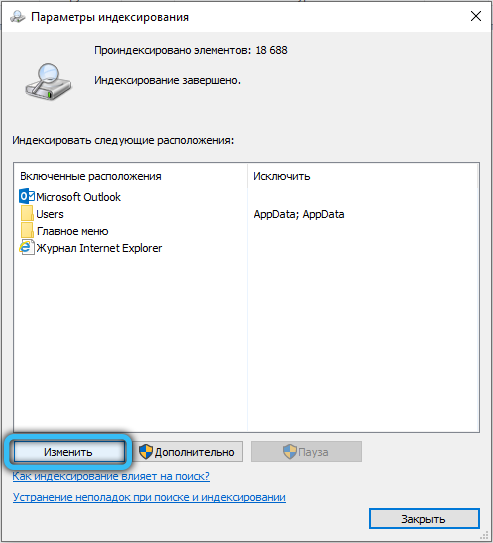
- in the window that opens, a list of all places that are currently being indexed will be displayed. Click on the “Change” button;
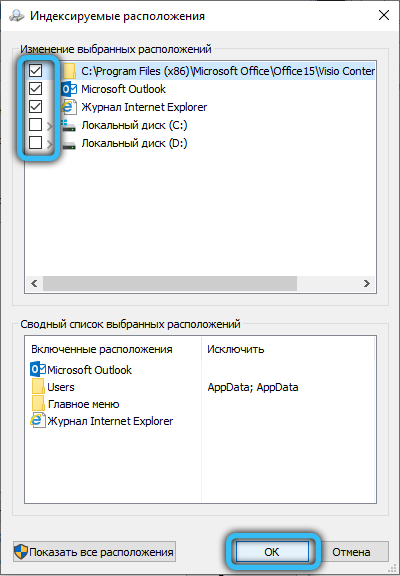
- the same list will appear in a new window, but with check marks. If you need all the locations, click the “show all locations” button. We uncheck the boxes where we deem necessary, confirm by clicking OK.
The same operation can be performed in a different way, in this case, you can disable indexing of only the entire disk. This can be useful, for example, if you want to exclude an SSD drive from indexing in Windows 10/8, which, as noted above, does not make sense to index.
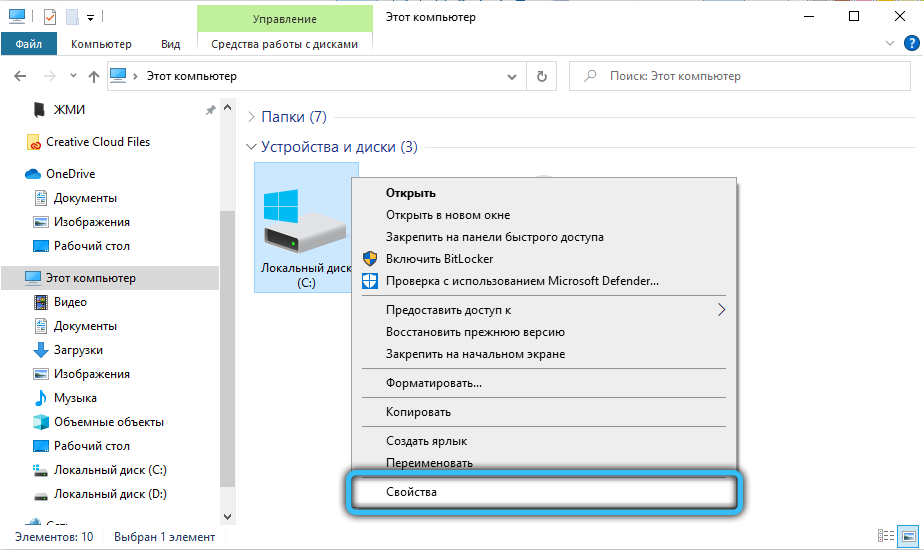
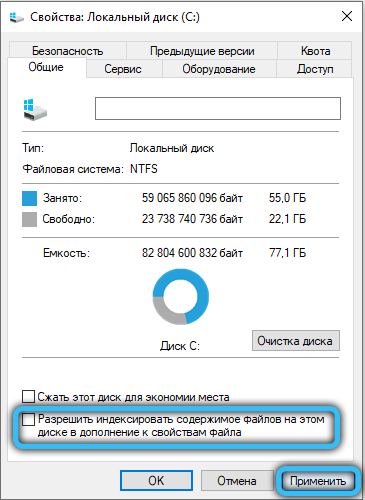
To do this, you need to open “My Computer” and right-click on the disk that you want to disconnect. In the menu that appears, select the “Properties” item and uncheck the “Allow indexing context files” line. Be aware that the shutdown operation can be time consuming.
Recovering the index file
Search Service is a common system utility that can also crash. In such cases, the index database turns out to be not entirely up-to-date, as a result, the search will not work correctly – it will greatly slow down, or even be completely ineffective.
In such cases, the damaged file needs to be fixed, and you can do it yourself as follows:
- using the method described above, open the “Indexing Options” window;
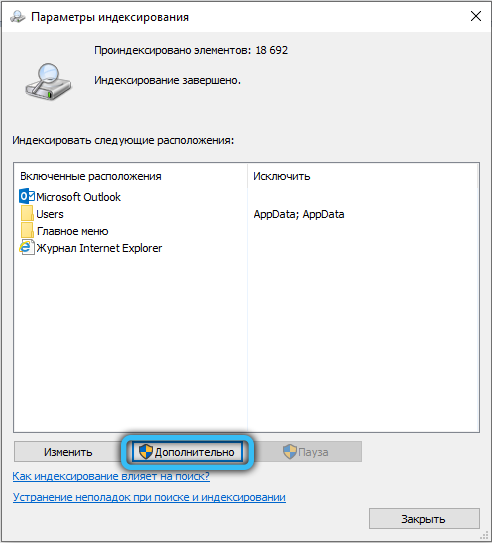
- click on the “Rebuild” button;
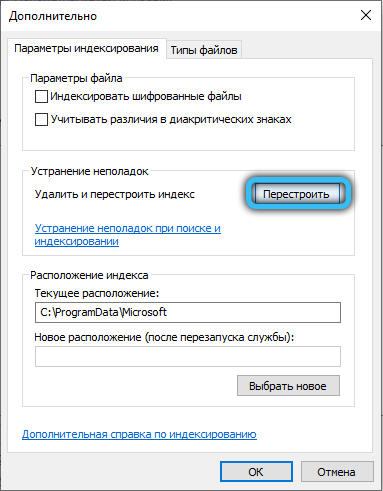
- waiting for the index file to be rebuilt, and this is also a rather lengthy procedure if the disks are full of files and the indexing function is activated.
So, now you know what indexing is for, and you can draw conclusions for yourself whether you need it or not. The function is certainly useful, and the good thing is that you can opt out of it selectively, and you already know how to disable indexing of a specific disk or folder.