Gigabit speeds from a provider are no longer exotic. Moreover, today this service has dropped in price so much that it has become available to most of the users. But there is one nuance here: it makes no sense to connect a gigabit tariff if your router does not support such speeds. Today we want to introduce you to one of the devices that allow you to transfer data at such tremendous speeds, and not only over the wire, but also through a Wi-Fi connection. Intrigued? Then read on carefully.
Contents
Description and main characteristics of the router Asus RT-N66u
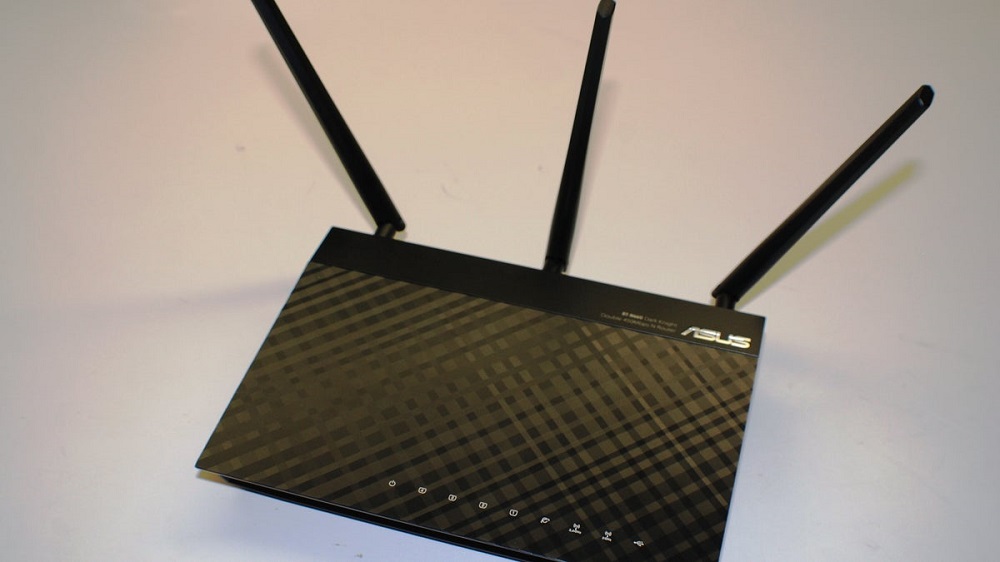
You can start the review of Asus RT-N66u with its extraordinary appearance, which generally corresponds to the style of the company. But this is still secondary. A feature of the model, in addition to supporting two frequency ranges, is the increased speed of wireless data transfer, reaching 450 MB / s for each frequency. And if we take into account that the router can exchange data simultaneously at both frequencies, then the total performance of the wireless network is an unprecedented 900 MB / s, which is almost equal to the wired speed, it is gigabit for the model.
Of course, these are purely theoretical indicators. In practice, it is almost impossible to achieve such speeds for many reasons.
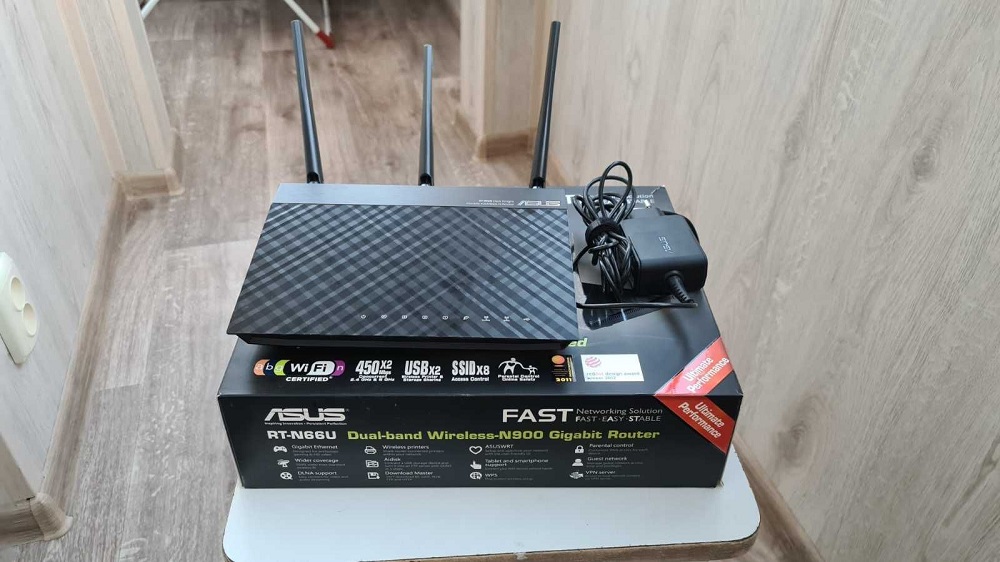
The delivery set of the device, in addition to the router itself, includes three detachable external antennas, moreover, rather large ones, a patch cord, a network adapter, a plastic stand and a CD with drivers, instructions and other software.
The router is equipped with four LAN ports, two USB ports, a WAN port, WPS and Reset buttons.
Key features of ASUS RT-N66U router:
- Supported Wi-Fi standards: 802.11ac / 802.11n;
- max speed in the 2.4 GHz band: 450 MB / s;
- max speed in the range of 5 GHz: 450 MB / s;
- support for simultaneous work in two bands;
- transmitter power: 19 dBm;
- removable antenna gain: 3 dBi;
- 4 gigabit LAN ports;
- 2 USB 2.0 ports;
- support DHCP, DDNS.
Internet setup
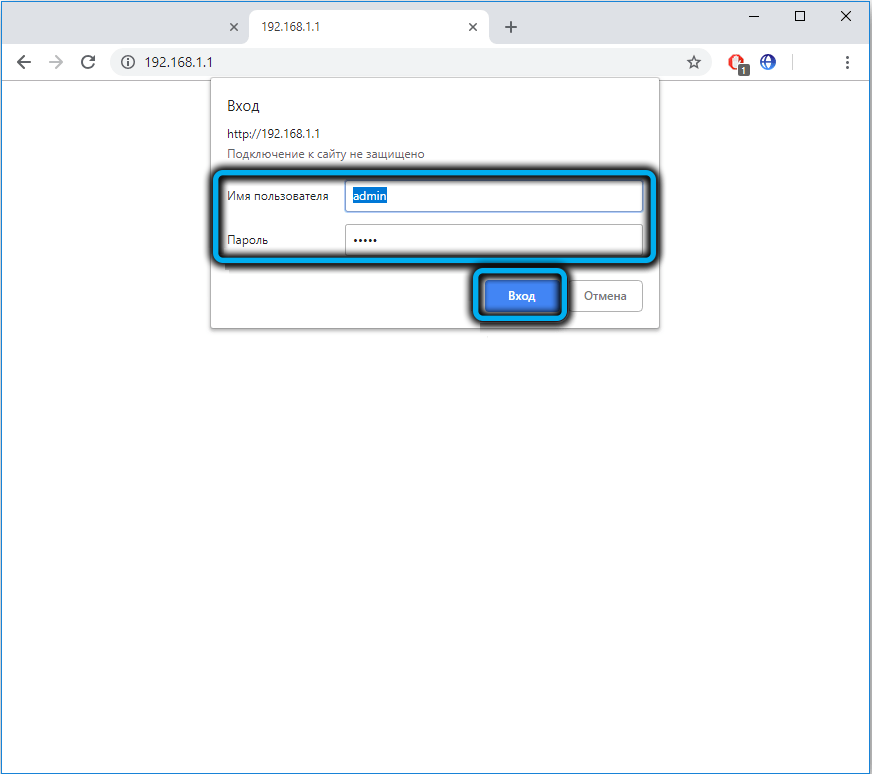
To configure the router, a web interface is used, which can be accessed from any browser by entering the default digital address 192.168.1.1 in the address bar, which is the same for all brand models, or the symbolic one – router.asus.com.

The administrative panel of the router is password protected, by default the login / password pair is the same – admin. If this is the first time setting up a new device, the automatic setup procedure (Internet and Wi-Fi) will start, but you can also make settings manually.
In any case, if the web interface is in English, in the upper right corner you need to change the language to Russian.
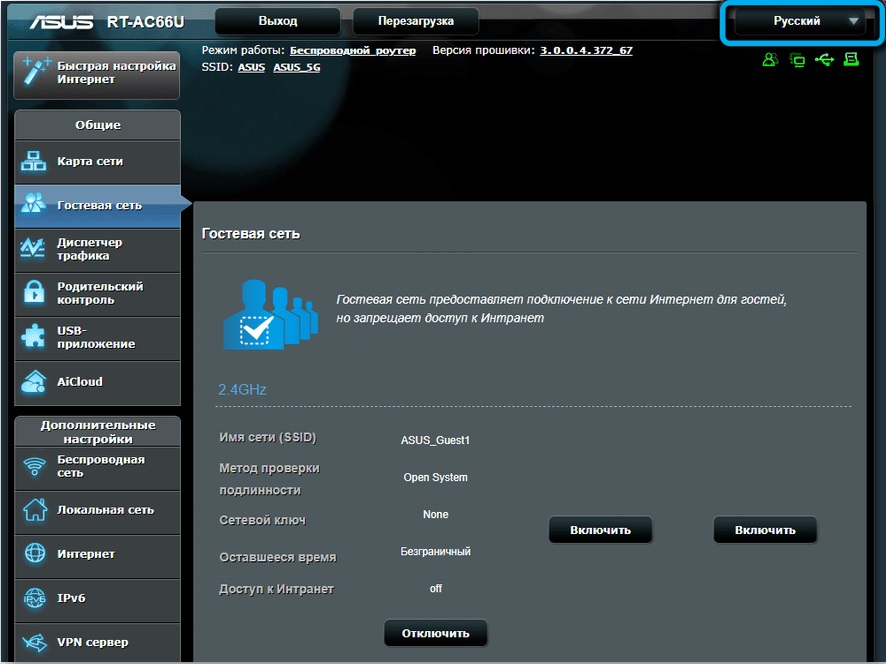
Then we click in the right panel on the “Internet” tab and go to the page for connecting to the World Wide Web.
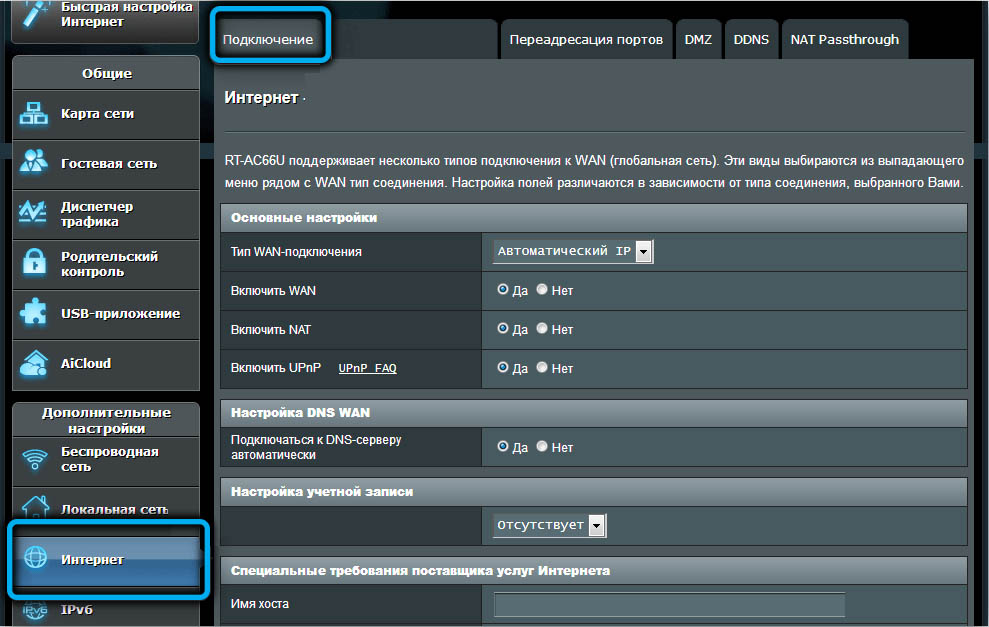
The first thing to do is choose your connection type. This data must be provided by the provider. Let’s consider all possible options.
PPPoE
Password-protected connection type, used by Rostelecom, TTK, Dom.ru and many other providers.
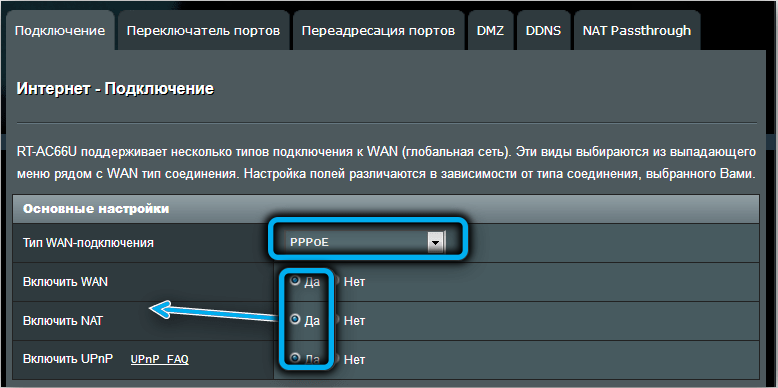
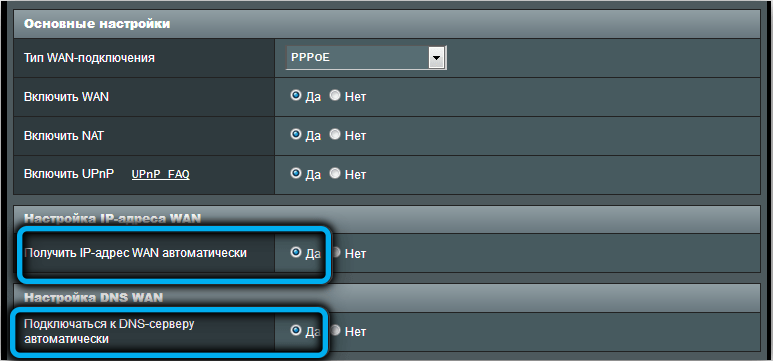
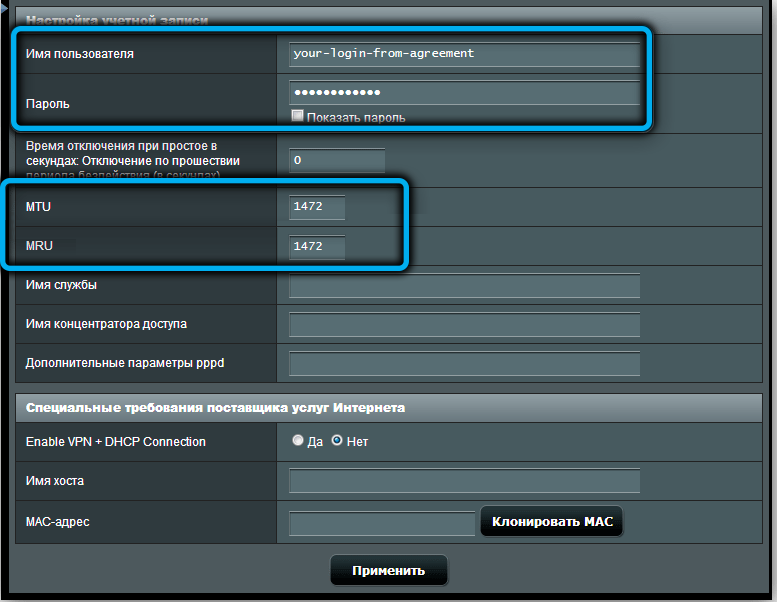
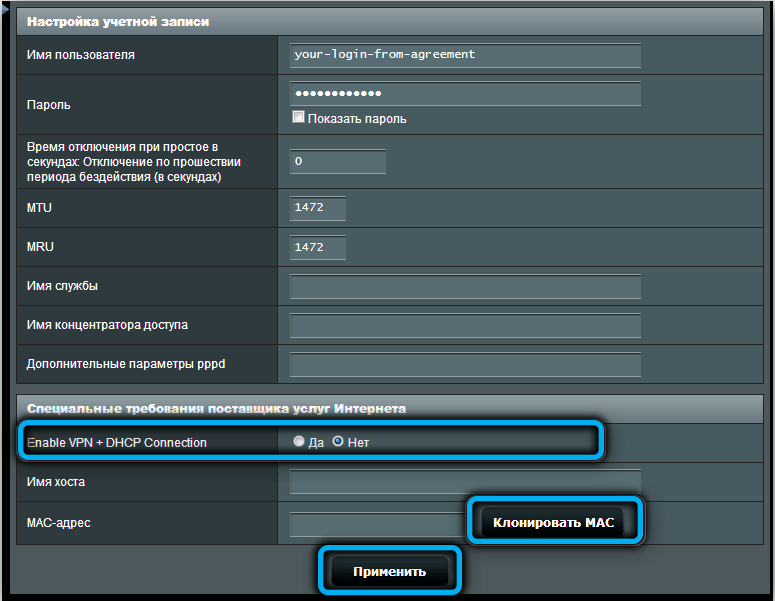
Here it is important to know only the login and password for communication with the provider’s servers. After entering them, you do not need to configure anything else, but just in case you need to make sure that the default values of the parameters have not been changed. Thus, the “Yes” selector must be enabled for the “Enable WAN / NAT / UPnP”, “Obtain IP address / Connect to DNS server automatically” parameters.
For the “Enable VPN” parameter, the “No” selector must be activated. The MTU / MRU field should be 1472, unless otherwise specified in the contract.
L2TP
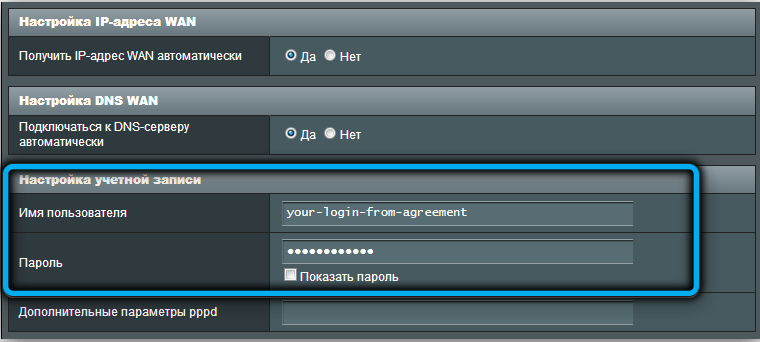
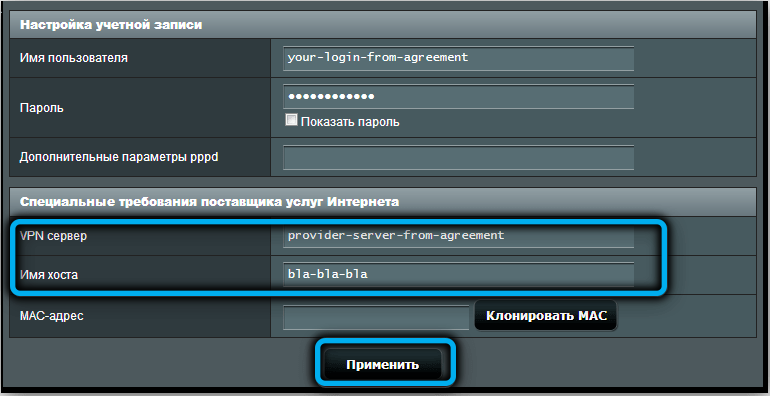
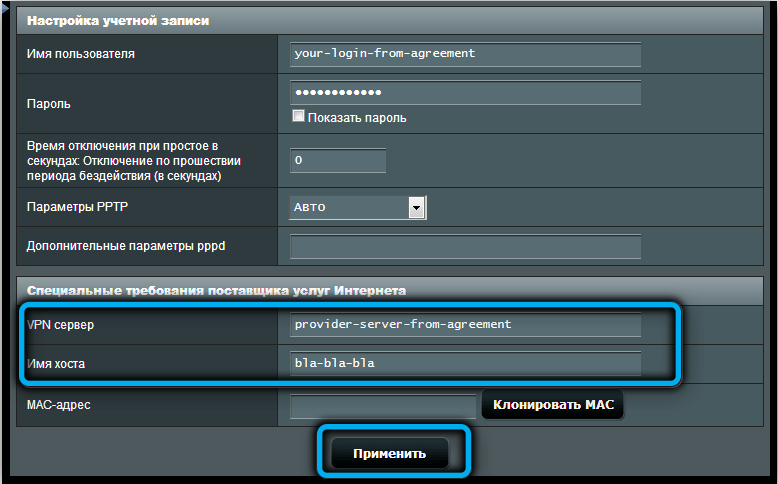
Configuring an ASUS RT-N66U router with an L2TP connection type (Beeline and some other providers) also requires a username and password, but in addition, you need to specify the name or digital IP address of the VPN server, this data must also be provided by the provider.
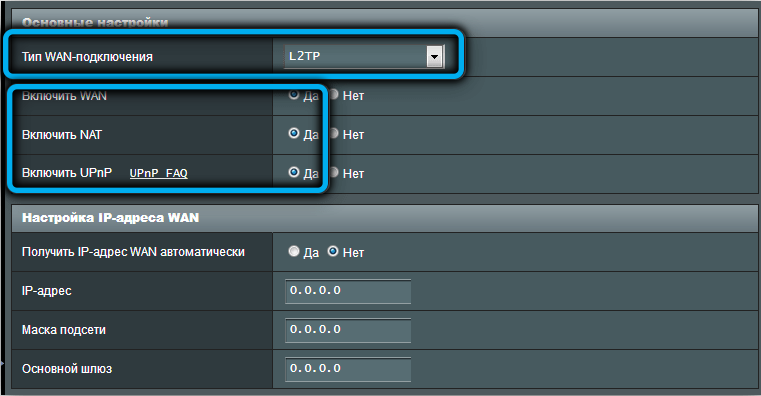
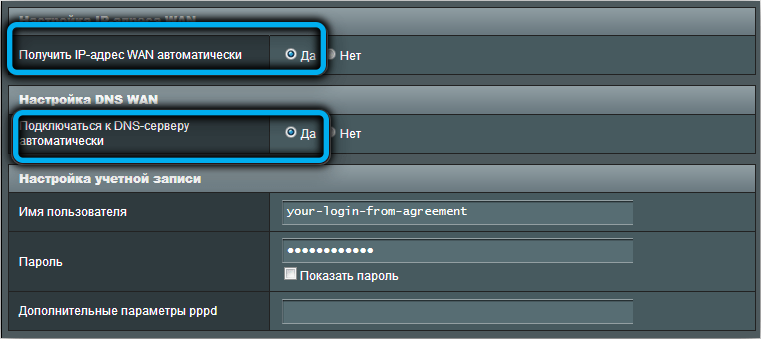
All other settings are the same, only the opposite should be “yes”.
PPTP
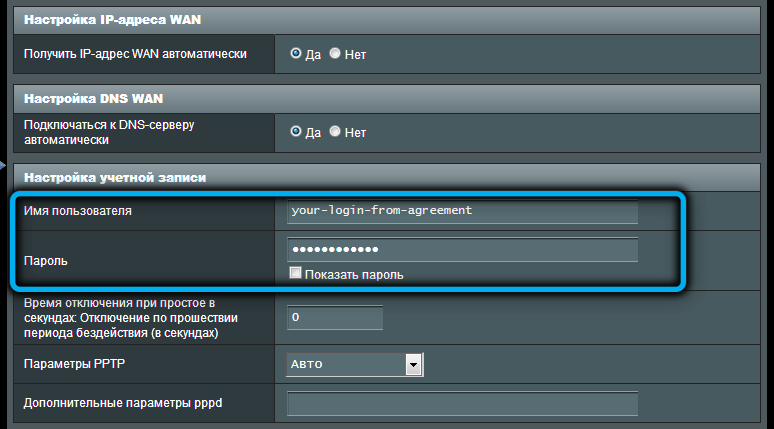
The instructions for connecting Asus RT-N66u for this type of connection are almost the same as for L2TP, only here the name or numeric IP address of the VPN server is entered into the “Heart-Beat Server …” field and the hostname is added.
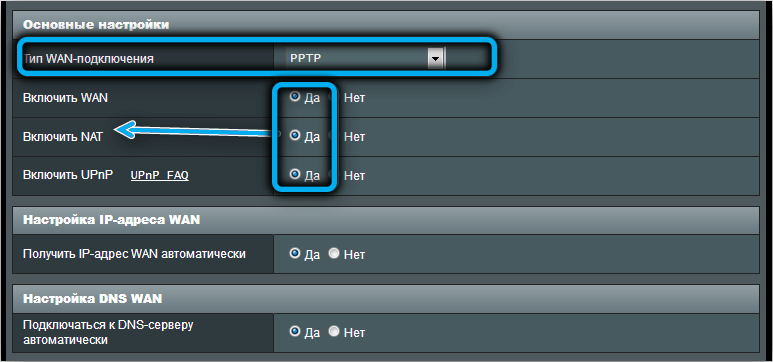
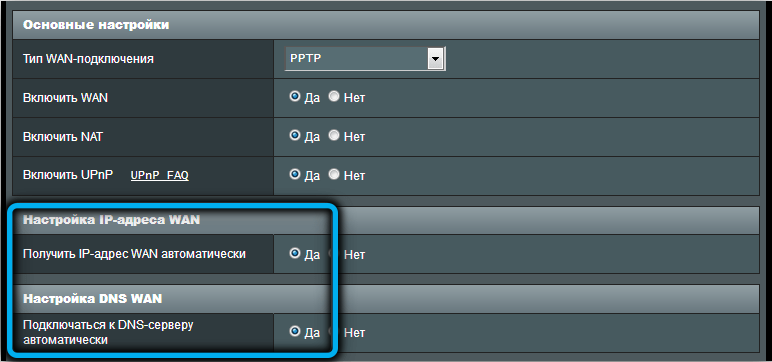
After entering all the data for each type of connection, click the “Apply” button.
How to configure Asus RT-N66u router for Wi-Fi distribution
The instruction for the Asus router for connecting a wireless network is simple, but it must be applied to both networks operating on different ranges:
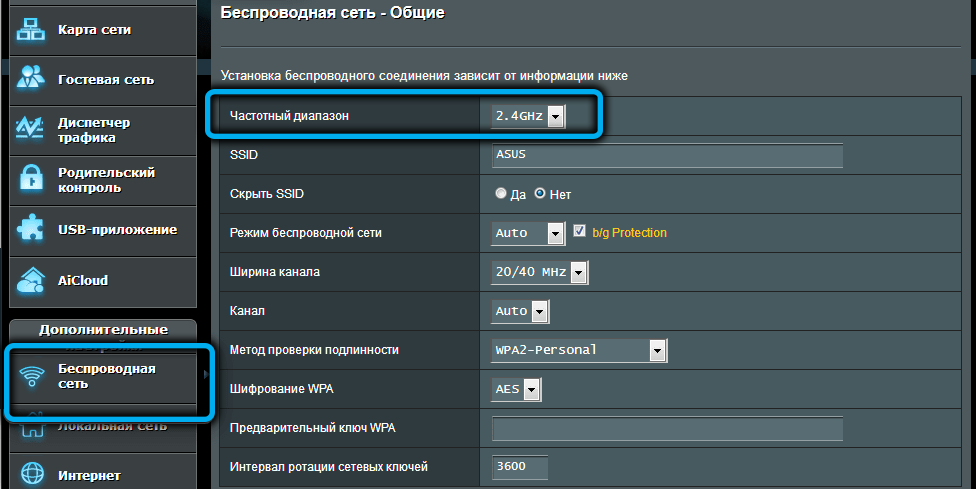
- select the “Wireless network” tab in the left menu;
- in the “Frequency range” field, specify 2.4 GHz (after completing the setup, we repeat the procedure for the 5 GHz frequency);
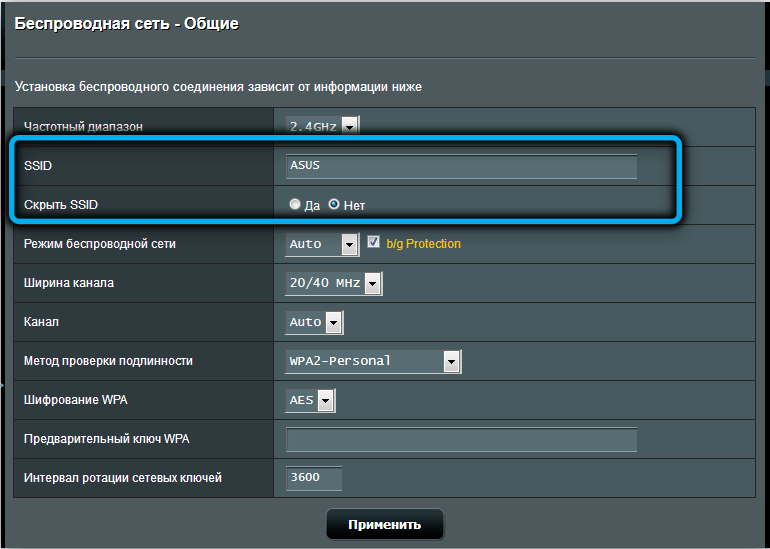
- in the SSID field we drive in the name of our wireless network;
- in the “Authentication Method” field, select the WPA2-Personal parameter;
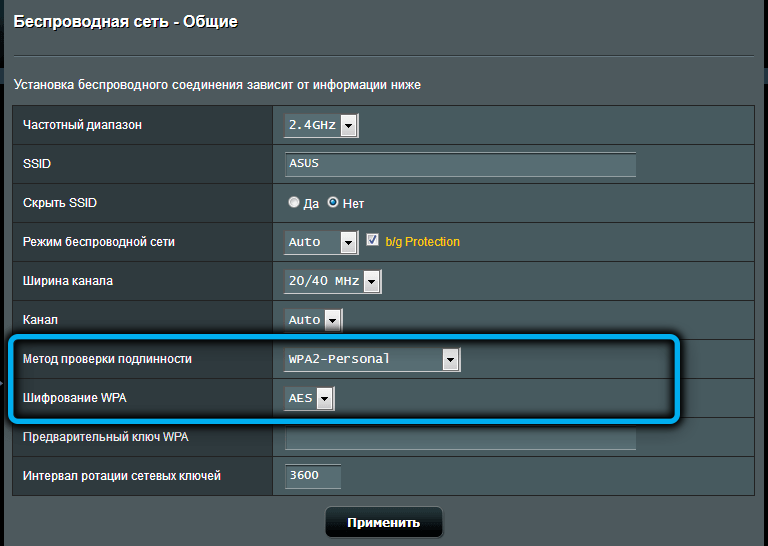
- finally, in the “Pre-Shared WPA Key” column, enter the password for the network;
- press the “Apply” button.
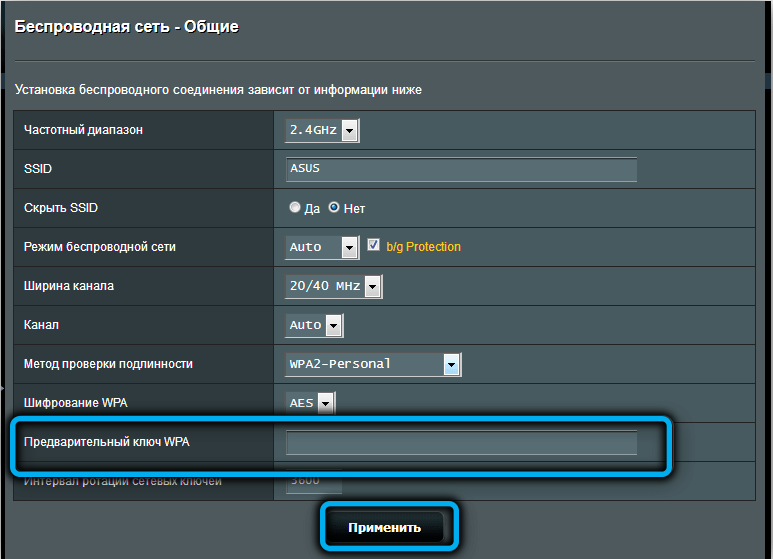
It is highly recommended that you name your networks so that you can easily distinguish between where the network is at 2.4 GHz and where is at 5 GHz.
What is it for? The fact is that the router is dual-band. A lower frequency has a longer range, but due to the fact that so many devices use this range, it works with a lot of interference and therefore is slower. The 5 GHz band is fast, but the range is shorter, and not all devices support it. So you will have the opportunity to choose the optimal network for each specific device.
Port forwarding
Regardless of the type of connection, the router always receives a specific IP address provided by the provider (it can be dynamic, that is, it changes with each new connection, or static). But end devices (computers, smartphones, TVs, set-top boxes) already receive an internal address starting with the digits “192.168.1” or “192.168.0”. These are the IP addresses of the local network, this numbering is done for convenience. The problem is that if someone from the outside tries to transfer data to a specific device, then such an attempt will be unsuccessful, since the external node knows the address of the router, but not the end device. In principle, this situation is rare – for example, when torrent clients are running, when setting up IP cameras, when you need to use FTP connections. Many online games also require a specific IP that is hidden behind NAT.
The problem is solved by port forwarding. That is, the router needs to be told that if a packet arrives addressed to a specific port, it must be immediately addressed to a specific local IP address. This operation is called port forwarding.
To do this, you need to know which port to open, and this already depends on the specific application. In principle, it is possible to transfer ports in a fairly wide range, but this is a less preferable method.
There is no universal rule here. In the popular torrent client µTorrent, for example, the desired port can be seen in the settings (the “Connection” tab), in network multiplayer games, look in the settings too.
So we know which port to forward, now let’s get down to business:
- go to the “Internet” tab;
- select the item “Port forwarding”;
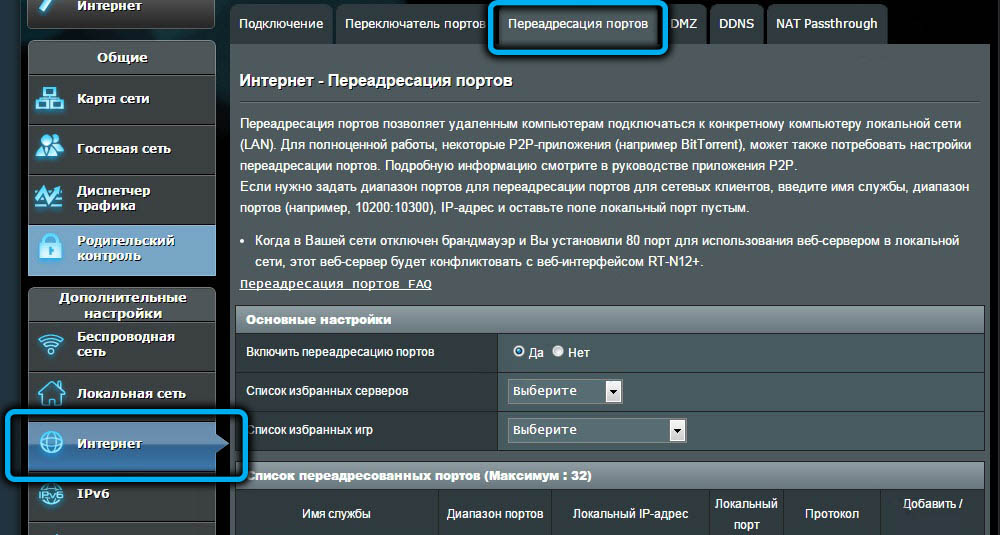
- set the selector to the “Yes” position opposite the “Enable port forwarding” parameter;
- in the “List of favorite servers” field, you can select popular services for which port forwarding will be performed automatically (the same BitTorrent client or FTP client);
- a similar opportunity is provided for popular games (in the “List of favorite games” field, there are WOW, CS, Ageof Empires, Warcraft, etc.);

- in the “Service name” field, you can specify for which program you open the port, this is purely informational data;
- the “Port range” field is intended to indicate a specific port, if known, or a range of ports (separator – colon);
- the “Local IP address” field is also important, here we write the internal address of the device (for example, 192.168.0.15);
- in the “Local port” field we indicate the same as in the “Port range”;
- in the “Protocol” field, indicate the protocol used by the program for which port forwarding is required;
- click on the plus sign on the right;
- click on the “Apply” button.

It remains only to reboot the router, and all the settings made will start working, and all incoming packets intended for the running program or game will be redirected to the desired computer.
How to reboot or reset ASUS RT-N66U to factory settings
The first way to reset the router settings is physical. You just need to press the “Reset” button and hold it for at least 20 seconds, after which the router will reboot.

The second one is programmatic, through the web interface:
- go to the “Administration” tab;
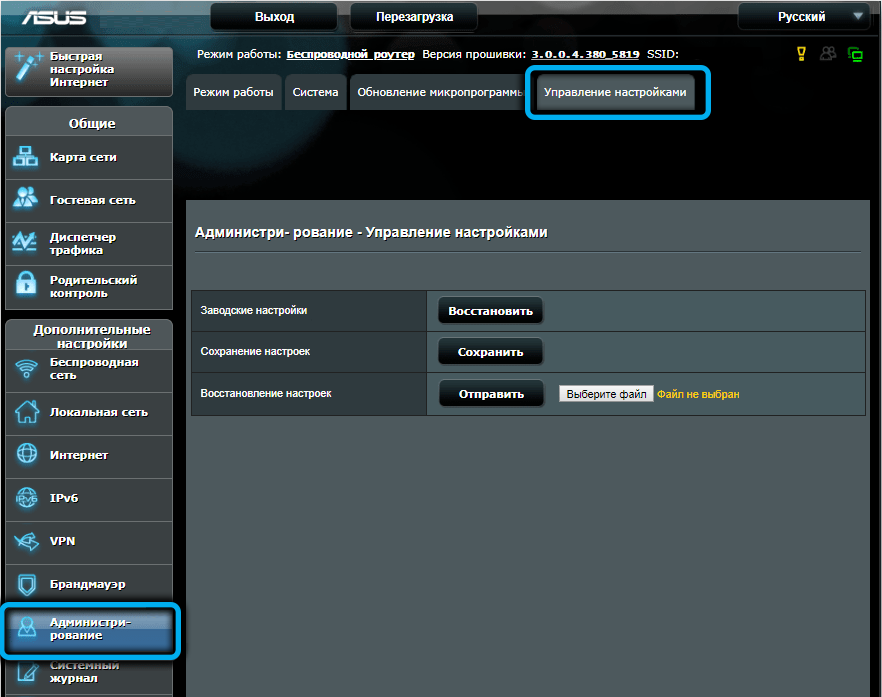
- select the item “Reset / Save / Load settings”;
- click on the “Reset” button;
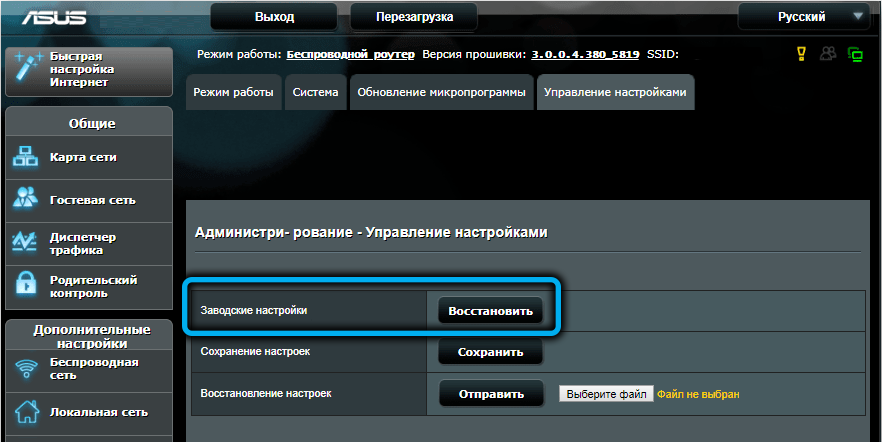
- we confirm our intentions.
Rebooting the router is required much more often – in all cases when it starts to work unstable for no apparent reason. To do this, you can also use the physical and software method. The first is to disconnect the device from the network for 30-40 seconds, the second – by pressing the “Restart” button located at the top of the main page of the admin panel.

Firmware upgrade
A good rule of thumb is to ensure that the latest drivers and firmware are used on all your devices, including your router. In the latest versions of Windows, updates are made in automatic or semi-automatic modes, but for the router this operation must be performed manually.
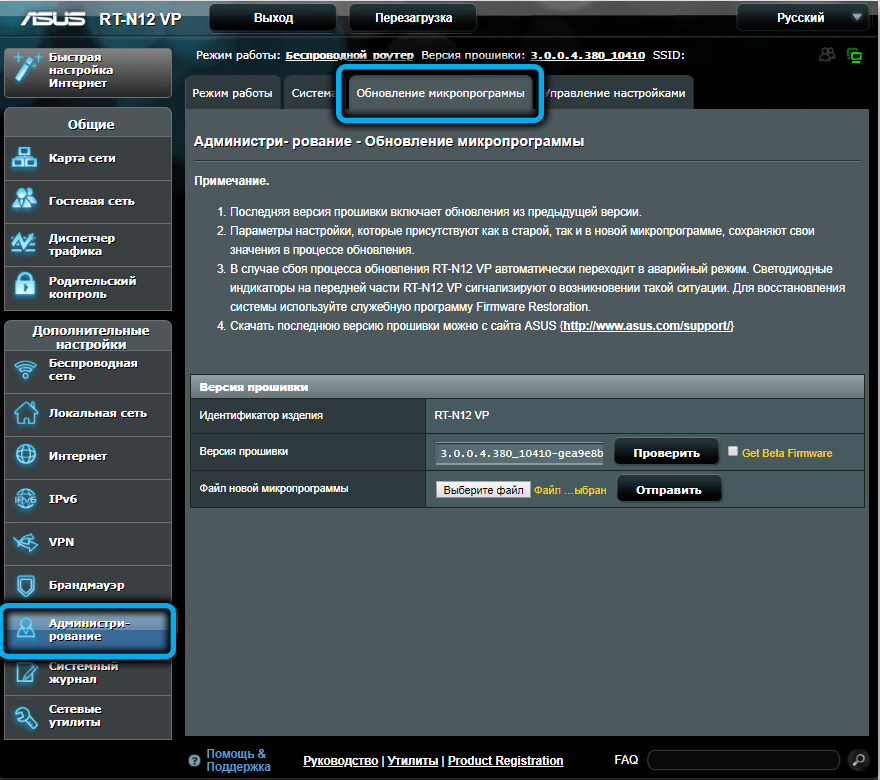
First you need to find out what version of the firmware is installed on your device. To do this, go to the “additional settings” tab and select the “Administration” item. Click on the “Firmware update” tab in the top panel and write down the firmware version number.
Now, in a new browser tab, go to the official website and look at the number of the latest firmware – it is located at the top of the list. If it is more than what you recorded, it will not hurt your router to update. Click on the “Download” button. The firmware is zipped, so you need to unpack it to get the file with the .bin extension.
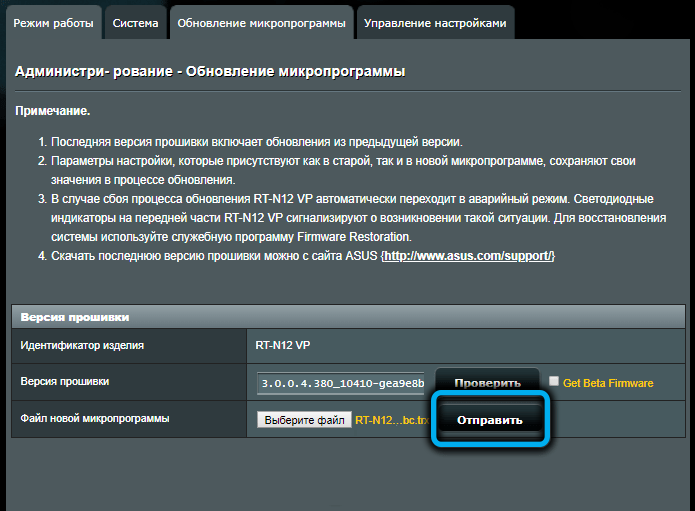
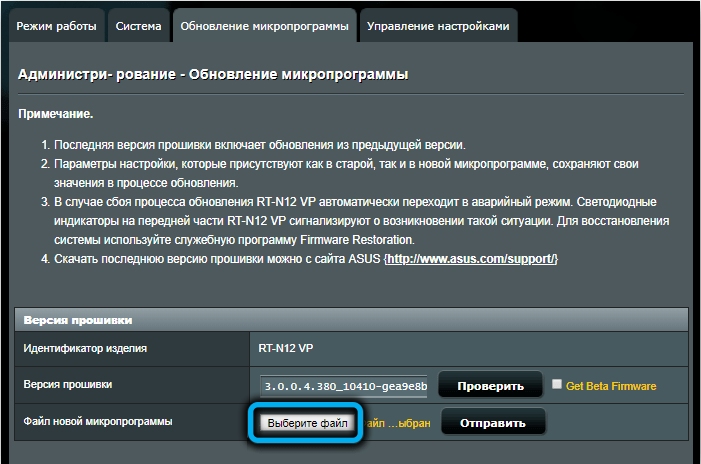
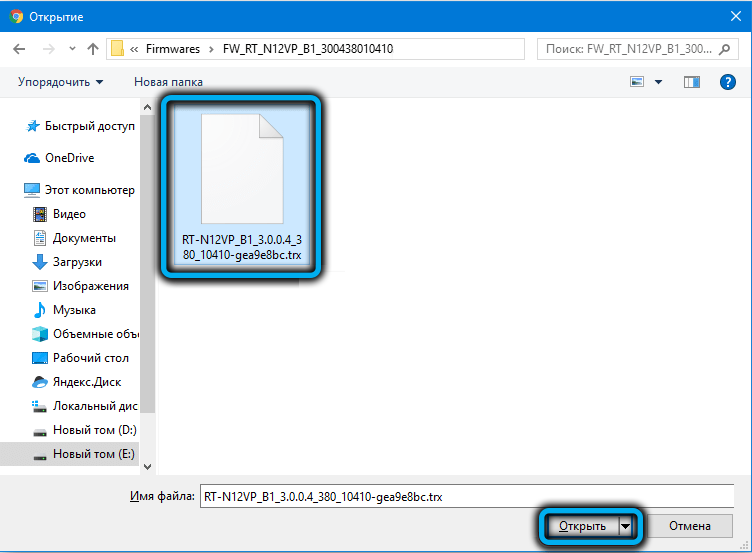
Return to the router’s web interface, click on the “Browse” button. An explorer will open, in which we find the firmware file and click on the “Open” button. It remains to press the “Send” button and the process of flashing the RT N66U router starts, after which it will reboot.

Now you know how to flash and configure the Asus RT-N66u router. Share in the comments if you succeeded in doing this according to our instructions.