OTA (“Over The Air”) is an update for the Android system that a manufacturer or operator sends to their devices via the Internet, and that is presented on those devices in the form of a notification that will say something like ” System update ». The user touches that notification and the update will start downloading from a specific web link.
Typically, only the device that receives the OTA notification can update, but there is a way to capture the web link where the file for that OTA update is hosted. People on the internet often capture the link of that OTA update and share it so that others can download it and update their device at that time, without having to wait for the notification. Even the file of that OTA (.ZIP) is usually shared directly.

How to install an OTA update
Once the OTA update has been downloaded, either from the manufacturer or operator’s server (for example, for Nexus devices, the official download link is something like https://android.googleapis.com/packages/ota/ google_hammerhead / 8f8cc12f7a9d.signed-hammerhead-MRA58K-from-LMY48M.zip) or from any file server (uploaded there by a third party), the installation procedure is the same. The first step is to get the .ZIP file of that OTA and then proceed as follows.
– Put the .ZIP file of the OTA update in the memory of the device (DO NOT unzip the .ZIP file)
– Start the device in Recovery mode . This may vary depending on the device:
- Method 1 : With the device turned off, press and hold both the power button and volume up button (or power button + volume up button + home button). Release them when the brand logo appears. This method is generally used for Samsung devices.
- Method 2 : Start the device in “Bootloader” mode (with the phone turned off, hold down the power button at the same time and for three to five seconds and decrease the volume). Select the “Recovery” option. When the lying green robot doll appears and the message “No command”, hold down the power button and without releasing it press the volume up button.

– Once inside the recovery, choose the option “apply update from sdcard” and select the .ZIP file that was put in the device memory in the initial step.
Remember that the OTA .ZIP file must be the correct one for the exact device model that you want to update. Search for the OTA based on the device model number (there’s something about it in this article): for example, something like “OTA XT1063”.
How to capture an Android OTA update
If you want to capture an OTA update to share it with others, the first and fundamental requirement is * DO NOT DO ANYTHING * when you see the OTA notification on the device and proceed as below. The second requirement is to have the ADB tool installed and working on the computer (this article explains how to do it). Connect the Android device to the PC and do the following:
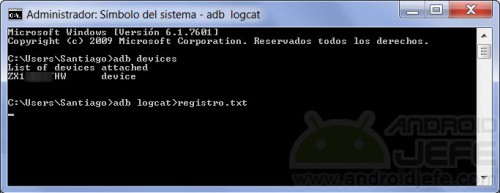
Open ADB on the PC, type the command adb devices and press Enter. This command should return the serial number of the device, indicating that it is correctly connected to the computer. Then write the following command:
adb logcat>registro.txt
Press Enter. This command will save all the activities carried out on the Android device, in real time, in the text file registry.txt .
Only once the above is done, press the notification of the OTA on the Android and start the download of the update. The objective is that the previous command can detect and save in the file registry.txt the URL where the OTA will be downloaded.
Wait for the update to finish downloading on Android. Then open the registry.txt file in a PC text editor and look for the download URL for the OTA update. As there will be quite a bit of text in that file, it is recommended to use the search function of the text viewer program being used and search for terms such as “http”, “ZIP”, “ota”, “cds”, the model number of the device (for example «XT1063» for one of the existing Moto G 2014 models) or the «codename» of the device (for example «titan» for the same Moto G 2014) to find the URL more quickly. For Motorola devices, try searching for the term storage.googleapis.com and for Nexus devices search android.clients .
It is important to remember that the web links of certain OTA updates can expire quickly (that is the case of Motorola OTAs, for example), therefore it is recommended to download the OTA and upload a backup to a file server so that there are no problems to download it for others in the future. That is not the case with OTAs from Nexus devices, as these links do not expire.
The application is supposed to alogcat available on Google Play It does the job of the ADB utility to capture the activity of the Android device and therefore the URL of the OTA, but in my case this application has not worked.
Where is the OTA update downloaded on Android (root)
Immediately after the download of the OTA update has finished on the device, * DO NOT * tap on the “Update” button: click on the “Update after” option. After this you can search the .ZIP file of the OTA in the memory of the device. The prerequisite for this is that the device has root permissions.
Considering the above, download a file explorer with root access from Google Play: for example, ES File Explorer or Root Browser. Give root permission to that browser and find the directory /cache . This directory is only visible with root permissions (it will appear empty otherwise). In that directory, find the OTA’s .ZIP file. If, for example, the OTA is from a soak test update, the .ZIP file will have a string of phrases like blur_version_titan_asia_retail . Once that .ZIP file is found, copy it to another folder or upload it to the internet to share it.
10 pages to download Samsung and Android firmware (ROM)
How to solve problems generated by updating your cell phone
Changing the ROM unlocks a mobile device or not?
Receive updates: SUBSCRIBE by email and join 10,000+ readers. Follow this blog on Facebook and Twitter.