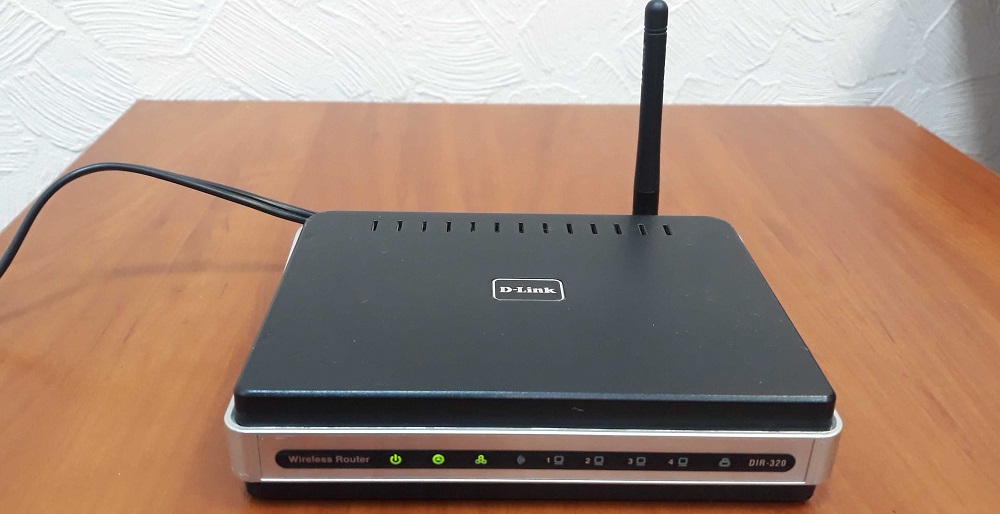
DIR-320 is one of the most popular home router models that has gone through several modifications. And although at the moment the device is no longer in production, due to its budget cost and high reliability, it remains the most popular item in the secondary market, and its new owners are interested in both the capabilities of the router and its basic settings. This is what will be discussed in this article.
Contents
Description, characteristics of D-Link DIR-320
Unassuming, but nice design and quite tolerable functionality – by no means the whole list of qualities that contribute to the popularity of the router. Even the newest models of this price class are rarely equipped with a USB port. The DIR-320 has it, and it can be used both as a print server and for connecting external drives or a 3G modem.
The reliability of the device is legendary – there are statements about a year’s use without rebooting. The hardware part does not shine with outstanding characteristics, but the router practically does not heat up and is characterized by the highest stability in operation.
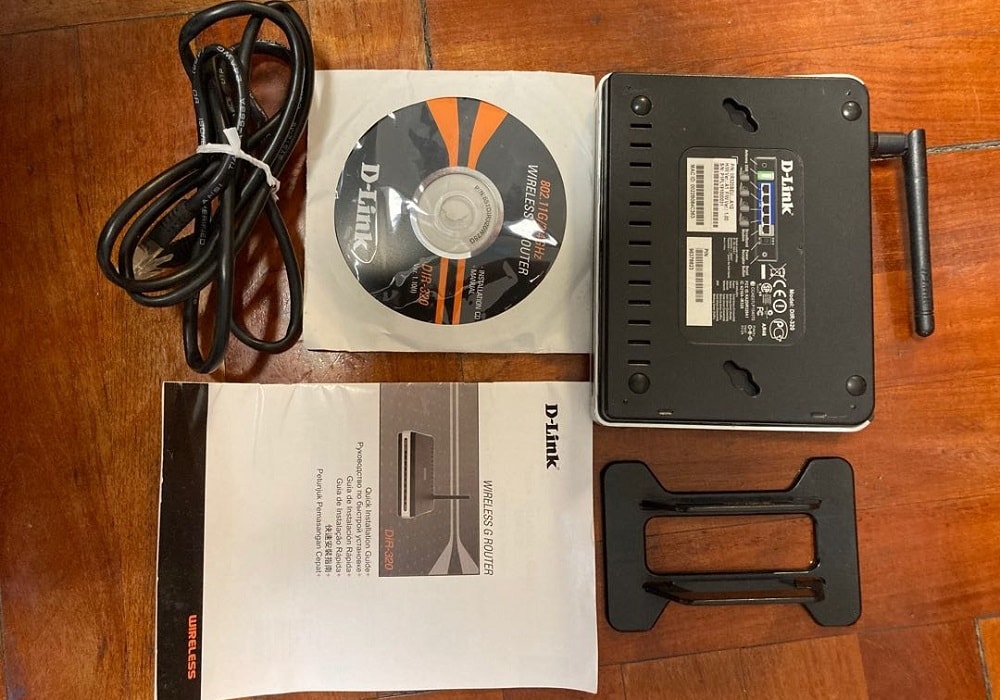
The router has no problems with security: it has a built-in firewall, a function for filtering devices by MAC address, and parental control.
Main characteristics of the D-Link DIR-320 router:
- 4 100Mbps LAN ports and 1 WAN with the same data transfer rate;
- 1 USB 2.0 port;
- WI-Fi network speed – 150 Mb / s;
- support for IPTV;
- SPI firewall.
There is a WPS button on the side panel, a Reset button on the back, LAN / WAN and USB ports.
How to set up the Internet on D-Link DIR-320
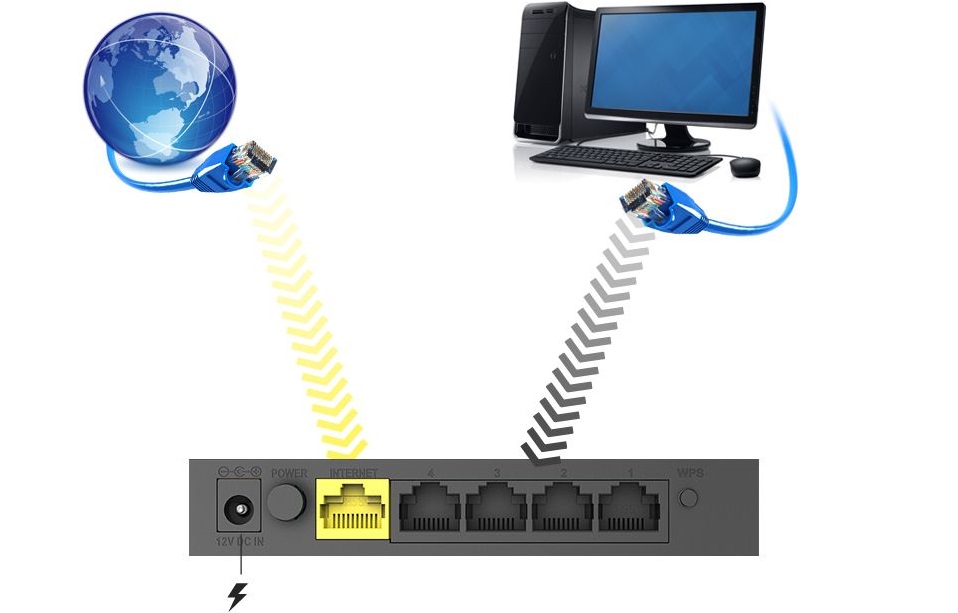
To enter the parameters of the router for the first time, it must be connected to a PC using a twisted pair cable, one end of which is “plugged” into the LAN port of the computer’s network card, and the other – to any of the four ports of the router. Of course, the cable from the Internet provider must also be connected to the WAN port – on the first models it is designated as the Internet, on the later it has the WAN designation familiar to routers.
After completing these simple manipulations, you can start preparing the router for work. In any browser, enter the default IP address of the router in the address bar (indicated on the sticker below). For this model, it is 192.168.0.1.
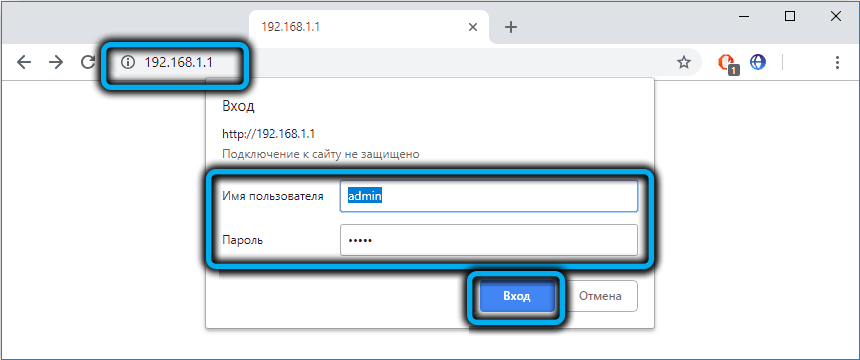
The start page of the web interface will open, on which you need to log in, that is, enter your username and password. This pair is also indicated on the label. Rather, there is only a login – admin, there is no default password, but it will need to be changed later – otherwise anyone within the coverage area of your Wi-Fi network can get access to the admin panel.
If everything is done correctly and you managed to enter the settings of the DIR-320 router, the first step is to specify the type of connection to access the Internet. It can take three values - PPOE, L2TP, PPTP. You can find out the specific value from your provider, usually this information is indicated in the contract for the provision of network access services. After that, if the web interface is not Russified, you need to change the language to Russian.
Further actions depend on which network access protocol is used, while in each of the three options there are two subspecies: dynamic and static IP.
Let’s consider all these cases in detail.
PPTP configuration with dynamic addressing
This protocol is considered obsolete, but it is still used by the popular Internet service provider NetByNet, with both dynamic and static IP addresses.
Here is a step-by-step algorithm for dynamic addressing:
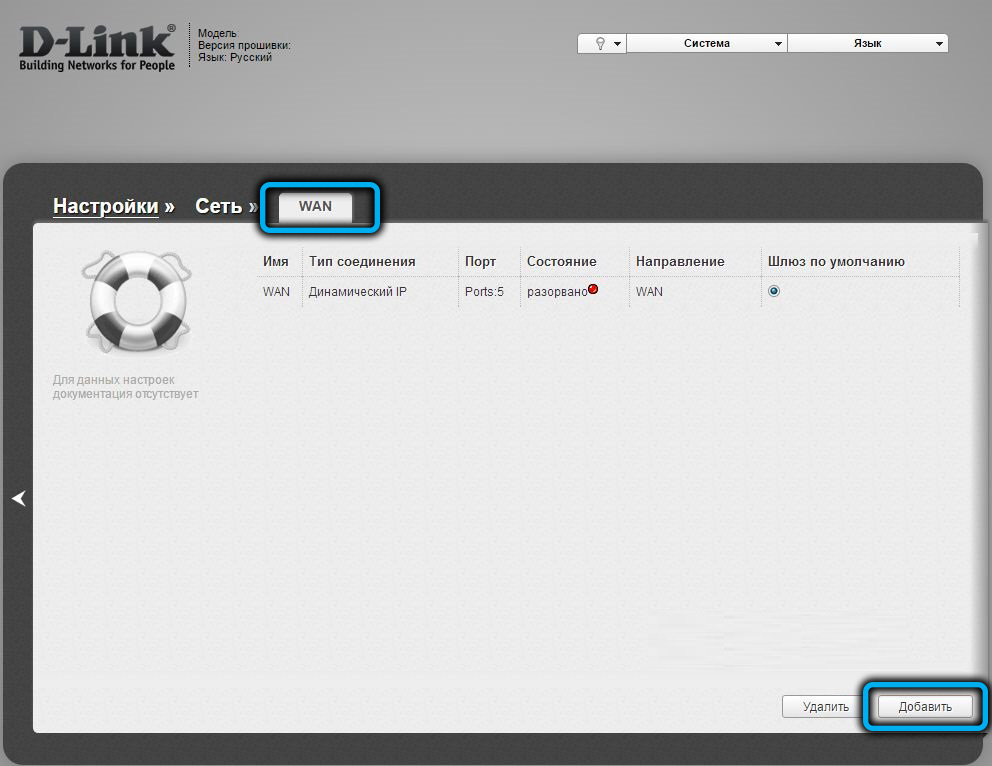
- in the web interface, click on the “Network” tab and select the “WAN” item;
- since we have no active records yet, press the “Add” button;
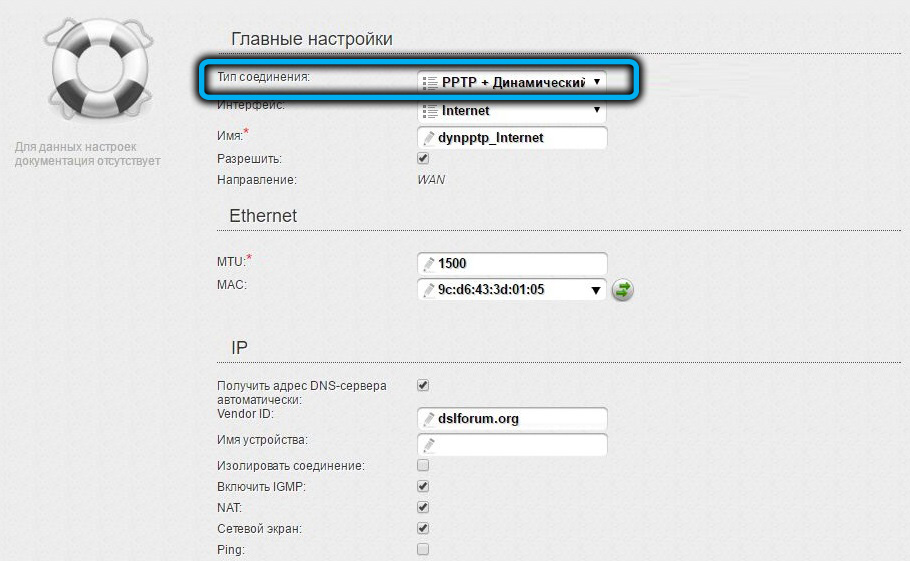
- on the page that opens, in the “Connection type” field, specify “PPTP (Dynamic IP)”;
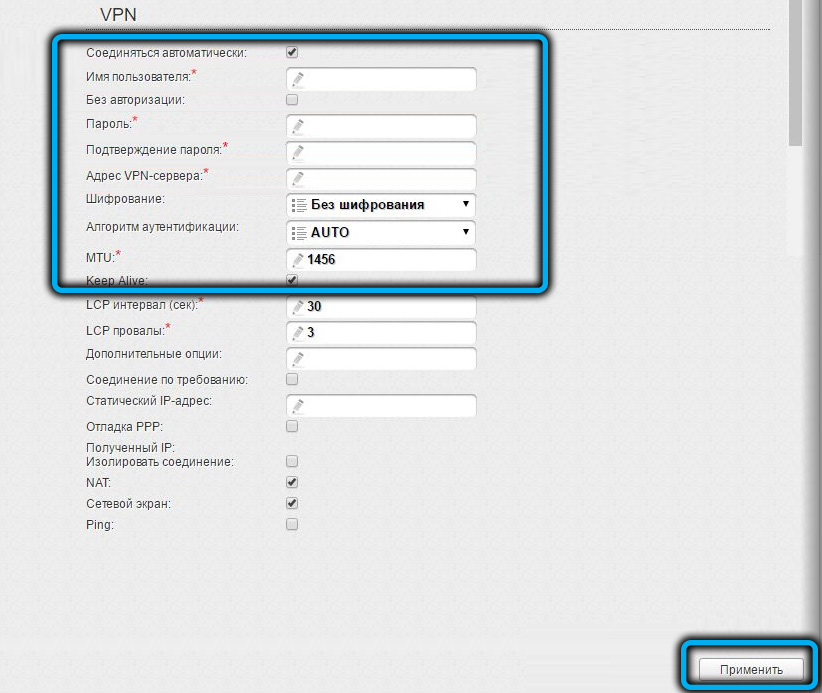
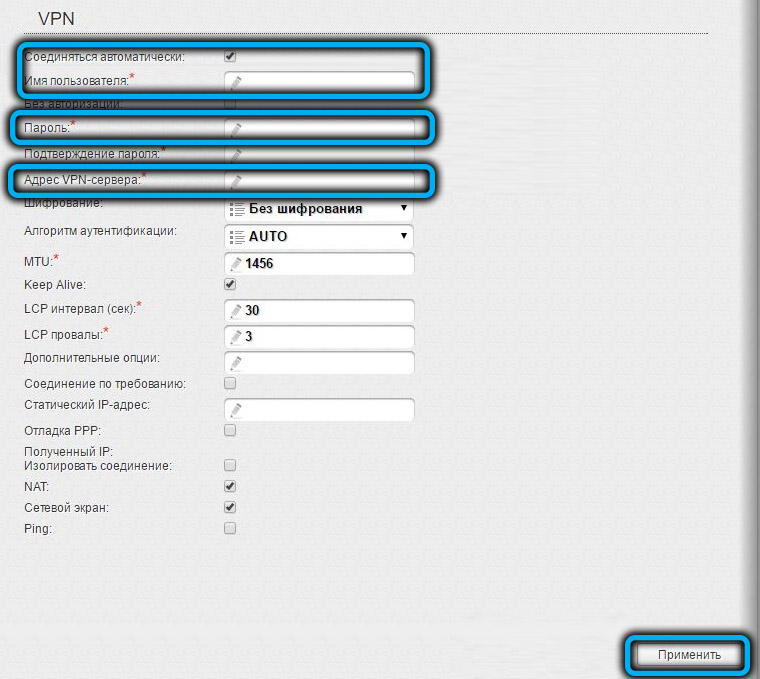
- move down to the VPN section, and put a tick in front of the “Connect automatically” item;
- enter authorization data: login and password twice;
- enter the “VPN server address”, which is also provided by the service provider;
- click “Apply”;
- at the very top, click on the “System” tab and on the “Save and Reload” sub-item.

After rebooting, the router will be connected to the world wide network.
How to connect DIR-320 to PPTP with static IP
A static IP address is provided to legal entities, but ordinary users can also order this paid service.
In this case, when choosing a protocol, you must specify “PPTP + Static IP”.

Further actions will also be different:
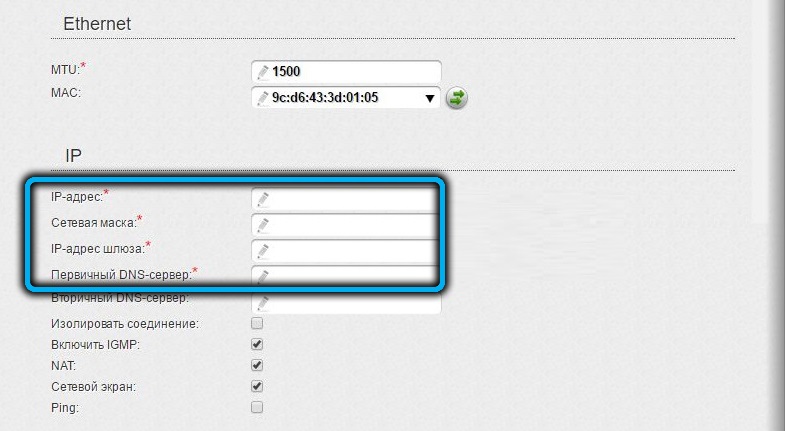
- in the “IP” section, fill in the “IP address” field by entering the value specified in the contract;
- we also fill in the fields “Netmask”, “IP-address of the gateway” and “Primary DNS-server”, all this data is provided by the service provider;
- in the VPN block, fill in the same fields as for the dynamic protocol;
- press the “Apply” button;
- in the “System” menu, select the “Save and Restart” item.
Dynamic addressing differs from static addressing in that after each new communication session (read – after each reboot of the router), the device will receive a new IP address selected from the pool of free addresses of your network access service provider. With static addressing, your router will always have one network address.
DIR-320 connection via L2TP with dynamic addressing
This type of connection is used by the Beeline provider and local network access providers.
Step by step algorithm:
- in the web interface, click on the “Network” tab and select the “WAN” item;
- click “Add” (connection);
- on the next page, in the “Connection type” field, indicate “L2TP (Dynamic IP)”;
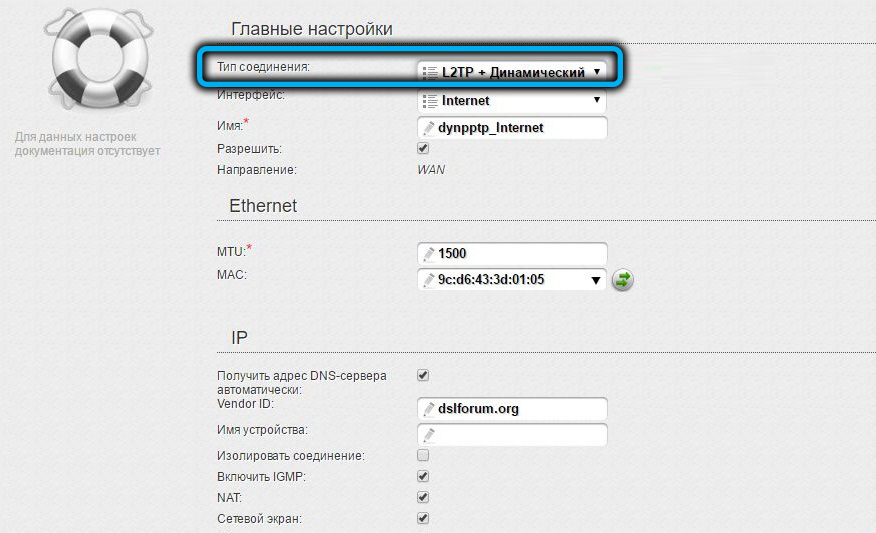
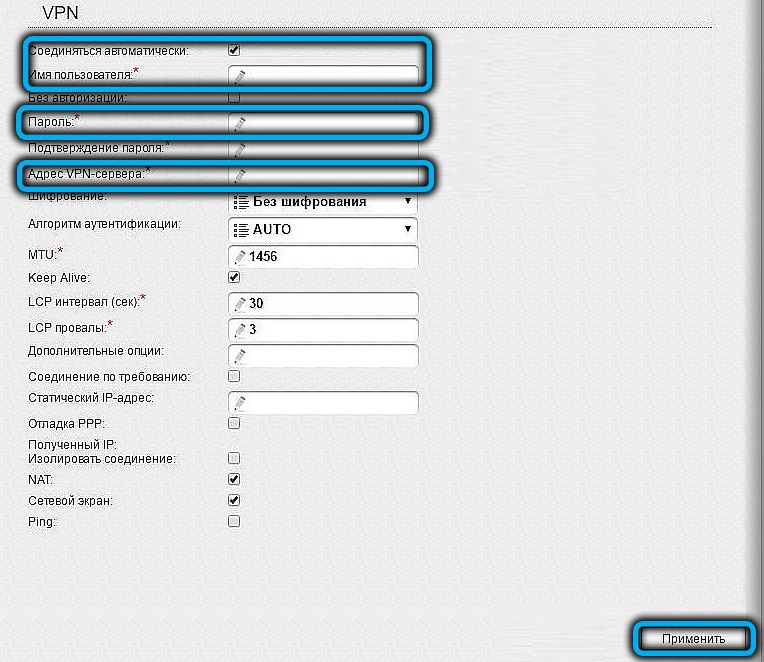
- go to the VPN section, put a tick in front of the “Connect automatically” item;
- enter authorization data: login and password twice;
- fill in the “VPN server address” field;
- click “Apply”;
- in the “System” menu, select the “Save and Reload” sub-item.
After rebooting, the router will be connected to the world wide network.
Configuring D-Link DIR-320 over L2TP with static IP
As a rule, in this case, individuals have the opportunity to use static addressing as a paid service.
Detailed instructions:
- in the web interface, click on the “Network” tab and select the “WAN” item;
- since we have no active connections yet, press the “Add” button;
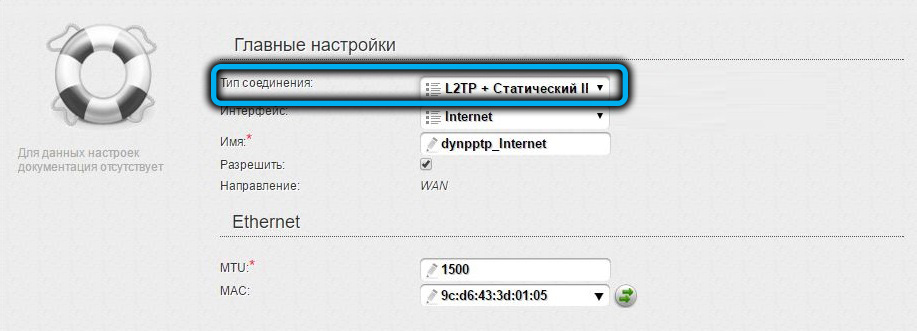
- on the page that opens, in the “Connection type” field, specify “L2TP + Static IP”;
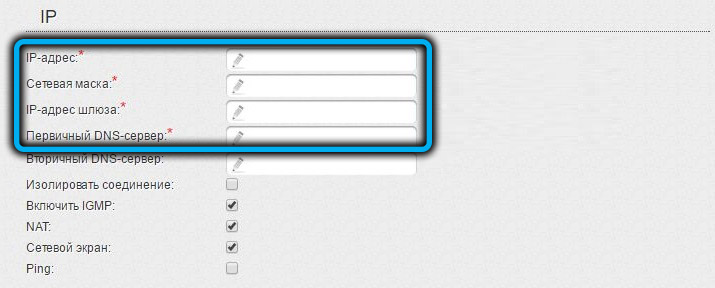
- in the “IP” section, fill in the “IP address” field;
- we also fill in the fields “Netmask”, “IP-address of the gateway” and “Primary DNS-server”, all this data is provided by the service provider;
- in the VPN section, put a tick in front of the “Connect automatically” item;
- enter authorization data: login and password twice;
- enter “VPN server address”;
- press the “Apply” button;
- at the very top, click on the “System” menu item and select the “Save and Reload” sub-item.
Configuring PPPOE with dynamic IP
The most popular modern type of connection. Of the major providers, Dom.ru and Rostelecom use it.
Algorithm of actions:
- before choosing a protocol, the first two items are the same;
- In the “Connection type” field, specify “PPPOE (Dynamic IP)”;
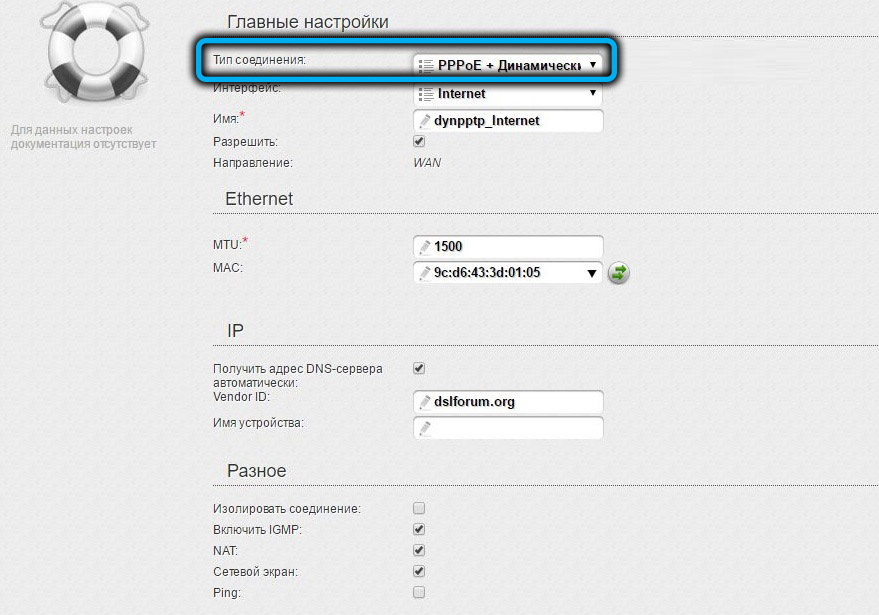
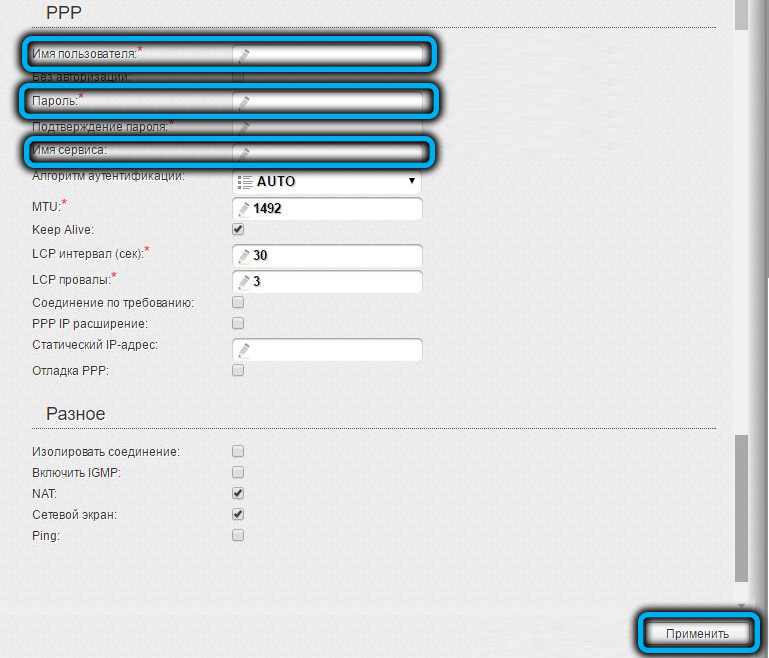
- In the VPN section, make sure there is a check mark next to the “Connect automatically” parameter;
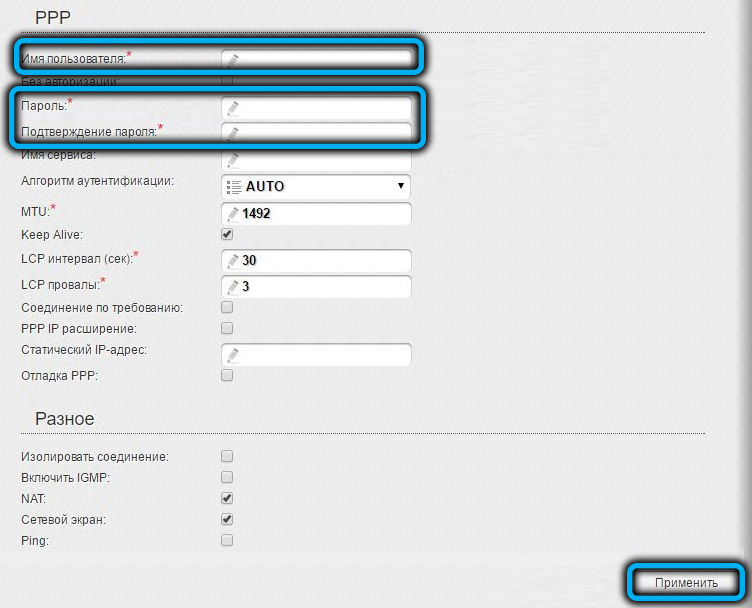
- enter authorization data: login and password twice (to avoid typing errors);
- press the “Apply” button;
- in the “System” menu and select the “Save and Reload” sub-item.
As you can see, the PPPOE protocol differs from other network protocols only in the absence of the need to enter the address of the provider’s server, that is, this is an automatic connection with the indication of authorization data.
Configuring D-Link DIR-320 on PPPOE with static addressing
The settings are similar to those for other protocols, except for the absence of the need to enter the address of the provider’s server (gateway).
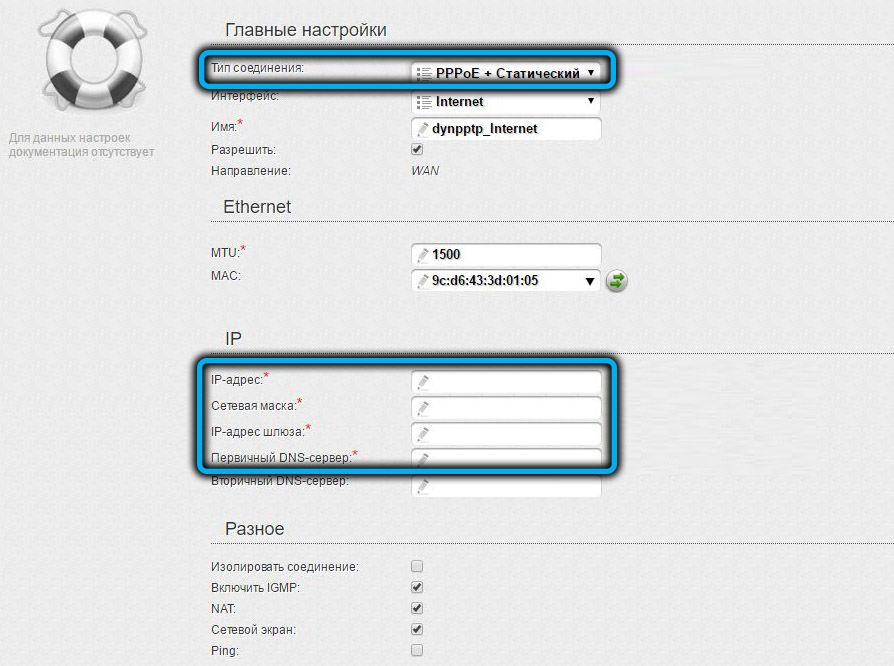
As you can see, all three types of connection require the obligatory input of the provider’s login and password.
Configuring the D-Link DIR-320 router for Wi-Fi distribution
If communication with the outside world is established, then you can take care of creating a home wireless network.
This is done as follows:
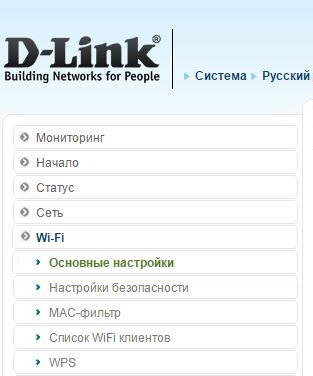
- on the main page of the web interface, on the “Wi-Fi” tab, click on the “Basic settings” link;
- check the box next to the item “Enable wireless connection”, if it is not there;

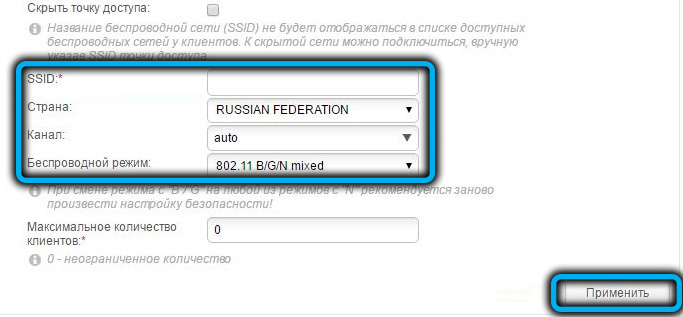
- in the SSID field, enter the name of our future network (the use of Russian letters is not allowed);
- make sure that the country field contains the correct value, in the Channel field the default setting is “auto”, in the Wireless mode field the protocol should be “802.11 B / G / Nmixed”;
- click “Apply”;
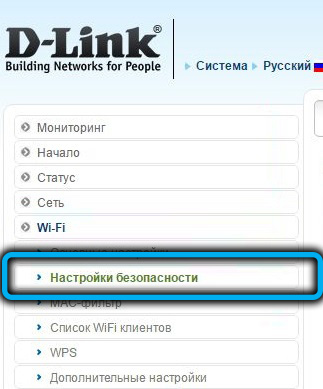
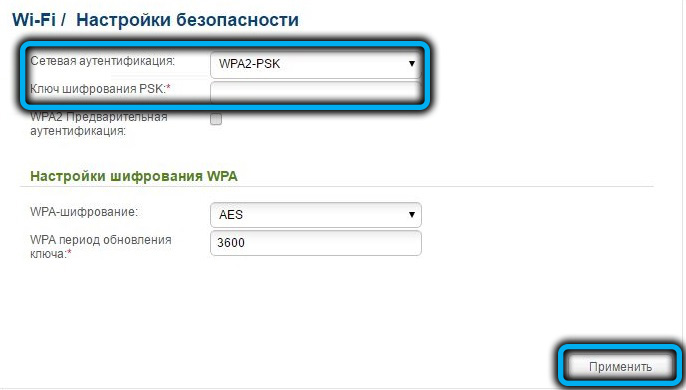
- by clicking on the left arrow, we move to the “Wi-Fi” menu, where we click on the “Security settings” link;
- make sure that the “Network Authentication” field is set to WPA2-PSK;
- enter a password to protect your network in the “PSK encryption key” field;
- click “Apply”;
- at the very top, click on the “System” menu item and select the “Save and Reload” sub-item.
Before putting a password on Wi-Fi, think carefully about whether it is worth making it too simple – if it is hacked by a smart neighbor IT specialist, the consequences can be very unpredictable.
Reboot D-Link DIR-320, reset to factory settings
Usually, the reboot option is available in the web interface of most router models, as well as the reset function to default (factory) settings. But a separate button for restarting is very rare, unlike the Reset button.

Hard reset is used in cases when, for some reason, access to the web interface is not available (for example, you do not remember the password to enter the administrative panel). The corresponding button is located on the back of the router. Since it is recessed (in order to prevent accidental pressing), you need to use any sharp object. After pressing the button, you need to hold it in this position for about 30 seconds, after which the router will reboot with zeroed parameters. To hard reboot the device, you just need to disconnect the DIR-320 from the network and turn it back on after 10 seconds.
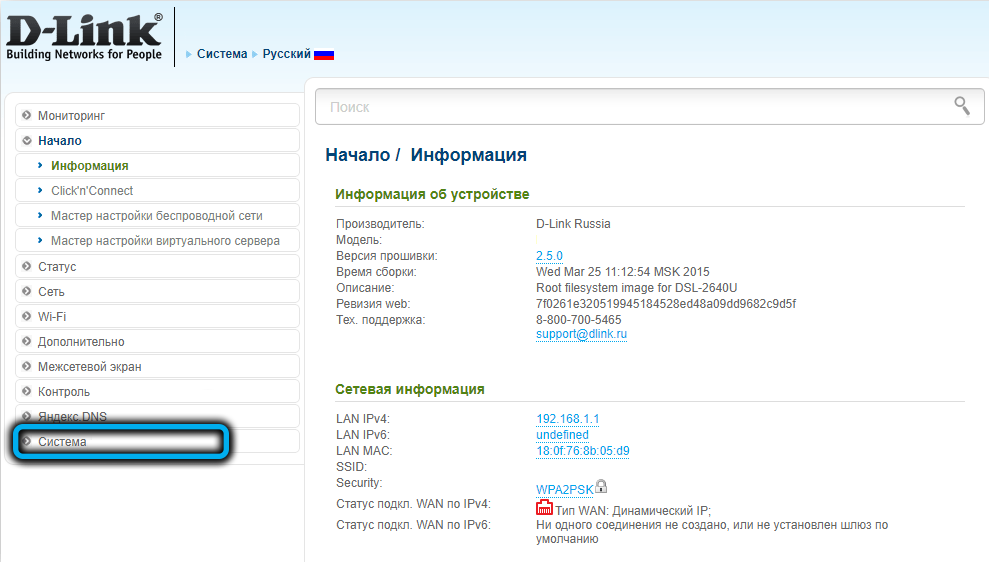

Reset and reboot can also be performed through the web interface, both functions are available in the “System” tab.

D-Link DIR-320 firmware update
We will not remind users of the need to perform this operation, much less insist. Among them there are those who believe: if the device works, then it is better to leave everything as it is, if only it does not get worse. If you have at least once reflashed a router, then you know that this operation allows you to improve the operation of the router, increase the speed of data exchange and get rid of the existing roughness of the firmware. The main thing is to use only a wired connection to the PC for this.
We bring to your attention detailed instructions on how to independently flash a D-Link DIR-320 router:
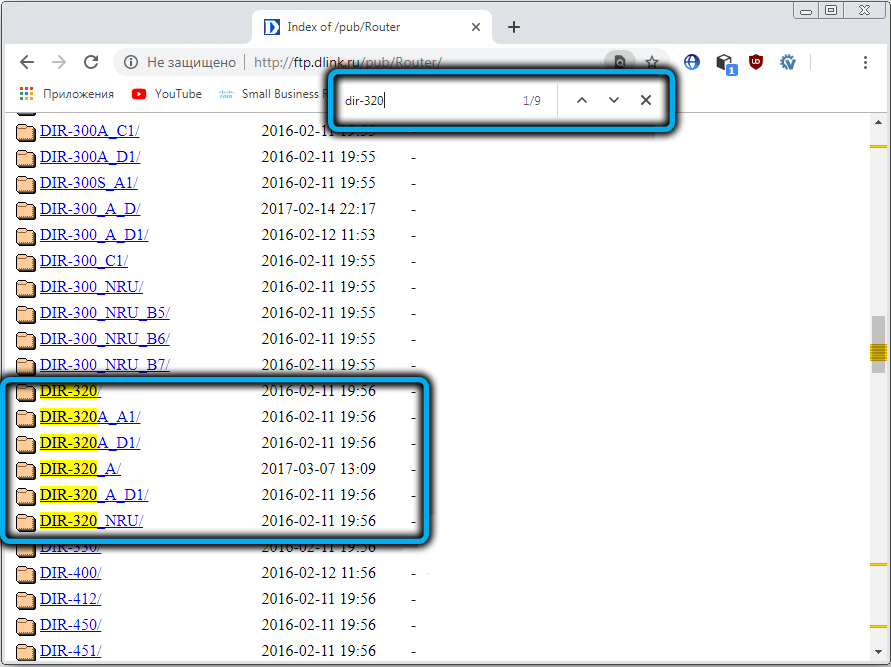
- download the latest firmware version from the D-Link ftp server to your PC;
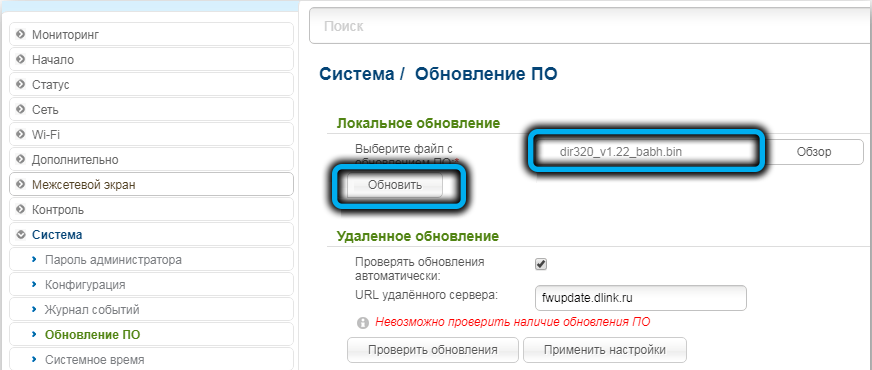
- enter the web interface, select the “Advanced settings” tab, go to the “System” section, click on the “Software update” menu item;
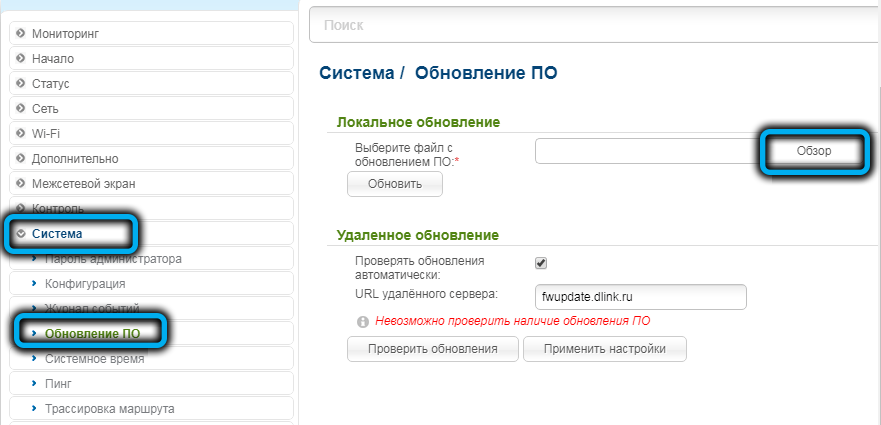
- press “Browse” and through the explorer select the firmware for the DIR-320 downloaded to the computer;
- click “Update”;
- we wait until the new firmware is written to the device’s flash memory (this is about 5 minutes).
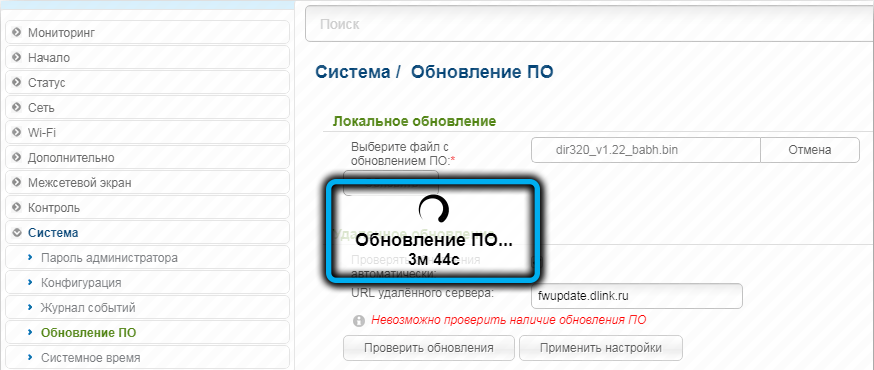
The router will then reboot with the new firmware version.
Share in the comments if you managed to flash and configure the D-Link DIR-300 router and whether it was difficult for you to do it.