Windows users during the operation of the computer may encounter various failures and errors, including those related to incorrect disk operation. Problems can arise regardless of what actions are performed or when performing certain operations. So, often users are faced with an error with the text “CHKDSK is not valid for RAW disks” that appears when you run the Check Disk system tool for servicing the hard drive.
The notification informs that Windows cannot recognize the file format, that is, this section does not have it, as a result of which the disk does not open, and the CHKDSK tool is unable to solve the task of restoring the file system, since it does not work with such media. The RAW state, the essence of which is the absence of FS, is relevant for both internal and external media. This is a rather serious nuisance and, as a rule, formatting is an effective solution, but then the data stored on the device or partition will disappear along with the nuisance, which is unacceptable in some cases. In more detail, why the error occurs and how to fix it, we will consider further.
Contents
For what reasons CHKDSK is not available for RAW
The RAW label is assigned when Windows does not recognize the file system type because the media is not formatted with supported NTFS or FAT. As a result, an error occurs when trying to scan with the built-in utility, but this is only one of the signs of a problem that has occurred, indicating the incorrect operation of the disk or removable media. There are several reasons for the problem:
- The disk or volume is not formatted.
- The file system structure is incorrect.
- Read errors, absence or limitation of access to filesystem or device.
- Impact of third-party applications and services running in the background.
- The impact of viruses.
- Damage to the structure of the file system.
- Physical damage to sectors, hard drive failure.
- System failure due to improper removal (in the case of removable storage), incorrect shutdown of the computer, power outages, etc.
The content of devices with RAW markup cannot be viewed, and no operations are performed on the data. At the same time, if any information was previously written to the drive, it is still there, despite the lack of access to the content, so the possibility of data recovery remains.
How to fix the problem
The easiest way to fix a RAW drive is with a new drive or device that is missing important information. The problem is solved by formatting. If you need to save the data available on the disk, the task is already more difficult.
Let’s take a look at what to do if Windows displays the “CHKDSK Invalid for RAW Disks” error. There are several effective ways to cope with the task in one case or another.
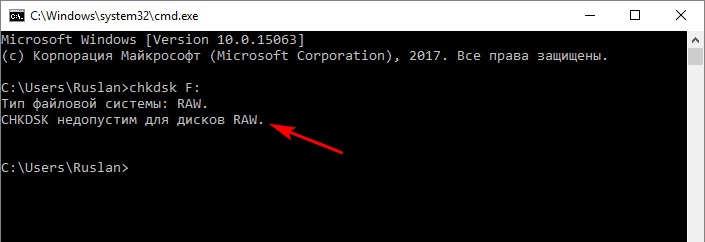
Recheck with built-in CHKDSK tool
First of all, the disk is checked by the CHKDSK utility, which is able to detect and correct errors, as well as restore the integrity of the file system. It is possible that the matter is in a one-time system failure, then the service will be able to scan the HDD and fix the malfunction. The service starts checking the hard drive from the command line in administrator mode:
- We pass to the command line tool (administrator), for example, through the “Start” menu, which is also called by the Win + X keys.


- In the terminal, type chkdsk a: / f and press Enter (here “a” is the RAW drive letter, which needs to be fixed).

If the source of the problem is a system failure, error checking will begin. The ones found during the scan will be corrected, and at the end of the procedure the disk will appear in the correct format (as a rule, it is NTFS).
If the problem is deeper, the error will again make itself felt and it will have to be corrected by other methods.

When the OS does not start, you can run a scan in the Windows recovery environment. For the procedure, you will need a Windows 10, 8, 7 recovery disc or a drive with a distribution kit (this can be a bootable USB flash drive or a disc with the corresponding version of the operating system).
To complete the procedure, starting from the installation media, you need to do the following:
- We change the order of starting devices in the BIOS settings by setting the priority for the removable drive in Boot.
- We start from the media.
- Select the language, click “Install Windows”, then “System Restore”.
- We go to the section “Troubleshooting”, then to “Additional parameters”, here we find the “Command line” tool (you can also call it with the Shift + F10 keys).

- Now we enter the commands in turn:
- diskpart

- list volume (allows you to find out which letter the partition is designated by, it may differ from the one assigned in the working OS)

- exit

- chkdsk a: / f (here “a” is the RAW drive letter).
Scanning with the utility in the recovery environment will help fix the existing problems and after the device restarts, Windows will be able to start. If the error remains in place, move on.
Clean Boot
If the problem does not affect the system partition and Windows starts normally, you can perform a clean boot, which disables third-party programs that start with the operating system. This solution is safe and effective in certain cases, it allows you to identify the influence of software on the appearance of a problem, if any, and easily eliminate the culprit.
We carry out the following actions:
- Go to the system tool “System Configuration” in any convenient way (for example, in the “Run” console (Win + R), type msconfig and press Enter, or start the service from the Control Panel (section “Administration”), or find it through the search in the Start menu ).

- In the “System Configuration” window, go to the “Boot” tab, in the “Boot Options” block, uncheck the “Safe Mode” item, if it is checked.
- On the “General” tab, mark “Selective startup” and uncheck the “Load startup items” item.

- Now, on the “Services” tab, put a checkmark at the bottom opposite “Do not display Microsoft services”, next to it click “Disable all”.
- We go to the “Startup” tab, go to the Task Manager and disable each of the programs in the list (RMB – “Disable”).

- Apply the changes and reboot.
The computer will start in clean boot mode. If the error no longer occurs when starting the scan process, this indicates that the problem is caused by third-party software. To identify which software is the source of the trouble, you can turn on the applications one by one.
Formatting a disk or RAW partition
The procedure is quite simple and is suitable when RAW is observed on a new drive or information on the disk, its section, which has become RAW, is of no value. You can format the media, as Windows advises, using standard operating system tools. If the method fits, let’s proceed:
- Launch the Disk Management tool in any convenient way (for example, the fastest way to do this is using the Run console and the diskmgmt.msc command ).


- In the utility window, right-click on the RAW section and select the “Format” action.

- If the action is not available and the situation concerns a new drive, click on the name of the RMB disk – “Initialize disk”, after the procedure we format it.
- The formatting process will be performed automatically, user intervention is to set the volume label and file system, usually NTFS.

Formatting a disk in a different file system
Another method involves using a different FS to format the drive, for example, NTFS for HDD, exFAT for USB devices. For the procedure, you will need to prepare a bootable USB flash drive or disk, then specify the boot priority from the removable drive in the BIOS.
How to fix the error “CHKDSK is invalid for RAW disks” by formatting in a different file system:
- We start from a removable drive, select a language and go to the “System Restore” section.
- In the diagnostics subsection, go to additional parameters and open the command line (or press Shift + F10).
- We register the commands:
- diskpart (disk space management tool);

- list disk (a list of disks will be displayed, select the problematic one);

- select disk 1 (instead of 1 we indicate the one that corresponds to RAW in your case);

- clean (clean up the volume);

- primary partition create (primary partition creation);

- active (activation);

- format fs = ntfs.

- We close the terminal and evaluate the results of the work performed.
In addition to the above methods, the error “CHKDSK is invalid for RAW disks” can also be dealt with using third-party disk resuscitation utilities. If none of the solutions worked well, use one of these software tools, such as the HDD Copy Tool. The software allows you to copy a drive sector by sector and extract information from a faulty disk without loss. Another product that will help you read RAW and recover a disk is the DMDE utility.