The recovery tool has been around since the ME version of Windows and has helped users get their computer back up and running countless times since then. In some releases, this feature turned out to be enabled by default, in others it was disabled. Judging by user reviews, Windows 11 belongs to the second category – automatic creation of restore points is disabled here. One can only guess about the reasons for such a decision – there is a version in progress that in this way the system allows you to save disk space, which is much more required on the system media than its predecessors. One way or another, but we recommend activating the function and tell you how to use it in the new OS.
Contents
How to set up restore points in Windows 11
The default settings, if this function is activated, work in such a way that restore points are formed only when critical changes are made to the components of the operating system. For example, after updates. Even this may be enough to restore the system to working capacity in case of problems. In our case, the function is disabled, so the first step is to enable it.
Setting up System Restore in Windows 11
To access the settings of this important function, perform the following sequence of actions:
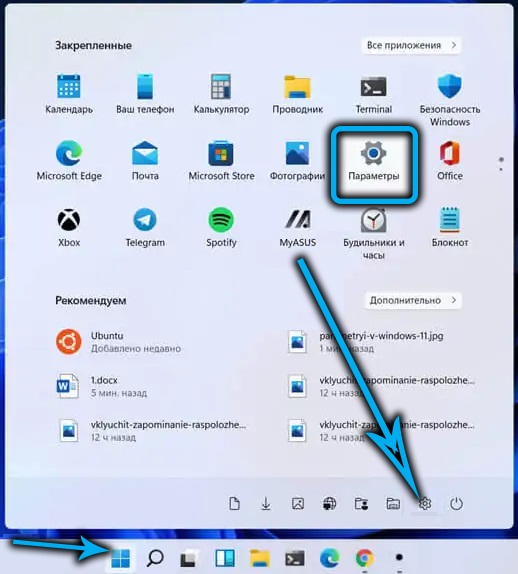
- through the Start menu, open the Settings application;
- click on the “System” tab, in the right block we find the line “About the System”, click on it;
- in the “Related Links” block, click on the “System Protection” item;
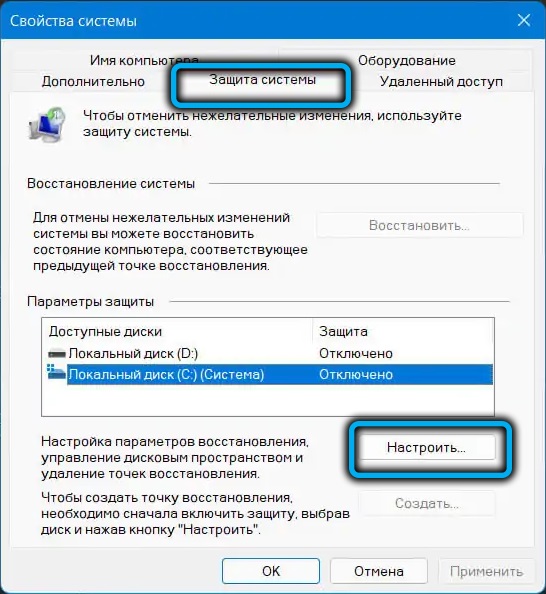
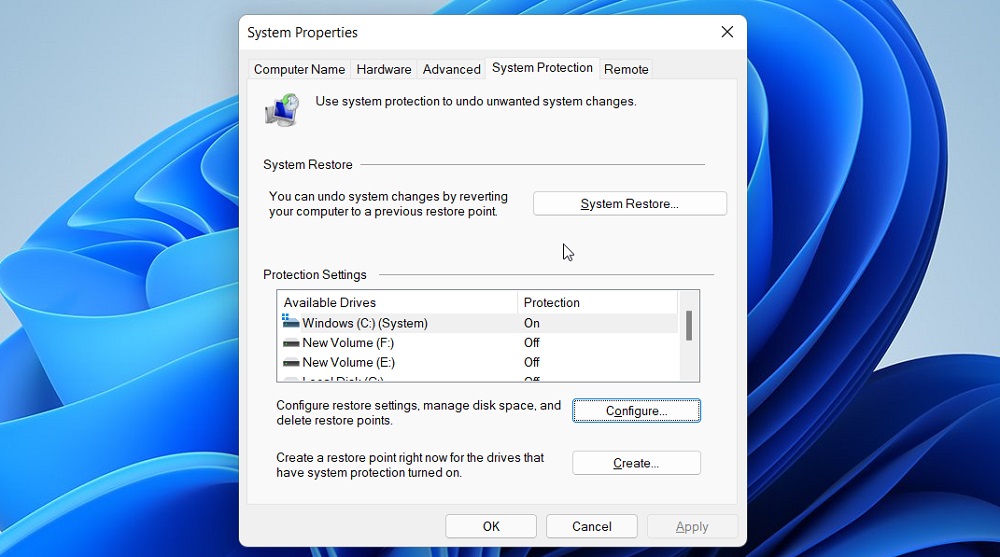
- the “System Properties” service window will open, where in the “System Protection” tab you can configure some settings for using the restore function.
How to activate Windows 11 System Restore
Since the feature is disabled by default, checkpoints will not be created.
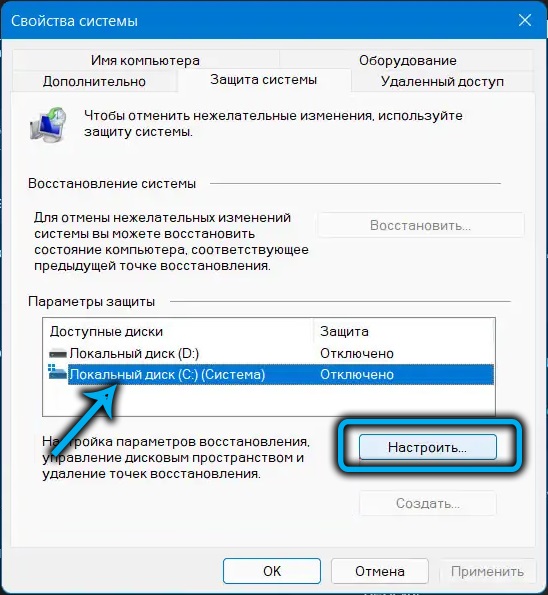
To do this, in the “System Properties” window in the “System Protection” tab we selected in the previous section, we check the protection status of the computer’s disk subsystem. We look in the “Protection Options” block at the “Protection” column. If it says “Disabled”, then recovery is not activated for this drive.
To activate the function, you need to click on the desired disk (usually the system disk needs protection), and then click on the “Configure” button.
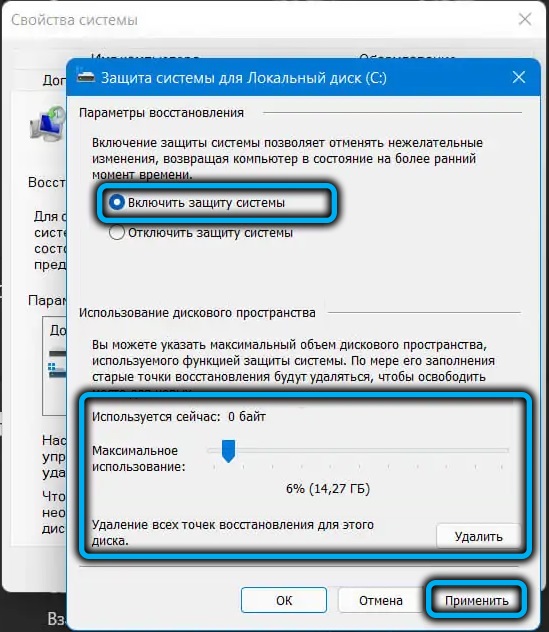
The “System Protection” window for the selected drive will open, in which we activate the “Enable system protection” option.
In the lower block, using the slider, you need to allocate a certain amount of disk space to create restore points. It is difficult to name a specific value, it is recommended to allocate approximately 5-15% of the size of the protected partition. In this case, if there is not enough allocated space to create the next recovery point, the oldest recovery point will be deleted.
It remains to click the “Apply” button and close the window by clicking OK.
After that, every time you install a new program or update the system, a backup copy will be automatically created in the state prior to making changes to the OS.
How to create a restore point manually on the current date in Windows 11
When the function is activated, the formation of points for the rollback of the operating system occurs automatically, but you can create them at your discretion.
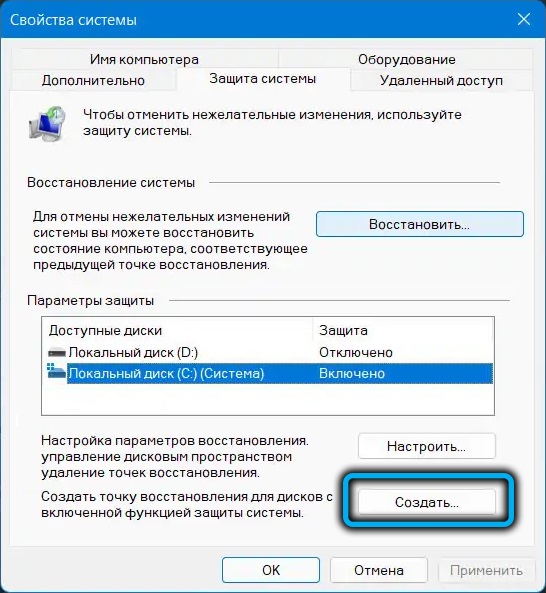
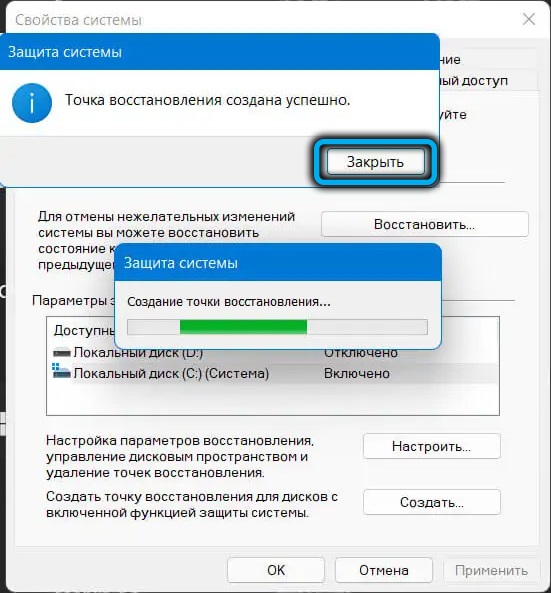
To do this, in the “System Properties” window in the same “System Protection” tab, click on the desired disk, selecting it, and then click the “Create” button.
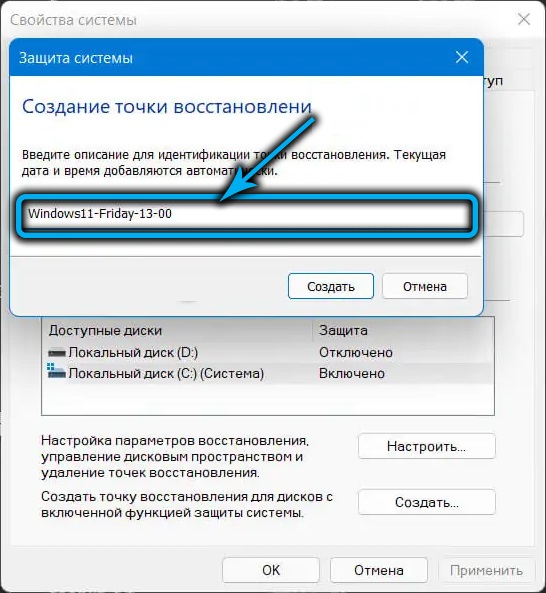
A window will open asking you to give a name to the restore point, at the end of which the date and time the rollback was created will be automatically added.
Since a large number of files will be written during the backup, the process may take several minutes (up to a dozen), although this will occur in the background.
As soon as the creation of the restore point is completed, you will receive a message about this in a separate window.
Create TV via command line
The same action can be performed in a command prompt terminal window by typing the following text:
wmic.exe /Namespace:\rootdefault Path SystemRestore Call CreateRestorePoint «Имя_точки_восстановления», 100, 7
Here you also have the opportunity to name the point with a name corresponding to the current situation, and the time and date will also be present at the end of the name.
Nuances of using restore points in Win 11
Now let’s look at how to restore Windows 11 in case of problems. These problems can be so significant that they prevent the system from booting normally. The recovery procedure in such cases involves performing a number of additional steps, which we will discuss later.
If Windows boots
In this case, the sequence of actions will be as follows:
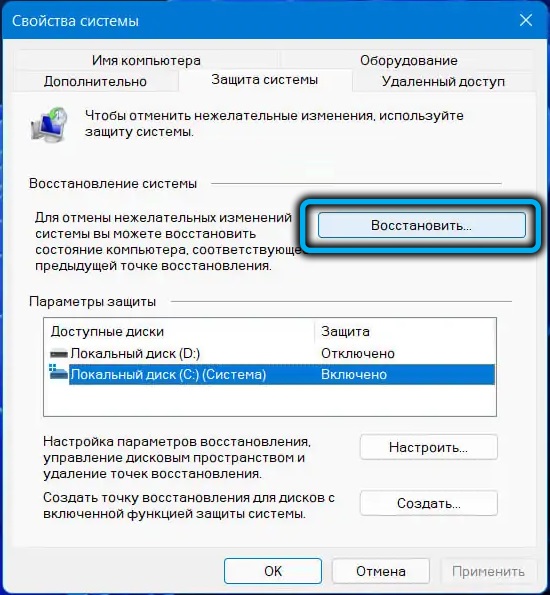
- call the “System Properties” window again, as described above, and go to the “Protection” tab (a quick way to launch the window is to use the rstrui.exe command in the “Run” console);
- click on the “Start System Restore” button;
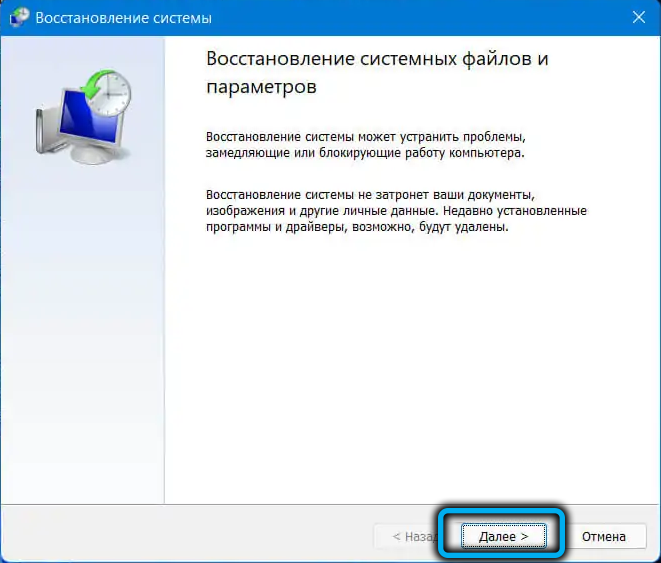
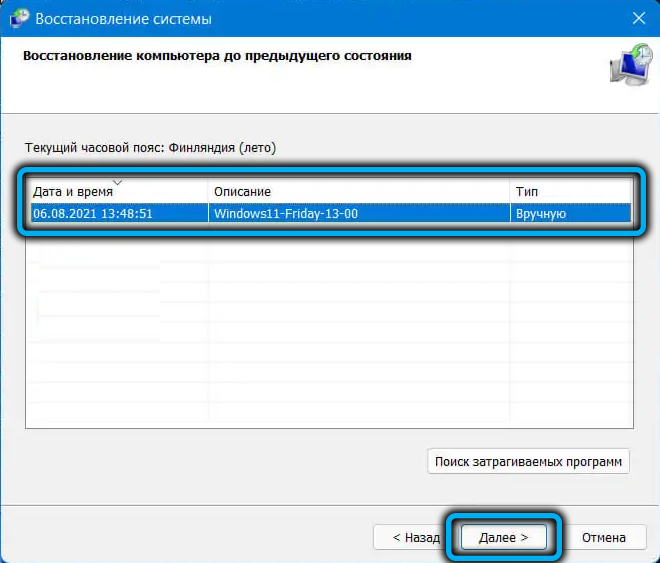
- A window will open that warns you that recently installed programs, updates, or drivers will be removed. We agree by clicking the “Next” button;
- a new window will open, showing only the last created checkpoint by default. If it does not suit you, check the “Show other restore points” option, and the list will be replenished with other, earlier dates. Choose the one you need;
- clicking the “Search for affected programs” button will indicate which programs / updates or other OS components will be rolled back;
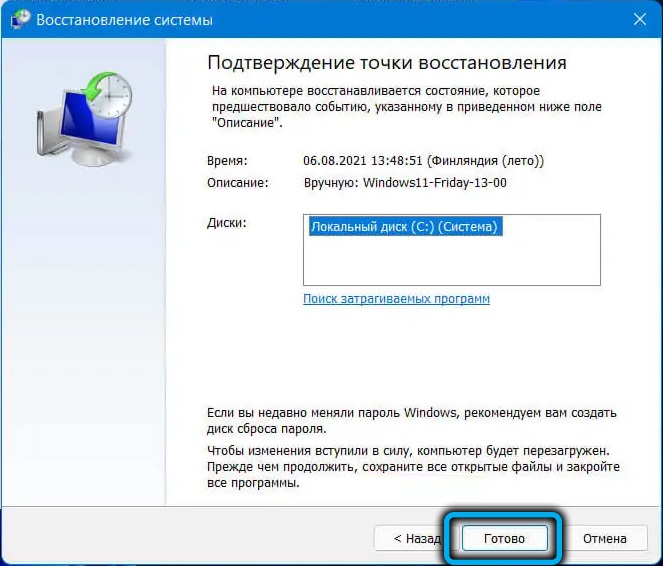
- Click the “Done” button and wait for the process to complete. It will end with a reboot of the computer, but the recovery can also take quite a long time, so be patient.
If Windows won’t boot
If the actions of the user or malicious software have led to a complete crash of the operating system, as a result of which it does not reach the loading of the desktop, you can restore the previous working state of the system using the following algorithm:
- if the download reaches the appearance of the lock screen, you need to click on the “Power” button located at the bottom right;
- A menu containing two items will appear. Hold down the Shift key and select the “Reboot” item to get into the recovery environment;
- if it doesn’t reach the lock screen, but when you press the Ctrl + Alt + Del combination, the “Task Manager” starts or the “Run” console fires (pressing Win + R), type the rstrui.exe command and press Enter (you need to look for the executable in the task manager rstrui.exe via the “File” menu);
- if the download stops with an error message and there is an “Advanced Options” button, click it and also get into the recovery environment;
- at worst, we use a bootable USB flash drive (by setting the appropriate option in boo tmenu), by clicking the “Next” button after the start window appears, and then select the “System Restore” option;
- if there is no bootable flash drive and all other methods are unavailable, you can try to enter the Windows 11 recovery environment in an alternative way. It is recommended to be used as a last resort, as it is considered potentially harmful to the file system. The essence of the method is to force the PC to turn off at the initial stage of system boot (long press the Power button on the system unit). After two such shutdowns in a row, the recovery environment will boot for the third time or a blue screen will appear with the “Advanced Options” button present at the bottom;
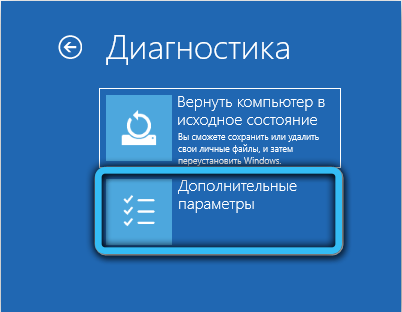
- in the recovery environment window, go to the “Troubleshooting” tab;
- select the “Advanced options” tab in the “Diagnostics” window that opens;
- Finally, in the next window, click on the “System Restore Using a Restore Point” tab, after which we perform the steps described in the previous section.
What to do if system rollback or manual restore points fail
Causes of possible problems when working with the “System Restore” function:
- the “Volume Shadow Copy” function is not activated (the default parameter of the service is to start manually). You can activate the service by running services.msc;
- important OS system files are corrupted. Fixed by running the corresponding service (sfc / scannow) through the command line, but always on behalf of the administrator;
- user profile is corrupted. Try creating a new user with administrator rights and logging in as that user.
The developers of Windows 11 made sure that in the event of serious violations in the operation of the operating system, it was possible to return to the factory settings without losing important data.
Now you know how to create a restore point in Windows. We hope you find our instructions helpful!
