The question of locking the laptop keyboard periodically arises from most users.

The most common reasons are the following factors:
- if some of the keys are damaged or out of order, which is manifested by spontaneous pressing and operation;
- if there are small children or pets in the house who can reach an open computer and press keys;
- finally, if you are used to working with a full-size keyboard, and the standard one is simply inconvenient for you (this is often the case with those who work with large amounts of text).
So how do you lock the keyboard on your laptop if you need to step back for a couple of minutes? How can I turn it off altogether? Here are the most affordable ways to lock the keys on a laptop.
Contents
Temporary shutdown for protection
Let’s start with the simplest: temporarily turning off the keyboard if you need to leave the room for a short while, where the child or your beloved cat is staying. Some laptop models have a special key combination for locking: usually “Fn” and one of the function keys (for example, F6 or F11).
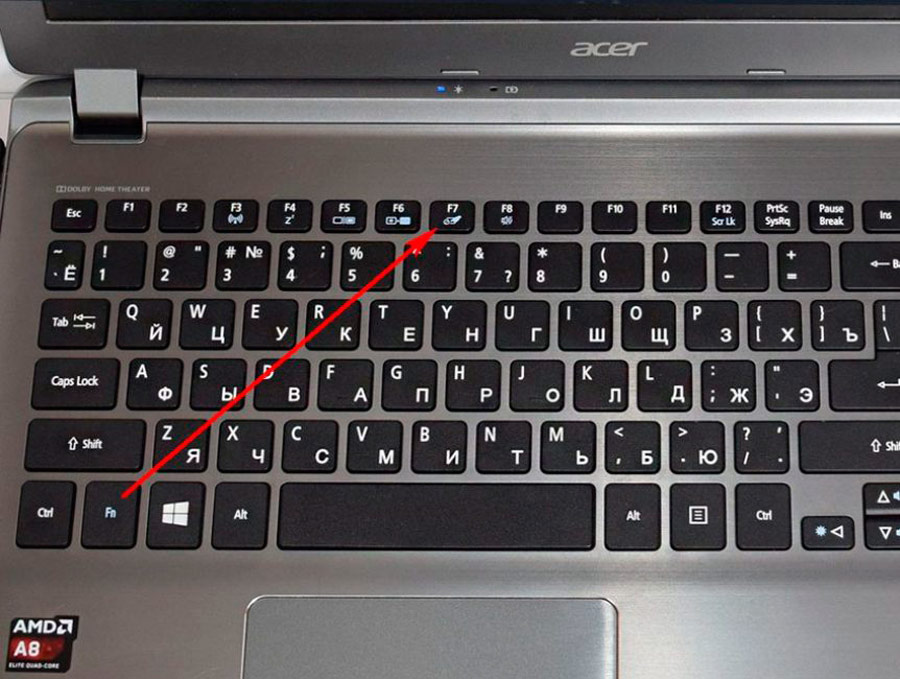
Look at the keyboard carefully, and if your laptop is one of these models, you will see the desired icon on one of the keys. Please note that this feature may not work if this device has an operating system other than the one preinstalled when it was sold.
If there is no special key to lock the keyboard, there is a universal method that temporarily locks the system as a whole. Press “Win” + “L” – this combination will lock the user account without leaving it.
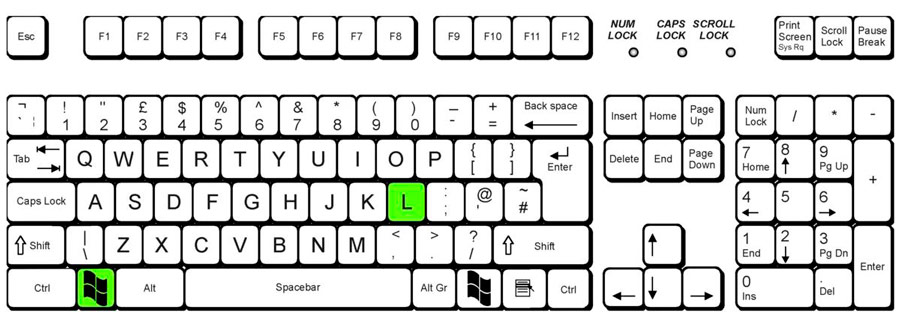
When you try to return to work, you will see the login screen for your account, and if it is password protected, you will need to enter it again. This method will protect your computer from unnecessary keystrokes while you are away.
DOS interface
Another option for quickly disabling the keyboard is to use DOS commands. We have prepared detailed instructions on how to do this.
- First you need to open a command line. Press the key combination “Win + R”, enter “cmd” in the appropriate field and click on the “OK” button.

Alternative way: click on the “Windows” icon in the lower left corner, and then go to “All Programs” → “Accessories” (or “System Tools”) → “Command Prompt”. 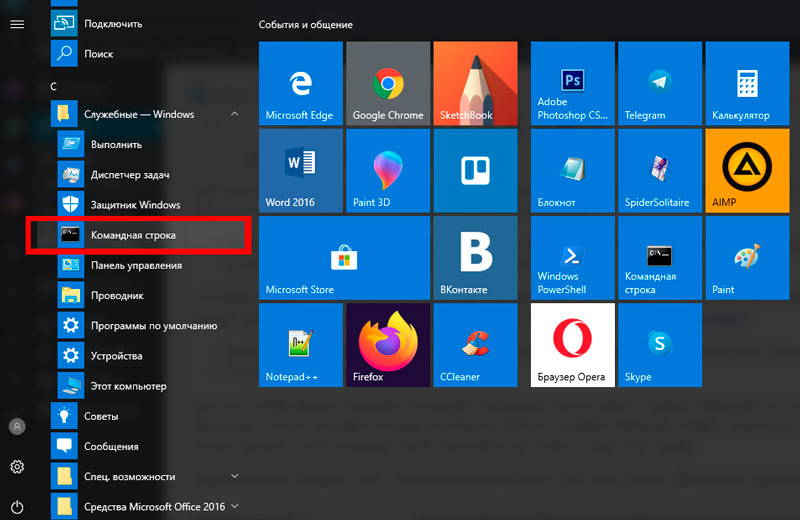
- You will see a black window in which you need to enter <code> “rundll32 keyboard, disable” </code>.

- Confirm the action with the “Enter” key.
In order to return the original state of the keyboard after some time, repeat the same procedure, just replace the command from the second step with “rundll32 keyboard, enable”. You can also create a shortcut with this command to perform all the steps in one click.
Through the device manager
Locking the keyboard using Device Manager is also an extremely effective method. Moreover, it will become inactive even in safe mode. So, let’s move on to solving the problem:
- Go to Start Menu → Control Panel. In the window with the name “Configuring computer settings”, sort the appearance of the page to “Large icons” by setting the appropriate option in the upper right corner, next to the line “View”. Select “Device Manager” from the list shown.
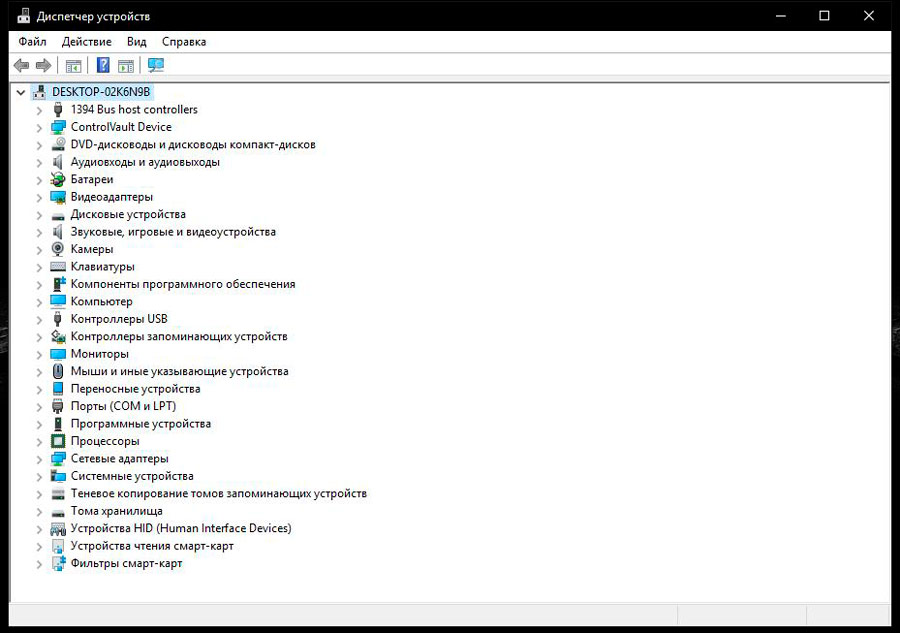
Alternative way: “Start” → “Control Panel” → “System” → “Device Manager”. In this case, the view mode should be set as “Category”.
One more: press “Win + R”, enter “devmgmt.msc” and confirm with “Enter” (Enter).
For Windows 10, this process can be simplified. Right-click on the OS icon in the lower left corner and click on the “Device Manager” link.
- In the list of devices that opens, you should find “Input Devices or Keyboards” (there are other similar names). Right-click on the line with the name of your device and select “Disable”. If there is no such parameter, then “Delete”.
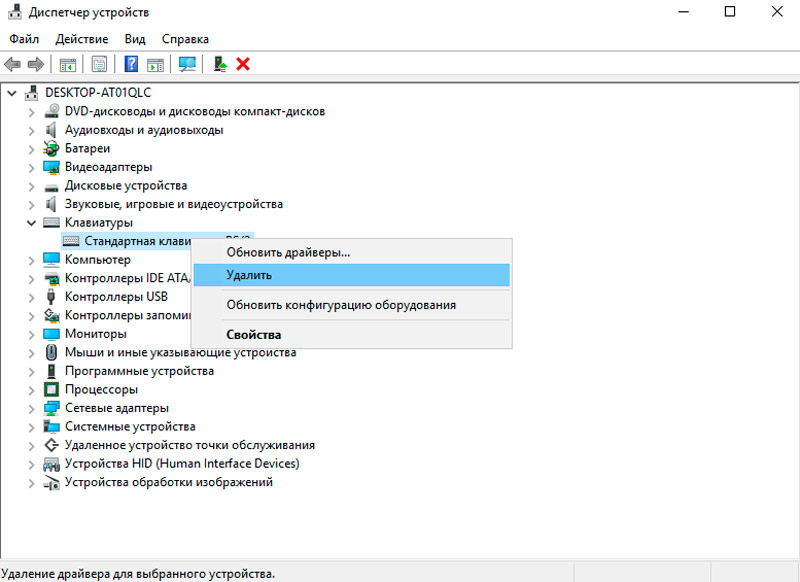
The keyboard is switched on according to the same principle, the only thing is that during the final operation you need to click on “Activate”. In the event that you made the deletion, you must click on the name of the PC (the very first line) and select “Update configuration”.
Via BIOS
This is not the most popular method, but it is very reliable. The BIOS settings are entered during the boot of the operating system. At this point, you need to press a specific button, depending on the manufacturer of the laptop. Most often this is one of the “F1-F12” or “Delete” keys.
BIOS versions can vary significantly from each other. Most often, the item we need is located in the “Advanced” tab. In it you need to find “USB Support VIA” and set the switch to the “Disabled” position. The input device is turned on in the same way, changing the value to “Enabled”.
In addition, some models have a USB Legacy Support option. Its peculiarity lies in the fact that the reactivation of the keyboard occurs exclusively through a CMOS reset on the motherboard.
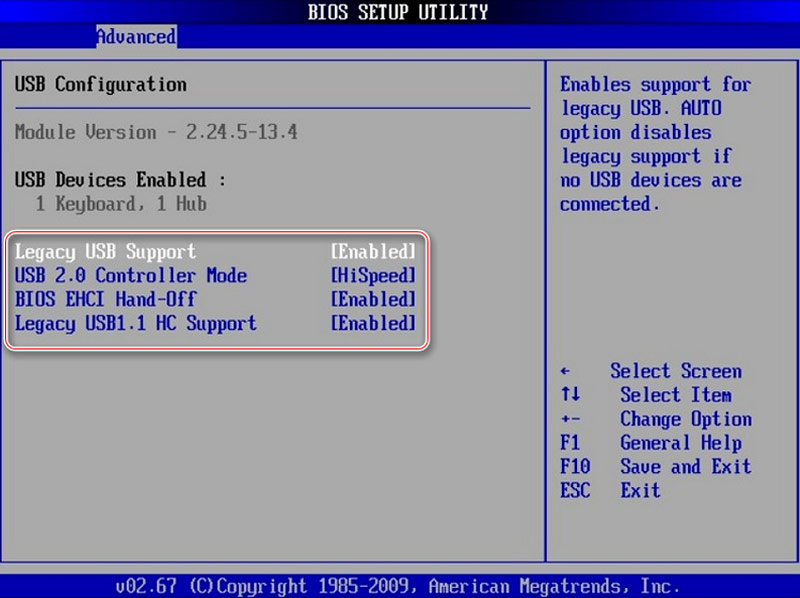
HP brand notebooks have the additional option of disabling function keys only. This is a kind of protection from children. For this purpose, the BIOS menu provides a corresponding “Action Key Mode” item. By changing the value to “Disabled”, the top row of keys will stop working. After performing these manipulations, you will not be able to adjust the sound, change the brightness of the screen, or use some functions.
Use to block third-party software
In addition to the standard software, there are also separate programs for working with the keyboard. They have various functions, easy customization to fit your needs, including blocking. In this article, we will look at the most effective and popular ones. We recommend downloading any of the presented utilities exclusively from the official website of the developer.
Child lock
Quite a simple program that allows you to completely lock the keyboard in just a couple of clicks. It is extremely convenient to control it using hotkeys.
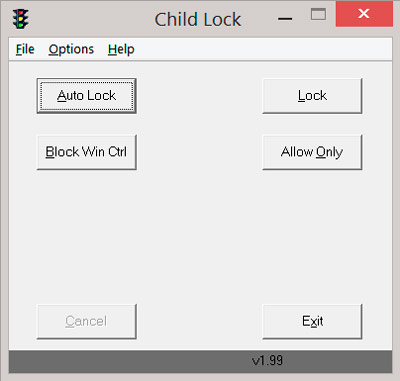
Let’s move on to setting it up:
- After starting in the activation window, find the item “Lock”. If enabled, the keyboard and mouse buttons will cease to function. The cursor will continue to work normally.
- There is also the “Autolock” function – automatic shutdown of the input device for 10 minutes.
Another “Block Win Ctrl” button disables “Win” and “Ctrl”. And the “Allow only” option turns off absolutely everything.
Block
This utility has easy control and advanced functionality, for example, you can use it to set a timer or turn off the display. Moreover, there is a Russian interface language available. The program is automatically minimized to the tray and does not interfere with the user.
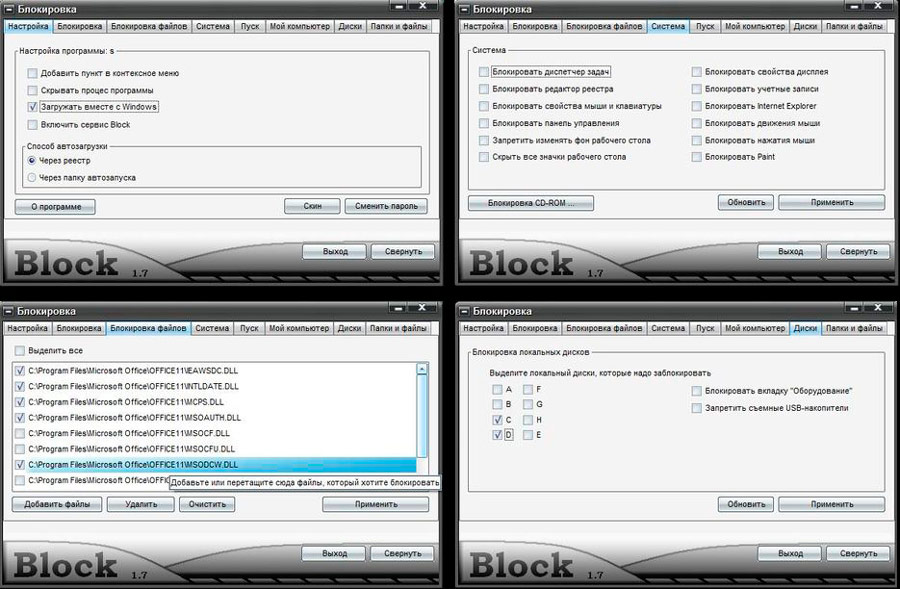
All that needs to be done is to select the “Lock the keyboard” option and enter a password that you will need to unlock in the future.
Toddler keys
Probably the oldest, but at the same time one of the most reliable programs for our purpose. It runs without any problems even on Windows XP. After installation, open the system tray (in the notification area) and find the icon for this application. Then click on it with the right mouse button or touchpad and select the “Lock keyboard” line. Ready! To activate the keyboard, uncheck this item.
Disconnect on MacBook
Deactivating the keyboard on Mac is a little more difficult, for this you need to create a special service and manage the lock using the assigned keyboard shortcut. Follow it step by step and you will succeed:
- First of all, open system preferences and select the keyboard module. Then click on “Keyboard shortcut”.
- On the left in the list, click on the “Services” link.
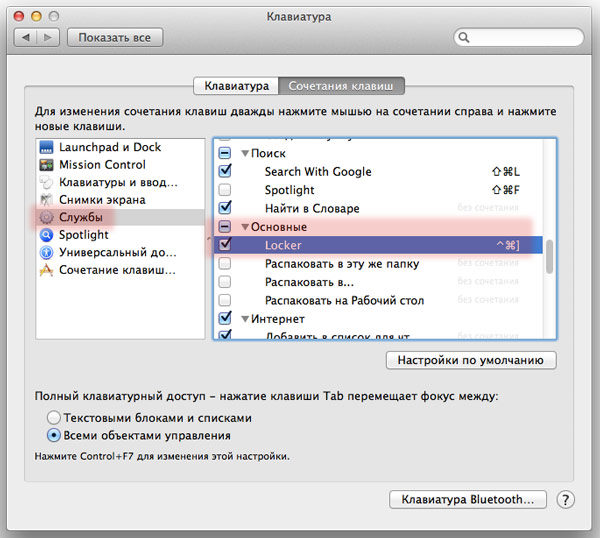
- Further, on the right side of the window, find the “Basic” directory and click on “Block poppy”.
- The Add Combination button will pop up. After clicking, enter the combination by which the MacBook will go into the “Login” mode.
As a result of these actions, the device will be absolutely protected from accidental and unwanted clicks while you are away.
Disable a faulty keyboard
If your PC keyboard is partially or completely out of order and does not perform its functions, or you do not plan to use it due to inconvenience, you can turn it off by hardware. This can only be done if you are fully confident that you will not need it.
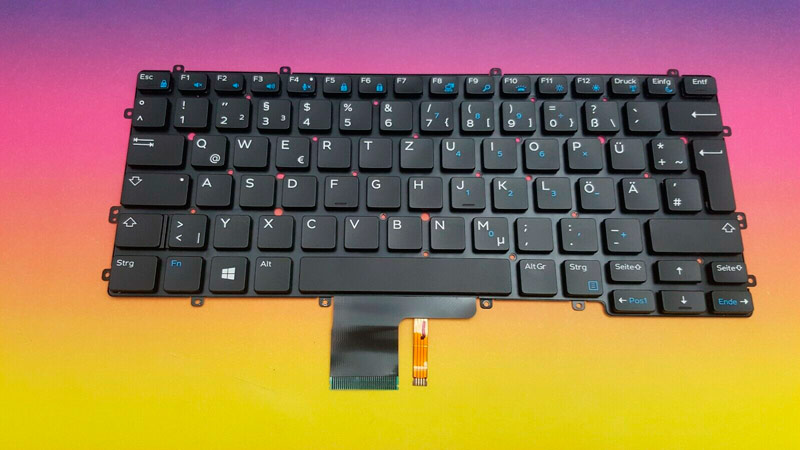
If you remove the cover of the laptop case, you can visually find a ribbon cable leading from the keyboard panel to the motherboard. Unplug it from the connector and reassemble the laptop. Then you can connect the external device without fear of hardware conflicts.
Keep in mind that switching to an external keyboard will deprive you of some of the advanced functionality provided for laptops: for example, turning Wi-Fi on / off from the keyboard, adjusting sound volume, screen brightness, etc.
Conclusion
As you can see, there is nothing difficult in blocking or completely disabling the keyboard on a laptop. It all depends on the factor that prompted you to think about how to lock the keyboard on a laptop. We hope our article helped you in resolving your issue. And for clarifications, you can always contact us in your comments.