Editing photos and pictures is one of the tasks that can be done on a computer using special programs. To perform professional tasks for this purpose, utilities such as Photoshop, or similar in functionality, are used.

In the absence of such software or the inability to use it for amateur purposes, you can use Paint or its more advanced version of Paint.net to work with images, which, despite the skepticism of some people, have a decent set of features. The utility makes it possible to work with pictures and photographs, allows you to remove unnecessary image components, combine several elements of the pictures into one, by first changing the background to transparent, and the result obtained, with the correct and careful execution of tasks, is not inferior in quality to the work performed in more powerful graphic editors.
In this article, we will consider some of the nuances of working with the program, we will tell you how to remove the background in Paint.net, replacing it with “transparent”, which will allow you to use an element of a photo or picture for further exposure.
Contents
Change the background of a picture in the Paint.net editor
To work with images, pictures, photographs, it is recommended to use the free utility Paint.net, which is not included in the Windows OS applications, by downloading it here . By installing a free application on a computer device, the user will be able to work with images and perform complex tasks using a simple and intuitive tool.

Making the background of the picture transparent
Paint.net allows, due to its versatility, to work with images, change the background of pictures, and eliminate defects. Often, users set themselves the task of changing the background of the image. Such tasks allow you to place a specific logo on a colorful basis, or your photo, an image of a pet or a flower arrangement not on the background of a table or window, but with an interesting and spectacular landscape as a background.
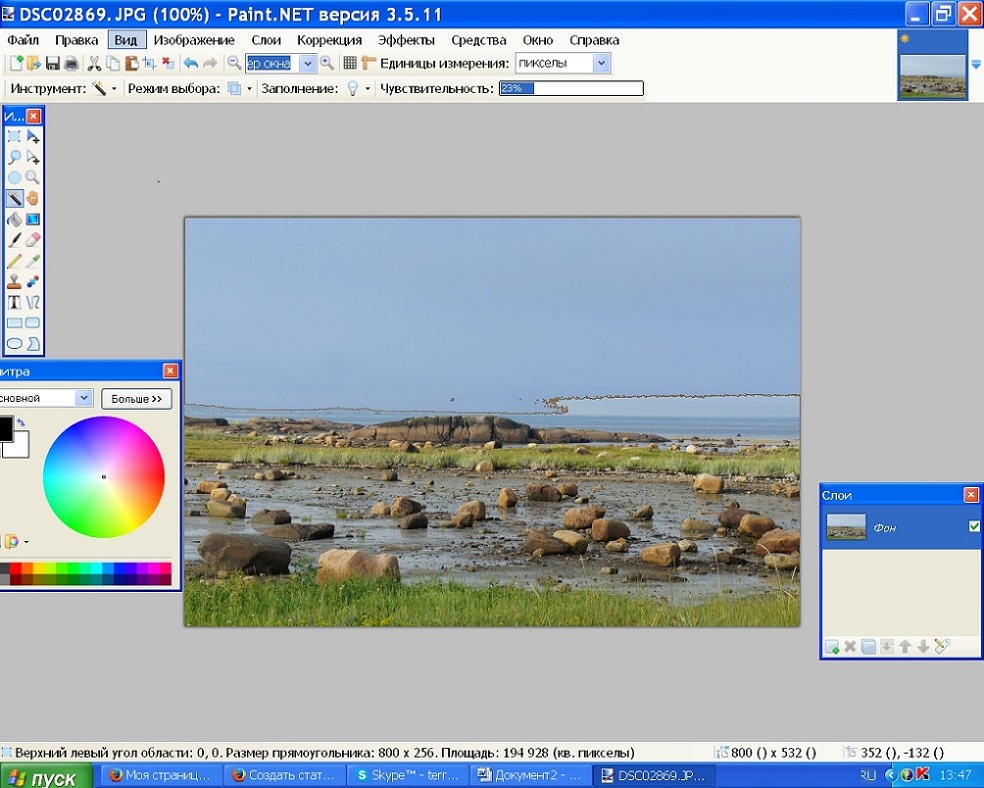
This task can be accomplished quite easily by uploading two photos to the application: the main one, with a colorless background, and the secondary one, which will serve as the base for the new picture. To combine photographs, you will need to initially go into the parameters of each of them, making them similar in size, which is the basic condition for the possibility of connecting them: it is important to set identical canvas sizes by setting the same values in the “Height” and “Width” sections of the image.
Further, the creation of a complex image is performed as follows:
- Open the required background change the picture on a transparent background, transfer it to a new base by sequentially performing the following manipulations: by simultaneously pressing Ctrl and A, select, copy, holding down the key combination Ctrl and C, after switching to the background picture, paste with the command Ctrl + V.
- After that, if the image with the picture is not displayed in the background, you will need to activate it by moving it to the foreground.
- Save a new photo: in the “File” item, select the “Save As” command, name the created illustration and select the preferred format.
At this, the work can be considered completed, but the stumbling block in the procedure is the moment of creating a photo with a transparent background.
Transparent background in Paint.net
The ultimate goal of the task is to get an image from a photo without a background. To remove the background of a picture, at least three methods of working with a photograph can be used, and the choice of the option for performing the task depends on the type of the original picture.
The Magic Wand as a Photo Editing Tool
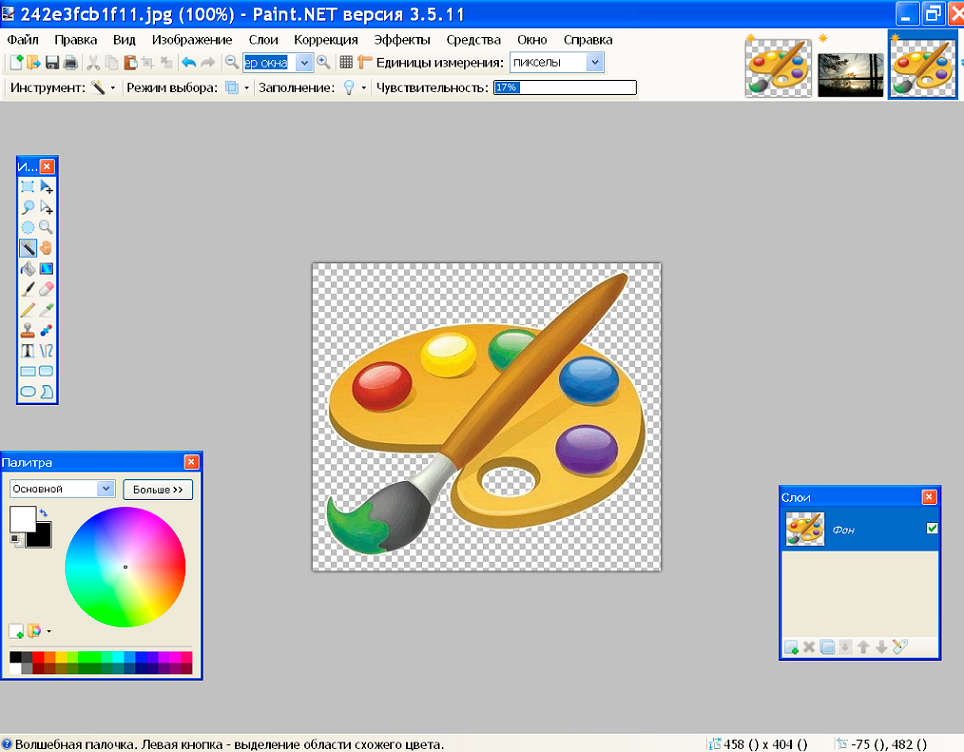
So, how to make a transparent background in Paint.net. If the background of a photo or picture is a solid color, it is recommended to use the Magic Wand tool.

Working with the Magic Wand tool
An important condition for the possibility of using this tool is a small variety of background shades, and best of all, the uniformity of the background. The “magic wand” has its own threshold of sensitivity to various shades, and when it is applied for a picture with a colorful background, it will take a long time to determine the boundaries of the areas, the removal of which is necessary for the user.
To make a picture without a background, the user will need to perform the following manipulations one by one:
- Open the Paint.net editor, then go to the program menu in the “File” section, select the “Open” command: using the “Browse” option, load the photo, which is supposed to be edited.
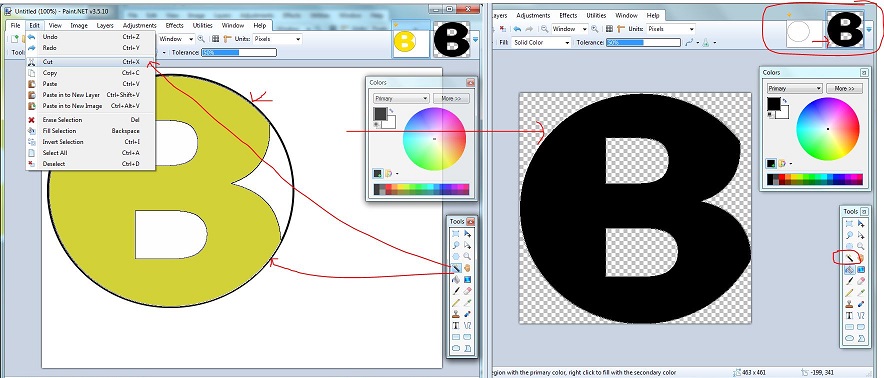
- Before removing the background, making it transparent, you need to find the “Magic Wand” on the toolbar and adjust its sensitivity. For a simple background, it is enough to set the perception threshold of about fifty percent, but if the photo has a complex color gamut, it is better to reduce the parameter to about thirty percent.
- Next, with the “Stick” you will need to mark the background you need to remove: after selection, it acquires a light blue tint.
- Select the “Clear Selection” command in the “Edit” section of directives. If the actions are performed correctly, then after the performed manipulations the background will be visually displayed as a checkerboard pattern on a white background, which indicates its transparency after saving.
In order for the final image to have a transparent background as a result of the work performed, the image must be saved in PNG format that supports transparent display. Alternatively, you can use GIF, which also supports the ability to display a transparent background. You cannot use other formats for saving, since the picture will have a white area, instead of the required transparent background.
Clipping to selected borders
If, if necessary, put a colorless background of a photo with a monochromatic base, everything is quite unambiguous, then in order to make the background of the picture transparent in Paint.net, when the image has a texture of different colors, a different version of the task will be required. The proposed option with the “Magic Wand” will not give the desired result, or you will have to perform the background discoloration procedure several times, which is not very convenient and time-consuming if there are a lot of multi-colored elements to remove.
The Crop by Selection function is a great help in creating transparent backgrounds in Paint.net, when processing a photo, if the main element of the image is correct in shape. To draw the boundaries of an object that you want to keep as the main one, it is recommended to use the Line or Curve tool, or the Magic Wand tool, as in the previous option.
To complete the task, you will need to set a starting point and circle the working element of the photo: this must be done in such a way that the contour is closed, and the setting of borders for cropping should coincide as much as possible with the outlines of the picture. Next, you need to correct the selection boundaries by moving the set frame: using the cursor, drag the lines so that they coincide with the outer contour of the picture. It remains only to select the menu item “Crop by selection”, followed by saving the photo element on a colorless background in PNG format.
“Pattern” of a fragment of a photo using the “Lasso” tool
The most difficult process is considered to be the background bleaching process, when the required processing of the picture has a complex texture, large-scale color gamut, as well as objects inside the picture that need to be discolored.
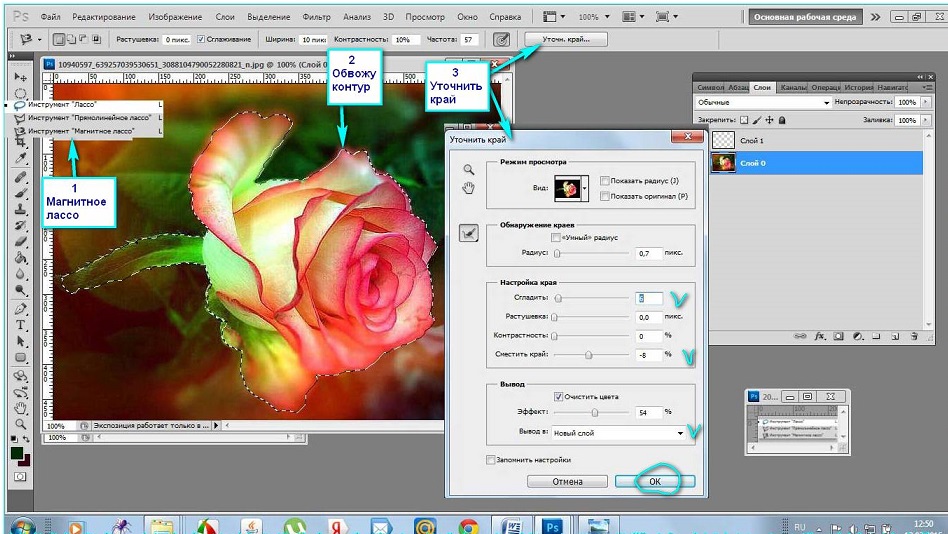
In such a situation, in addition to the already known tools, it is worth adding the functionality of the “Lasso” option. This tool is designed to highlight the boundaries of complex-shaped objects.

Working with the Lasso Tool in Paint.net
To use the ability to make the background transparent, you need to click on the “Lasso” icon, use the cursor to set the starting point on the edge of the selected object, and by holding down the left button of the manipulator, smoothly and as accurately as possible outline the drawing along the contour. Irregularities can later be “corrected” with the help of the “Magic Wand”, and the elements of the picture, necessary for the user, but not included in the selection area, can be added using the “Union” option. To exclude a drawing object, use the Subtract function.
The user should not be afraid to make a mistake when making a selection, since Paint.net allows you to go back a few steps using the “Undo Action” command, followed by correcting errors. It should be understood that the success of the task and the effectiveness is acquired through trial and error.
You can remove the image that is outside the boundaries of the selection using the “Crop to selection” option, as in the previous case, which will make the background white. After that, it remains to select the white background with the “Magic Wand”, and make it transparent, following the instructions above.
If necessary, if the drawing has a very complex configuration, additional “correction” of the contours of the object may be required, which can be done with high precision by an eraser or an already known “stick”. To improve the accuracy of work, it is recommended to use the “scaling” option of the problem object, which will allow you to see the shortcomings and effectively eliminate them.
Do not forget that at the end of the work, you must save the resulting drawing, choosing the preferred PNG format during the procedure, which allows you to fix the discoloration.
Summarizing
The Paint.net graphic editor is a free software that allows you to perform amateur photo editing tasks, without a preliminary comprehensive study of the program, with the possibility of obtaining a result worthy of quality characteristics.
The described methods of background discoloration will allow you to supplement your photos and interesting pictures with new meaning through simple manipulations, giving them a new life. It is noteworthy that even children can work with this application, and the final result, with a creative and principled approach to completing tasks, will be able to absolutely compete and even compete in efficiency with photos processed in more powerful graphic editors.