To store all sites on the Internet, a kind of computers called servers are used. They have unique IP addresses, which are combinations of numbers. But since it is inconvenient for the average user to remember such combinations, domain names for resources were created (for example, google.com). But DNS servers are responsible for decoding domain names into IP addresses.
Let us dwell in more detail on the operating principle of such servers and methods for setting them up.
Contents
What is a DNS server and why is it needed?
A DNS server is a specialized resource responsible for matching domain names of Internet sites with real IP addresses. A special database is used in which all the necessary information is collected.
The principle of operation of a DNS server is very similar to the methods of interacting with the phone contact book. A specialized tool searches for a specific domain name in a previously created database, finds the IP address of the resource of interest and moves the user to the desired page. The computer does not have access to the IP address itself, so you cannot do without a DNS server when working on the modern Internet.
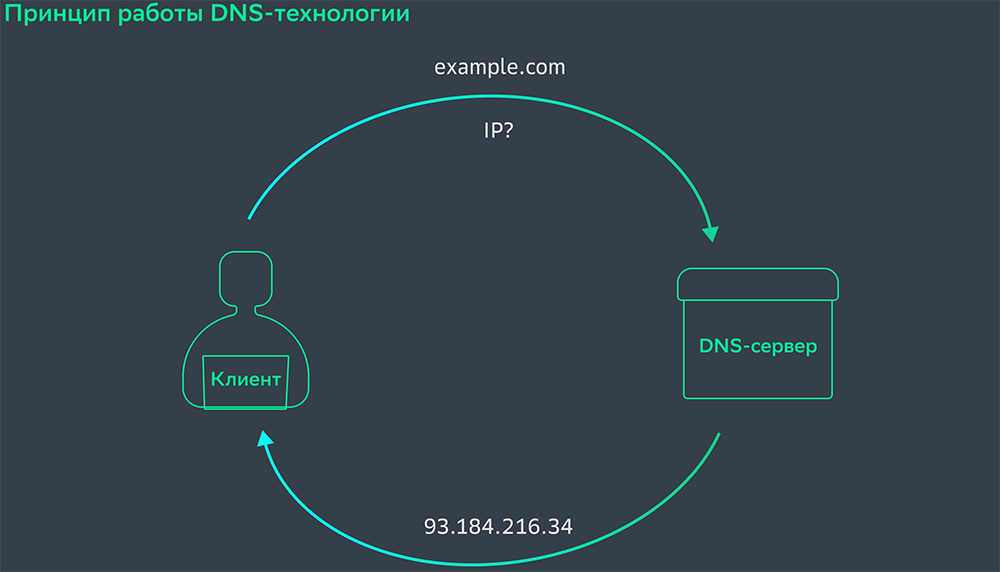
A list of IP addresses is stored on some local computer, in a file called hosts. If the required data cannot be found on a separate server, the service forwards the request to a higher-level server. In particular, this may be the provider’s own local server.
This redirection of requests continues until the required IP address is found on one of the servers. If the information cannot be found even on the root server, the browser will notify the user that a site with that name does not exist.
The DNS server also allows you to perform the reverse operation by finding out the domain name of a site using the IP address data you have on hand.
Using standard Windows tools
Modern versions of the Windows operating system include many different tools for managing Internet access. In particular, it is possible to change the DNS server.
Sequencing:
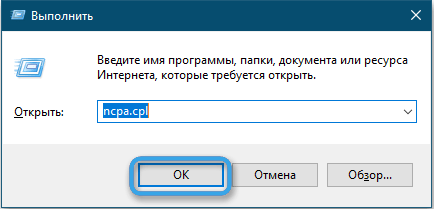
- Press the Win+R keys to access the Run window. In the line that appears, enter the command ncpa.cpl and confirm the action with the Enter button.
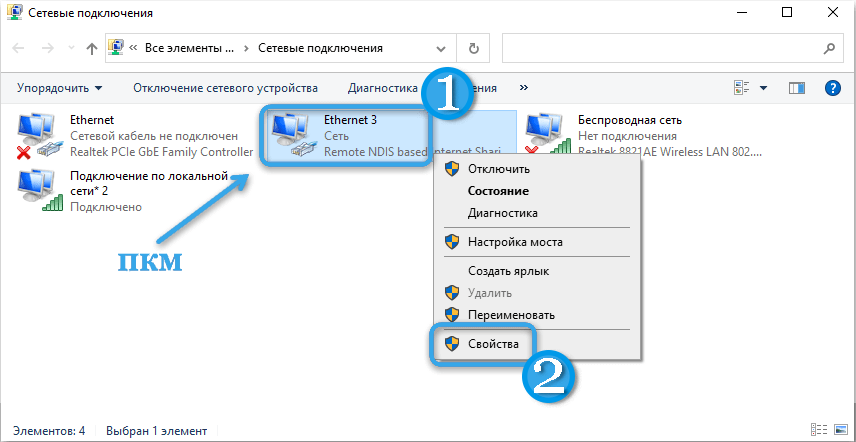
- A window will open in which you need to right-click on the current Internet connection.
- In the dialog menu, select “Properties” to access the Internet connection settings.
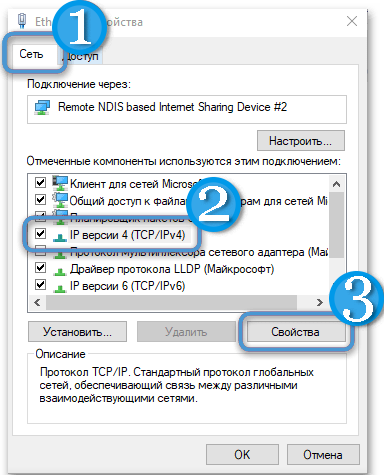
- View the list of components and select “IP version 4” or “TCP/IPv4”. Click on the “Properties” button.
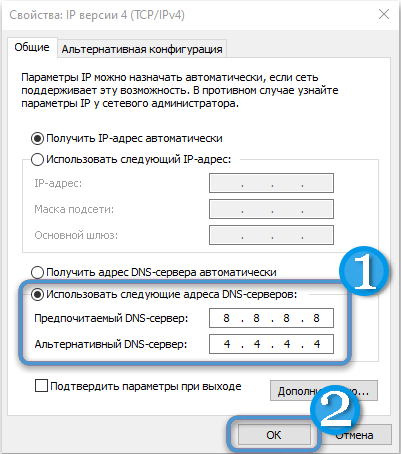
- In the properties of IP version 4, check the box next to “Use the following DNS server addresses.”
- Enter the required addresses in the appropriate fields, thereby creating your own DNS server. Confirm the actions and apply the changes with the “OK” button.
In some cases, it is also necessary to additionally change the DNS for IP version 6. The algorithm of actions is similar.
It is recommended to reset the DNS cache immediately after making the appropriate changes. And if everything is done correctly, the process will be completed. And when working in a browser, the entered DNS server address will be used to access sites.
Setting up the router
If you need to create a common DNS server for all devices within the apartment, it is much easier to immediately configure the router accordingly. However, this method is more suitable for fairly experienced advanced users, and may seem too complicated to an untrained person.
Depending on the manufacturer and model of the router, the setup principle may differ slightly. However, in most cases, the operating algorithm is common to all devices of this type.
Procedure:
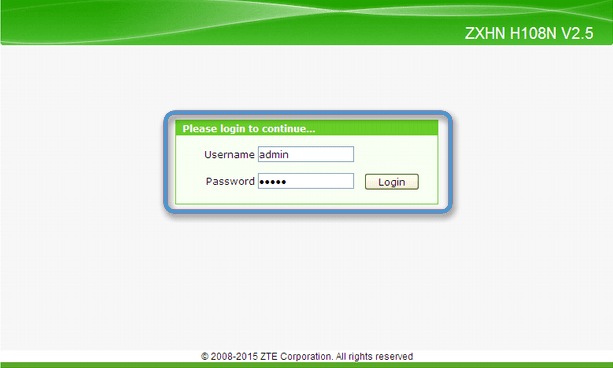
- Using a special address, log into the router’s web configurator. You can find out the address of this resource from the instructions or description on the router packaging.
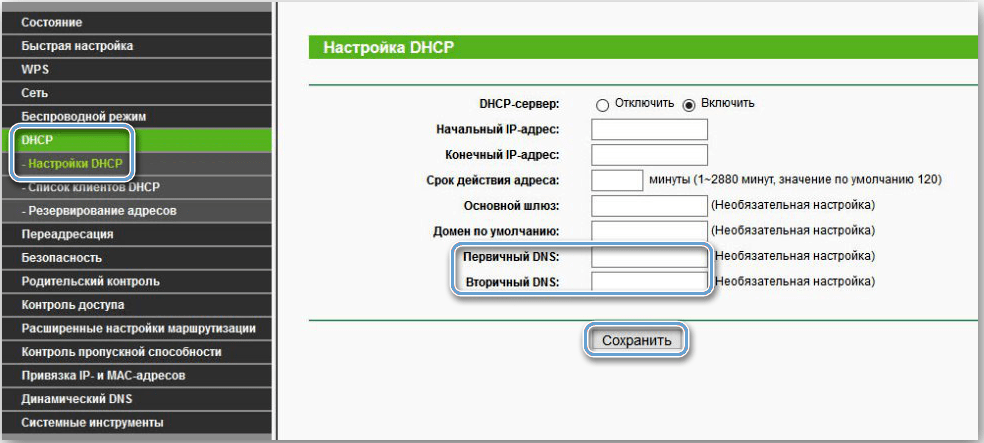
- Go to the section with DHCP settings.
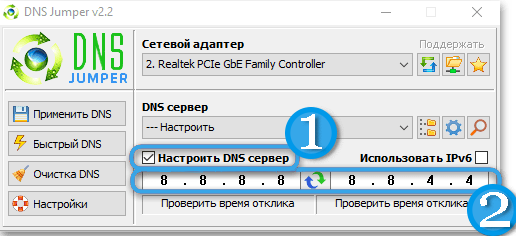
- Set your own DNS addresses instead of the default ones.
You can also find information on how to get into the settings of your router on specialized Internet resources. Most often, you just need to enter the router model into the search bar of your browser.
Additional software
If you do not want or have the ability to use the built-in operating system tools to configure DNS, you can always use third-party software. Moreover, specialized programs most often provide a much larger range of capabilities.
One of the most popular is the DNS Jumper program. This is a portable tool to quickly switch DNS server on your computer. Full support is provided not only for the current Windows 10, but also for older versions of Windows 8.1, 8, 7, Vista, XP. Moreover, no additional settings are required in the system.
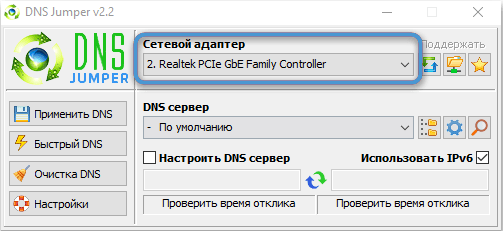
Algorithm for working with the program:
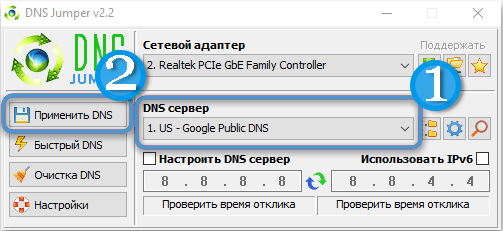
- launch the software on your computer and find your preferred database in the list of DNS servers;
- apply changes by clicking on the appropriate button.
The YogaDNS program works in approximately the same way. This is a DNS client that intercepts user requests at the system level and processes them through specific servers using specific custom protocols.
In most cases, the easiest way to change the address or otherwise configure DNS on a computer is to use the tools built into the operating system. The standard functionality is usually more than enough to conveniently change the address base. However, no one prohibits the use of third-party programs. But here it is worth making sure that the additional software itself does not contain malicious code. So it is recommended to download only well-known, proven programs from reliable resources.
Did our instructions help you set up a DNS server on Windows 10 or 11? Did any problems arise during the work? Share your experience in the comments.
