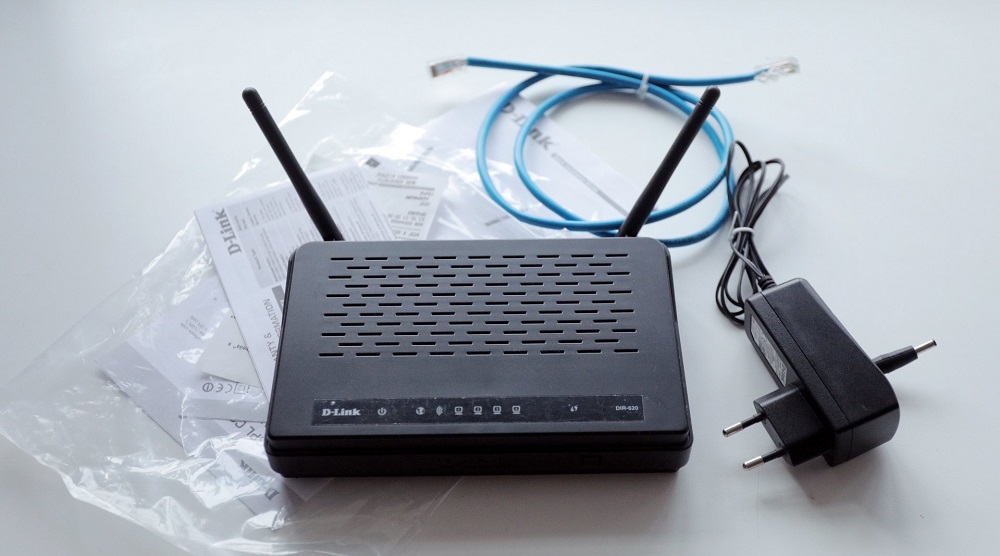
Configuring the DIR-620 router from D-Link is no more difficult than other models in the series. At the same time, given the additional options of the router, which imply more flexible network configuration, and the presence of special tools, the process is still different. For a seasoned user, the task will not be difficult, while novice users will have to tinker, but armed with instructions, it will not be difficult to cope.
Contents
Description and characteristics of the router
The D-Link DIR-620 router is a universal network device supporting WiMAX, 3G GSM and CDMA networks, as well as an integrated switch that allows you to easily deploy a network at home or in a small office. The wireless router provides a stable wireless connection at speeds up to 300 Mbps (802.11.n communication standard). The device also has a built-in firewall to ensure data security when connected wirelessly.
Main characteristics of D-Link DIR-620:
- type: Wi-Fi router;
- interfaces: 4x LAN (300 Mbit / s), 1x WAN (100 Mbit / s), USB0, 1x WLAN;
- wireless standard: 802.11n, 802.11g, 802.11b, 802.3, 802.3u;
- work in the range of 2.4-2.462 GHz;
- transmitter power: 17 dBM;
- antennas: 2x internal;
- antenna gain: 2 dBi;
- connection protection WEP, WPA, WPA2, WPS;
- security: firewall (FireWall), NAT, SPI, filtering by IP address, MAC address and TCP / UDP;
- the ability to work with 3G / 4G modems.
Setting up the Internet on a router
Configuring the D-Link DIR-620 router is no more difficult than other models. This can be done in several steps, following the steps described sequentially, while, before proceeding with the configuration, it is better to update the firmware to the current version (more on this below).
Equipment connection
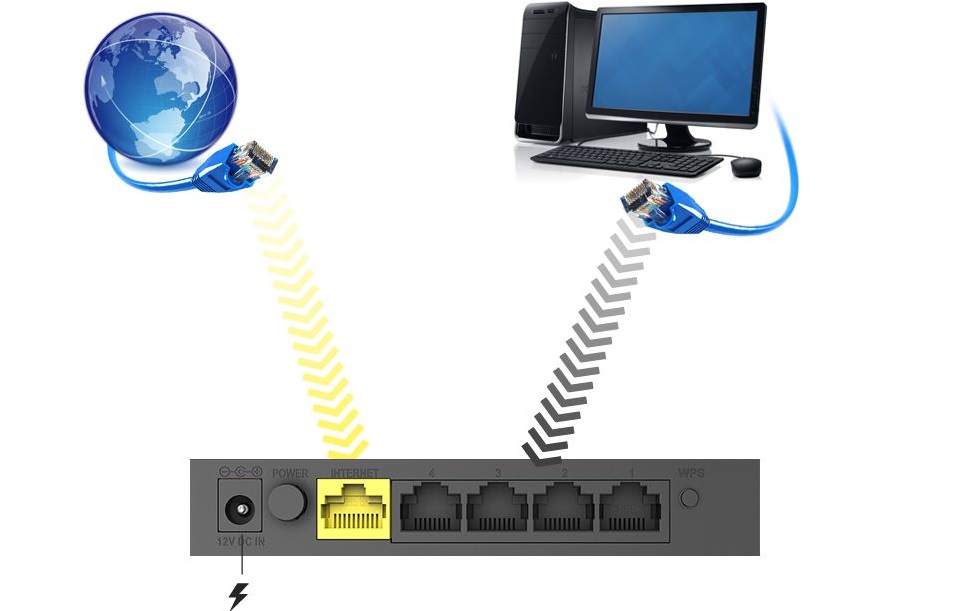
First, you need to connect the D-Link DIR-620 router to your computer. Everything is standard here:
- connect the provider’s cable to the Internet (WAN) port on the back panel of the network device;
- we connect the router (LAN port) to the computer using a cable (supplied with the device);
- all that remains is to plug the power adapter into the appropriate socket, plug it into an outlet, and then start the computer to configure.
Obtain IP address and DNS servers automatically
Before configuring the router, it is worth checking the local network settings, for which we perform the following steps:
- go to the “Control Panel” (for example, through the “Start” menu);
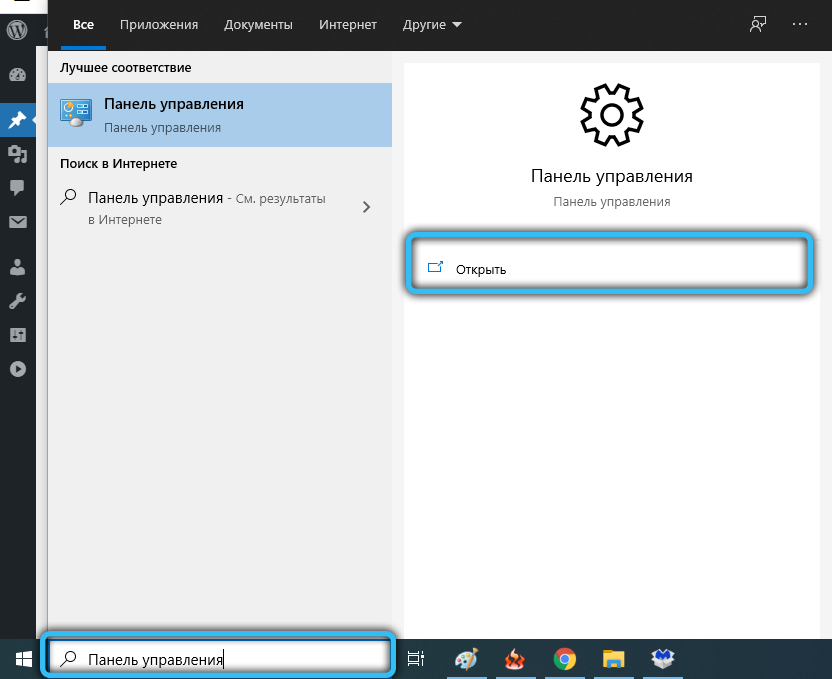
- from the category “Network and Internet” select “View network status and tasks”;
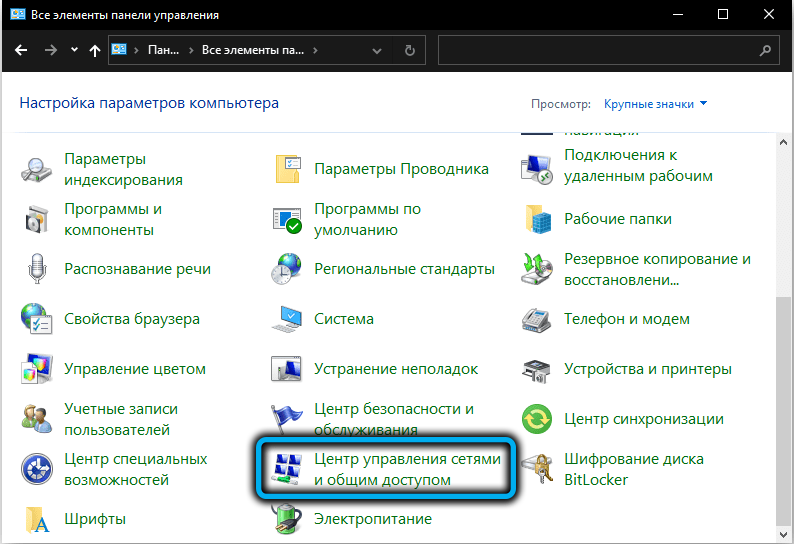
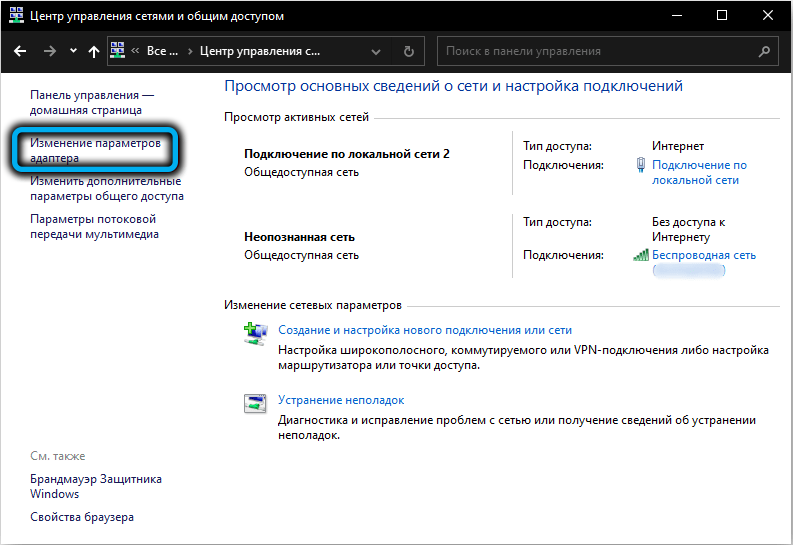
- in the menu on the left, select the option “Change adapter parameters”;
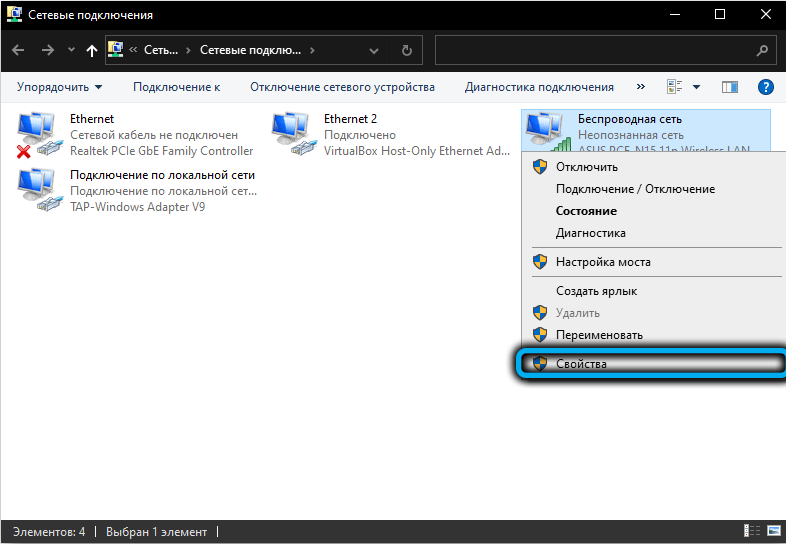
- in the window with connections, press RMB on the local connection and select “Properties” from the context menu;
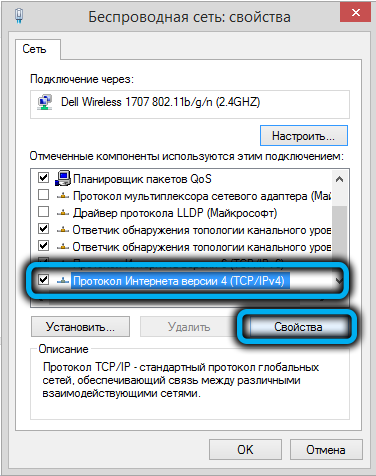
- in the properties window on the “Network” tab, select the TCP / IP version 4 (TCP / IPv4) protocol and click the “Properties” button;
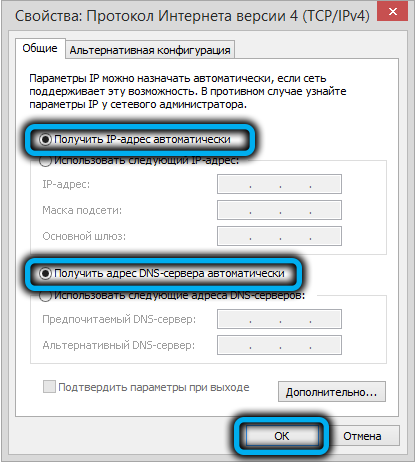
- in the window that opens, mark the items “Obtain an IP address automatically” and “Obtain a DNS server address automatically”, click “Ok”.
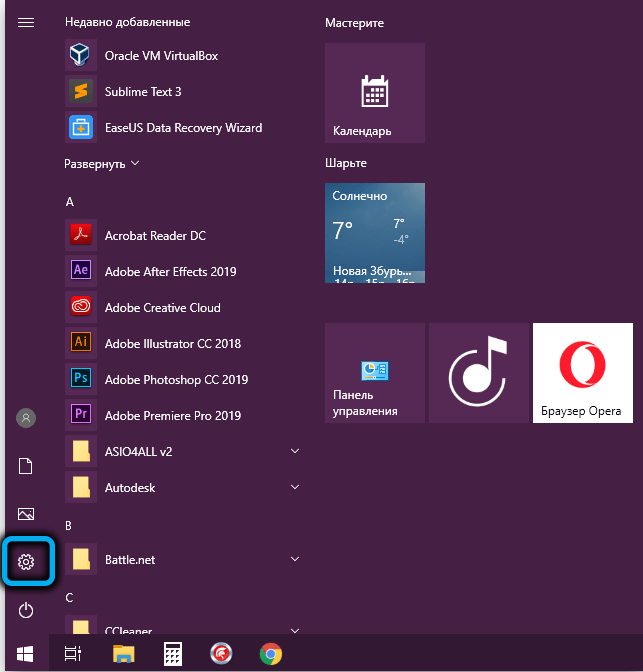
In Windows 10, instead of the Control Panel, you can use the Settings snap-in:
- go to the parameters window (via “Start” or by the keyboard shortcut Win + I);
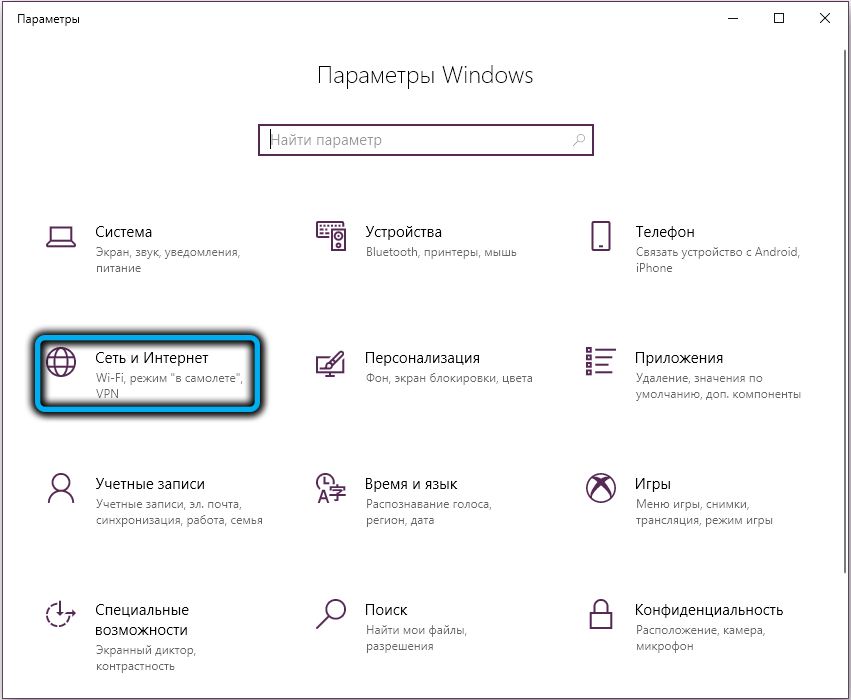
- we press “Network and Internet”;
- in the block responsible for changing network parameters, select “Configure adapter parameters”;
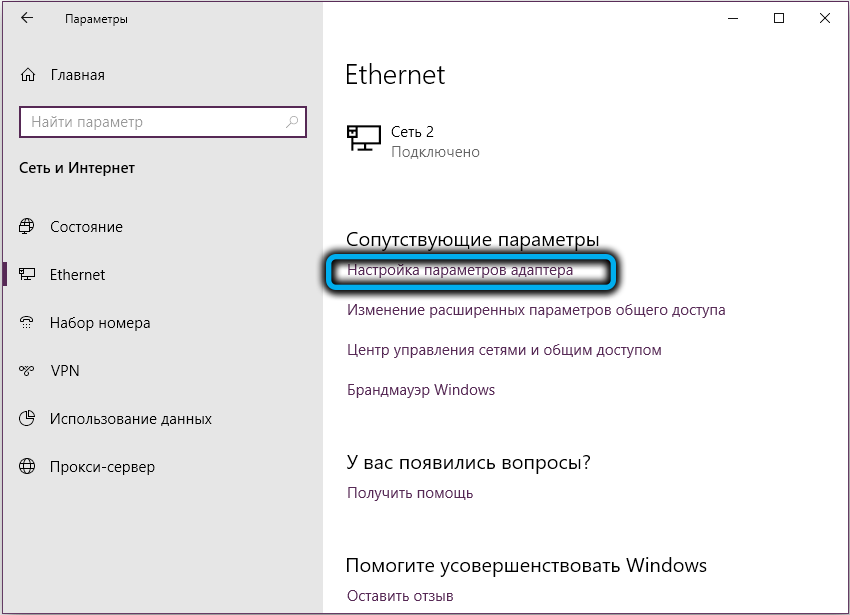
- the same window with network connections will open, where we perform the above actions.
We will configure the router through the web interface, the version of which will depend on the installed firmware. In this case, the setting is performed in the same way regardless of the version of the interaction interface, the differences relate to the appearance, while the navigation through the sections and all the items will not differ.
How to enter the D-Link DIR-620 settings:
- open the browser and write 192.168.0.1 in the address bar;
- authorization data will be requested, enter them in the appropriate fields (by default, on D-Link devices, the name admin and the same password are used) and press the enter key.
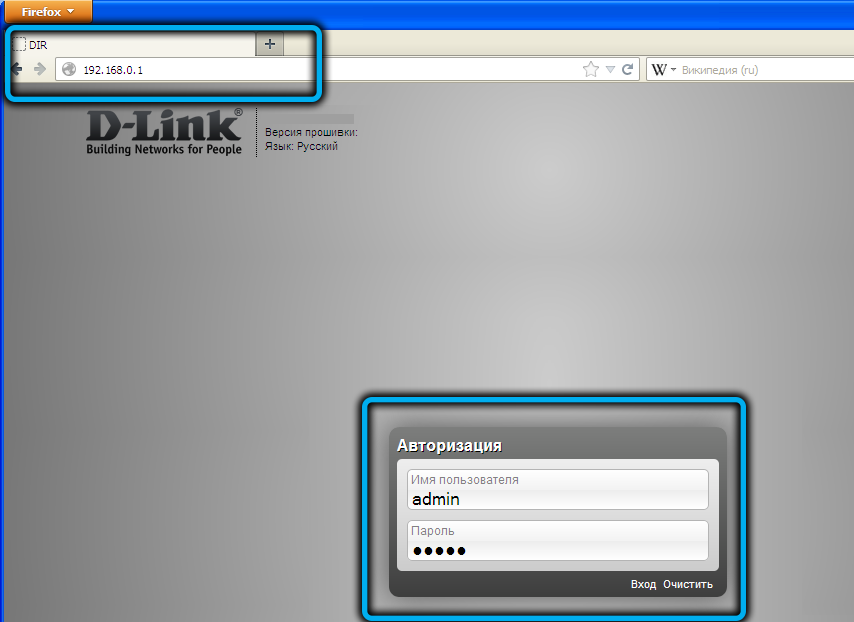
Having entered the web interface, the wireless network must be protected with a password and, taking into account the type of connection used by the provider (PPPoE, PPTP, L2TP), make the settings corresponding to the connection.
If you are uncomfortable working with the English interface, you can change the language, for which you need to go to the “Language” tab in the upper part of the window and select Russian from the drop-down list.
To change the standard password, do the following:
- in the router interface, go to the “System” tab and select the “Administrator password” menu;
- enter a new password in the appropriate field (“New Password”) and confirm it (“Confirm Password”);
- press the button to save the parameters (“Save Setting”), after which you will need to enter the settings of the router again using the new data.
Setting up an internet connection
To set up the Internet on a router, you need to find out what type of connection is used by your provider. This information can be obtained from the contract with the service provider or by calling technical support.
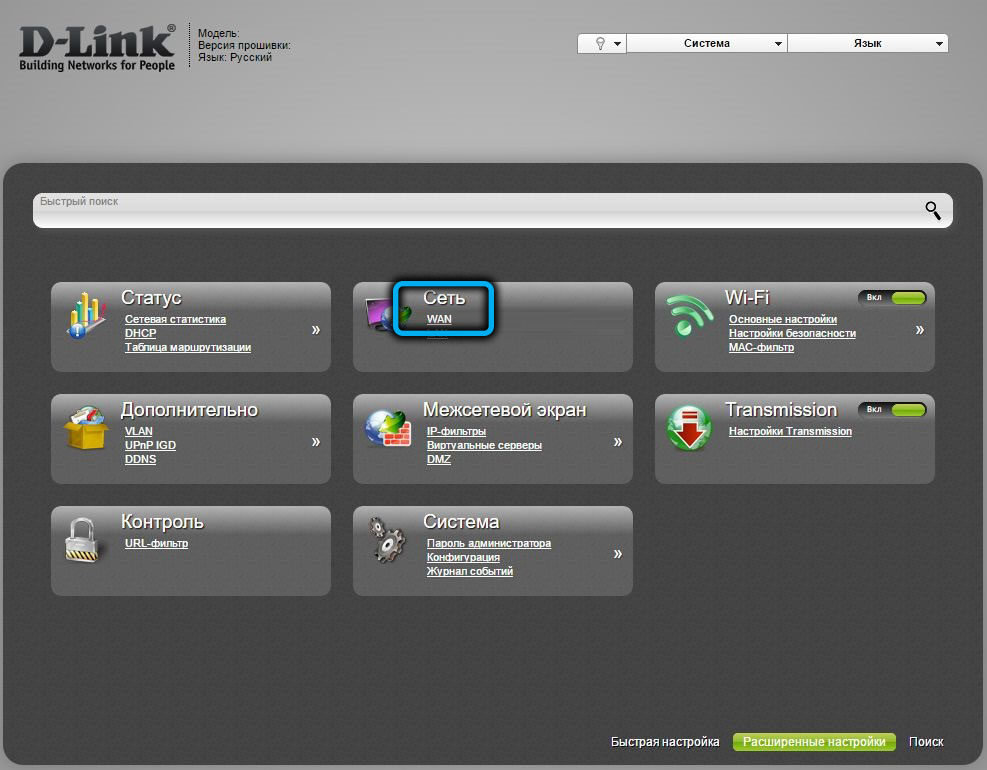
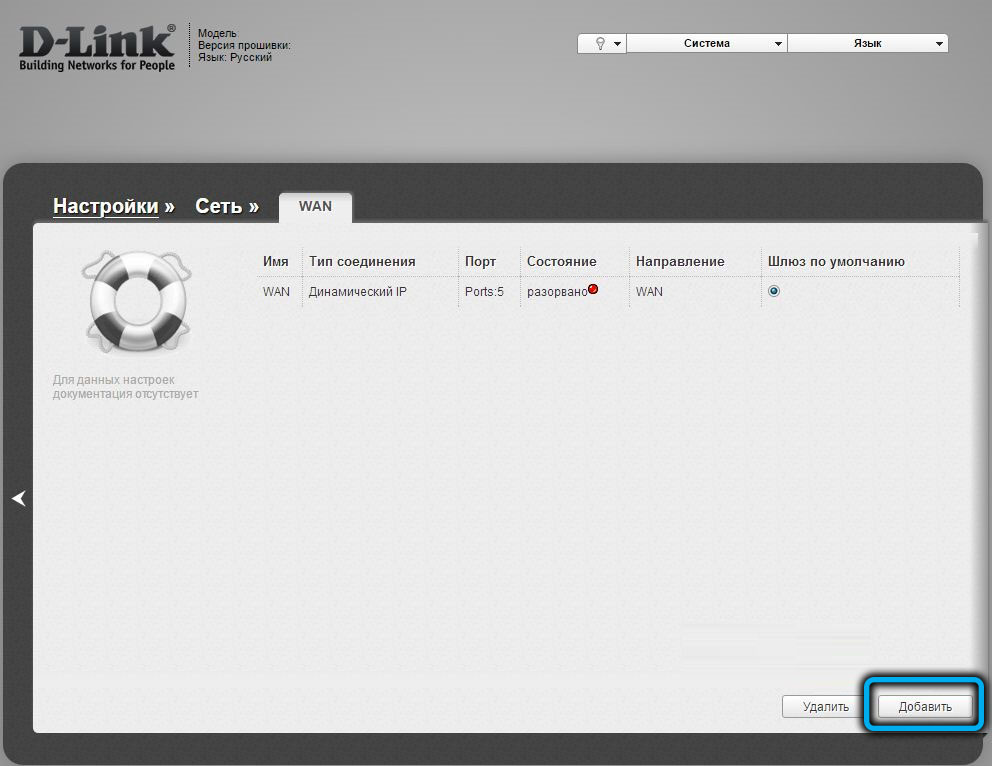
On the advanced settings page in the router interface in the “Network” section, select the WAN item and click the “Add” button. Further actions will depend on the protocol used.
PPPoE connection
PPPoE connection is used by many providers (Rostelecom, Dom.ru and others). To connect to the Internet using this communication protocol, we perform the following actions:
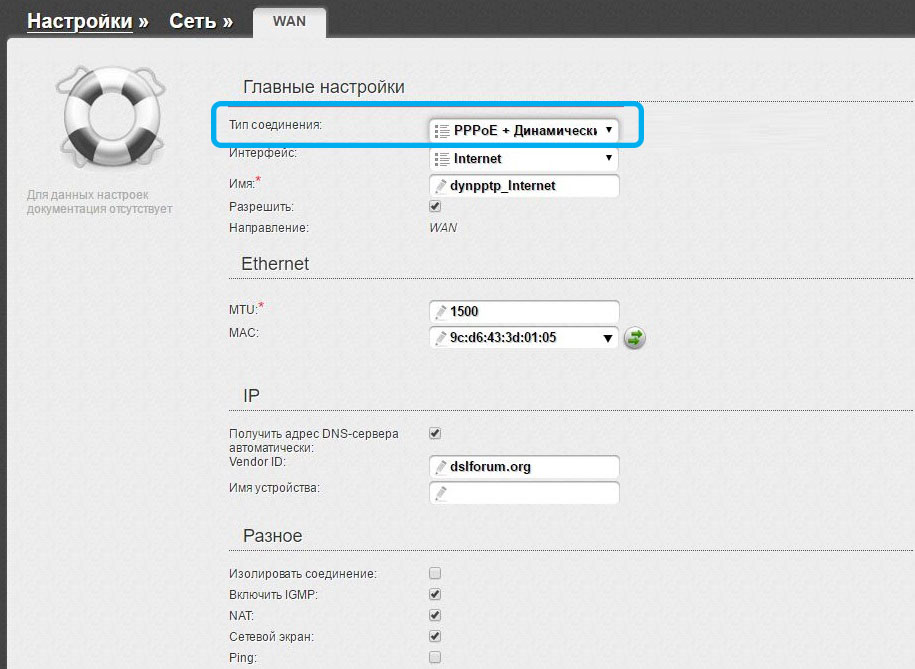
- in the item “Connection type” from the drop-down list, select the PPPoE option;
- in the next field, select the port (WAN, here specified as Port5);
- the connection name can be left the same;
- further in the PPP block, the lines for the username and password are filled in according to the information from the agreement with the provider;
- opposite the item “Authentication Algorithm” should be the value “Auto”;
- mark the Keep Alive item with a bird;
- in the MTU field, change the value to 1450 or less;
- check if the NAT and Firewall options are checked in the “Miscellaneous” block, and also check the “Enable IGMP” item if the ISP provides the IPTV service;
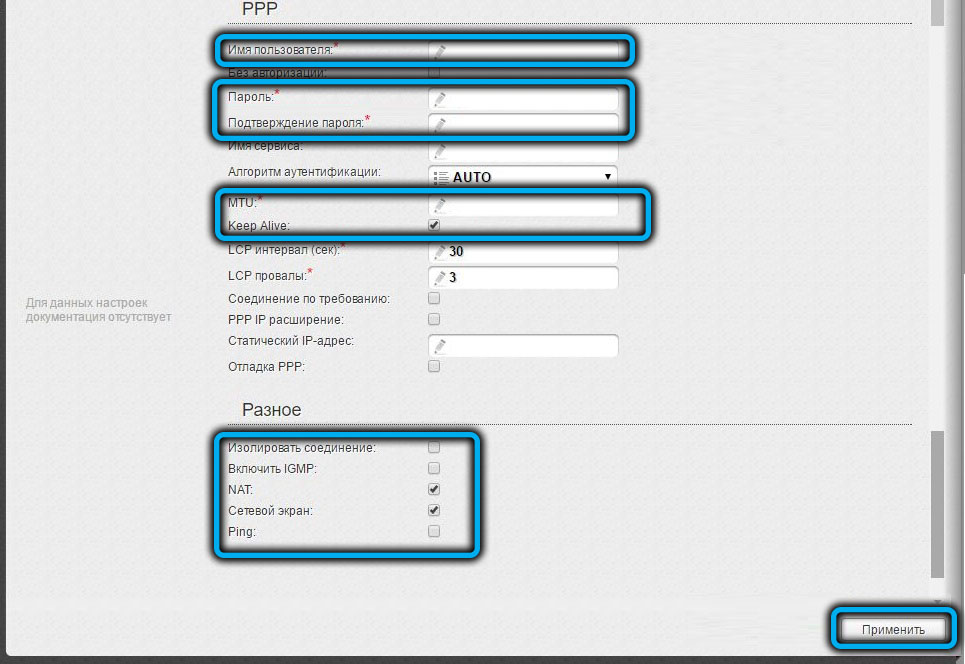
- apply the entered parameters, save (“System” – “Save and Restart”).

L2TP connection
To configure an L2TP connection, follow the same steps:
- specify the type of connection L2TP + Dynamic IP;
- select the WAN port (Port5);
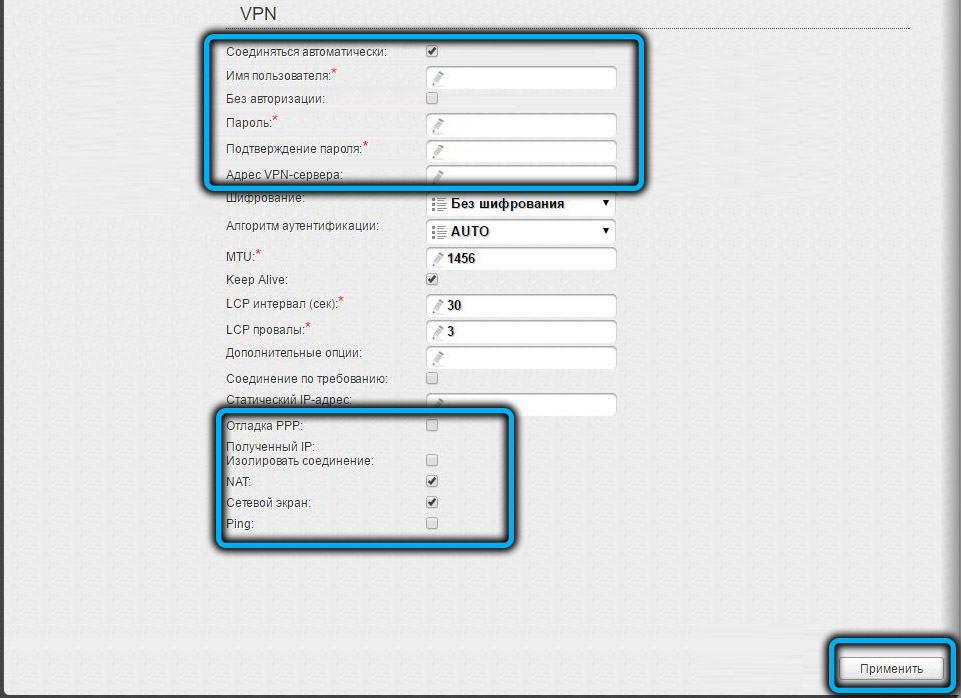
- enter the data for authorization from the contract, confirm the password;
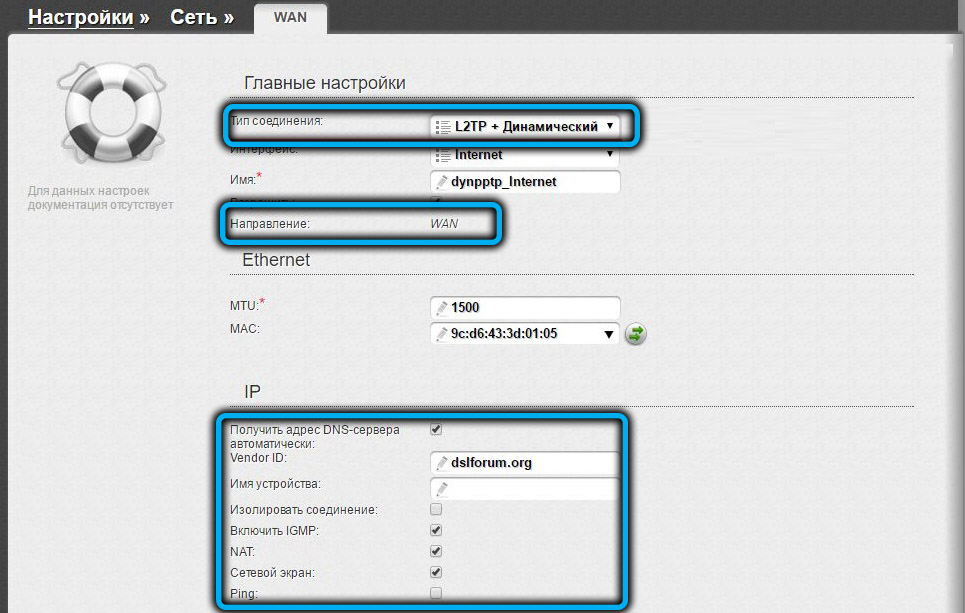
- register the address of the provider’s VPN server;
- check in the “Miscellaneous” block whether the NAT and Firewall options are activated, if not, put a check mark. We also enable IGMP if the Internet provider provides the service for watching Internet TV;
- save the settings.
PPTP (VPN) connection
To connect D-Link DIR-620 to the Internet using the PPTP protocol, follow the same steps:
- select the required type of PPTP + Dynamic IP connection;
- change or leave the name of the connection;
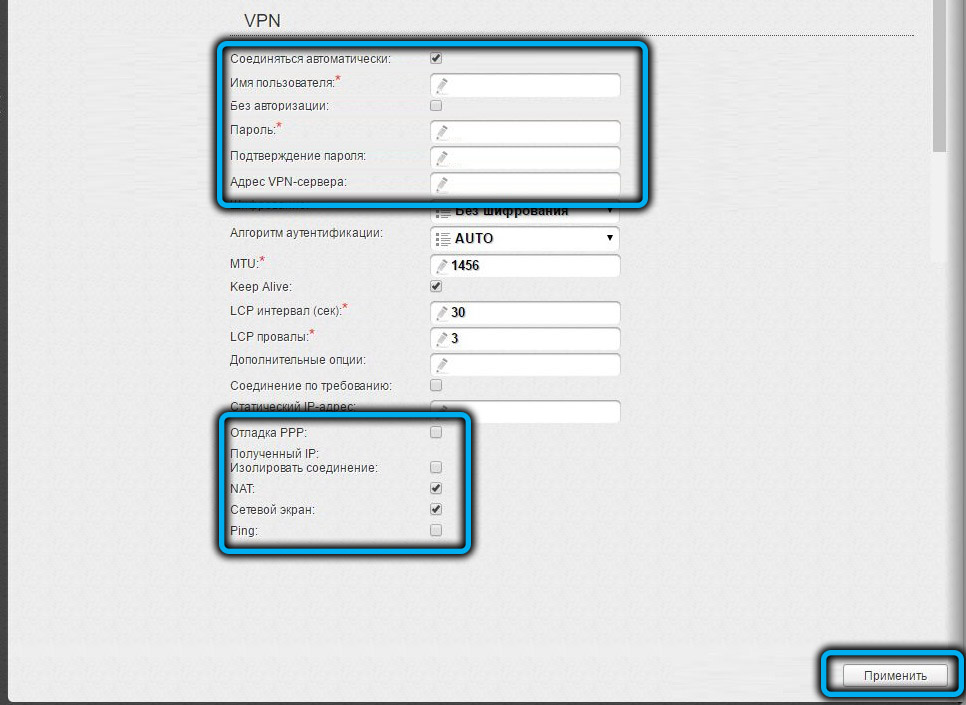
- enter data from the contract (name, password), confirm;
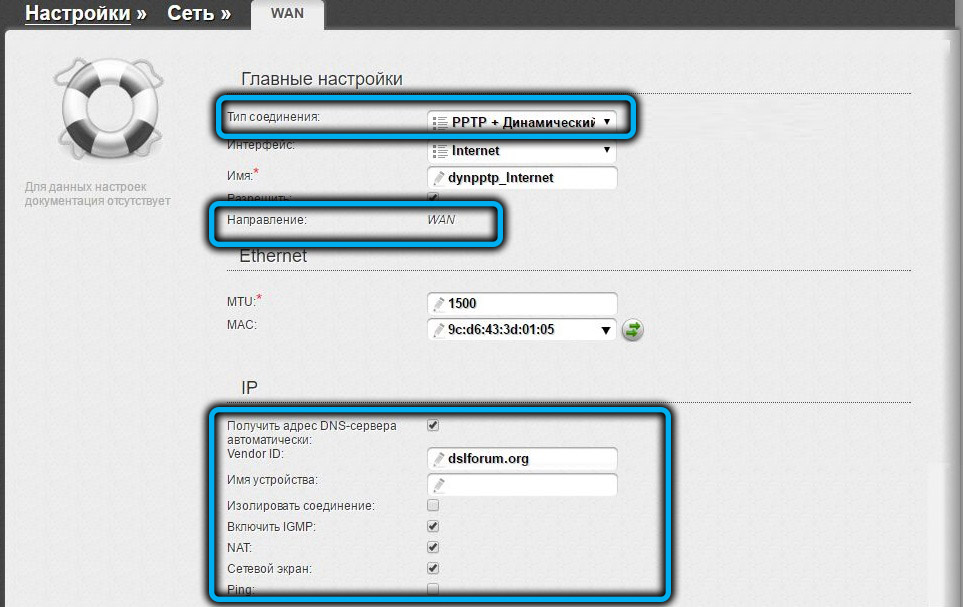
- specify the address of the VPN server;
- mark the option “Connect automatically”;
- apply the changes, save the specified settings and reboot the network device.
After the connection is created, the Internet access check will be carried out.
How to set up a router to distribute Wi-Fi
When the Internet connection is established, you will also need to configure the access point so that the D-Link DIR-620 router distributes Wi-Fi to connected devices.
With the Click’n’Connect tool, you can quickly set up the Internet. The user will have access to the basic options, but there is also the possibility of more detailed customization with the introduction of the necessary parameters manually.
To configure D-Link DIR-620 for Wi-Fi distribution, follow these steps:
- in the “Wi-Fi” section on the advanced settings page, select “Basic settings”;
- check the “Enable wireless connection” option if it is inactive;
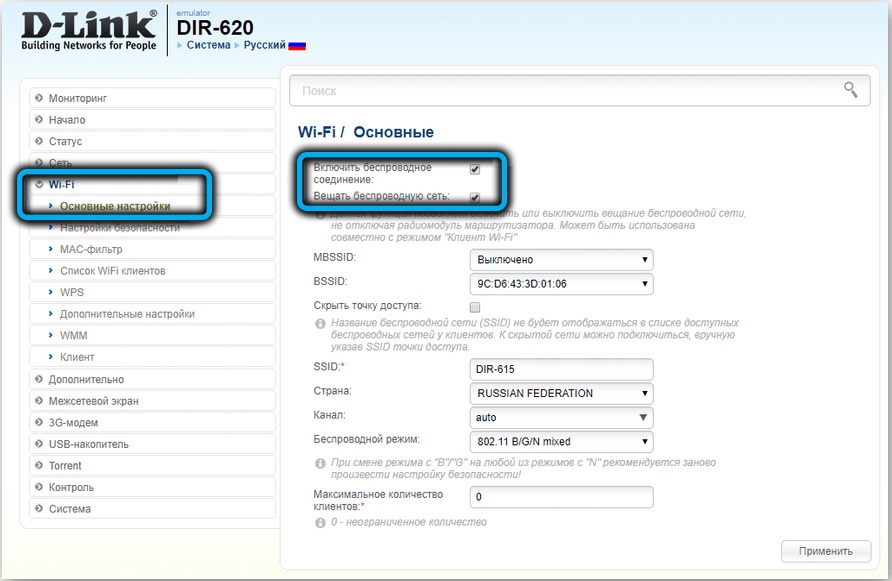
- specify the appropriate name of the SSID network (it will be visible to devices in the list of available connections), click “Change”;
- we register such information as country, channel (value “auto”), wireless mode (802.11 b / g / nmixed);
- apply the changes, return to the previous screen;

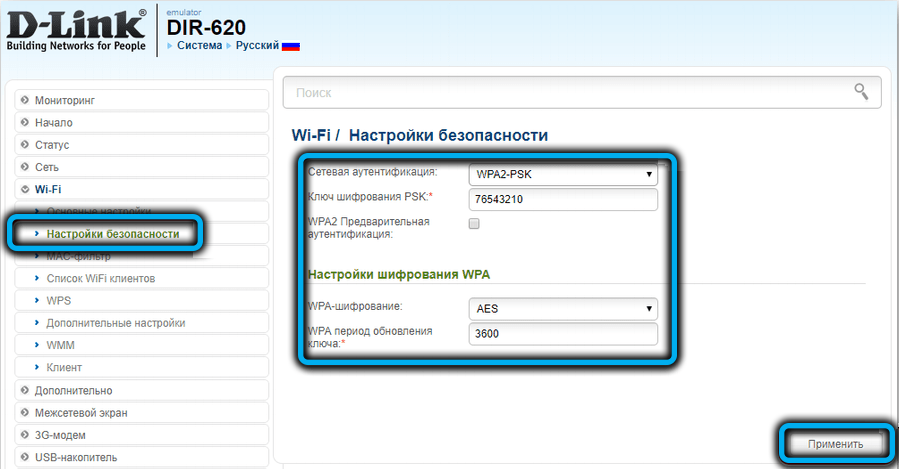
- set a password for accessing the wireless network in the Wi-Fi security settings, for which we select the type of network authentication (preferably WPA2-PSK) from the drop-down list and enter a reliable key (at least 8 characters). Configuring with encryption will help protect the network from unwanted connections;
- we apply the changes by pressing the corresponding button and you can check the work.
Now, connecting to Wi-Fi via a computer, smartphone or other device, select the name of the created network from the list of available connections and enter the authorization data.
To check the connection, you can go to the “Network Information” subsection, where there will be an inscription informing about the presence of a connection and an IP address.
How to reboot your router or reset it to factory settings
When the router is ready to work, it is worth saving the configuration and rebooting the device. Reboot also helps to restore correct operation in case of errors, in addition, to troubleshoot or in case of changing the provider, you can reset the D-Link DIR-620 settings to the factory values. The procedure can be performed both through the interface and by hardware.
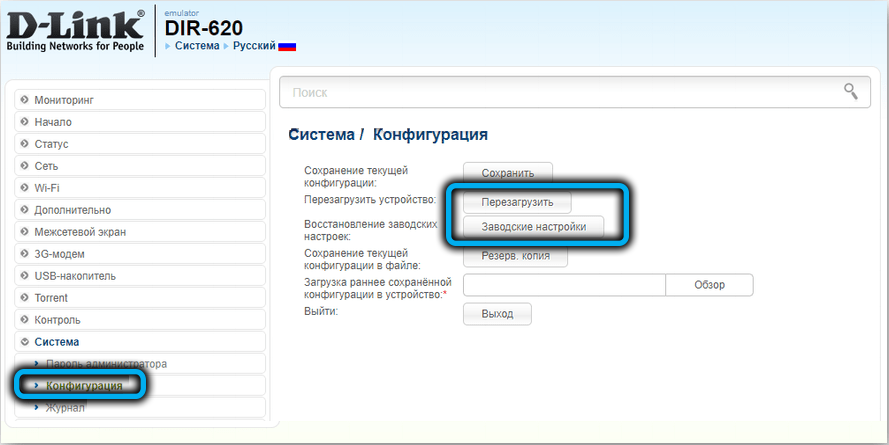
Saving the current parameters, resetting the settings to the factory configuration, as well as rebooting and backing up are available in the interface on the “Configuration” tab of the “System” block and are performed by clicking on the corresponding section buttons. The default settings are applied after the user confirms the operation, or the intent is confirmed by inactivity after one and a half minutes after selecting the option. The values will be applied on next boot.
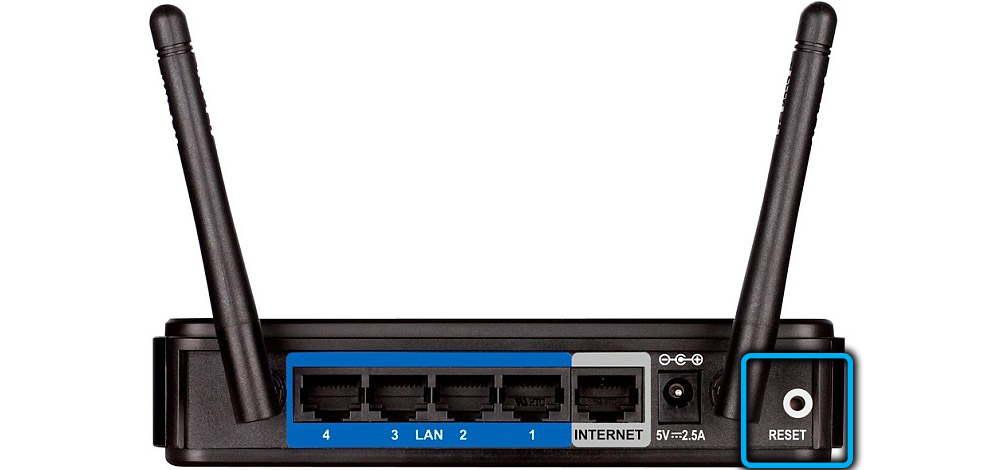
A hard reset is performed by holding the Reset button on the device for a long time for about 10-15 seconds (we are guided by the indicators of the router, they will blink), after which the router will reboot.
Firmware upgrade
The firmware of the router is also updated via the web-based interface of the device. The firmware of the D-Link DIR-620 router is not difficult and takes only a few minutes, and the algorithm of actions is the same as in the case of other brand devices.
The functionality of the interface is identical, but its appearance depends on the variation of the configurator. The item responsible for updating the software is located in the “System” section, which can be accessed from the main menu (in the old interface) or from the advanced settings at the bottom of the page (in the new one).
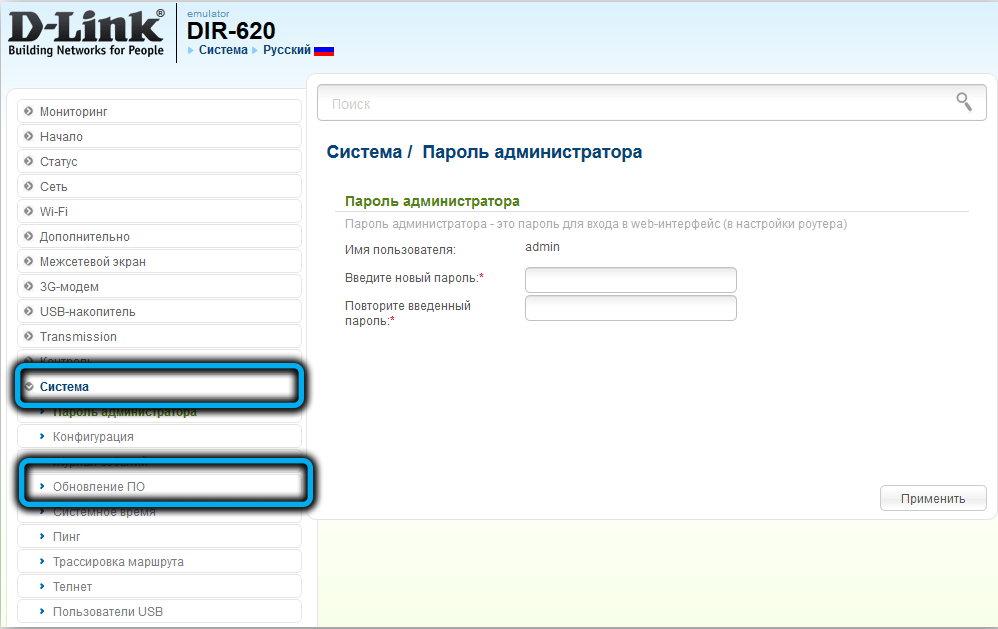
There are two ways to update D-Link DIR-620 software. Let’s consider each in more detail.
Automatic firmware update
This is a simple and quick implementation option, since in this case the network device will independently find and install the appropriate firmware, while a minimum of actions is required from the user.
How to flash D-Link DIR-620:
- open the router interface at 192.168.0.1;
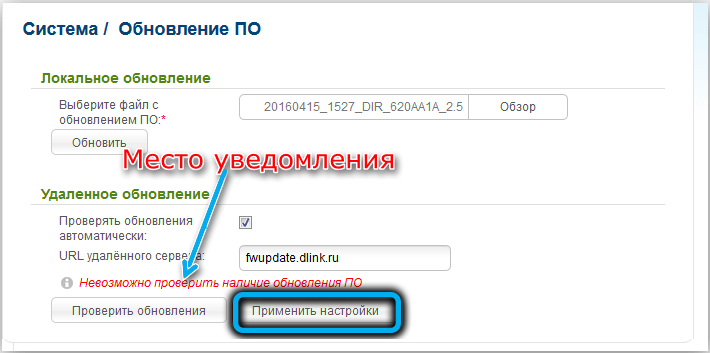
- go to “Advanced settings (in the new gray configurator) and in the” System “block click” Software update “(the option can be opened after clicking on the arrow);
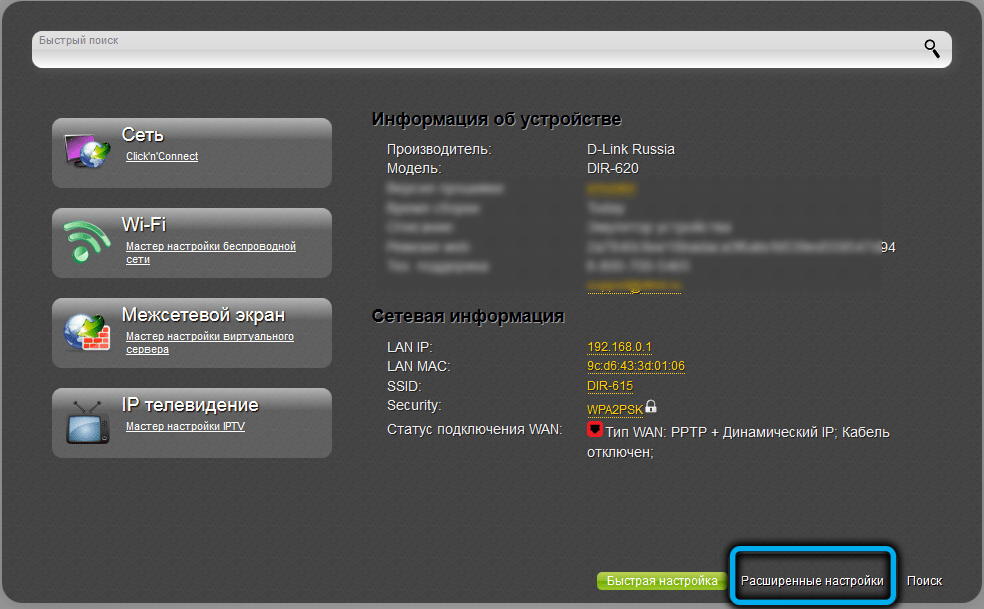
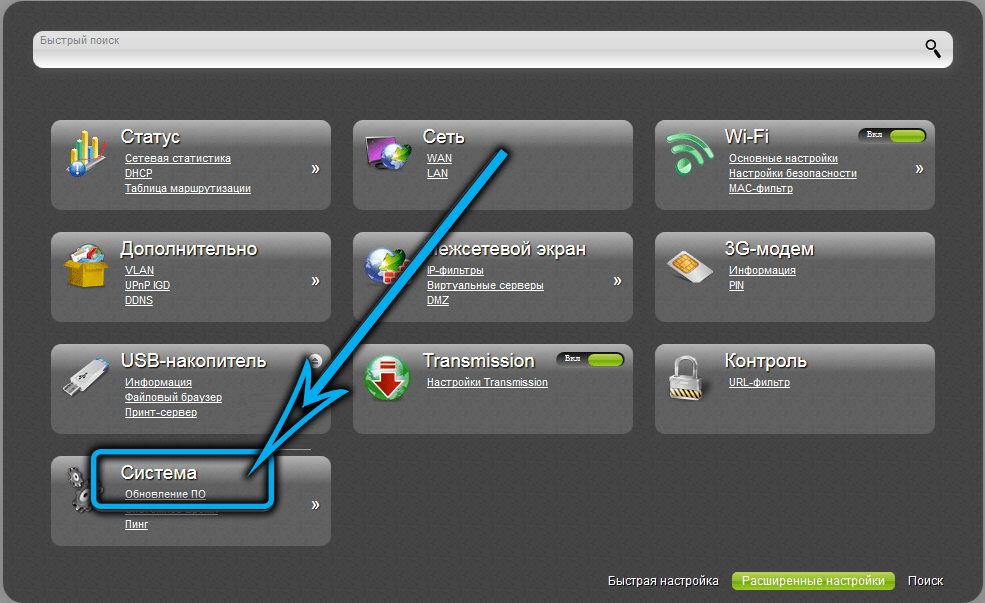
- see if the checkbox “Check for updates automatically” is checked, you can also manually check for updates by clicking the appropriate button;
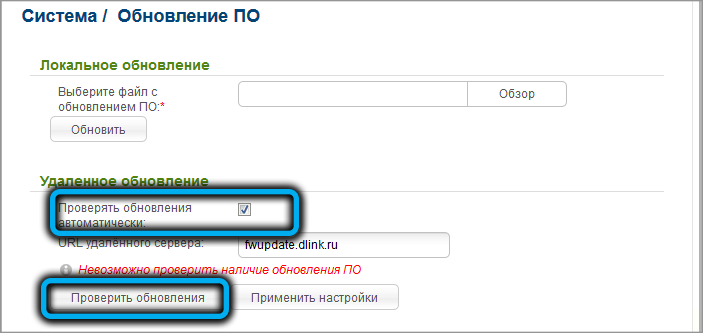
- if there are available updates, a notification will appear under the address line informing you of this. Click “Apply Settings” to start the process, after which you will need to wait for it to end.
Manual firmware update
You can also flash the device locally, for which the fresh firmware is pre-downloaded from the manufacturer’s FTP server (taking into account the router’s revision).
How to flash D-Link DIR-620:
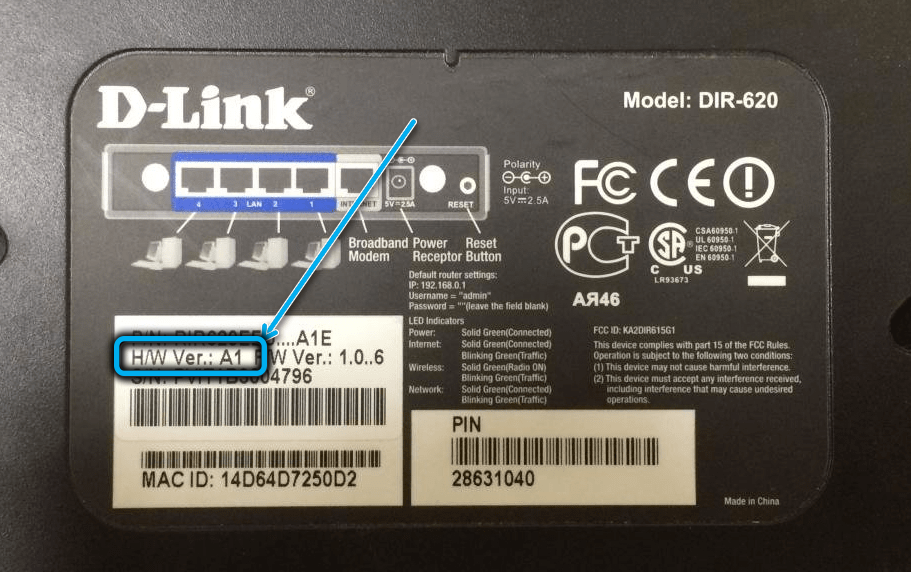
- we determine the revision of the device (look at the bottom of the case);
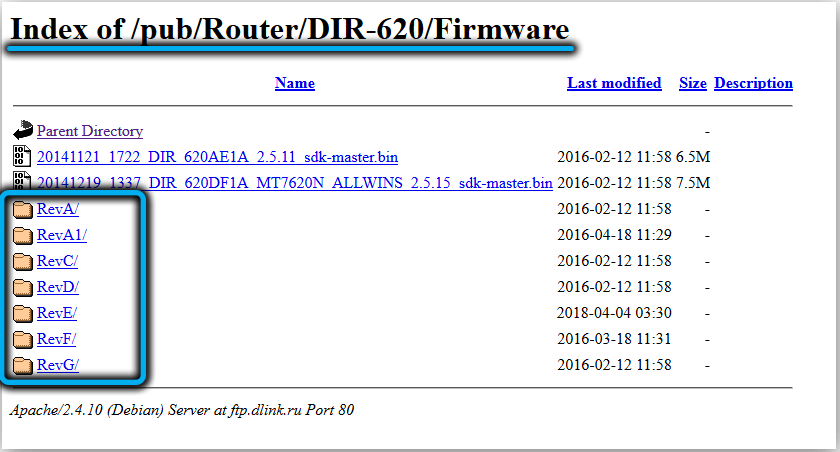
- on the official manufacturer’s resource https://ftp.dlink.ru/ go along the path / pub / Router / DIR-620 / Firmware and select the folder with the name corresponding to the revision of the device;
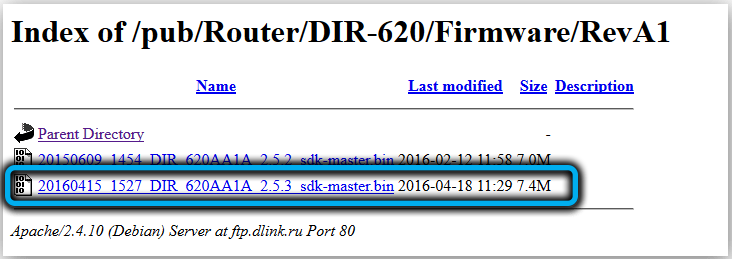
- download the file with the extension “.bin” (look by date, select the latest version), to download just click on it;
- in the interface, go to the software update section;
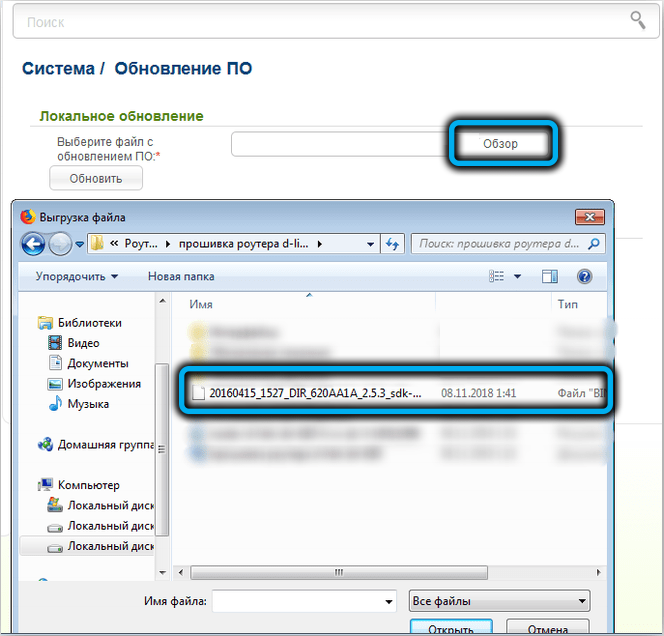
- install the firmware, specifying the path to the downloaded file (use the “Browse” button to open the explorer to select an object);
- press the “Update” button and wait until the software is installed. The process will take several minutes, after which a message will appear stating that the firmware has been successfully completed.
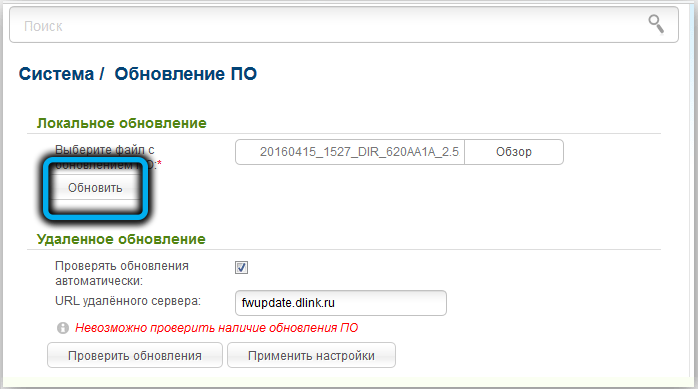
After 5 minutes, if the message about the success of the procedure has not appeared, you can go to the router interface. If it does not help, after another 5 minutes, turn off and then turn on the device.
Leave your feedback in the comments about whether the article helped you and what difficulties you encountered with the firmware and configuration of the D-Link DIR-620 router.