Access from Microsoft provides users with ample opportunities to create and work with databases. Nowadays, databases are very widely used in all kinds of spheres and fields. In general, we can say that now we cannot do without them. In this regard, it is very important to be able to work with Access tables. The main element of user interaction with the database is the query. This article will take a closer look at how to create a query in Access. Let’s get started. Go!

First of all, let’s figure out what a request is. This is a database element that serves to select the desired information from the table. They are of two types:
- Sample (allow you to receive data and perform operations on it);
- To change (allow you to add, delete, and change values).
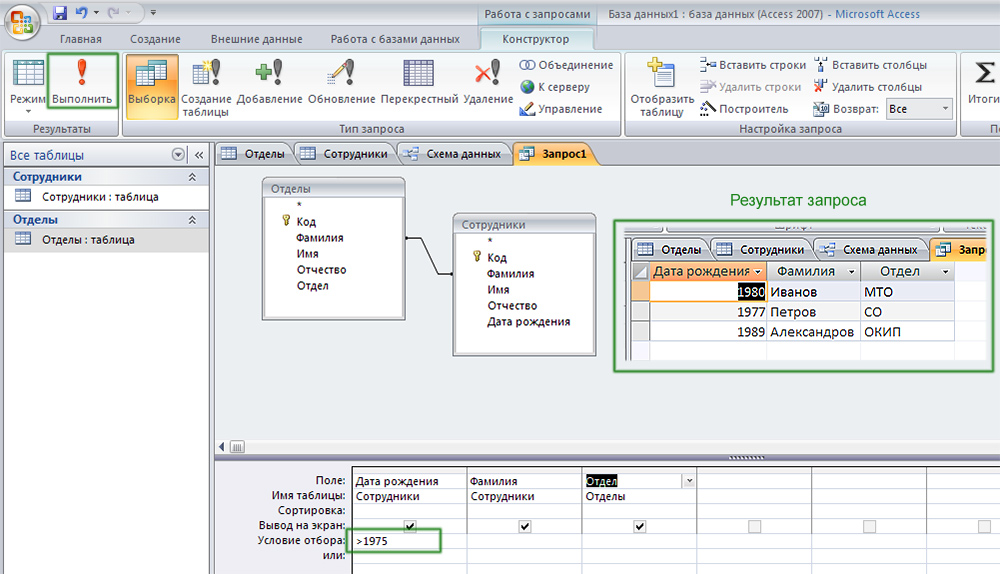
Now let’s go directly to practice. Go to the Create tab and click the Query Builder button. In the window that opens, select one or more tables from which you want to select data. By clicking the “Execute” button, you will receive all the information from the tables you have selected. For a more specific selection, go to the “Design” tab and enter the desired word or number in the “Criteria:” field. For example, suppose you want to get a list of all employees born in 1980. To do this, write 1980 in the “Date of birth” column in the line “Selection condition:” and click the “Execute” button. The program will instantly give you the result. For convenience, you can save the created request in order to use it in the future. Use the key combination Ctrl + S and enter the name in the appropriate field, and then click “OK”.

By specifying a condition for the selection of data, we get the desired selection
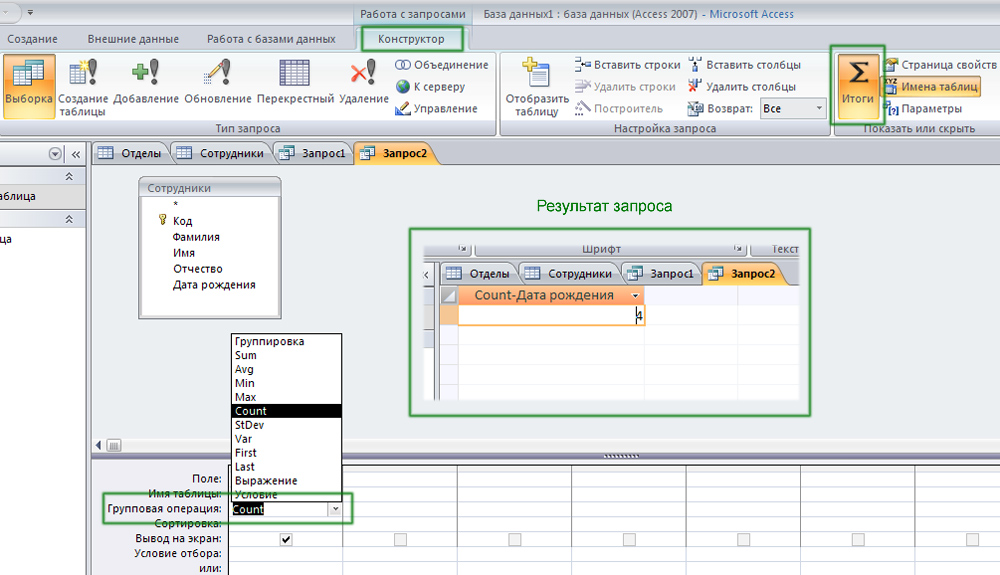
To count the values in a column, you can use what are called group operations. To do this, on the “Constructor” tab, click on the “Summary” button. In the “Grouping” line that appears, select the “Count” function, which allows you to add up all non-zero values. To avoid displaying the word “Count” in the column name, in the “Field” line, enter the name before what was indicated earlier. Saving is done in the same way using the Ctrl + S combination.

Access counts non-empty cells
Now let’s create a parametric query. It allows you to make a selection by the entered parameter. For example, on a given date. Having opened the required database, write (without quotes) in the corresponding column “[Specify the date]”. Square brackets are required. In the window that appears, enter the desired date. After that, the program will automatically make a selection according to the date you entered. You can put signs “>” (more) and “<” (less) to display items earlier or later than the specified date. For example, a list of employees who submitted reports before 01.07.
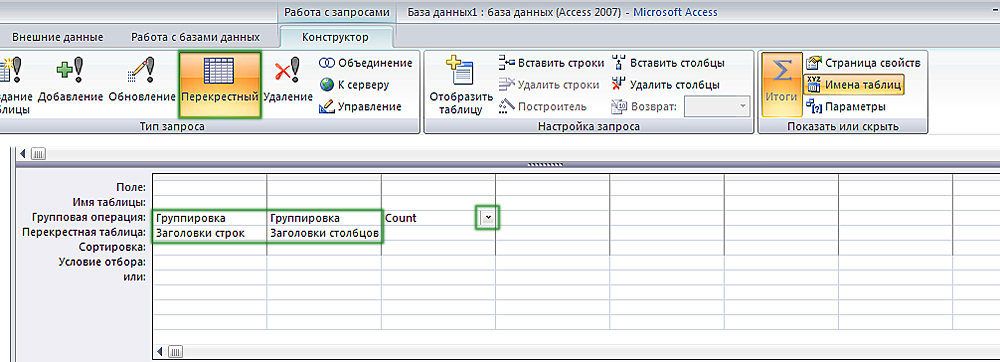
How do I create a cross-reference? It is enough to find the “Cross” button on the toolbar and click on it. After that, in the “Cross Table” item, select “Row Headings” in the first cell, “Column Headings” in the second, and “Value” in the third. Then you can count the values using the “Count” function already mentioned above. Please note that if you specify in the second cell “Row Headings”, as in the first, instead of “Column Headings”, then nothing will work. Be sure to consider this.

We make a cross query in the database
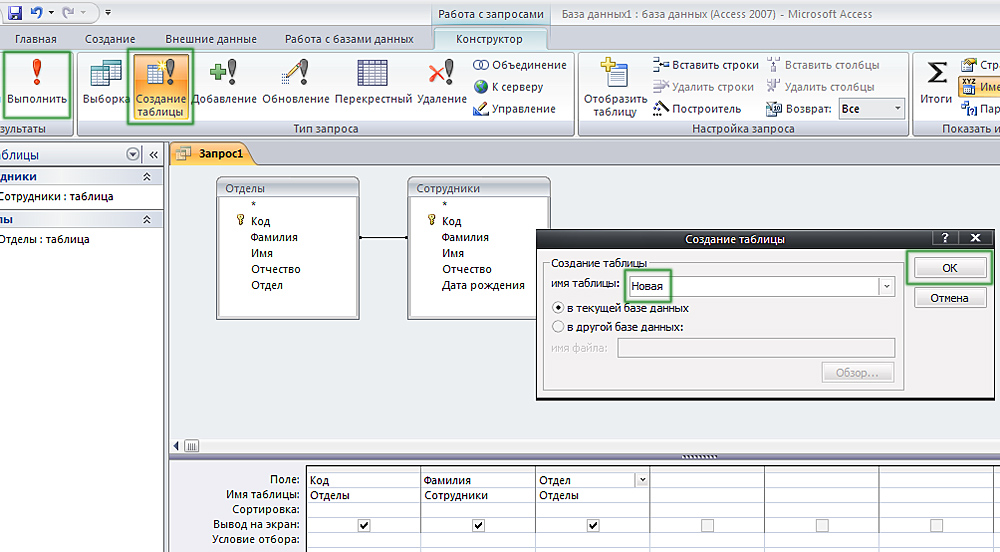
You can also make a request to create a table. How it’s done? It is enough to open the databases with which you are working, then fill in the “Selection condition” cell and click on the “Create table” button. Don’t forget to hit “Run”. Microsoft Access builds a new table based on the options you specified. For example, a list of all employees with their contact information for the profession of “Accountant”.

When saving, you need to specify the name and location of the new table
As you can see, Microsoft’s Access program allows you to do a lot of things. Knowing how to make a query in Access will make you feel much more confident when working with databases. Write in the comments if this article was useful for you and ask questions on the topic discussed.