The range of programs designed to work with video files is very diverse. A wide selection of such programs allows you to choose for yourself a tool that is suitable in terms of functionality and convenience, both among paid and free ones. In this article, we will tell you about the very popular and noteworthy free program VirtualDub, the capabilities of which are not inferior to similar analogs.
Contents
Downloading and unpacking the program
VirtualDub begins to pleasantly surprise the user even at the initial stage of its operation: the program does not require any installation, since after downloading the archive with the program on a PC, it is enough to launch VirtualDub.exe with a standard double-click on the name to open it. By default, the program includes built-in codecs that allow you to perform basic tasks for video editing, editing, compressing and converting files, provided it is downloaded from an official source. As a disadvantage, the inadmissibility of working with files in mp4 and MOV formats is noted, but this oversight is eliminated if you additionally install codecs for interacting with these components, the detailed installation instructions for which will be described later in the article.
Hotkeys
For the convenience of working with VirtualDub, it is recommended to learn how to control functions not only by selecting the required command with the mouse, but also using hot keys, which significantly speed up actions. The program is initially equipped with many “hot keys”:
- To open a file, hold down the Ctrl and O buttons at the same time.
- In order to move through the video, you can use the combination of the Shift key and the arrow keys on the keyboard, which will allow frame-by-frame movement.
- The combination of Alt with an arrow allows you to move a gap of fifty frames.
- To record from the screen, use the F6 key, which is responsible for starting the “capture”.
- You can stop capturing by pressing Esc.
- To delete the selected object, as in any other programs, you can use the Delete key.
- The F7 button is responsible for saving the edited video.
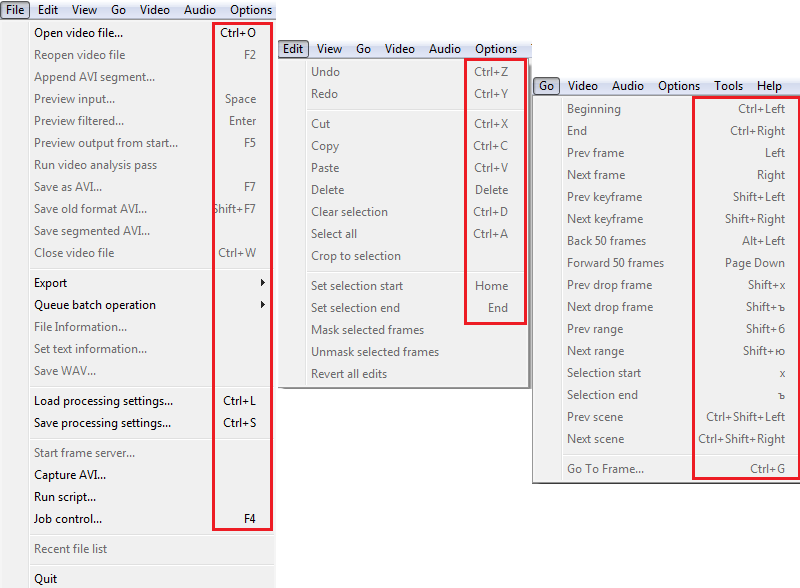
In fact, this is only a small part of the working keys and shortcuts, but initially there is no point in memorizing the combinations: most of them are written in the menu settings sub-items, opposite each of the positions in the drop-down list, which will allow you to learn over time the most important “hot commands” … We will understand further in detail how to carry out the procedure for capturing video from a monitor, since it is for this purpose that utility resources are most often used.
Capturing video
Screen recording is one of the features of VirtualDub. This function is implemented in many highly specialized programs, but VirtualDub copes with the task at a very high level, which makes it possible to use it for this purpose. You need to write down, for example, a detailed guide on how to work in a particular program, record achievements during the passage of the game or for other purposes. Recording is carried out in accordance with the following regulations:
- After opening the main window of the program, through the “File” tab, start the process “Capture video to AVI”.
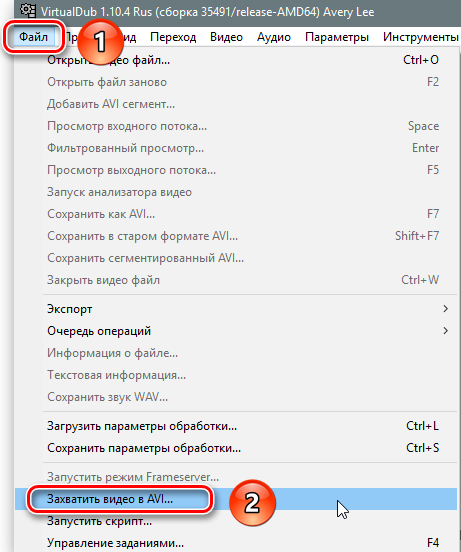
- In the window that opens with the capture settings, go to the “Device” section, where to activate Screen capture.

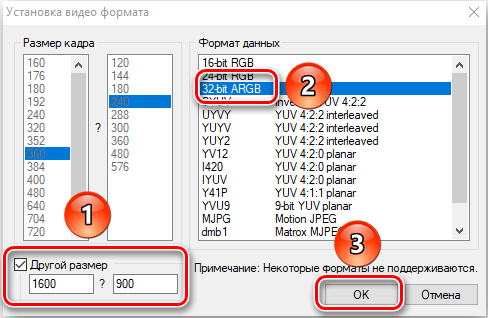
- The capture area will open, with small parameters of the captured image, which can be corrected by making changes in the settings. To this end, you need to go to the “Video” tab, where select the “Set format” item.

- In the opened window called “Setting video format”, you will need to put a “checkbox” opposite the inscription “Other size” at the bottom of the screen, having registered in the free fields of this section the required resolution for correct video recording. In the “Data format” section, leave the 32-bit ARGB video format unchanged, or select it if a different format is activated by default, and confirm the introduced innovations with the OK button.
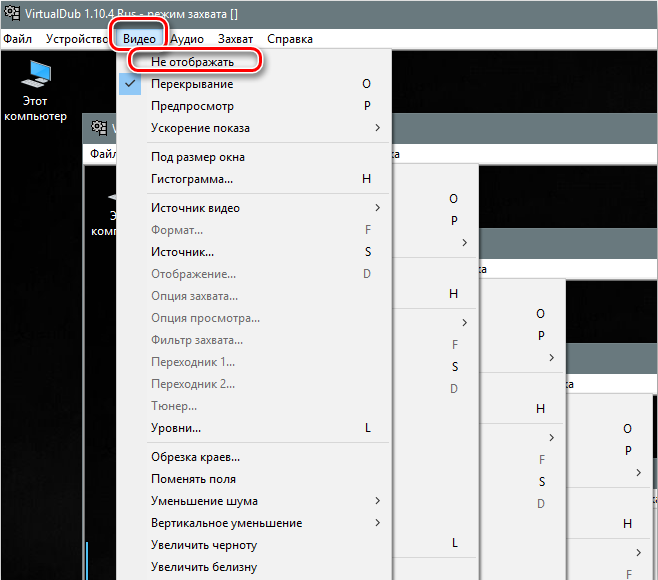
- After these manipulations, several windows will open that are responsible for previewing the recording. It is advisable to close them so as not to overload the PC. The windows are closed by the “Do not display” command in the “Video” tab.
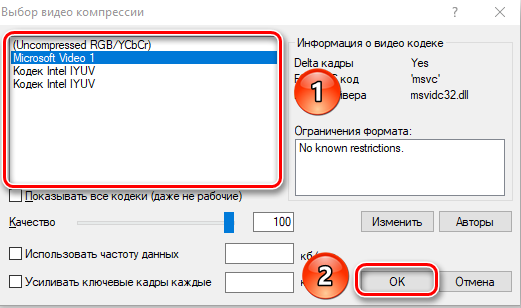
- Further, by calling the compression settings with the C key, it is necessary to set the codec for the recorded video in order to minimize the volumetric parameters of the video. The user will be able to choose the codec according to his needs from the proposed list, in accordance with the requirements for the quality of the original video material. The choice is confirmed with the “OK” button.
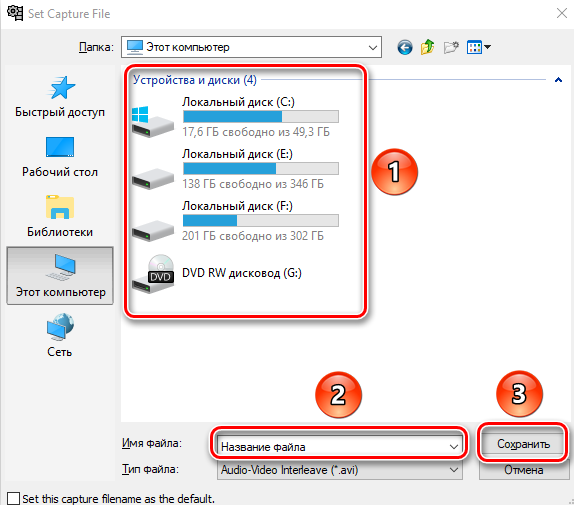
- After that, the user needs to determine the storage location of the recorded material and specify a new file name, which is performed in the window called by the “hot key” F2. The data is confirmed by clicking “Save” in the same window.
- Now you can proceed to recording the material: for this you need to select the “Capture video” item in the “Capture” tab. The fact that video recording is in progress will be informed by the Capture in progress notification in the top line of the program window. The recording process is stopped by selecting the “Stop Capture” command in the “Capture” section.
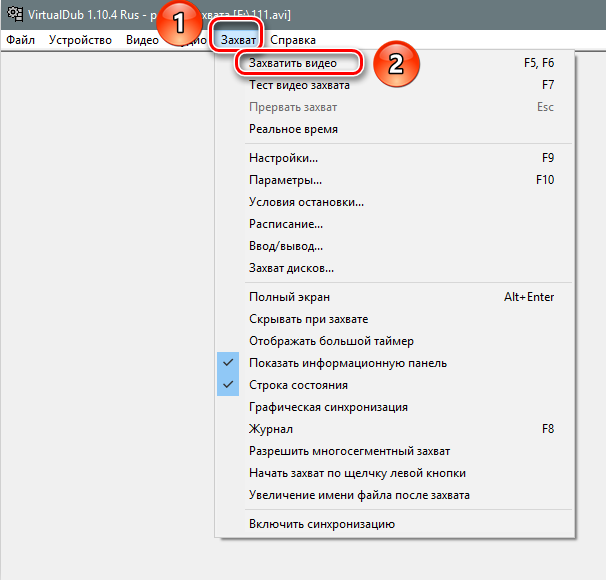
After completing the recording, you can close the program without fear for the safety of the video, since the video object will automatically be placed at the pre-specified address under the name specified by the user.
Remove audio from a video file
Sometimes, when working with video files, it becomes necessary to delete the audio track, which VirtualDub allows you to cope with. To complete this task, you will need to carry out the following simple manipulations in the following sequence:
- Select a video file, the removal of the audio track from which is necessary for the performer.
- Go to the “Audio” section of the menu on the horizontal taskbar at the top of the screen, where in the drop-down list activate the “No audio” mode.
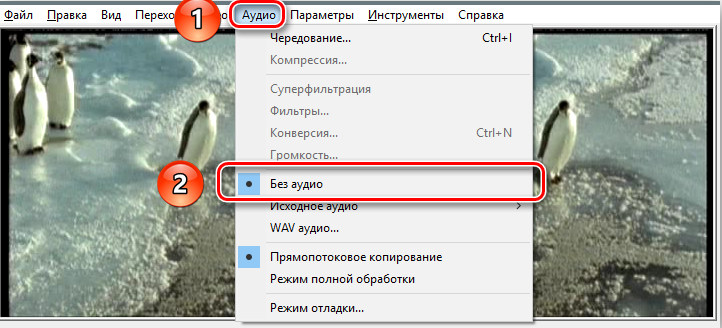
- Save the modified video file by pressing the F7 key, followed by specifying the area for saving the object and its new name, and confirming the command with the “Save” button.
The program will automatically save the file without an audio track, which will allow you to work as you wish in the future.
Editing video files
VirtualDub has decent functionality for editing video files. To work with an object, you need to initially load it into the program, which is done through the “File” menu, with the subsequent activation of the “Open video file” item, or by simultaneously pressing the Ctrl and O keys, and select the object on the PC that requires editing, confirming the command the “Open” button. If the manipulation is performed correctly, two identical images will open in the main window of the utility, where the first is the original version of the video, and the second is the modified version, which will indicate the possibility of further work with the object. Since the functionality of the program is multifaceted, we will consider in detail only some of the most popular manipulations, on the basis of which you can acquire skills in working with the utility,which will allow in the future to carry out more complex tasks.

First, let’s figure out how to crop a video file in VirtualDub or cut a fragment necessary for further work. For this purpose, it is enough to use the scale under the opened video and the tools below it: by moving the slider in the form of a notch, the user marks the beginning and end of the section intended for deletion or saving. If cropping with subsequent deletion of a fragment is required, it is enough to press Delete on the keyboard after setting the boundaries of the site. If you need to save the object, then you need to select the command “Save as AVI” in the “File” section, giving a name to the selected object.
The program also allows you to combine several videos into a single whole, which is done by adding new fragments to the main video file through the “Add AVI segment” item located in the “File” tab. The added segment, or several videos, will be automatically “attached” to the main video in the order of loading. The resources of the program also allow you to correct the situation when the video file has a “wrong” location: upside down or filmed at an inconvenient angle for viewing. You can rotate the image as follows:
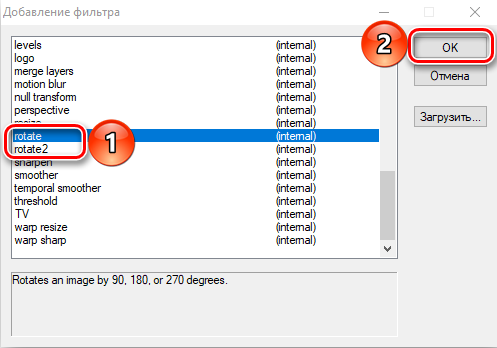
- Through the item “Filters” in the “Video” section of the menu, select the “Add” setting.
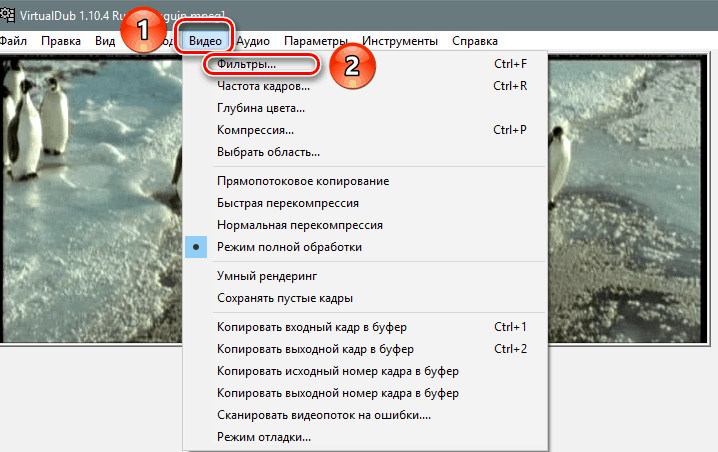
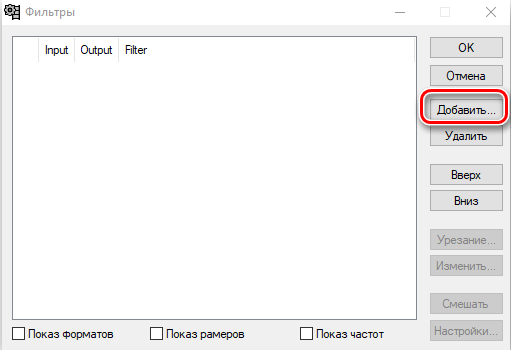
- In the “Add” section, activate the Rotate filter if the standard rotation is 90 or 180 degrees. If the degree of rotation is not the reference, you will need to select the Rotate2 task, where you can set an individual video rotation schedule.
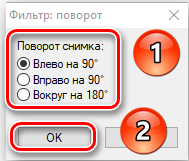
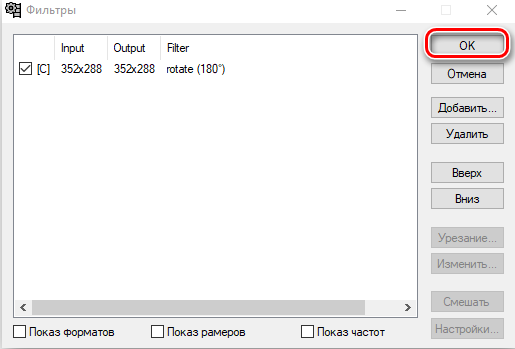
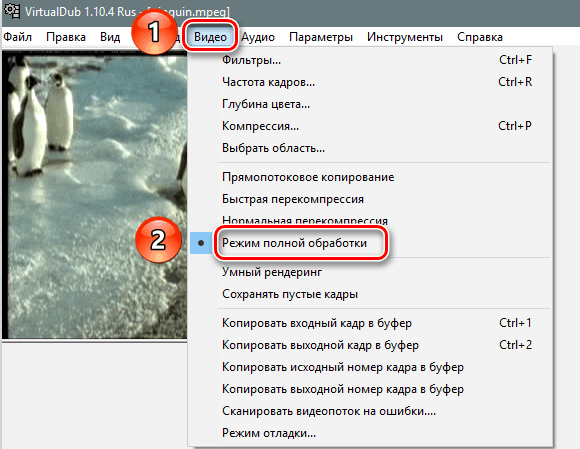
- After changing the angle of rotation of the image, it remains only to confirm the command with the “OK” key, set the file to “Full processing mode” in the “Video” section and save the object.
The program also allows you to make GIF animation of a video file or its fragment. Processing using animation is carried out in accordance with the following regulations:
- First, a video is uploaded, which the user intends to convert. If you need to animate a part of the file, trim it according to the above instructions.
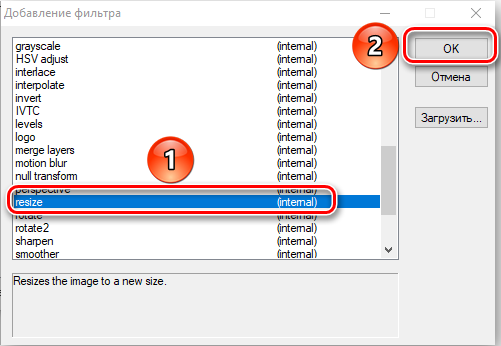
- If the file has a high resolution, to reduce errors or processing time, it will need to be reduced. To do this, go to the “Filters” section in the “Video” tab, then activate the “Add” item in the right pane of the window.
- From the offered filter registry, select the Resize item, which is responsible for resizing.
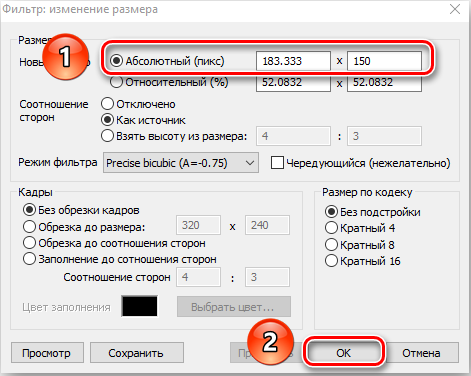
- In the window that opens, set in the first line the value “Absolute”, in the position “Aspect ratio” – “As source”, and confirm the actions with the “OK” button at the bottom of the screen.
- In the next window, the program will display a user-defined filter, opposite which you will need to put a “tick” and confirm the installation with the “OK” key.
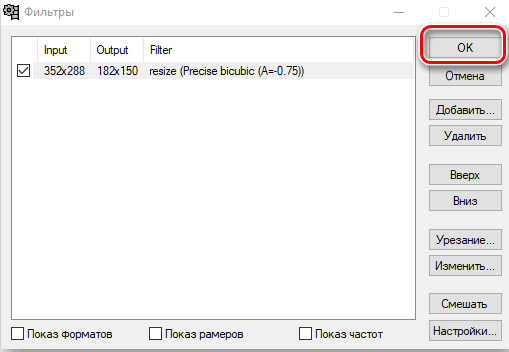
- At this point, the compression of the image can be considered completed, the result will be displayed in the preview window.
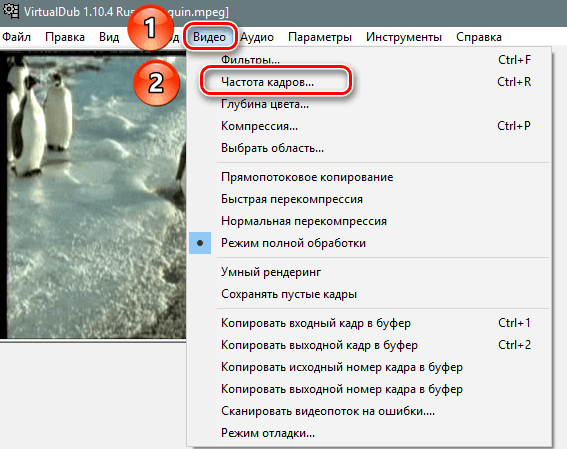
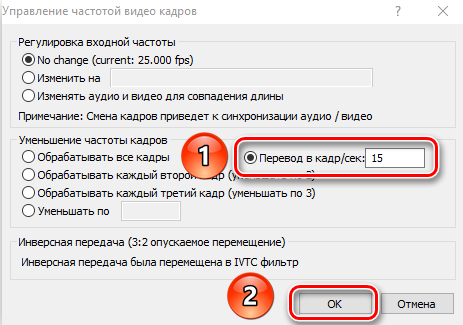
- The next step is to change the frame rate. To complete the task, go through the “Video” item to the “Frame rate” section, where in the “Frame transfer” line set a value from 10 to 15.
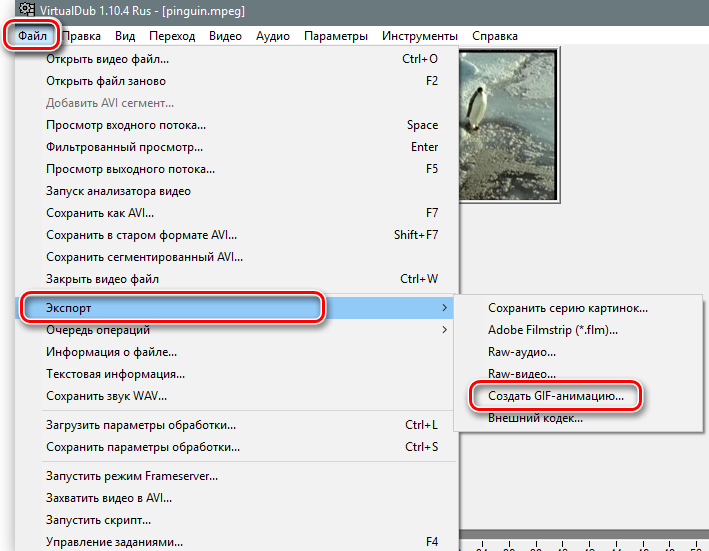
- Saving an animated object is performed by entering the “Export” menu through the “File” tab, followed by a transition to the “Create GIF …” item, where in the settings window you will need to specify the name of the output video file and parameters for animation playback.
- It remains to click on the icon of three dots opposite the file name, which will allow you to select the location of the finished object, and apply the “Save” command located at the bottom of the screen.
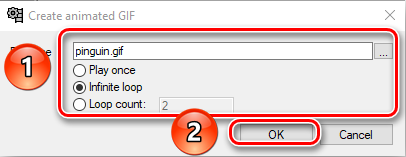
Usually, the process of converting a video file does not take much time, the user can view the result of the performed manipulations by opening the finished file in the folder where it was saved. Having considered the main options and capabilities of the program, let’s move on to the stage of studying the nuances of saving a video file, including when it is supposed to change the extension of an object.
Saving the edited clip
The final stage of the editing work is precisely the saving of the object, which will allow you to further dispose of the video file for its intended purpose. In a situation where a video file needs to be saved in a standard format, the process is not difficult, it consists in performing such simple manipulations:
- One by one, in the “Audio” and “Video” sections, activate the “Direct stream copying” item.
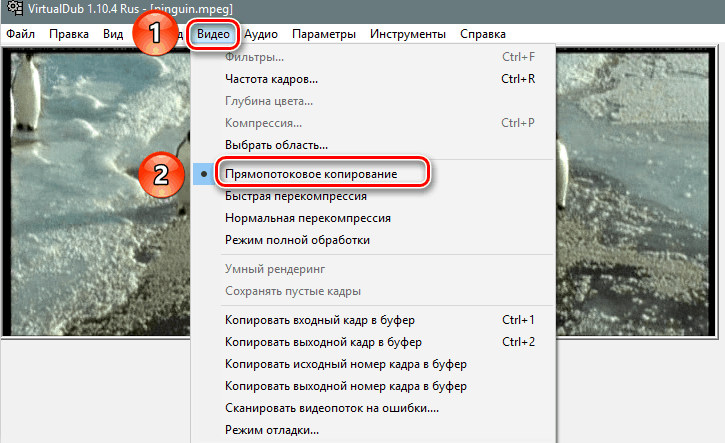
- In the “File” tab, select the “Save as AVI” task.

If the video file needs to be saved in a different format, the task is a little more complicated, but it is also done. For example, if you need to save a file and at the same time re-encode both sound and video, you will need to do the following:
- In the “Audio” section, activate the “Full processing mode”, and in the “Compression” item, set the desired codec for sound, for example, recode audio to mp3.
- Perform similar manipulations in the “Video” section, setting the required format for the video file, for example, the popular DivX.
- Save video after setting the quality of the final video file.
The saving process, with the simultaneous conversion of the video file, can take a long period, the duration of which proportionally depends on the specified settings and PC performance. More complex in the VirtualDub program is working with mp4 and MOV files. In order to be able to work with these formats, you will have to download special plugins:
- First, it is worth checking in the root directory of the program for the presence of folders named plugins32 and plugins64. If the specified objects are absent, you will have to create them manually.
- Next, you need to find the FccHandler Mirror module on the network, designed for the VirtualDub software, and download it to your PC.
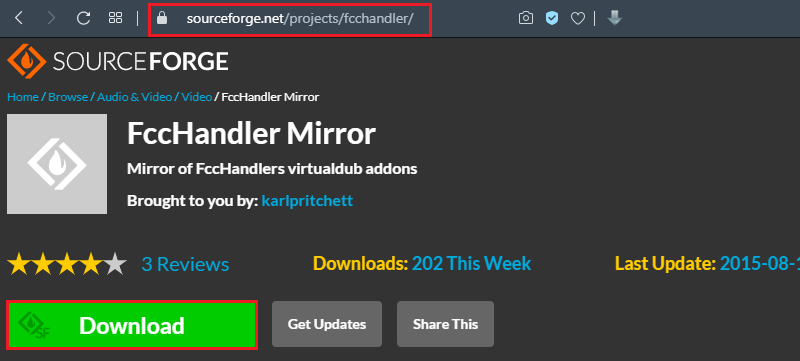
- After that, you need to extract the Quick Time.vdplugin and Quick Time64.vdplugin objects from the archive into plugins32 and plugins64, respectively.
- All that remains is to install the ffdshow codec according to the “Installation Wizard” guide, first downloading it from the network, then activate VirtualDub and try to open the video file with the MOV or mp4 extension. The object must be compatible with the bitness of the OS.
If all manipulations are performed correctly, and the working tools are downloaded from reliable resources, in the future you can not only work with files in standard formats, but also save the processed video to mp4 or MOV according to the above instructions.
Summarizing
The VirtualDub program is an excellent free tool for working with video files, but despite its simple and intuitive interface, it has certain features that will have to be dealt with in order for the workflow to become operational, and the result of the manipulations done to meet the expectations of the performer. The nuances of working in the program described in the article will allow you to figure out how to create your own video or video tutorial, process any video that requires modernization, according to personal preferences.