Many gamers, using gaming software on computers running Windows 10, face various problems in the form of errors and failures that occur during installation, starting the game or already in the process. Games and programs that previously functioned without problems may stop starting when the system is updated to the “dozen”. And there are many reasons for this. Syndicate fans also did not pass by the malfunction. Let’s figure out what this startup problem may be related to and how to fix it depending on the source of the trouble.

Contents
Installing DirectX 9.0c
One of the most common reasons why Syndicate won’t launch on Windows 10 is DirectX incompatibility. To ensure the interaction of the device with multimedia, a set of components is required on it, in the specific case DirectX 9.0c, which is absent by default in Windows 10. The system comes with DirectX 12, while Syndicate or other old software requires an earlier version …
So, if the software does not start or the system generates errors, in the description of which files of executable libraries (for example, d3dx9_35.dll), you need to install a suitable DirectX package. It is easy to do this:
- download the package of components from the official resource. We do not run the file, because the system will generate an error that says that the installed OS libraries do not match (to install DirectX 9.0c, an earlier version of Windows is needed);


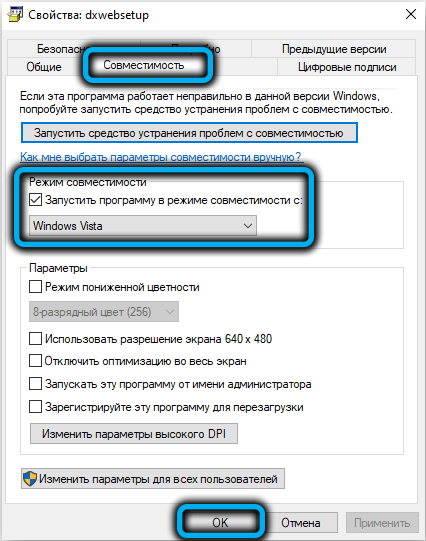
- to activate the compatibility mode, click on the downloaded PCM file and select “Properties” from the context menu;

- in the properties window go to the “Compatibility” tab and mark the item “Run the program in compatibility mode” here, then select “Windows Vista” from the drop-down list. Click “Ok” at the bottom of the window, then “Apply”;
- now we launch the downloaded library file, accept the terms of the agreement and click “Next”;

- we are waiting for the installation of the components and at the end of the procedure, click “Finish”.

Installing Visual C ++ and Microsoft .NET Framework 3.5
In addition to the incompatible version of DirectX, the reason for the problem starting the game is often the outdated Visual C ++ and .NET Framework. The next thing to do if Syndicate does not start, while the start of the software is accompanied by the appearance of errors, the description of which contains the names of the files “MSVCR120.dll”, “VCRUNTIME140.dll” and “runtime-x32.dll” – is the installation of these libraries :
- download, taking into account the bitness of the system from the official website and install on the computer a set of components of the Microsoft Visual C ++ environment, which ensures the launch of applications that were developed in the C ++ language in Visual Studio;
- download and install the NET Framework 3.5 installation file, which is responsible for the correct operation of the installed software, from the Microsoft website.

The process of installing the Framework can also be performed through the standard snap-in “Control Panel”. It’s easy to do, let’s take a closer look at how:
- go to the Control Panel (for example, go from the “Start” context menu);

- click Programs – Programs and Features, then in the window from the menu on the left, select “Enable or disable Windows components” (you can also go to the Windows components window through the “Run” (Win + R) console using the OptionalFeatures command);


- in the window that opens, in the list of components, mark the line “.NET Framework 3.5 (includes .NET 2.0 and 3.0)” and click “OK”;

- to install files that are not in the system, in the window that opens, we allow Windows Update to download them, after which an automatic installation will occur on the computer, the process of which can be monitored thanks to the display of the progress bar;


- the system will notify the end of the process with a corresponding message on the screen, after which you can try to start the game again.

Updating graphics card drivers
Usually games of this kind refer to the video card, and if the drivers are damaged or outdated, it is highly likely that nothing will open. So, if Syndicate does not start, perhaps this is the case.

You can update the video card drivers in different ways, for example, through Windows Update or through the Device Manager, but it is better to go to the official website of the graphics adapter manufacturer, where there is always the latest software, and download them manually from there. In the “Drivers” section of the website, you can find and download the appropriate up-to-date software, taking into account the system version.
Increasing the paging file
If the software does not have enough RAM to work, a swap file is used, where the necessary components of the game can be placed. So, when it is disabled or its volume is insufficient, this may be the reason why Syndicate does not start on the computer, so we will consider what to do in this case.
To activate the swap file or increase its size, perform the following steps:
- to configure the function, press RMB on the “This computer” shortcut on the desktop and go from the context menu to the properties by selecting the appropriate item (an alternative way to open the window involves accessing the Control Panel, where you need to go to the “System and Security” – “System” section );

- in the left menu of the properties window, select “Additional system parameters”;

- on the “Advanced” tab in the “Performance” block, click “Options …”;

- in the window of performance parameters, select the “Advanced” tab and in the “Virtual memory” block, press the “Change …” button;

- uncheck the box “Automatically select the size of the paging file”, mark “Specify size” and write the required values in the appropriate fields;

- save the settings by clicking the “OK” button. We close the windows.

Direct Play Activation
Early versions of Windows assumed the use of Direct Play libraries to start gaming software. In the 10th version of the system, the option is inactive by default, which becomes the reason that some games, in particular old ones, may not start. The problem is solved by activating the library in Windows 10. This can be done in just a few clicks:
- go to the Windows components window through the Control Panel or using the Run console (Win + R) and the OptionalFeatures command;
- scroll down the list of components, find here “Components of previous versions” and mark the item with a tick;

- open the directory by clicking on it and activate DirectPlay, click “Ok” at the bottom of the window;

- reboot the system for the changes to take effect.
Enabling Compatibility Mode
Another proven way to solve the problem with running old games on Windows 10 is to activate compatibility mode, which allows you to emulate the functioning of earlier versions of the operating system. You can enable it using the standard OS toolkit.
Using the troubleshooter
In the arsenal of the standard Windows utility there is an option that allows you to easily complete a task in several steps:
- go to the Control Panel in any convenient way, for example, through the “Start” menu;

- select the “Troubleshooting” section. To facilitate the search, set the view type “Large icons”;

- in the window that opens, select the “Programs” item (Execution of programs intended for previous versions of Windows), which will launch the “Eliminate compatibility problems” utility;


- click “Advanced” and in the line that opens “Run as administrator”, after which the utility will restart with privileges;

- press “Advanced” again, mark the item “Automatically apply changes” and press the button “Next”;
- wait while the utility performs problem detection;

- upon completion of the diagnosis, we will receive a list of the problem software. If the required application is not displayed in the resulting list, select the item “Not in the list”, then click “Next”;

- the next window involves choosing the path to the directory where the software is located, for which we click “Browse” and in the explorer that opens, we find the application, select it with the mouse and click “Open”;

- the line in the compatibility troubleshooting window will be filled with the address of the software location, click “Next” to continue;
- the utility will analyze the selected software and find startup problems;
- in the next window, select the line “Program diagnostics”;

- mark the first item in the list of problems that appears “The program worked in previous versions of Windows, but it is not installed or does not start now”, click “Next”;

- indicate which version of the OS the program previously worked with, go to the next stage of the procedure by clicking “Next”;

- the changes will be applied. Now you can check the program by pressing the corresponding button. If everything works, click “Next”;

- this completes the diagnostics and troubleshooting, we save these parameters for the program;
- we are waiting for the completion of the saving process, after which the window will close, and the user will have access to information about fixing the problem. Close the troubleshooter.
By changing the properties of the shortcut
If the first method did not give results, we try to complete the task by doing the following:
- press RMB on the shortcut of the problematic software, go to properties;
- in the properties window go to the “Compatibility” tab, where we enable the option (put a tick next to the item) “Run the program in compatibility mode” and in the drop-down list select the OS version in which the game was launched;
- in the same window, you can also check the “Run this program as administrator” item. Click “Ok”.

Deactivation of conflicting applications
Software conflicts are one of the most common causes of application launch problems. So, to fix this problem with the start of Syndicate, you should try to deactivate the software that prevents it from starting. This is often the antivirus or Windows firewall. Security software usually blocks the start of programs downloaded from unofficial sources. You can turn off the antivirus to check the assumption, and if so, add the game to the list of exceptions or remove the program that interferes with the launch if it is not needed. Removing the software is performed using the appropriate option in the Control Panel and special utilities.

Now you know what to do if Syndicate does not start on Windows 10. In the comments, tell us if the above methods helped in your case, and if so, what exactly solved the problem?