This is a simple instruction on how to record what happens on the screen of an Android device (what I do on the phone while using it). The recording is saved in the memory of the phone, in high quality (HD video, 720p) and in mp4 format, which can be directly uploaded to YouTube or edited with any program on the PC.
The advantage of the method used here is that it is not necessary to be root and it can be done without installing applications. The disadvantage is that the phone must have Android 4.4 or a higher version (see footnote for alternatives for other versions). Audio is not recorded either.
Step 1. Prepare the Android phone
Go to Settings > About phone . Tap seven times on Build Number . A message will appear stating that Developer / Developer Options have been activated . Return to the Settings screen, tap on Developer / Developer Options and turn the switch ON . On the same screen, check the box that corresponds to USB Debugging and Show touches .
Step 2. Prepare the PC (Windows)
- Download and install the minimal ADB and Fastboot:
forum.xda-developers.com/showthread.php?t=2317790 - Download and install the universal ADB driver (works for most Android devices):
koushikdutta.com/post/universal-adb-driver
Note : The above resources are unofficial, easier and more direct alternatives to install / use. The other longer and more complex option is to download the Android SDK ( android.com ) and “configure” the ADB tool. For the second, you would have to look for the mobile driver on the manufacturer’s website.
Step 3. Connect the phone to the PC
Using the micro USB cable. If this is the first time they are connecting, the phone will display a message requesting that USB debugging be allowed . Click OK .
Step 4. Start recording


Screen recording started on the Motorola Moto G Second Generation. Resulting video in HD resolution, at 60 frames per second.
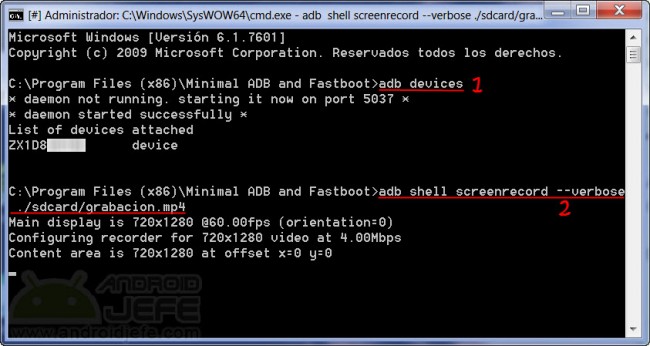
First, to confirm that the phone is correctly connected, in the ADB tool write the following:
adb devices
Press Enter. This should return information from the device, indicating that it is properly connected. Once this is confirmed, write the following command, which will be in charge of ordering the start of the recording:
adb shell screenrecord --verbose ./sdcard/grabacion.mp4
Press Enter. Recording has started. You have to go to the phone and do everything you want on it, without disconnecting it from the computer. To end the video, go back to the ADB tool on the PC and press Ctrl + C. This stops the recording and saves the video in the device memory (sdcard) with the name record.mp4 , which can be located with a file explorer like ES File Explorer .
Video quality
Advanced users can go to the help page on this topic ( developer.android.com/tools/help/adb.html#screenrecord ), where they can add other parameters to the above command to vary the quality of the video. By default and if the mobile supports it, the previous command records at the same resolution that the phone screen has. When the screen is not HD (1280 × 720) the parameter --size allows changing the video resolution, although this may not provide the best result.
In other versions of Android other than 4.4
For Android 4.3 and lower, the recording of what is done on the device is possible as long as the mobile has root, through an application like Z Screen Recorder. On the other hand, Android 5 records the screen without root through an application such as Lollipop Screen Recorder or iLos Screen Recorder (both free on Google Play) without the need to connect the phone to the PC as it has been done here.
How to RECORD the cell phone screen
How to record screen on Android Jelly Bean and old versions (Root)
3 ways to record INTERNAL Android audio
Receive updates: SUBSCRIBE by email and join 10,000+ readers. Follow this blog on Facebook and Twitter.