iVMS 4500 is a mobile application that allows you to connect to your DVR video surveillance system from your mobile. In this way you can see the security cameras of your home or office on the cell phone.
Contents
IVMS 4500 configuration
Setting up this app is relatively easy. The most standard process is to manually add the DVR information to the application.
What we explain next is to do two things: configure local access and remote access. The first will be used to see the cameras even WITHOUT the internet (but always connected to the same WiFi that the DVR is under). The second, to see the cameras through the Internet from anywhere in the world.

Requirements
Before you start, the DVR must already be connected to the network. You should also have a static IP address reserved on your network modem or router. In the settings of that DVR you must also have assigned the same IP.
This is a separate topic, but a lot of information can be found online on how to do all of this. The procedure will vary depending on the brand of the modem / router (here the instructions for Linksys, Tplink, Dlink or Netgear) and the DVR (here the Hikvision DVR equipment manuals).
Once the iVMS application is installed on the cell phone, open and indicate the region in which you are. Then:
- Touch the button at the top left to open the menu.
- Select “Devices”.
- Tap the “+” button at the top right.
- Choose the option “Add manually”.
For the local and remote access configuration do the following.
Local access

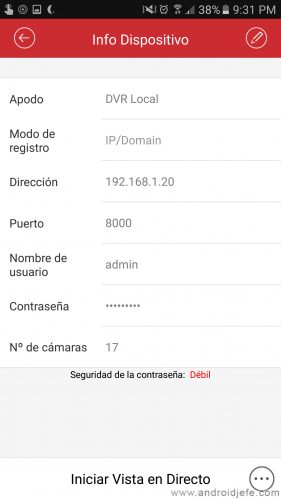
The values to be entered in the iVMS 4500 app are as follows:
Nickname: Local DVR (o lo que sea que desees poner)
Registration mode: IP / Domain
Address: 123.123.123.123
Port: 8000
Username: example
Password: example
The values in red will vary in each case. In “Address” you must put the fixed local IP that should have been previously configured. In “Username” and “Password” you must enter the same data that was configured on the DVR (the username and password that was set in the initial configuration of the equipment). Port 8000 is the one configured by default in the application and in Hikvision DVRs, so it is better to use that same value.
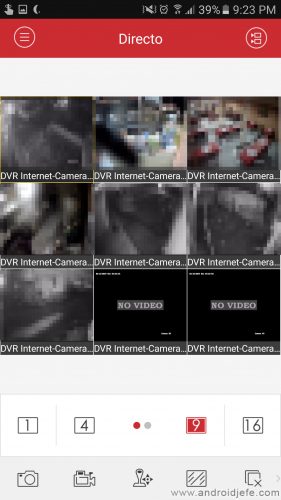
If everything is correct, pressing the “Start Live View” button will show the cameras.
Remote internet access
There are two ways. The easiest is to configure the online platform of the DVR and enter this data in the iVMS app. If the manufacturer of the DVR does not have this platform, you will be obliged to contract a public IP from your Internet provider and do a port mapping on your router.
In both cases, make sure you meet the requirements mentioned above. In other words, connect the DVR to the network and set the static IP.
Online DVR platform
In the case of Hikvision DVRs, the platform is called Hik-connect . In the settings of your DVR, make sure to activate this platform and that the DVR is «online».
The iVMS 4500 app incorporates the option to view the cameras through this platform. In the side menu, tap on “Hik Connect”, create an account and log in. Then you can enter the serial number of your DVR to link it to that account and that’s it. You will already have remote access from anywhere to your DVR.
You can also create a Hik Connect account at hik-connect.com. There is also a Hik Connect mobile app from which you also have access to cameras. It is also useful when it is required to unlink your DVR from an account to which it is currently linked and does not allow you to link it to your current account.
Public IP
A public IP is a global identifier for your network. It allows you direct access to your router / modem, from anywhere in the world. An intermediary platform like the one just mentioned is not necessary.
To find out if you have a public IP address accessible from anywhere, you can search for “what is my IP” on Google and several pages will appear that will offer this information. This IP address is entered into the address bar of the web browser. This action should return the login page of your router or modem. If not, then you don’t have a functional public IP. You must hire it from your ISP or internet provider.
If you already have a public IP, but it changes from time to time (dynamic) and you lose access to your cameras every time this happens, you can ask your ISP to change you to a static or fixed public IP. If this has an additional cost, you can use a DDNS system. There are free DDNS services such as NO-IP. If you have a Hikvision DVR, this manufacturer has its own HiDDNS service.
Port settings on modem / router
In addition to having the public IP, in order for the cameras to be seen by the cell phone via the internet, it is necessary to configure the router or modem so that the requests for access from the internet are redirected to the DVR.
This is done by configuring the so-called ports or modem and / or router. Technically, this procedure is called “opening” ports, port mapping or port forward in English.
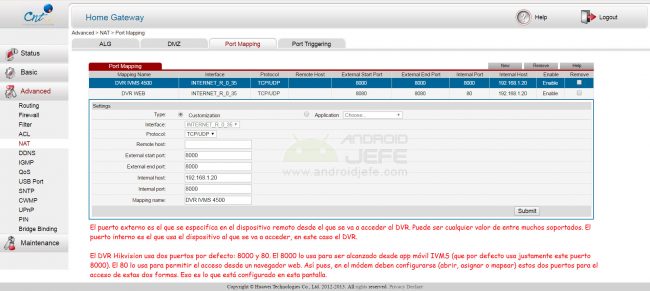
In the case of a Hikvision DVR, it uses three ports by default. Two of them matter to us here. Port number 80 and 8000 (can be seen in the DVR network settings). The DVR can be accessed through port 80 through a web browser. Through port 8000 the DVR is entered from the iVMS application. These two ports are the ones that must be “opened” in the modem or router to establish a connection.
The port opening procedure is a topic that varies from one modem and / or router to another, and it is impossible to talk about each case. However, to get an idea, below is the opening or correct mapping of ports 80 and 8000 for a Huawei HG532S modem:


The DVR has a fixed local IP 192.168.1.20. Click on the image to enlarge.
The Port Forward website offers manuals on how to open ports on each of the existing modem or router brands.
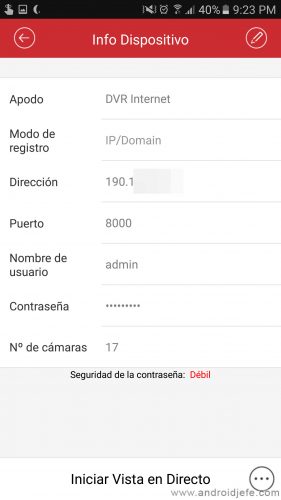
After ports 80 and 8000 are successfully opened on the modem / router, go to the iVMS 4500 mobile app, add a device manually, and enter the following information:
Nickname: Internet DVR
Registration mode: IP / Domain
Address: 321.321.321.321
Port: 8000
Username: example
Password: example

They are practically the same data as when we configured local access. The only critical variant is the direction. Here you have to put the public IP address of your internet connection.
As in the previous case, if everything is correctly configured, by touching the “Start Live View” button you can see the cameras from anywhere in the world.
The advantage of having a public IP is that, if you did the above correctly, you can enter this IP in a web browser on any device and see your cameras. An application is not required.
Connection error on iVMS 4500
The two most common errors that appear when tapping the “Start Live View” button in the iVMS-4500 application are the following:
«The reception of data from the device expired»
«Connection error»
Generally, these two errors are generated when configuring remote access from the internet. The problem is usually a poor or incomplete modem configuration.
If you are working with public IP, the problem may be due to incorrect opening of the ports mentioned above. It is important to remember that port 80 is used to access the DVR from a web browser. Port 8000 is used to access the DVR from the iVMS application. If the problem is that it cannot be accessed from the iVMS application, you will need to verify the port 8000 assignment.
A simple way to diagnose the possible cause of the connection error is to enter the public IP in your browser. The DVR login page should be displayed. If you get the login page of the modem or router, then surely the modem configuration mentioned above is incorrect, incomplete or does not exist. Internet access requests are not being redirected to the DVR, as it should be.
Links
IVMS 4500 Android App Official Manual : Mediafire (PDF)
Download IVMS 4500 for Android : play.google.com
Receive updates: SUBSCRIBE by email and join 10,000+ readers. Follow this blog on Facebook and Twitter.