It is generally accepted that Word is designed to work with text, and Excel is focused on creating tables. But this is not quite a fair statement.
The functionality of Word is quite extensive. This allows you to work through it and with tables. The user can create a table, edit it and arrange it at his own discretion.
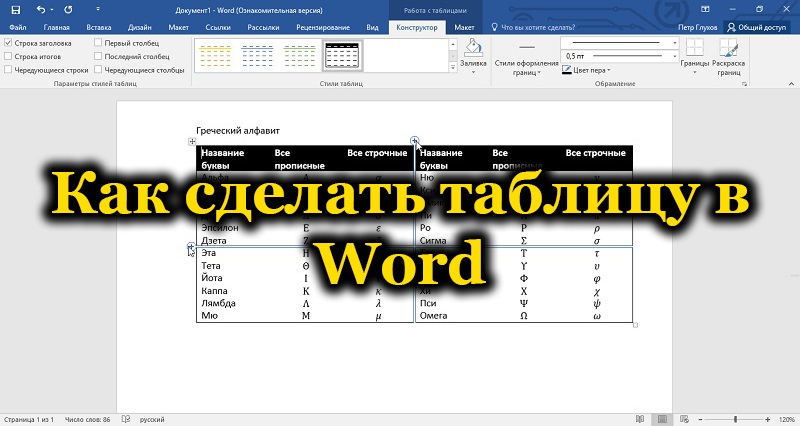
In total, there are several ways to create tables that are available in Word.
Contents
Methods for creating tables
When creating this or that content in the form of text, it is often necessary to supplement it with visual tables. Their content doesn’t matter now. For now, the main thing is to figure out how to make tables in Word and what is required for this.
As mentioned earlier, Word is quite a functional tool. Therefore, there are 6 options at once for how you can create tables in Word. They need to be considered separately.
Standard method
This is the most simple and classic way of how to insert a table and display it in Word. The nuance is that the sizes are limited. It can be from 1 by 1 to 10 by 8 columns and rows.
If you need to add more of these or those components, then you will have to use the methods presented below.
In the case of the classic method, to create a table in a text editor Word, you will need the following step-by-step instructions:
- open the “Insert” tab;

- click on the “Table” button;

- select the required number of rows and columns in a special constructor;
- click on the desired structure with the left button.
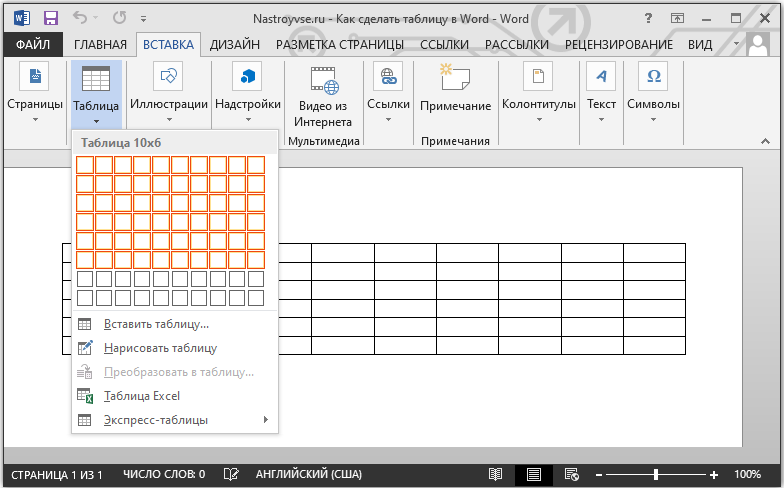
That’s it, now you know how to add the required table available in Word. But since it is limited in the number of columns and rows, this option is not always suitable.
Table with a given width
A distinctive feature of this method is that here you can draw a table in the Word editor using any number of columns and rows.
If you do not know how to draw the desired table in Word using this method, then take a look at the instructions:
- open the “Insert” menu;
- click on the “Table” item;
- click on the line “Insert table”;
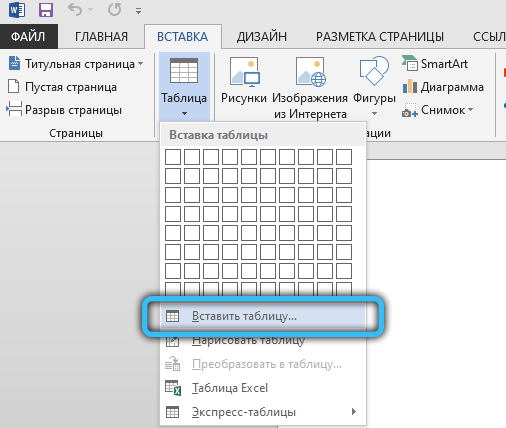
- when a new window opens, write down the necessary parameters there;
- write down how many rows and columns you need;
- set their width, if necessary;
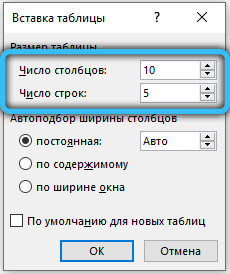
- confirm the entered data with the “OK” button.
That’s all. Job is done. But this is not the last way to add. Alternative options are worth considering.
Painting
Word also allows you to insert a table you need into a document by drawing it.
In this case, a special built-in tool comes to the rescue. Nothing complicated. Many users use this method when they need to create a table with a specific configuration. The idea is to:
- go to the “Insert” tab;
- go to the “Table” section;
- click on the “Draw table” button;
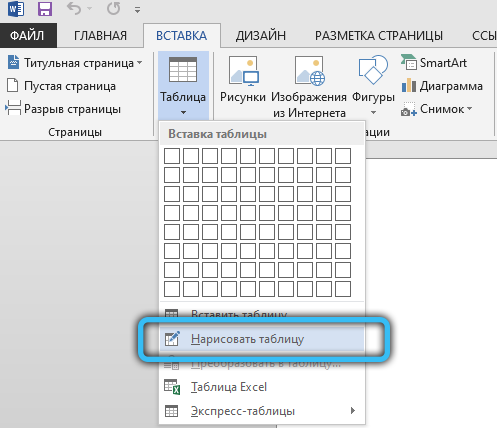
- wait for the pencil tool to appear on the text editor sheet;
- select a rectangular or square area that will act as a border for the table being created;
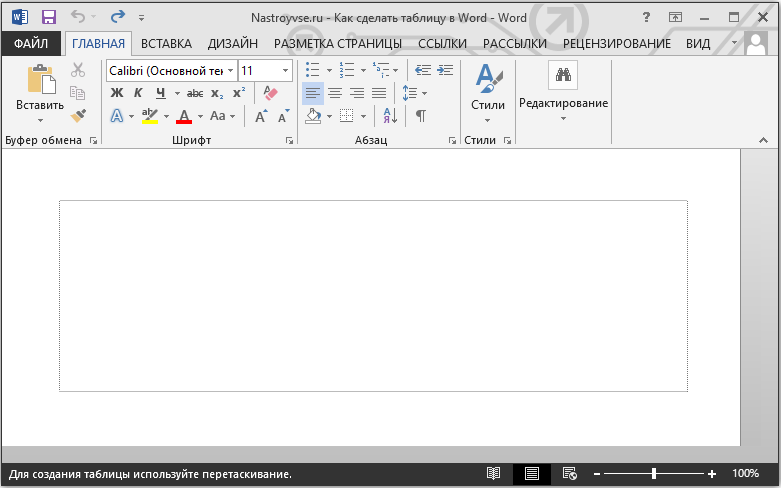
- using a pencil, holding down the left mouse button, draw lines from one border to another;
- draw the number of columns and rows that are needed;

- upon completion of drawing, double-click the left button inside the created table.
This deactivates the pencil and you can continue with normal editing.
If some lines turn out to be superfluous, use an eraser to remove them simply.
Paste from Excel
Microsoft Office is not only universal, but also closely interconnected with each other. This allows you to use the capabilities of one tool within another application.
A good example is the ability to insert Excel tables directly into the Word text editor. Moreover, all its basic features will be provided in the form of adding functions, sheets, formatting and much more.
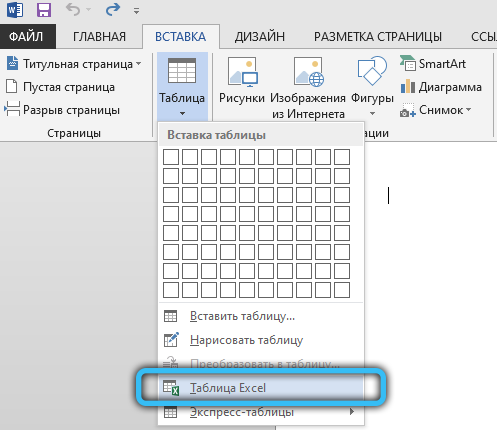
Moreover, it is extremely simple to do this. You need to open the “Insert” tab, and click on the “Table” button. Then select the item “Excel Table”.
Converting text
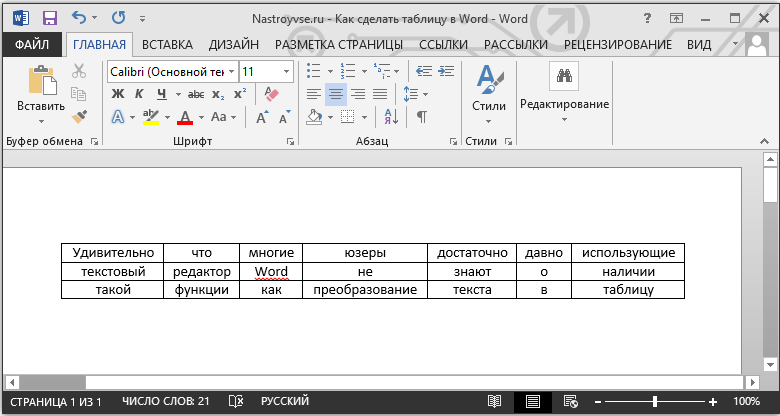
Surprisingly, many users who have been using the Word text editor for a long time do not know about the presence of such a function as converting text to a table.
But this is a fairly easy-to-use tool. To use it, you need to do the following:
- select all or part of the text from which you need to build a table, while holding down the left mouse button;
- go to the “Insert” menu;
- click on the “Table” item;
- in the list of suggested options that opens, click on “Convert to table”;
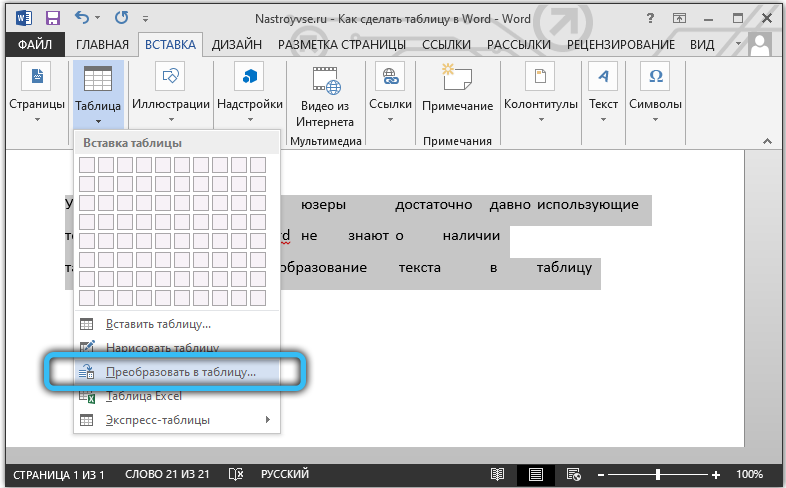
- when a new window appears, set the required parameters for the table;
- specify the required number of columns and rows;
- choose the appropriate width and option for the separator;
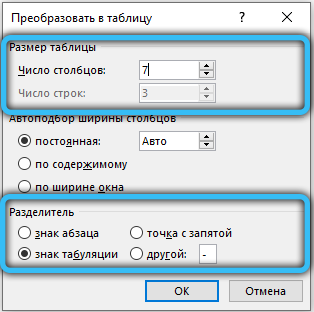
- confirm all changes with the “OK” button.
The preliminary breakdown allows the program to correctly determine the required number of table components. That is, rows and columns. The selected paragraphs will be lines, and the section with columns will contain the text that the user has separated by using tabs.
Express table
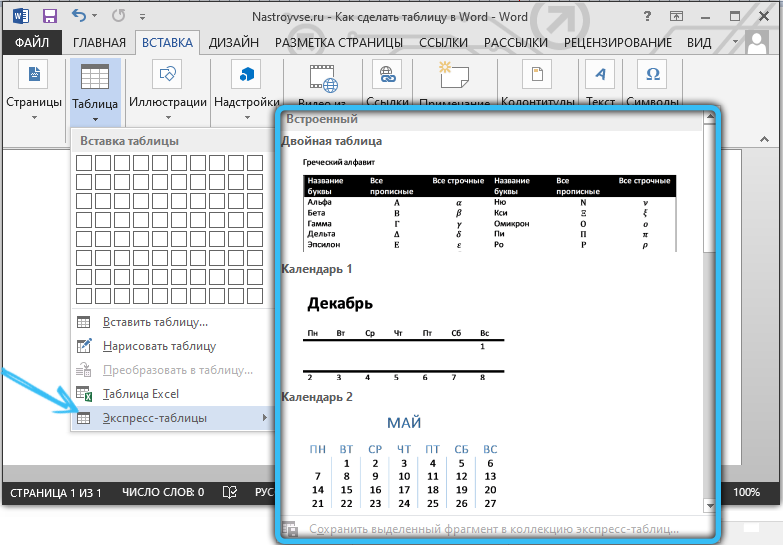
The last, but no less frequently used option, is the use of a tool in the form of a quick spreadsheet. This is a collection of ready-made templates that allows you to add the desired table, which is suitable in terms of its parameters, in just a few clicks.
To do this, you need to open the “Insert” tab, from there go to the “Table” section, and click on the “Express Tables” item. A corresponding list of templates will open, from which the user can already select the most suitable option.
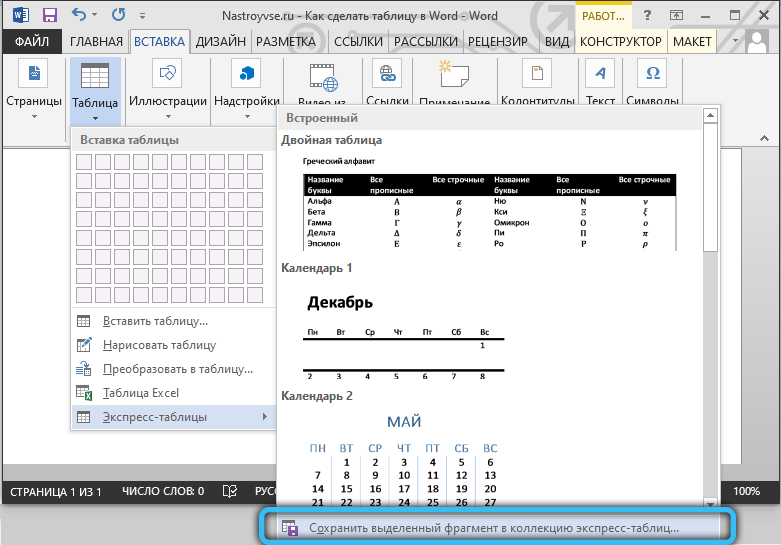
A very relevant tool for those who often work with tables in a text editor and use certain configurations. You can save a copy of such a table, and later use it to work with other text. You don’t have to re-create the structure every time.
To add your version to the number of templates, you need to select the table with the left button, and then click on the button to save the selected fragment to the collection. This command is located just below the list of basic templates.
Editing
It is important to understand that once added, the table is unlikely to have the appearance that the user ultimately needs. Often you have to add, delete, combine and break something into separate cells.
All of this requires table editing skills. It is not difficult to master them. In addition, the functionality of the Word application is quite extensive, but at the same time understandable.
How to add columns and rows
If, when filling out the structure, it turned out that the number of created columns or rows is not enough, it is not necessary to delete everything and create the table anew.
You can just add the missing pieces. Moreover, there are several ways available at once:
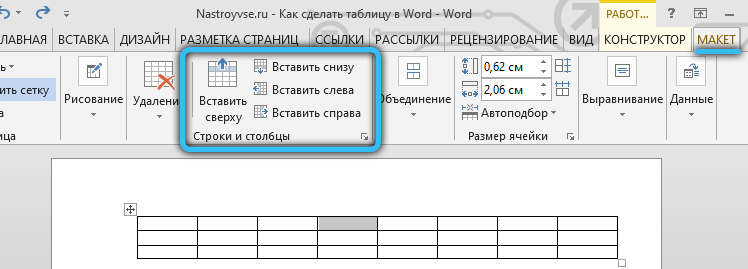
- Click on the table cell next to which you want to add a fragment. Next, in the “Layout” tab, go to the “Rows and Columns” category, and then press the “Insert …” button. You can insert from the left, right, bottom and top. Here you already need to focus on a specific table.
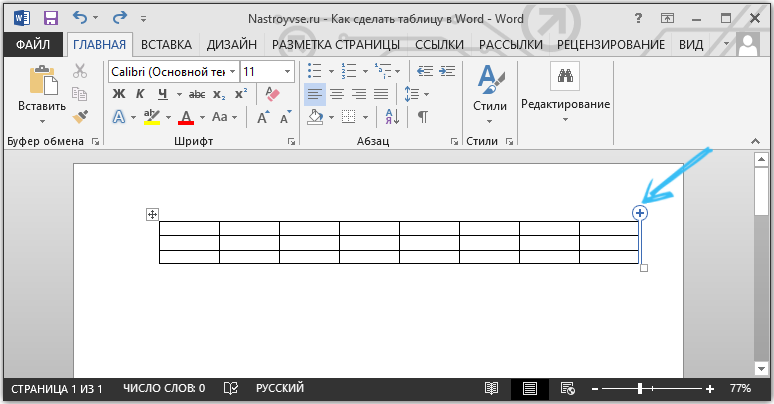
- For another method, move the cursor to the left or top border of the created structure so that it is between the rows or columns. A plus sign will appear, which should be clicked on. This will add the desired element.
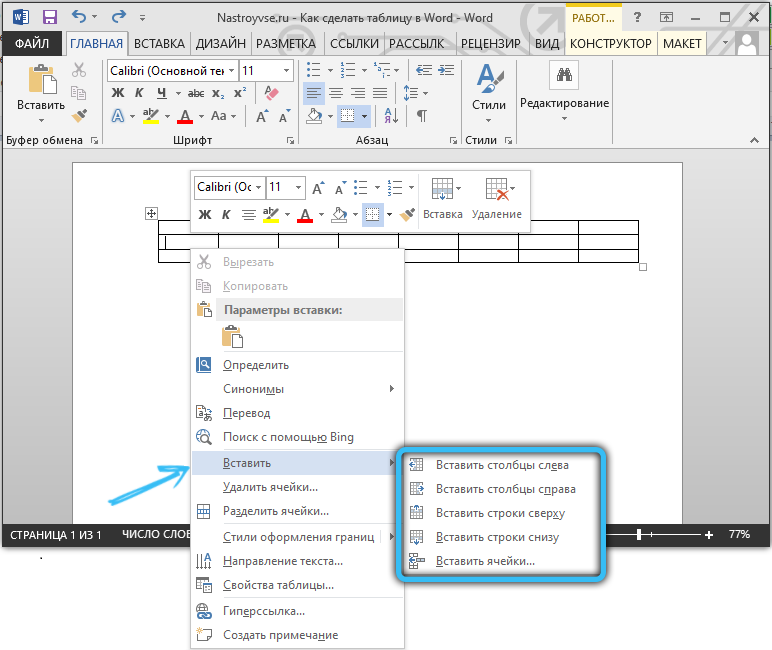
- Press the right button on one of the cells, then click on “Insert”. From the list that appears, all that remains is to choose what exactly needs to be inserted.
- Draw the missing components using the pencil tool. Not the most convenient option, but it suits some.
If you need to add several components to the table at once, then before applying one of the presented methods, select the required number of rows or columns using the left mouse button.
How to remove columns or rows
It also happens that you need to get rid of unnecessary fragments of a previously created table. It is also not a difficult task to complete.
To do this, you must:
- click on the cell of the column or row you want to get rid of;
- go to the “Layout” tab;
- click on the “Delete” button;
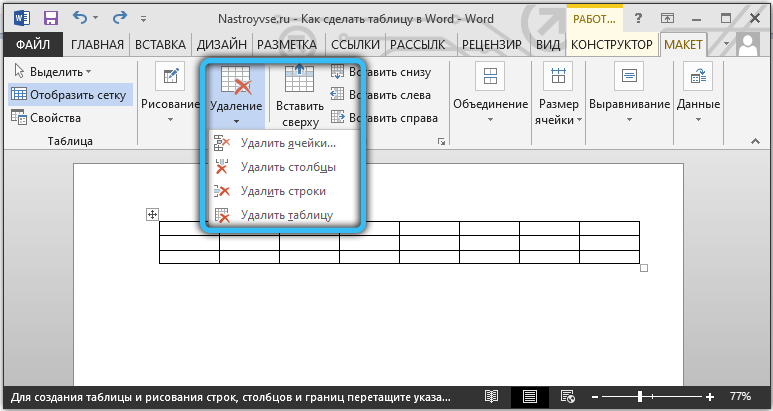
- choose one of the options that the program will offer.
Or use the same eraser. But it is better to use it when the table has not yet begun to be filled with text.
How to merge cells
Having several cells at your disposal, sometimes you need to make one continuous table block from them. To combine, you need to do the following:
- select the required number of cells by holding the left mouse button;
- right-click on the selected area;
- select the item “Combine cells”;
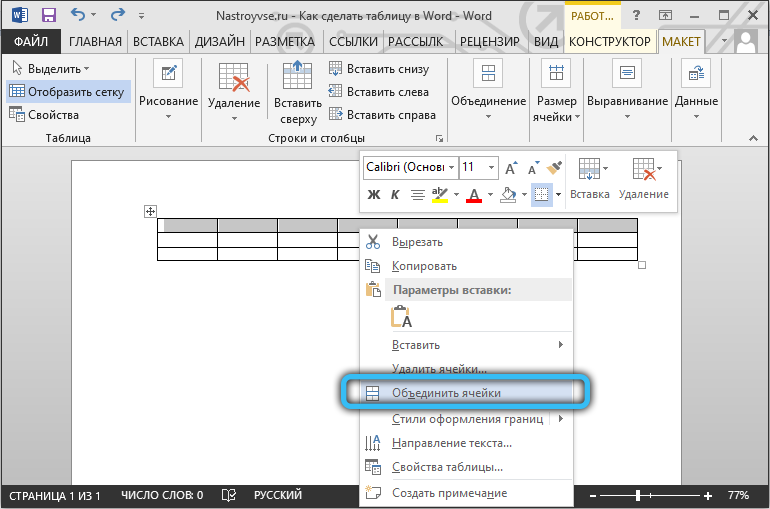
- or use the same function through the “Layout” tab.
The eraser also erases the borders between cells, and thereby merges their contents. But with the eraser, you should work more carefully so as not to break the structure of the table, to keep its neat appearance.
How to lay out cells
This procedure is carried out in cases when you need to create additional columns or rows based on previously created cells.
This is not difficult to do. The instruction looks like this:
- click on the edited cell with the right mouse button;
- select the “Split Cells” item from the opened context menu;
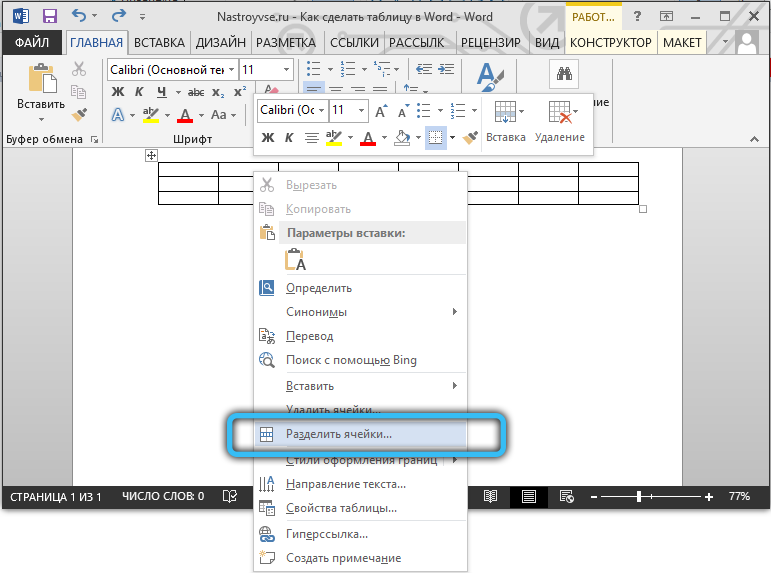
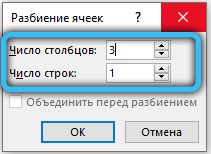
- set the required number of rows and columns in the parameter settings window;
- confirm the changes with the “OK” button.
Alternatively, you can use a pencil. But then you will have to additionally design the table in order to give it the desired appearance. Therefore, the above method usually works better.
Table decoration
The table has been created and edited. But its appearance may not meet the expectations and requirements of the user. It is required to add some design elements.
This will help the tools available in the tab called “Design”. There are several useful functions here at once aimed at improving the appearance of tables and their personalization.
Fill function
A tool such as “Fill” is needed in order to change the color in different cells. Due to this, information is visually grouped in the table, the data becomes visual, and accents can be highlighted.
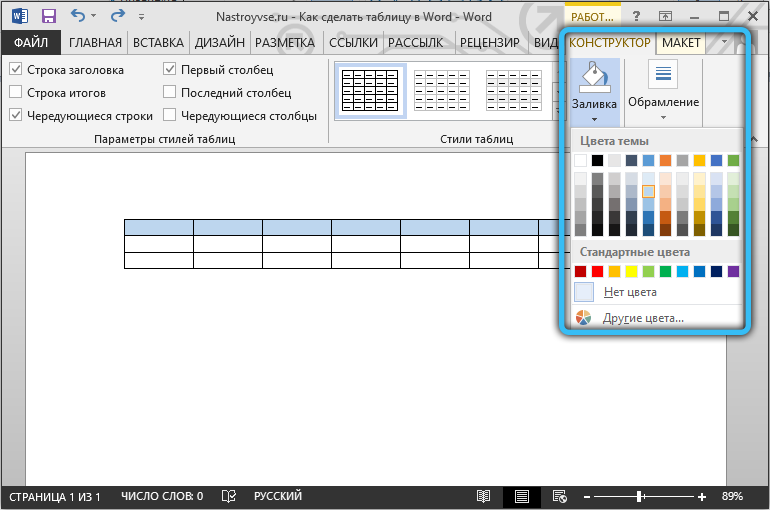
To add or change a color, select the desired cells with the left mouse button, and then click on “Fill”. This tool is located under the Design category of the toolbar.
Then the user selects the desired color. By this principle, you can fill in all the components of the table, or select only the most basic ones.
Style
Styles can be used to change the appearance of a table. To do this, Word provides predefined templates.
The user is given the opportunity to choose the appropriate option available in the text editor collection, and then make the appropriate necessary changes to it.
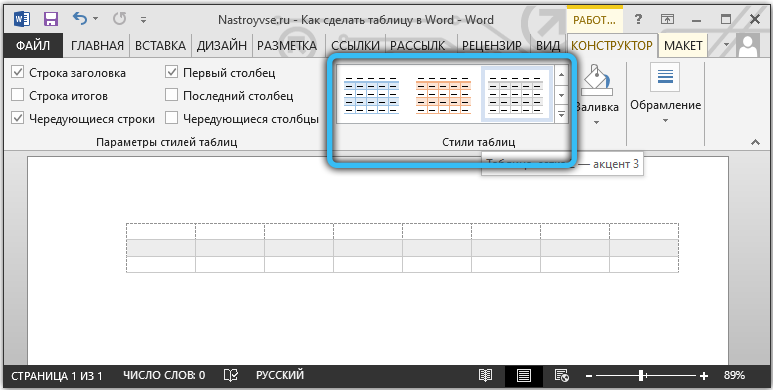
To find these templates, just go to the “Design” tab and then select the “Table Styles” group.
Change the width and height of cells
Table cells do not always contain the same amount of information. Therefore, they need to be edited and designed so that they look as organic and beautiful as possible. At the same time, they performed their direct functions.
You can use the Layout tab to change the width or height for the cells.
Here the instruction will look like this:
- select the required cells with the left mouse button;
- open the “Layout” tab;
- set new values in the corresponding fields (Width and Height).
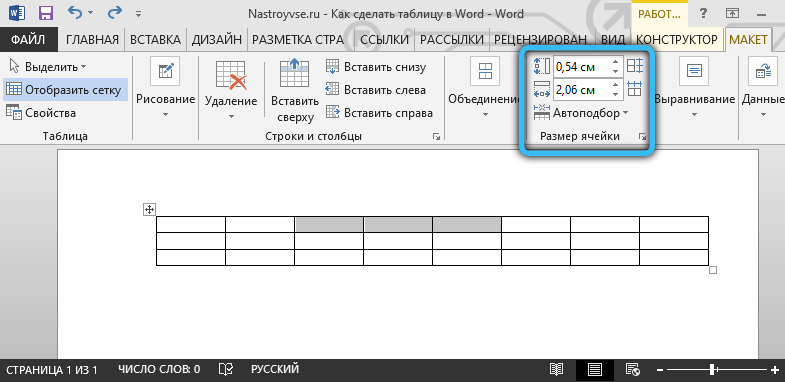
You can also change the size of the cells manually. To do this, move the cursor to the edge of the cell and drag it in the required direction.
But with manual editing, the structure of the entire table may be violated. Therefore, it is not recommended to get too carried away with this method.
Boundaries
Another user of the Word program, when working with tables, can correct the design of their borders.
To do this, select the appropriate style for the borders. It is located in the “Design” tab in the group of tools called “Borders”. Then, using the Pen tool, draw the desired lines.
To cancel the action, if you don’t like something, press the combination of the Ctrl and Z buttons. When drawing is finished, press Esc.

Using the built-in capabilities of the Microsoft Word text editor, you can create tables, edit them, and design at your discretion.
All functionality is well thought out. Each tool has its own clear and understandable place in the corresponding groups and sections. Therefore, it takes quite a bit of time to get used to and learn how to fully work with tables.
It will be fair to say that not everyone and it is not always convenient to work with a spreadsheet editor in the person of Excel. Yes, in terms of tables, it is even more functional, and opens up additional opportunities for users. But if the main emphasis is on the text, and part of it needs to be inserted into the table, here the functions and options of Word will be more than enough.
The main working tools for editing, creating and designing tables are the Layout and Design tabs. If you study them carefully and understand the functions of each element, you can quickly create the most complex table designs.
It is not for nothing that Word is considered the best text editor. And not only for computers and laptops running on Windows operating systems. The competing operating systems have their counterparts for Word. But for some reason, many users, working even with other operating systems, still strive to install the Microsoft Office package for themselves.
Do you often work with tables in Word? How functional and convenient do you think this application is? What flaws do you see in Word and where should they refine their tools?
Share your opinion, give advice to beginners. Tell us about some life hacks related to tables and Word.
Subscribe, comment, ask questions and tell your friends about our project!