Contents
Every new version of Android brings with it some innovations, some of which are sometimes not directly visible. And even if Android 9 Pie has already appeared, Android 8 still runs on more smartphones. In this article, we will show you some tips and tricks that will help you become an Oreo professional.
- Android Oreo: update overview for smartphones and tablets
- Android 8.0 in the test: How the Oreo update changes your smartphone
Organize your notifications
You may not know it yet, but with Oreo you can postpone notifications. This means that you can simply delete a notification that you are currently not interested in and have it automatically displayed again later. This can be really useful in many situations.
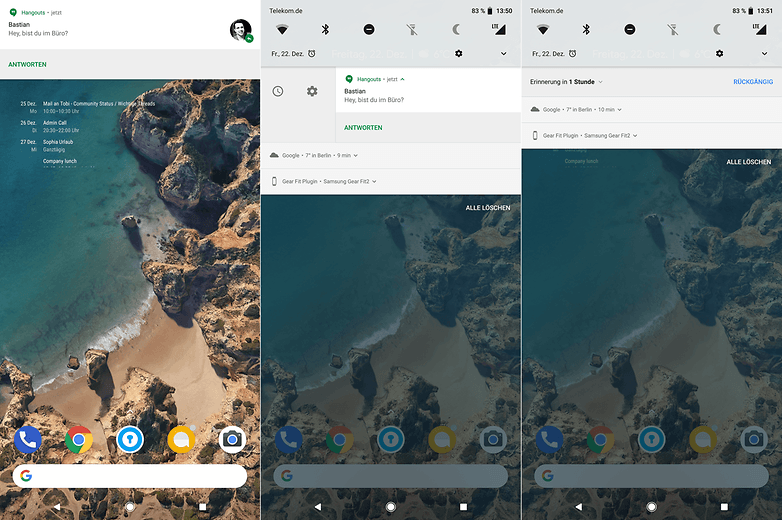
To use the function, you simply have to push the corresponding notification slightly to the side. But don’t wipe them completely, just until the little field opens with the clock. You just have to tap on this and decide when you want to see the notification again.
Disables the notification points
The notification points are a new feature of Android Oreo. You will see a small dot on the app icons on the home screen if there is any news in the app. If you receive a new message in a messenger, for example, this small dot indicates this.
However, these colored dots could be more of a problem for some users, since they are not as useful as Google probably hoped. We therefore explain to you how you can deactivate the function.
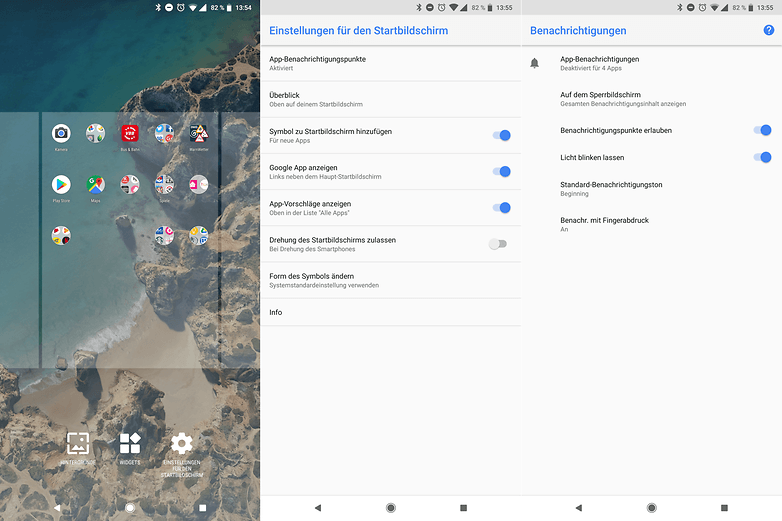
- Hold down a free space on the home screen
- Click Home Screen Settings
- Select the App notification points item
- Unchecked Allow notification points
Et voilà, you already have a simple solution to make the annoying points disappear on the homescreen.
Set up permanent notifications about the behavior of apps
App XY is active in the background and consumes battery
To help you save valuable battery power, Google has introduced a new warning with Android 8 Oreo. It warns when an app is consuming power in the background. However, if you run a music player, this warning is permanently displayed for this app.
The problem: The notifications cannot be excluded for certain apps. Apps such as music players, messengers and other services now run consciously in the background and therefore also consume battery. If you find these notifications too annoying, you can also deactivate them.
The short way:
If the notification is currently displayed, do the following:
- Opens the notification line
- Hold your finger on the notification
- Flips the switch so the notification disappears
The long way:
If the notifications are not currently displayed, you have to take the long way:
- Opens the settings
- Tap Apps & Notifications
- Tap on app info
- Tap on the three dots in the top right and select Show system processes
- Search for Android system in the list and select it
- Then tap app notifications
Here you can see many entries that you can activate and deactivate, but don’t let yourself be overwhelmed. Among other things, you will find the corresponding entry Power-consuming apps here , which deactivates the annoying notifications. Unfortunately, the function is then generally deactivated for all apps. The function cannot yet be switched for individual apps.
Creates space with just a few clicks
Android Oreo has an interesting function that allows you to free up space on the internal memory with just a few clicks. It is available on all smartphones with stock Android ( Pixel 2 , Pixel 2 XL , Pixel , Pixel XL , Nexus 5X , Nexus 6P and Pixel C ), those from Nokia and some from Motorola, as well as on Sony smartphones. Samsung and Huawei have decided to use their own solutions even with Android 8.0 Oreo. The use of the function can therefore deviate from my explanation here.
First, you can see which apps use how much storage space. In the settings you can access the corresponding list under Storage. The apps are divided into different categories here. Find out here whether uninstalling an app is worthwhile.
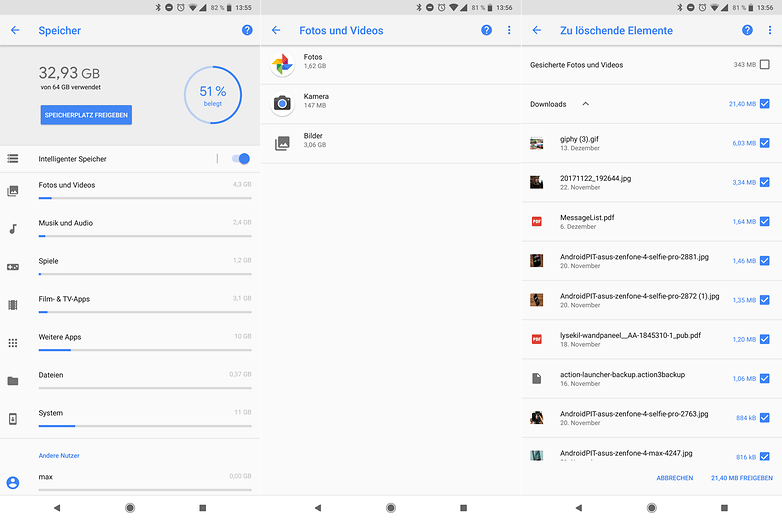
Above the list is the button “release memory”. Clicking it shows us a list of things that we can safely delete to free up more space. In my case, I am shown files in the download folder, a list of the rarely used apps and the option to delete my photos and videos from the smartphone after the online backup.
Uses picture-in-picture mode
With Android 8 Oreo, Google introduced picture-in-picture mode. This allows you to run selected apps in a small window, similar to Windows, and do something else on your smartphone in parallel. You can slide the small window across the screen with your finger and place it where you want. With one click you make it big again.
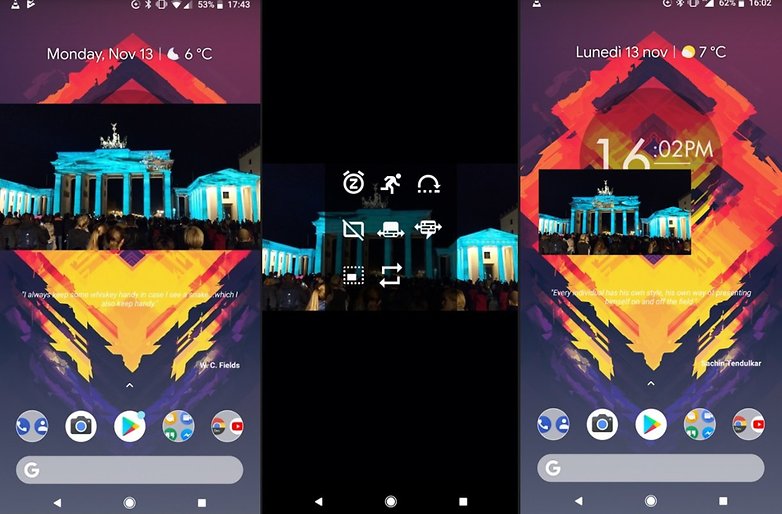
To know which apps support picture-in-picture mode, go to the Settings in the Apps and Notifications area. Under Advanced , Special App Access and Picture in Picture you will find a list of which of your installed apps support this Oreo feature. Especially Google Maps, Netflix and YouTube are really practical here.
Smart Text Selection: Copy and paste made easy
Copying and pasting text on your smartphone can be a delicate test of dexterity and God forbid that your touch won’t accidentally trigger anything else. Appearance of the “Smart Text Selection” tool from Google, which helps and recognizes the context of the highlighted. If you mark an address, phone number, email address or a name, Android Oreo offers you corresponding links to the phone app, Google Maps etc.
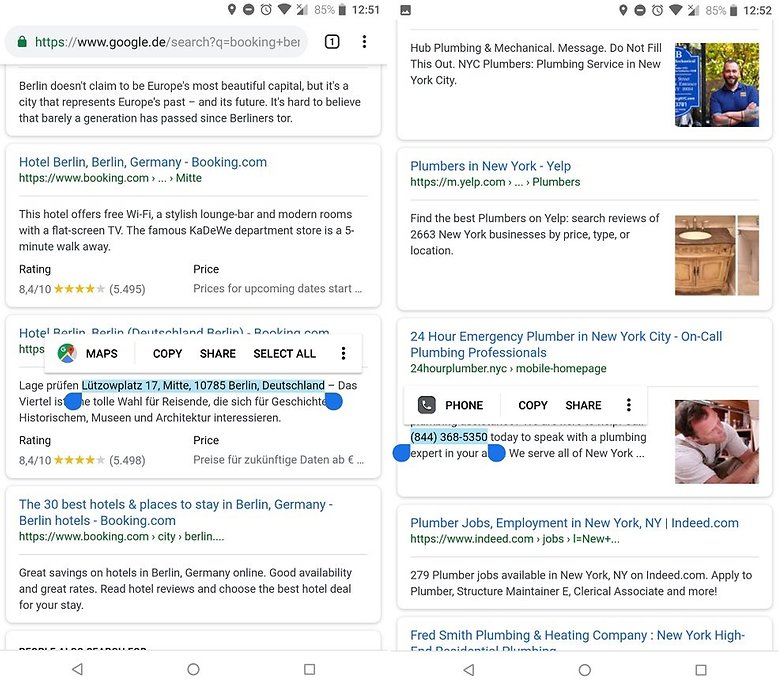
To use the Smart Text Selection, simply hold your finger on a block of text that you want to copy. The corresponding options should then appear automatically: For example, the selection of an address should offer the option of jumping to Google Maps – with the address already in the corresponding field.
Numbers instead of pointers
The watch with the hands, which you can use to set alarm clocks, times for appointments and the like in Android’s own app, looks chic, but it is not particularly good to use when it comes to exact times and exact minutes. This is better done without moving the pointer back and forth, but by simply entering numbers.
To manually enter the exact number of hours and minutes, all you have to do is press the small keyboard symbol at the bottom left of the screen with the pointer clock. Then you can select the time you want with much more convenience.
